How to Mount a Painting on a Wall Safely Without Damaging It
You can mount a painting safely without damaging it by matching the hardware to the piece and wall, measuring and leveling precisely, and using supports rated for the painting’s weight. For light works use picture hooks or adhesive hangers; for medium pieces use anchors or toggle bolts; for heavy or valuable art secure to studs or use a French cleat. Handle frames gently, add felt pads to prevent abrasion, and check fittings regularly—keep going to get specific tips for tricky walls and antiques.
How to Mount a Painting on a Wall Safely Without Damaging It
You’ll get the safest results by following a few quick best-practice steps—proper hardware, accurate measuring, and secure anchors.
If the piece is heavy, antique, or valuable, consider hiring a pro who’s the right tools and experience.
For small, standard frames you can handle it yourself with care and the right anchors.
Quick Answer Best Practices at a Glance
When you want to hang a painting without risking damage, start by matching the hardware and hanging method to the work’s weight and frame type; use anchors for drywall, studs for heavy pieces, and wire or D-rings rated for the load.
Follow these quick best practices for how to mount a painting on a wall:
- Measure, level, mark placement.
- Choose anchors or studs.
- Secure hardware, test stability.
When to Hire a Professional vs. DIY
If a piece is large, valuable, or awkwardly shaped, hire a pro; for small, standard-framed paintings you can usually handle the job yourself.
Assess risk, tools, and confidence. Choose pro when weight, antique value, or tricky placement’s involved. DIY if you have proper anchors, a level, and steady hands.
- Safety first
- Value matters
- Tools and skill
Basic Understanding What ‘œSafe’ Mounting Means and Why It Matters
Safe mounting means protecting the frame, canvas, and wall from scratches, warping, or falls, so you don’t lose the artwork or damage your home.
You’ll want to match the painting’s support and hanging system—wire, D‑rings, cleats (including French cleats), or float frame—to the weight and style of the piece.
Gather the right materials and tools first—hooks, anchors, screws, a level, stud finder, tape, and gloves—to guarantee a secure, damage-free installation.
Types of Damage to Avoid (frame, canvas, wall)
Three things can go wrong when you mount a painting: the frame can crack or warp, the canvas can sag or tear, and the wall can be damaged by holes or moisture—each outcome undermines the artwork and costs time and money to fix.
- Frame: avoid pressure, impact, and hanging stress that split corners.
- Canvas: prevent slack, punctures, and dust exposure.
- Wall: seal moisture, use proper anchors, and minimize unnecessary holes.
Common Painting Support and Hanging Systems (wire, D-rings, cleats, French cleats, float frames)
Mounting hardware lets you secure a painting so it stays level, bears its weight, and won’t damage the work or the wall over time.
You’ll choose systems based on size, weight, and frame style. Wire and D-rings suit light to medium pieces; cleats and French cleats provide strong, concealed support for heavier works; float frames need precise alignment.
- Wire/D-rings
- Cleats/French cleats
- Float frames
Materials and Tools Overview (hooks, anchors, screws, level, stud finder, tape, gloves)
A reliable toolkit makes hanging art straightforward and prevents accidents: you’ll need hooks or screws rated for the painting’s weight, wall anchors or toggles for hollow walls, a stud finder, a level, measuring tape, and gloves to protect finishes and your hands.
Choose hardware matching weight and wall type, keep spare anchors and correct screwdriver bits, and wear gloves to avoid fingerprints and guarantee a steady grip while you measure and secure.
##
Often overlooked, choosing the right hanging hardware makes the difference between a secure display and a disaster.
Often overlooked, the right hanging hardware separates a secure display from an avoidable disaster.
Pick hardware based on frame weight and wall type so you won’t risk slippage or damage. Consider compatibility, corrosion resistance, and adjustability to keep the painting level and safe.
- Match weight rating
- Use wall-appropriate anchors
- Prefer adjustable hangers for leveling
Step-by-Step Guide to Mounting a Painting Safely
Start by inspecting the painting and frame so you know what support and hardware you’ll need.
Choose hanging hardware rated for the piece’s weight, find studs or suitable drywall anchors, then measure and mark the exact placement.
Finally, level and pre-drill if needed, and install the anchors or hooks securely.
Step 1 Inspect the Painting and Frame
Before you mount anything, closely inspect the painting and frame to identify weaknesses, existing repairs, or hazards that could worsen during handling.
Check canvas tautness, stretcher integrity, frame joints, and backing condition.
Look for loose fittings, insect damage, mold, or flaking paint.
Note fragile areas and any labels or provenance marks.
Document issues before proceeding to mounting.
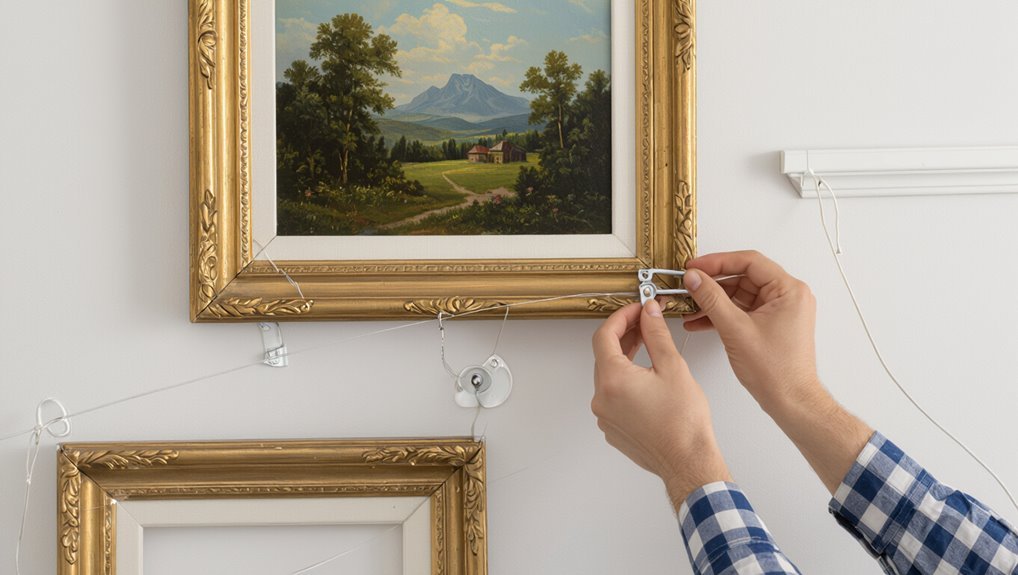
Step 2 Choose the Right Hanging Hardware for the Weight and Frame Type
Once you’ve documented the condition, match the hanging hardware to both the painting’s weight and the frame type so the installation’s secure and reversible; lighter works can use D-rings or picture wire, while heavier or valuable pieces need cleats, mirror bolts, or professional-grade anchors.
Check frame rear: sawtooth, D-rings, wire, or solid wood rail dictate choice. Use rated hardware and replace corroded parts.
Step 3 Locate Wall Support (studs vs. drywall) and Measure Placement
With the right hardware chosen, you’ll next find where the wall can actually carry the load and mark the painting’s position.
Use a stud finder to locate studs; if none align, plan for drywall anchors rated for the painting’s weight.
Measure from floor or adjacent features to center the piece, mark top and hanging points lightly, and double-check measurements before proceeding.
Step 4 Mark, Level, and Pre-drill Holes if Necessary
After you’ve marked the hanging points, put the painting’s measurements to work: use a level to guarantee your marks are perfectly horizontal, then transfer those points to the wall.
If your hardware or wall type calls for it, pre-drill pilot holes sized to the screws or anchors you’re using.
Check spacing twice, confirm measurements from floor or furniture, and choose drill bit size matching fasteners to prevent cracking.
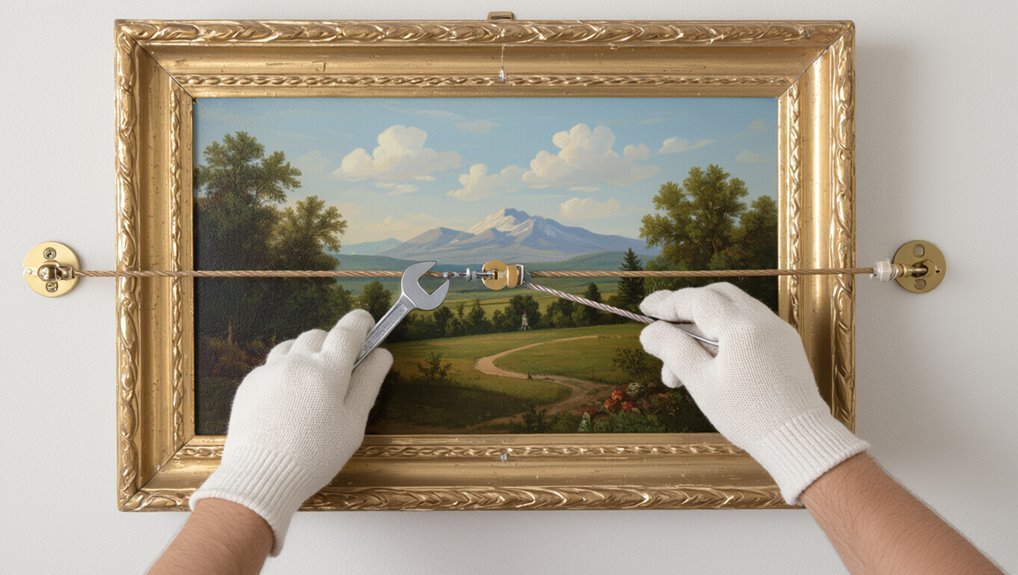
Step 5 Install Anchors or Hooks Correctly
Now that your marks are level and any pilot holes are in place, it’s time to install the anchors or hooks that will actually carry the load.
Choose anchors rated for the painting’s weight and wall type. Tap expansion anchors flush, screw toggle bolts until secure, or drive appropriate picture hooks into studs.
Tighten gently; avoid overtightening which can crack drywall or strip threads.
Step 6 Hang the Painting and Check Alignment and Stability
Lift the painting carefully and hook it onto the installed anchors or screws.
Then step back to verify it’s level and stable.
Adjust by nudging the frame or tightening fasteners until edges align with adjacent surfaces.
Check that the wire or sawtooth sits securely on the hardware, and gently press center and corners to confirm there’s no wobble before letting go.
Step 7 Final Safety Check and Adjustments (security features, earthquake/sway proofing)
When you’re satisfied the painting is level and stable, perform a final safety check: confirm all fasteners are tight, secure any exposed hanging wire or sawtooth with locking hardware, and add earthquake or sway-proofing—like museum putty, adhesive bumpers, or safety cables—to prevent shifting during vibration.
Test gently for movement, tuck loose wire, label heavy pieces for extra anchors, and document your adjustments for future checks.
Weight and Hardware Guide (Quick Reference)
Before you pick hardware, you’ll want to sort your painting into a weight category so you know what anchors and hooks will hold it.
I’ll show quick recommendations for common weight ranges and the right hardware for drywall, plaster, and studs.
Then you’ll learn a simple, safe way to weigh the painting at home so you can match it to the guide.
Weight Categories and Recommended Hardware
Start by sorting your artwork into clear weight categories—light (up to 10 lbs), medium (10–40 lbs), and heavy (over 40 lbs)—so you can match each piece to the right hardware. Use picture hooks or adhesive hangers for light, wall anchors or toggle bolts for medium, and studs with heavy-duty screws or French cleats for heavy.
| Weight | Recommended hardware |
|---|---|
| Light | Picture hooks/adhesive |
| Medium | Anchors/toggle bolts |
| Heavy | Stud screws/French cleat |
How to Weigh a Painting Safely
1 simple tool—a digital hanging scale or a sturdy bathroom scale—lets you get an accurate weight so you can pick the right hardware.
Use gloves, support edges, and avoid pressing glass. Read the scale twice for consistency.
- Hang by the wire or lift by the stretcher for true load.
- Add packaging weight if framed.
- Round up to nearest pound.
Specialized Mounting Scenarios and Solutions
When you’re facing heavy, oversized, or fragile pieces you’ll need tailored techniques and hardware to protect both the artwork and the wall.
You’ll learn non-invasive options for antiques, differences between mounting canvases and framed works, and renter-friendly fixes for plaster, brick, and concrete.
Start by evaluating weight, wall type, and the painting’s condition so you can pick the safest solution.
Hanging Heavy or Oversized Paintings
Because heavy or oversized paintings put extra stress on walls and fasteners, you’ll need to plan mounting and reinforcement more carefully than for lighter pieces.
Locate studs with a reliable detector, use heavy-duty anchors or toggle bolts, and consider a French cleat or wall-mounted rail.
Enlist help to lift, test stability gradually, and periodically inspect fixings for wear or movement.
Fragile or Antique Paintings (non-invasive methods)
Heavy or oversized works require reinforced fixings, but fragile or antique paintings call for a different approach: non-invasive mounting that protects original frames, canvases, and surfaces.
You’ll use museum hooks, reversible adhesives, and padded brackets; avoid drilling into frames or canvas.
Test adhesives on inconspicuous areas, consult a conservator for valuable pieces, and use climate-stable hangers to minimize stress and vibration.
Canvas Stretchers vs. Framed Works
If you’re mounting a work on a stretcher versus a piece already in a frame, you’ll need different hardware and handling: stretchers demand secure, evenly distributed support that won’t warp the bars or distort the canvas, while framed works require fittings that respect the frame’s structure and sightlines.
For stretchers use Z-bars or cleats and strap supports; for framed works use D-rings, wire, or inset brackets matched to frame strength.
Rental Walls, Plaster, Brick, and Concrete Solutions
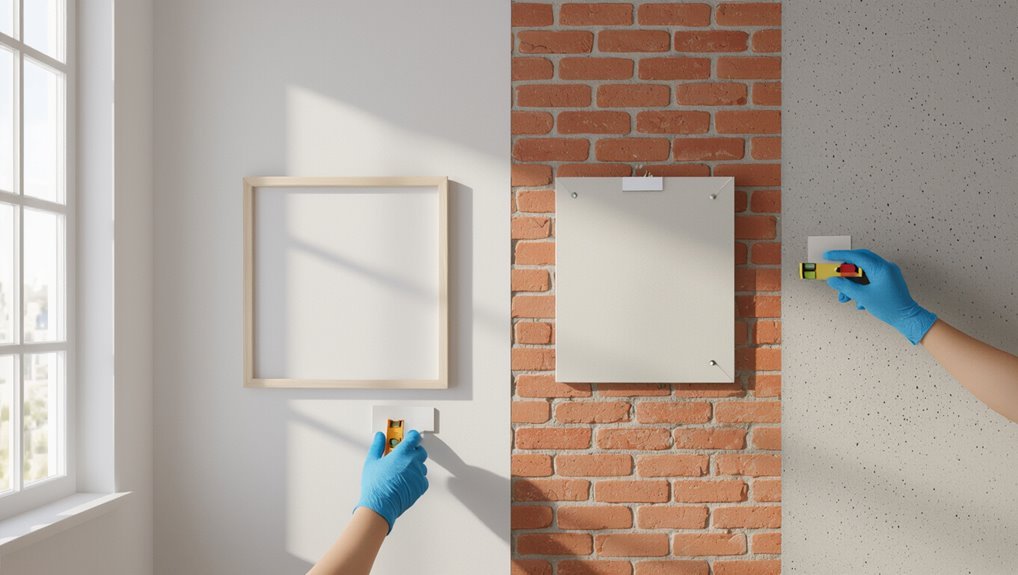
Mounting on rental drywall, older plaster, brick, or concrete calls for different choices than those you’d make for stretchers or framed works—these surfaces vary in strength, fragility, and how they’ll hold fasteners.
For rentals, use damage-free hooks or adhesive strips rated for weight.
For plaster, locate studs or use toggle anchors.
For brick or concrete, drill with masonry bits and use sleeve anchors or masonry screws.
Common Mistakes and How to Avoid Them
Don’t use undersized hardware or the wrong anchors — they’ll fail under a heavy frame.
Pay attention to studs and balance so the painting hangs straight and secure.
Protect the frame and canvas during installation and add seismic or extra fastenings in high-risk areas.
Mistake 1: Undersized Hardware or Improper Anchors
One common mistake is using undersized hardware or the wrong anchors for your wall type, which can let a painting slip or pull out unexpectedly.
Check weight, frame attachment, and wall material. Use anchors rated for the load—toggle bolts for hollow walls, masonry anchors for brick, and wood screws into studs.
Test the fit, tighten securely, and recheck periodically to prevent failure.
Mistake 2: Wrong Placement Ignoring Studs or Balance
If you ignore wall studs or balance when choosing where to hang a painting, the piece can tilt, pull loose, or damage the wall over time.
Check stud locations, use proper anchors if studs aren’t available, and center heavy pieces over solid support.
Step back to assess visual balance relative to furniture and eye level so the artwork stays secure and looks intentional.
Mistake 3: Damaging Frame or Canvas During Installation
Handle the frame and canvas with care to avoid scratches, loose joints, or punctures during installation.
Support the frame at its strongest points, use gloves or clean hands, and rest the painting on soft padding while you mark and drill.
Never lean tools or hardware against the canvas, tighten fasteners gradually, and inspect joints and hanging hardware before final placement to prevent damage.
Mistake 4: Skipping Seismic/Safety Fastening for High-Risk Areas
Because earthquakes, busy households, and crowded spaces can all dislodge even well-mounted art, you should never skip seismic or safety fastening in high-risk areas; using earthquake clips, security wires, or wall-anchored hangers keeps paintings from falling and injuring people or getting damaged.
- Anchor heavy frames to studs or use toggle bolts.
- Add earthquake clips or museum putty for small pieces.
- Use security cables for valuable or frequently bumped works.
Tips, Best Practices, and Preventative Care
Keep up with regular checks on hanging hardware and monitor humidity and temperature to prevent warping or mold.
When installing, wear gloves, use padding, and get a helper for larger pieces to avoid damage.
For the best look, hang at eye level and plan grouping and spacing before you commit to nails.
Long-term Maintenance (checks, humidity and temperature considerations)
When you mount a painting, plan for ongoing care so it stays secure and undamaged over time; regular inspections and controlling humidity and temperature are just as important as the initial installation.
Check hangers, wires, and frames every few months, keep indoor humidity around 40–55%, avoid rapid temperature swings, use a hygrometer, and adjust HVAC or dehumidifiers to prevent warping, mold, and adhesive failure.
Protecting the Artwork During Installation (gloves, padding, helpers)
Although installation can seem straightforward, protecting the artwork requires deliberate steps:
Wear clean cotton or nitrile gloves to avoid oils, and lay soft padding or a blanket beneath the work.
Use tape or corner protectors on frames, secure hardware before lifting, and enlist a helper for heavier pieces.
Move deliberately, avoid sudden pressure on canvases, and keep tools clear of the surface.
Aesthetic Tips Eye Level, Grouping, and Spacing
After you’ve protected the piece and secured its hardware, think about where it will sit in the room: eye level is a reliable anchor—hang the center of most artworks about 57–60 inches from the floor so viewers can engage comfortably.
Consider grouping and spacing to balance scale and sightlines:
- Align centers for cohesion.
- Keep 2–4 inches between small frames.
- Use wider gaps for mixed sizes.
Tools and Products Checklist (Printable)
Now that you’ve covered care and best practices, let’s list the tools you’ll need to mount a painting safely.
You’ll get a concise checklist of essential tools for most jobs plus optional items for special cases.
Print it out and grab what applies before you start.
Essential Tools for Most Jobs
A single, well-packed toolkit will save you time and keep your walls damage-free; this checklist lists the basic tools and products you’ll use for most hanging jobs so you can grab what you need and get started.
Include a tape measure, level, pencil, stud finder, hammer, drill with bits, appropriate screws/anchors, picture hooks, hanging wire, and protective pads to prevent frame and wall damage.
Optional Tools for Special Cases
When you run into unusual frames, heavy pieces, or tricky wall materials, you’ll want a few specialized tools on hand to make the job safe and straightforward.
Use these optional items only as needed to protect art and walls, and choose quality brands rated for your weight and wall type.
- Heavy-duty picture hangers or toggle bolts
- French cleat kit or security mounting hardware
- Felt pads, anti-tip straps, and moisture-resistant backing
FAQ
Got questions? You’ll find quick answers here on ideal hanging height, the strongest anchors for heavy frames, when picture wire is enough, how to protect antique frames without drilling, and what to use on plaster or brick walls.
Read on and you’ll get clear, practical guidance for each situation.
How high should I hang a painting?
Wondering how high to hang a painting? Aim to place the center at eye level—typically about 57–60 inches from the floor—so most viewers see it comfortably.
For groupings, treat the cluster’s center as the focal point. In rooms where people sit, lower the artwork slightly.
Measure and mark before drilling to guarantee balance and visual harmony.
What is the safest anchor for a heavy framed painting?
If you’ve hung your painting at the right height, the next step is making sure it stays there—especially with heavy frames.
Use a heavy-duty anchor rated for your painting’s weight: toggle bolts or molly anchors for drywall, and screws into studs for best security.
For masonry, use expansion anchors or masonry screws. Always match anchor type and weight rating to the frame.
Can I hang a painting with just picture wire?
Can you hang a painting with just picture wire? Yes — for lightweight, well-framed pieces you can, provided the wire, screws, and wall anchor are rated for the load and are securely attached.
Inspect knots, twists, and frame hardware regularly.
For heavier, valuable, or fragile paintings, pair wire with wall anchors or consult a professional to guarantee safety and prevent damage.
How do I hang an antique painting without drilling into the frame?
Lightweight picture wire can work for many framed pieces, but antique paintings often need gentler handling — you’ll want methods that avoid drilling into original frames or backing.
Use museum-grade hanging strips, hook-and-loop fasteners rated for weight, or padded French cleats attached to stretcher bars rather than the frame.
Consult a conservator for fragile canvases and use wall anchors appropriate to your wall type.
What should I do if my wall is plaster or brick?
Plaster and brick walls need different anchors and a bit more prep than drywall, so choose hardware rated for your wall type and the painting’s weight.
Use masonry screws or anchors for brick and plaster-specific anchors or toggle bolts for brittle plaster.
Drill slowly with a masonry bit, avoid hammering near lath, and consider adhesive picture hangers or a rail system if you want minimal drilling.