
How to Paint a Bubble With Acrylic Paint Realistically
You’ll start by observing real bubbles and blocking a dark, simple background to make highlights pop. Mix transparent acrylics and gloss medium for thin glazes, paint core colors with soft blends, then build color shifts outward with staining pigments. Keep edges soft, add crisp white highlights last with a fine liner, and glaze shadows for depth. Work in layers, correct with lifting or glazing, and varnish for gloss—keep going to uncover more techniques and tips.
What This Tutorial Will Teach You About Painting a Bubble
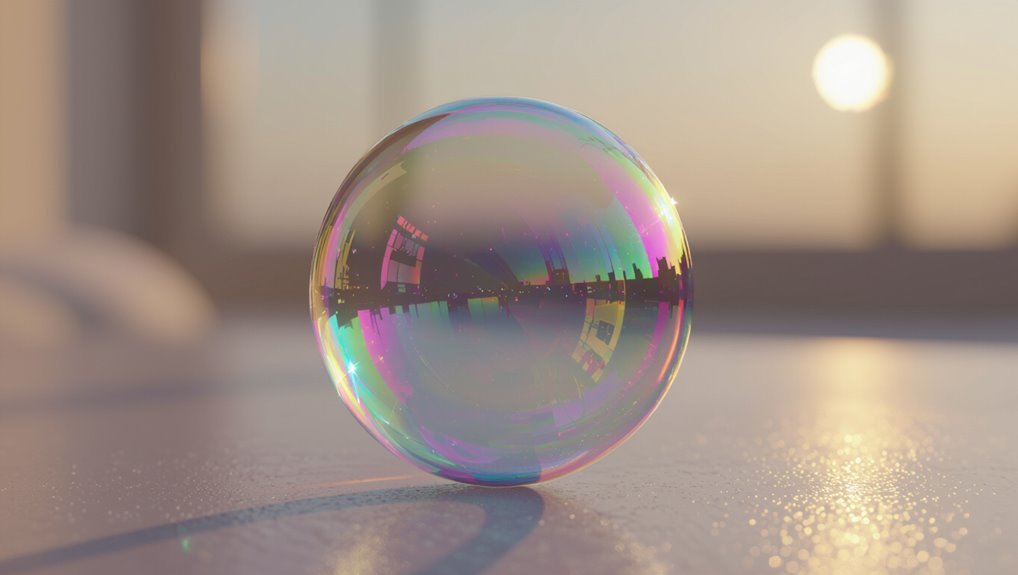
When you follow this tutorial, you’ll learn how to see and paint the key features that make a bubble look real: its thin, translucent shell, subtle color shifts from interference, and the sharp highlights and soft reflections that define its form.
You’ll practice observational techniques to capture bubble characteristics, mixing thin glazes, placing crisp highlights, and rendering faint iridescence with controlled strokes and layered transparency.
Skill Level and Prerequisites for This Guide
You’ll need a few basic materials and tools—paints, brushes, a smooth surface, and optional masking fluid—to follow this guide.
You should also be comfortable with basic painting techniques like blending, glazing, and controlling edge hardness. If you’re new to any of these, a quick practice session will get you ready.
Required Materials & Tools
Skill level: this guide suits beginners who know basic brush handling and intermediate painters who want to refine glazing and reflections; if you can mix colors, control thin glazes, and steady a small brush, you’re ready.
For materials, gather acrylics (transparent and opaque), gloss medium, fine round brushes, synthetic filbert, palette, and smooth paper or gessoed board.
Emphasize material selection and tool maintenance.
Basic Painting Techniques
Although you don’t need advanced experience, this guide assumes you can mix basic colors, control thin glazes, and steady a small brush for detail work.
- Understand color theory to place highlights and subtle iridescence.
- Practice brush techniques: soft edges, tiny strokes, and precision lifts.
- Master glazing to build translucence without muddiness.
- Keep palettes, clean brushes, and patience to refine realistic reflections.
Materials Needed for Realistic Acrylic Bubbles
Before you mix paints or sketch a circle, gather a compact kit of tools that’ll make painting realistic acrylic bubbles easier: a few synthetic round brushes (sizes 0–6), a soft flat for smooth gradients, a palette knife, a smooth primed panel or heavyweight paper, a stay-wet palette or damp sponge, and a selection of acrylics—titanium white, phthalo blue, ultramarine, alizarin crimson, and a transparent color like phthalo green—plus gloss medium and retarder for blending.
Use masking tape, soft cloth, fine liner brush, and a magnifier to study bubble anatomy and light behavior as you work.
Best Paints and Brands for Transparent Effects
When you’re aiming for transparent effects, you’ll want paints with clearly labeled transparency levels so you can control glaze and layering.
I’ll show simple color mixing tips that preserve luminosity without muddying the hues.
I’ll also recommend reliable brands known for sheer acrylics and glazing mediums that make bubble reflections pop.
Paint Transparency Levels
Because light plays the starring role in a realistic bubble, you’ll want paints with true transparency rather than sheer tints or heavy opacifiers.
Use transparency techniques to layer glazes and suggest color variations without muddying. Choose staining or semi-transparent pigments, and prioritize lightfastness.
- Phthalo blues (staining)
- Quinacridone violets
- Transparent yellows
- Iridescent mediums
Color Mixing Tips
If you want transparent, jewel-like colors for a bubble, pick paints and mixes that stay luminous when layered—lean toward staining phthalo blues, quinacridone violets, and transparent cadmiums or azo yellows, and mix them sparingly with glazing medium rather than white.
Use color theory to balance warm and cool shifts; practice precise mixing techniques, thin glazes, and gradual builds to preserve sparkle and depth.
Brand Recommendations
1 clear rule: choose paints that read transparent on the palette and stay luminous when glazed.
You’ll want trusted brands with consistent staining and glazing performance. Check brand comparisons and product reviews before buying; test small tubes.
- Golden Fluid Acrylics — glazing clarity
- Liquitex Professional — predictable mixes
- Sennelier Abstract — vibrant translucence
- Winsor & Newton Galeria — budget glazing
Brushes and Tools for Glazing and Soft Edges
When you want soft, translucent layers that read like glass, choosing the right brushes and tools matters as much as your paint mix. You’ll use glazing techniques and soft edge blending with soft filberts, synthetic flats, and a fan for feathering. Try a soft mop and liner for highlights; keep water and glazing medium handy.
| Tool | Purpose | Tip |
|---|---|---|
| Filbert | Smooth blends | Light pressure |
| Mop | Thin glazes | Lift excess |
| Liner | Sharp highlights | Short strokes |
Best Surfaces and Primers for Reflections
Choose a smooth, rigid support and a primer that keeps reflections crisp: you’ll get the cleanest highlights and sharpest edges on gessoed wood panels, stretched linen or hot-pressed canvas primed with a non-absorbent, satin or gloss ground.
- Hardboard: minimal surface texture, ideal for crisp bubble dynamics.
- Linen: subtle tooth, holds glazes.
- Hot-pressed canvas: smooth, consistent.
- Acrylic gloss ground: boosts reflectivity and layering.
Set Up Lighting and Workspace for Observation
Set your lights so they highlight the bubble’s edges without blasting the whole scene, using directional lamps to control highlights and reflections.
Angle or diffuse sources to avoid hot spots, and position a key light and a softer fill to capture both specular highlights and subtle color shifts.
Reduce workspace glare by covering reflective surfaces and working with matte backdrops so you can clearly observe the bubble’s true reflections.
Position Lighting Sources
If you want accurate references, arrange at least two light sources so the bubble shows a clear highlight and a contrasting shadowed area.
Position one stronger key light and a softer fill to control light direction and shadow intensity. Move lights to study reflections, angles, and rim highlights. Adjust distances and heights to capture realistic gradients.
- Key light
- Fill light
- Back/rim light
- Diffuser
Minimize Workspace Glare
Because reflections can wash out the subtle colors and highlights you need to study, minimize workspace glare before you begin by controlling direct reflections and bright hotspots.
Adjust workspace lighting with diffusers, position lamps at angles, and use matte surfaces to cut specular bounce.
Employ glare reduction techniques like polarizing filters or low-intensity bulbs so you can observe true color shifts and delicate highlights.
Study Real Bubbles and Photo References
When you study real bubbles and photo references, pay close attention to how light bends, reflects, and streaks across their surfaces so you can reproduce that complexity in paint.
You’ll note bubble characteristics and basic bubble physics that explain highlights, thin-film color, and edge clarity. Use references to copy subtle variations.
Note key bubble traits and simple physics—how highlights, iridescent thin-film colors, and edge clarity arise—then copy subtle variations from references.
- Observe angles
- Note colors
- Sketch values
- Compare photos
Visual Breakdown: Core, Rim, Reflections, and Shadow
Start by placing the core color where the bubble’s internal tint is strongest—usually opposite the light source—and blend it softly into the surrounding glass.
Emphasize the rim with a thin, bright highlight edge to suggest the bubble’s thin, refractive surface.
Together these elements anchor the reflections and shadow that make the sphere read as a realistic, translucent object.
Core Color Placement
Think of the bubble as four visual zones—core, rim, reflections, and shadow—and place your base colors to match each area’s light behavior.
Use core color theory and bubble color dynamics to choose a soft, slightly saturated center that contrasts surrounding tones. Apply colors thinly, adjusting hue and value for depth.
- Establish core
- Blend outward
- Respect ambient hues
- Keep edges soft
Rim Highlight Edge
After you’ve softened the core and blended outward, shift your attention to the rim highlight edge where the bubble catches the brightest light; this thin, high-contrast band defines its silhouette and makes the form read as glossy and delicate.
Use a fine brush for precise highlight placement, vary rim texture subtly with tiny breaks, and keep edges crisp yet slightly feathered to suggest translucency and fragility.
Choose a Composition That Sells Floating
When you arrange elements around the bubble, you’re not just placing objects—you’re selling the idea that it’s actually floating. Use surrounding cues and subtle shadows to suggest lift, and emphasize bubble environments and light reflections to anchor realism.
- Place lower objects to indicate space beneath.
- Use soft cast shadows.
- Add distant background cues.
- Keep nearby highlights crisp.
Blocking the Background to Support Transparency
Because a bubble’s transparency depends on what sits behind it, block in your background shapes and values early so you can read how the bubble will distort them.
Use bold background techniques—flattened shapes, value contrasts, and soft edges—to test reflections.
Step back and adjust values to heighten transparency effects, ensuring the bubble’s highlights and warped background read clearly before refining edges and details.
Mix a Neutral Base for the Bubble Midtones
Start by picking a neutral hue that sits between your warm and cool highlights so the bubble reads believable.
Adjust the mix so it leans slightly warm or cool depending on the surrounding light, then test the value to confirm it reads semi-transparent.
Finally, thin the paint to the opacity you need and compare it against the background to fine-tune the midtone.
Choose A Neutral Hue
A neutral midtone gives your bubble weight and believability, so mix a soft gray by blending small amounts of the primary colors you used elsewhere—usually a touch of blue, a hint of red, and a little yellow—until the tone reads neither warm nor cool.
- Test value against highlights.
- Keep saturation low.
- Use neutral color theory for harmony.
- Consider bubble color psychology.
Balance Warm And Cool
When you balance warm and cool tones, mix a neutral midtone that reads neither rosy nor icy so the bubble sits convincingly in your scene; pull tiny amounts of the same pigments you’re already using—blue, red, yellow—and adjust until the hue feels centered.
Then fine-tune value and saturation so highlights and reflections pop against that grounded base. Use that neutral to maintain color harmony while emphasizing subtle temperature contrast.
Test Value And Opacity
If you want the bubble to sit convincingly in light, mix a neutral midtone and test its value and opacity against your brightest highlights and darkest reflections; tweak the pigment ratios until the midtone reads neither translucent white nor opaque gray.
- Compare against highlights to test opacity.
- Layer thin glazes for subtle bubble texture.
- Adjust cool/warm balance for realism.
- Note edge shifts and reflection intensity.
Mix Iridescent Hues Without Metallics
Though you won’t be using metallic paints, you can still capture a bubble’s iridescence by layering translucent glazes of pure, slightly desaturated colors—think thin washes of cyan, magenta, lemon yellow, and a touch of violet—so the underlying tones shift as they overlap.
You’ll practice iridescent color mixing and use transparent layering to suggest shifting hues; balance color saturation and edge softness for realism.
Create Translucent Glazes With Acrylic Medium
Choose a clear acrylic glazing medium that stays glossy and mixes smoothly with your pigments.
Apply multiple thin, transparent glazes to build depth without losing the bubble’s delicate edge.
If you need more or less opacity, tweak the mix with water, glazing medium, or a slow-drying extender to control transparency.
Choosing the Right Medium
One reliable way to get those see-through, iridescent effects is to mix acrylic medium with your paint to make translucent glazes that build color without obscuring underlying layers.
You’ll choose based on medium selection and desired paint viscosity.
Consider:
- Gloss medium for sheen and clarity.
- Matte medium to reduce shine.
- Flow improver to thin without losing binder.
- Heavy body gel to slightly increase thickness.
Layering Thin Transparent Glazes
When you paint a bubble, build its iridescence with many thin, transparent glazes so light can pass through and reflect underlying colors; mix acrylic medium with tiny paint amounts, apply successive translucent washes, and let each dry.
You’ll use glazing techniques to control hue shifts and achieve subtle layering effects. Work patiently, refining edges and highlights to maintain depth without muddiness.
Adjusting Opacity With Additives
After glazing several translucent layers, you’ll need to control how much paint shows through—this is where additives come in.
- Use glazing medium to thin color while keeping pigment suspension for subtle opacity techniques.
- Add glazing retarder to extend open time and blend edges.
- Mix matte medium to reduce sheen and slightly increase opacity.
- Use glazing varnish sparingly to deepen translucence without clouding the bubble.
Thin Layers: Laying a Soft, Believable Core
Because the shell of a bubble reads as delicate, you’ll want to build its interior with thin, translucent washes that indicate volume without adding weight.
Work in multiple feathered layers, letting each dry before the next. Focus on soft blending and subtle color gradations, glazing pale tints to imply depth.
Keep edges minimal and avoid heavy pigment that flattens the form.
Paint the Bright Rim and Placement of Highlights
Though the bubble’s interior gives it form, you make it read as glass by laying in a bright, narrow rim that follows the shell’s curve and catches the strongest light.
- Use thin white for rim lighting, painted sharply.
- Vary thickness to suggest curvature.
- Place small secondary highlights where reflected light bounces.
- Keep other edges soft to sell the highlight placement.
Add Internal Color Shifts With Thin Washes
Start with very diluted paint so the color feels translucent and won’t overpower the shell.
Layer gradual color shifts, letting each wash dry before adding the next to build subtle depth.
Blend edges with a soft brush to keep the changes smooth and airy.
Start With Very Diluted Paint
When you lay down the first washes, thin your paint until it’s almost transparent so the paper’s luminosity reads through; this gives the bubble’s interior a delicate, airy base that heavier layers can modify without losing sparkle.
- Use extreme paint dilution for subtle color transparency.
- Swipe thin washes across the form.
- Let each wash dry before next.
- Preserve highlights by avoiding opaque coverage.
Layer Gradual Color Shifts
Once you’ve got that translucent base, build the bubble’s subtle internal colors with very thin, controlled washes that gradate across the form. Use color theory to choose hues and gradient techniques to shift tones subtly. Apply successive micro-washes, letting each dry.
| Hue | Value | Placement |
|---|---|---|
| Blue | Light | Rim |
| Pink | Mid | Flare |
| Yellow | Pale | Core |
| Green | Soft | Reflection |
Blend With Soft Brushes
A soft, sable-tipped brush lets you merge those delicate internal washes without disturbing the bubble’s translucent base; you’ll use soft brush techniques and subtle blending methods to suggest iridescence with thin, watery glazes.
Apply and feather edges, then lift or add glaze as needed.
- Load brush sparingly.
- Thin paint to wash.
- Feather outward gently.
- Layer after drying.
Paint Specular Highlights That Read as Glass
How do you make highlights read unmistakably like glass? Use crisp, small specular marks and razor-edge reflections to suggest a hard surface.
Combine highlight techniques with subtle glazing methods to build brightness without hardening edges.
Place tiny white accents where light concentrates, soften surrounding haloes, and preserve translucent gaps so highlights sit on top of the bubble, conveying glassy shine and depth.
Paint Reflected Environment Details Inside the Bubble
Look around your scene and note the main light sources so you can place accurate, bright reflections on the bubble.
Let nearby colors—walls, clothing, vegetation—bleed subtly into the shell to suggest environmental tint.
Add slight surface distortions and small secondary highlights to show how the bubble bends and catches light.
Observed Light Sources
Sometimes you’ll notice that the most convincing bubbles owe their realism to the tiny world they reflect — bright highlights, nearby colors, and even faint shapes are all compressed onto the curved surface.
Guide your brush by light angle and bubble texture; suggest sources, not full scenes.
- Single strong highlight
- Secondary diffuse glow
- Rim speculars
- Subtle shadowed core
Nearby Color Reflections
After you’ve placed highlights and shadowed cores, start suggesting the world around the bubble by painting tiny, warped fragments of nearby color—trees become streaks of green, a sky appears as a pale band, and a bright shirt may show as a saturated patch.
Use color theory to choose believable tints and subtle contrasts, and follow light behavior so reflections read as coherent, refracted bits of the scene.
Surface Distortions and Highlights
When you paint surface distortions and highlights, focus on how the bubble’s curvature bends and concentrates the reflected scene—sharp edges stretch into crescents, while broad planes compress into thin bands.
- Observe bubble dynamics: map warped reflections.
- Paint thin bands for compressed planes.
- Add stretched crescents at sharp shifts.
- Use subtle color interaction for specular highlights and rim glow.
Soften Edges and Blend for an Airy Finish
Although crisp highlights define a bubble’s shape, you’ll want to soften most edges and blend colors gently to achieve that airy, translucent look.
Use subtle blending techniques: feather with a dry, soft brush, glaze thin layers, and lift excess paint with a damp brush.
Prioritize edge softening over hard outlines, keeping shifts smooth so the bubble reads light, delicate, and believable on the surface.
Add a Convincing Cast Shadow and Contact Point
To ground the bubble and sell its translucence, place a soft, subtle cast shadow that follows the light’s direction and narrows toward the contact point. This shadow should be darker right under the bubble and fade outward, reflecting the shell’s thinness and the surface beneath.
- Use soft brush strokes for natural shadow techniques.
- Darken center at contact points.
- Blur edges toward ambient light.
- Adjust opacity for realism.
Use Glazing to Build Depth and Correct Color
Since thin, translucent layers let you tweak both depth and hue without losing previous work, start glazing with very diluted paint and build up in small passes.
You’ll use glazing techniques to subtly shift highlights, strengthen midtones, and enhance color depth.
Work sparingly, let each layer dry, and judge effects from a distance so the bubble stays luminous and believable.
Lift Paint and Use Negative Painting for Corrections
Glazing helps you nudge color and depth, but sometimes you’ll need to correct a highlight or clean up an edge—this is where lifting paint and negative painting come in.
When glazing tweaks color or depth, lift paint gently and use negative painting to refine highlights and edges.
You can remove glaze with a damp brush for subtle paint lifting, then refine shapes by painting around highlights into negative space.
- Blot gently
- Rebuff edges
- Reestablish tones
- Preserve translucence
Tiny Highlights and Micro-Reflection Techniques
Look closely at real bubbles so you can spot where tiny specular spots and micro-reflections sit on their surface.
You’ll paint minuscule highlights with a fine brush or small digital brush, placing them where light concentrates.
Then layer subtle color shifts around those points to sell the thin, translucent shell.
Observe Real Bubble Details
When you study real bubbles closely, you’ll notice tiny highlights and micro-reflections that give them life—pinpoint specular spots, faint rainbows, and minuscule mirrored shapes of the environment.
You should analyze bubble anatomy and light interaction to replicate those subtleties.
Observe:
- Edge color shifts
- Thin-film rainbow bands
- Tiny environmental reflections
- Varying highlight intensity
Paint Minuscule Specular Spots
Although they’re tiny, specular spots are what instantly sell a bubble’s realism, so you should place them with intention and restraint.
Use a fine-tipped brush and bright white sparingly to add specular highlights where light strikes strongest. Vary size and intensity for believable bubble reflections, avoid over-cluttering, and keep edges crisp.
Step back often to verify those micro-reflections read from a distance.
Layer Subtle Color Shifts
After you place the tiny specular spots, start layering faint color shifts to sell the bubble’s thin-film effect.
Use subtle glazing, translucent washes, and feathered edges informed by color theory and bubble anatomy.
Work small, blend micro-reflections, and vary hue intensity.
- Thin glazes
- Opposing hues
- Micro highlights
- Soft edge blending
Fix Common Mistakes That Break Realism
Mistakes like flat highlights, hard edges, or uniform color will instantly tell viewers your bubble’s fake, so you’ll want to check each element against how real bubbles behave.
Fix bubble texture by softening edges and adding tiny reflections. Reduce color saturation in highlights, vary opacity, and blend rim tones.
Step back often; squint to spot unnatural contrasts and correct them.
Step-by-Step: Paint One Small Bubble
Now take what you fixed and focus on a single, small bubble to practice those corrections.
- Sketch simple bubble shapes lightly, keeping proportions accurate.
- Block base tonal values, using color theory to choose subtle highlights and reflections.
- Glaze thin layers to build translucency, refining edges and inner cast reflections.
- Add crisp specular highlights last, step back, and adjust contrast until the bubble reads convincingly.
Step-by-Step: Paint a Cluster of Bubbles
Start by arranging three to six overlapping circles to form the cluster, varying their sizes and spacing so the composition feels natural; keep your pencil marks light so you can adjust intersections. Sketch internal highlights for bubble anatomy, block in base tones, then refine edges and apply reflection techniques. Use the guide below.
| Circle | Tone | Highlight |
|---|---|---|
| A | light | top-left |
| B | mid | center |
| C | light | edge |
| D | dark | overlap |
| E | mid | rim |
Suggest Motion and Translucency With Streaks
With the cluster laid in and highlights placed, add thin, curved streaks to indicate movement and the bubbles’ translucent skins.
You’ll convey motion dynamics and depth by varying streak thickness and opacity, layering glazed whites and pale colors to build translucent layers.
- Follow curve flow
- Vary opacity
- Use soft edges
- Keep reflections crisp
Scale Techniques for Larger Canvases and Murals
On large canvases and murals you’ll rethink composition, brushwork, and value relationships so bubbles read from a distance while holding up close—plan bold, simplified shapes for far viewing, map mid- and close-range details where viewers can peer in, and block in large color masses before refining highlights and streaks.
You’ll tackle scale challenges by using mural techniques: grid transfer, long-handled brushes, layered glazing, and viewing tests.
Quick Study Method for Beginners
Shifting from large-scale strategies to quick studies helps you build the instincts that make bubbles believable without spending hours on a single piece.
Use focused exercises to sharpen observation of bubble composition and reflective techniques.
- Limit studies to 10–15 minutes.
- Block basic shapes and values first.
- Practice tiny highlights and edge reflections.
- Vary color temperature quickly.
Troubleshoot Muddy or Flat Color
If your bubble looks muddy or flat, check how you’re mixing and layering color—you’re likely overblending or relying on desaturated midtones.
Reintroduce fresh saturated accents, adjust color harmony by choosing complementary pops, and use controlled blending techniques to preserve crisp edges and reflections.
Work thin glazes and allow layers to dry so highlights stay bright and translucent rather than dull.
Finishing Touches: Varnish and Preserve Gloss
After you’ve fixed muddy tones and restored crisp highlights, protect that work with a varnish that preserves the bubble’s glossy surface without dulling color.
You’ll use careful Varnish application for Gloss preservation.
Steps:
- Clean surface gently.
- Choose removable gloss varnish.
- Apply thin, even coats.
- Allow full dry between coats for lasting shine.
Photograph Your Painted Bubble for Sharing
When you’re ready to share your painted bubble, set up a simple photo area with controlled light and a neutral background so the gloss and color read true in images.
Use macro or close-up framing, steady tripod, and soft diffused light.
Experiment with angles to capture reflections and iridescence.
These photography techniques highlight bubble aesthetics and make your work look crisp and professional.
Next Skills to Practice for Reflective Realism
Now that you’ve photographed your painted bubble, focus on refining the skills that make reflections read as believable surfaces.
Practice targeted exercises to sharpen observation, brush control, and palette choices using reflection techniques and color theory.
- Study real reflections closely.
- Mix subtle hue shifts.
- Tighten edge changes.
- Photograph progress for comparison.
Frequently Asked Questions
How Do I Paint Bubbles Outdoors En Plein Air Without Studio Lighting?
You’ll observe bubbles reflection and outdoor lighting, blocking harsh sun with a diffuser or hat, using quick sketches, midtones and highlights, glazing thin layers, and capturing shifting colors; trust fast observation and loose, decisive brushwork outdoors.
Can I Achieve Bubble Effects With Water-Based Gouache Instead of Acrylic?
Can you get similar sheen and translucence with gouache techniques? Yes—you can achieve convincing bubble realism using water-based gouache by layering glazes, preserving highlights, softening edges, and using subtle color shifts, though it dries matte so varnish helps.
How Do Temperature and Humidity Affect Acrylic Drying for Glazing Bubbles?
Temperature effects speed or slow acrylic drying—higher heat dries faster, lower slows—so you’ll adjust glaze thickness and timing. Humidity effects: high humidity prolongs tackiness, low humidity accelerates curing, affecting blending and layer adhesion.
What Varnish Finish Best Replicates Varying Bubble Sheens Across a Painting?
I once mixed three varnishes like a barista blending coffee; you should use gloss, satin, and matte glazes to mimic sheen variations. Varnish types, finish durability, and careful application techniques guarantee realistic, lasting results.
How Do I Adapt Bubble Techniques for Abstract or Stylized Work?
You’ll simplify bubble shapes, exaggerate highlights and distort reflections, and lean into color blending for mood rather than realism; you’ll use bold strokes, layered glazes, and unexpected hues to make stylized bubbles feel dynamic and cohesive.
Conclusion
You’ve just learned the secret to painting a bubble so real someone might try to pop it off the canvas — and you’ll probably feel a little giddy every time light dances on your surface. Keep practicing those whisper-thin glazes, tiny highlights, and subtle reflections; they’ll make your work sing. Trust your eyes, embrace happy accidents, and soon you’ll be painting bubbles that float right out of the frame and into people’s hearts.
