How to Paint a Ceiling After a Water Leak and Cover the Stain
First, make sure the leak’s fixed and the area is completely dry. Scrape loose paint, sand feathered edges, and remove any mold—wear protection. Apply a stain‑blocking primer (shellac or oil for heavy tannins, water‑based for light marks), let it dry fully, then repaint with matching ceiling paint. For stubborn stains or texture mismatches, add a second primer coat and blend edges before the topcoat. Keep going to learn tips on primers, tools, and troubleshooting.
How to Paint a Ceiling After a Water Leak and Cover the Stain (Quick Answer)
Start by cleaning and drying the spot, applying a stain-blocking primer, then repainting with ceiling paint.
You can usually finish a small repair in 1–3 hours, spending $20–60 for primer and paint, and it’s an easy to moderate DIY job depending on ceiling height.
Follow the step-by-step routine and you’ll cover the stain without fuss.
Short step-by-step summary
Fixing a ceiling stain after a leak is straightforward if you follow a tight sequence: dry the area, remove loose paint, apply a stain-blocking primer, and repaint with ceiling paint.
Follow these steps on how to paint ceiling after water leak:
- Dry and clean the stain.
- Scrape loose paint and sand edges.
- Apply stain-blocking primer.
- Repaint with matching ceiling paint.
Estimated time, cost, and difficulty
Once you’ve prepped and primed the spot, plan on about 1–3 hours of hands-on work for a small stain (drying time excluded) and up to a half-day for larger or multiple stains;
full project time depends mostly on primer/paint drying times between coats.
Expect $20–$80 for materials if you DIY, $150–$500+ for pro repair; difficulty is low-to-moderate.
Why Ceiling Stains Appear After Water Leaks
When water soaks into your ceiling it weakens paint and softens drywall, which lets stains spread and paint peel.
Different stain colors and shapes—brown rings, yellow patches, or moldy spots—tell you whether it was a slow leak, a burst pipe, or ongoing moisture.
If the drywall is crumbling, the stain keeps growing, or you spot mold, call a pro; for small, dry stains you can often repair and repaint yourself.
How water damage changes paint and drywall
Because water soaks into drywall and paint, it changes their chemistry and structure, which is why you see stains after a leak.
You’ll notice paint blistering, peeling, and losing adhesion as binders break down.
Drywall fibers swell and weaken, creating soft spots and discoloration.
Mold and rust compounds can form, leaving persistent stains and odors that require removal or sealing before repainting.
Common types of ceiling stains and what they indicate
Stains on your ceiling tell a story about the source and severity of a leak, so learning to read their color, shape, and texture helps you decide what to do next.
You’ll learn common stain types and signs:
- Yellow-brown rings — slow roof or pipe leak.
- Dark, irregular patches — prolonged moisture, mold risk.
- Circular, damp spots — active drip.
- Powdery, crumbly area — drywall collapse potential.
When to call a professional vs. DIY
If a ceiling stain appears after a leak, you’ll want to judge whether the problem is something you can fix or needs a pro — the right choice depends on the leak’s cause, extent of damage, and your comfort with repairs.
Call a pro if you spot active leaks, sagging drywall, mold, electrical involvement, or extensive structural damage.
DIY limited stains, dry patches, minor drywall repair, and repainting.
Assessing the Damage Before Painting
Before you start painting, check safety first — turn off power in the affected area, look for mold, and inspect for any sagging or structural damage.
Make sure the leak is fixed by spotting active drips, dampness, or new discoloration versus old, dry stains.
Gather basic assessment tools like a flashlight, moisture meter, probe, and protective gear so you can evaluate the ceiling thoroughly.
Safety checklist (electricity, mold, structural issues)
Because water can create hidden hazards, start your repair by checking electrical, mold, and structural safety so you don’t make things worse.
Inspect fixtures, switches, and breakers; shut power if damp. Look for musty odor, discoloration, or soft patches indicating mold.
Probe joists and drywall for sagging or rot; support as needed.
- Turn off power
- Test for mold
- Check framing
- Call pros
How to identify active leaks vs. old stains
How can you tell whether that brown patch is a lingering stain or an active leak?
Check for fresh discoloration, dampness, or dripping; press a paper towel gently—if it darkens, moisture’s present.
Watch the area after drying and during rain or plumbing use; active leaks reappear or spread.
Old stains stay dry, flaky, and stable.
Note odor or mold growth as warning signs.
Tools and materials needed for assessment

Gathering the right tools makes evaluating water damage quick and accurate, and you’ll want a compact kit that covers moisture detection, safety, and basic repair needs.
Use these essentials to inspect, measure, and prep the ceiling before painting:
- Moisture meter and flashlight
- Ladder, gloves, goggles
- Putty knife, sandpaper
- Stain-blocking primer and patching compound
Preparing the Ceiling for Repair
Before you start painting, you’ll need to get the ceiling fully dry and fix the leak so the problem won’t come back.
Remove any loose paint, damp or moldy drywall, and address mold with proper remediation before patching holes or replacing damaged sections.
Once repairs are complete and the surface is sound, you can move on to priming and painting.
Drying out the area: methods and timeline
Once the leak’s source is fixed, you’ll need to dry the ceiling thoroughly to prevent mold and guarantee paint will stick; use airflow, dehumidification, and heat to speed drying while monitoring progress.
- Open windows, run fans to move air.
- Use a dehumidifier to pull moisture.
- Apply low heat (space heater) carefully if safe.
- Check dryness with moisture meter; wait 24–72 hours depending on readings.
Inspecting and repairing the source of the leak
Although you’ve dried the area, you still need to find and fix where the water came from so the stain and repair won’t return.
Inspect the attic, roof, plumbing lines, and nearby fixtures for drips, damaged flashing, or loose seals.
Turn off water when testing, tighten or replace faulty fittings, and patch roof damage promptly.
Document repairs before repainting.
Removing damaged paint, loose drywall, and mold remediation
Start by scraping away loose paint and any soft or crumbling drywall until you reach firm material.
Wear gloves, goggles, and an N95 mask.
Dry the area thoroughly with fans.
Clean mold with a detergent solution or a diluted bleach mix (1 cup bleach to 1 gallon water), scrub gently, rinse, and let dry.
Dispose contaminated debris in sealed bags.
Patching holes and replacing drywall sections (when required)
After you’ve removed loose material and treated any mold, inspect the ceiling for holes, soft spots, or missing drywall.
Small nail pops can be filled later, but damaged areas that sag or crumble need cutting out and patching.
Cut back to solid framing, fit a drywall patch, screw it to studs or backing, tape seams, apply joint compound in thin layers, sand smooth, then prime.
Priming to Block Water Stains (Direct Answer)
You’ll need a stain-blocking primer because it seals tannins and moisture marks so paint won’t bleed through.
Choose an oil-based, shellac, or a high-quality water-based stain blocker depending on odor tolerance and cleanup needs.
Apply with a brush for edges and a roller for fields, follow the manufacturer’s recommended dry times, and add a second coat if any discoloration shows through.
Why stain-blocking primer is essential
Confidence in the final finish comes from blocking the stain at its source: stain-blocking primer seals tannins and mineral deposits from the leak so they don’t bleed through your new paint.
You’ll prevent discoloration, reduce the number of topcoats needed, and improve adhesion for durable coverage.
Apply it to a clean, dry surface so your repainting stays uniform and long-lasting.
Types of primers that work best (oil-based, shellac, water-based stain blockers)
When you’re covering water stains, choose a primer formulated to block tannins and minerals: oil-based, shellac, and water-based stain-blocking primers each have clear strengths for different situations. You’ll pick shellac for stubborn stains, oil-based for durability on porous plaster, and modern water-based blockers for low odor and easy cleanup.
| Primer type | Best use |
|---|---|
| Shellac | Tough tannins |
| Oil-based | Porous ceilings |
How to apply primer for maximum stain coverage (technique and drying times)
Now that you’ve picked the right primer for the job, apply it in a way that maximizes stain blocking and minimizes rework. Use these steps:
- Clean and dry the stain; sand feathered edges.
- Roll a thin coat around the stain, then brush edges.
- Wait manufacturer’s recommended dry time (usually 1–4 hours).
- Apply a second coat if stain shows through; let fully cure before topcoat.
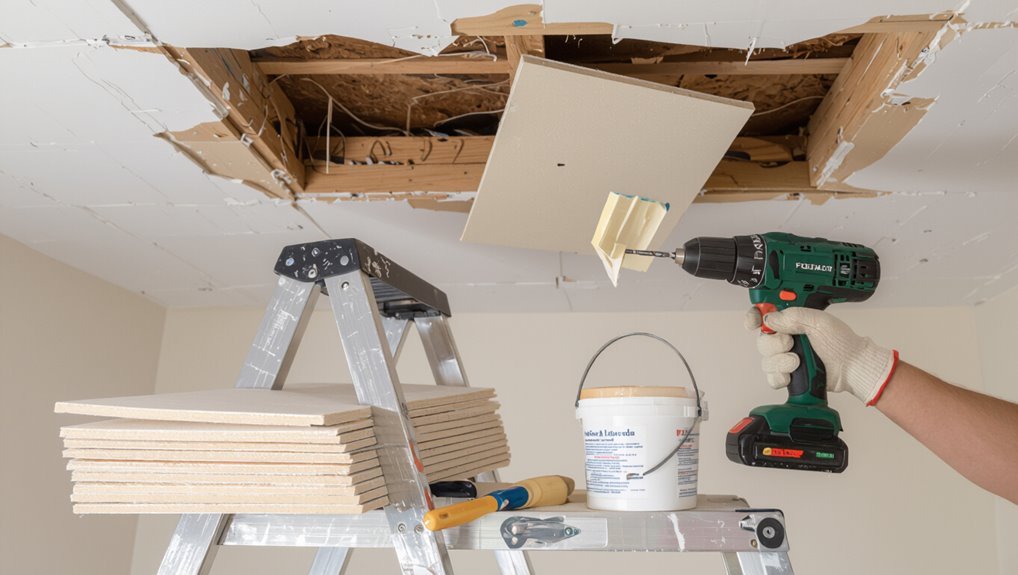
Step-by-Step Painting Process
Before you start, gather your materials and protect the room so dust and drips won’t create more work.
Sand and smooth the patched area, then apply a stain-blocking primer with full coverage in mind.
Choose the right ceiling paint (usually flat for ceilings), and use proper rolling and cutting-in techniques to get even coverage and seamless blending.
Step 1 Gather materials and protect the room
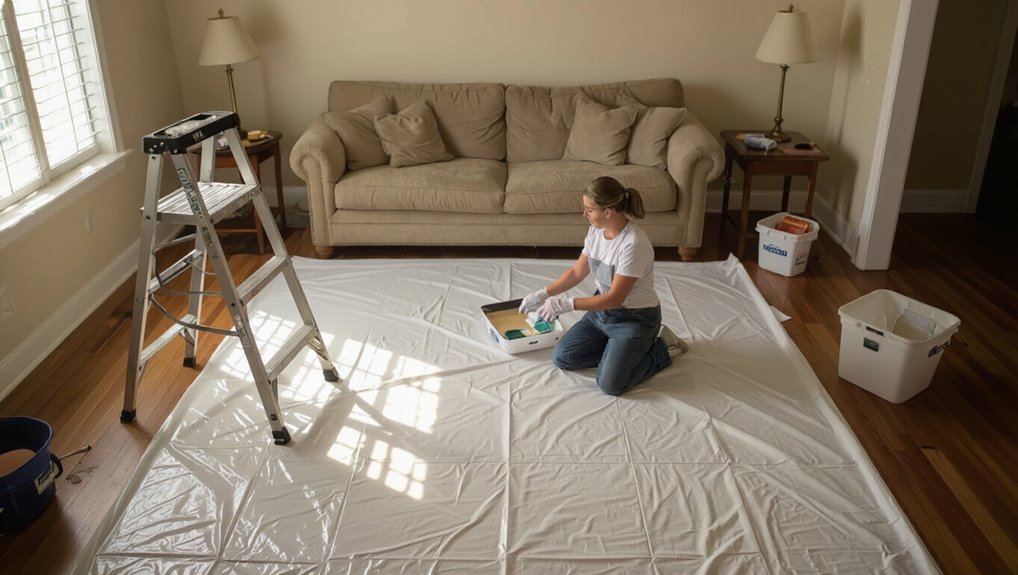
Start by gathering the tools and materials you’ll need and protect the room to keep cleanup easy and prevent further damage.
Lay drop cloths, tape plastic over vents and furniture, and set up a sturdy ladder. Have stain-blocking primer, ceiling paint, brushes, rollers, and gloves ready.
- Drop cloths and plastic
- Painter’s tape
- Primer and paint
- Ladder and tools
Step 2 Sanding and smoothing the patched area
Grab a sanding block or fine-grit sandpaper and smooth the patched area until it’s flush with the surrounding ceiling; you want a feathered edge so the repair won’t show through the paint.
Sand lightly in circular motions, wipe dust with a damp cloth, and inspect under angled light.
Repeat thin skim coats and sand between them until the surface is even and free of ridges.
Step 3 Apply stain-blocking primer (coverage tips)
Once the patched area’s smooth, apply a stain-blocking primer to seal any remaining discoloration and prevent tannins or water stains from bleeding through the topcoat.
Use a high-quality oil- or shellac-based primer for stubborn stains, roll thin even coats, feather edges, and allow full dry time.
One coat often works; add a second if the stain shows through.
Step 4 Choosing the right ceiling paint (flat vs. satin) and finish
Although ceilings hide flaws better with a flat finish, you’ll want to weigh durability, light reflection, and ease of cleaning when choosing paint.
Flat (matte) reduces glare and masks imperfections, while satin or low-sheen finishes stand up better to scrubbing and moisture in kitchens, bathrooms, or basements.
Choose flat for living areas and bedrooms; pick satin for moisture-prone or high-traffic spaces where wipeability matters.
Step 5 Painting technique for even coverage and blending
Start by cutting in a 2–3 inch border along the ceiling edges with a high-quality angled brush.
Then work the roller in overlapping “W” or “M” patterns to maintain a wet edge and blend each section seamlessly into the next.
Apply light, even pressure, reload the roller frequently, and work back into damp areas to avoid lap marks while keeping strokes consistent across the surface.
Step 6 Second coat and final touch-ups
Apply the second coat after the first has fully dried to the touch—usually 2–4 hours for latex or as the paint manufacturer recommends—so you can spot missed areas and guarantee uniform coverage.
Roll a thin, even coat, overlap previous passes, and feather edges to blend.
Inspect under good light, touch up thin streaks or pinholes with a small brush, and let cure before normal use.
Step 7 Cleaning up and post-paint inspection
Gather your tools and clear the area so you can clean up efficiently and inspect the ceiling while the paint’s fresh.
Remove drop cloths carefully, folding dirty sides inward.
Clean brushes and rollers per manufacturer instructions.
Check for missed spots, drips, or texture inconsistencies under good light.
Touch up as needed.
Dispose of waste properly and ventilate the room until paint cures.
Troubleshooting Common Problems and Mistakes
If you spot problems after painting—like stain bleed-through, texture or color mismatches, paint peeling, or a returning stain—you’ll want to diagnose and fix them quickly.
You’ll learn why stains come back, how to stop bleed-through, blend patched areas to match the surrounding ceiling, and prevent or repair bubbling and peeling.
Follow clear checks for hidden moisture or mold so the repair holds.
Stain bleeding through after painting causes and fixes
When a water stain bleeds through fresh paint, it usually means the stain’s tannins or mineral deposits weren’t properly sealed first — and you’ll see the discoloration reappear even after a couple of coats.
Stop sanding alone; clean, dry, then apply a stain-blocking primer (oil-based or shellac).
Let it cure fully, then repaint with quality ceiling paint.
Visible texture or color mismatch how to blend repaired areas
Because patched areas often differ in texture or shade from the surrounding ceiling, you’ll want to match both surface profile and paint appearance before you call the job finished.
Sand and texture the patch to mimic the surrounding finish, feather edges, prime with a stain-blocking primer, then apply ceiling paint with the same sheen and roller nap.
Blend edges with light cross-rolling.
Paint peeling or bubbling after repair prevention and remedy
Although you took care to patch and prime, paint can still peel or bubble if moisture, poor adhesion, or trapped air remain; you’ll prevent most problems by identifying the cause, then addressing it before repainting.
Remove loose paint, sand to feather edges, clean and degloss, apply appropriate primer, and use proper drying times.
If bubbles recur, cut out, dry the substrate, and reapply.
When the stain returns diagnosing hidden moisture or mold
If the stain comes back after you’ve sanded, primed, and painted, don’t assume the job failed for cosmetic reasons — it often signals lingering moisture or mold hiding above the ceiling.
Inspect the attic, roof, and plumbing for leaks, use a moisture meter, and look for musty odor or discoloration.
Fix the source, dry thoroughly, treat mold with a remover, then repaint.
Preventing Future Stains and Water Damage
To keep stains and damage from coming back, you should stay on top of roof, plumbing, and ventilation maintenance.
Choose moisture-resistant ceiling and attic materials so small leaks won’t leave lasting marks.
Do seasonal checks and use simple early-detection techniques to catch problems before they escalate.
Maintenance tips for roofs, plumbing, and ventilation
1 simple routine of regular checks and prompt fixes can keep small roof, plumbing, and ventilation issues from turning into ceiling stains or bigger water damage.
You should inspect, clean, and repair promptly:
- Check shingles, flashing, and gutters monthly.
- Test attic and ceiling for damp spots.
- Service plumbing, tighten joints, replace worn seals.
- Clean vents, guarantee proper exhaust and airflow.
Using moisture-resistant materials in ceilings and attics
Regular inspections and prompt repairs will cut down on leaks, but you can further protect ceilings by choosing moisture-resistant materials in attics and overhead spaces.
Use mold-resistant drywall, treated plywood, and closed-cell spray foam to limit moisture migration.
Install vapor barriers, corrosion-resistant fasteners, and moisture-rated insulation.
These choices reduce staining risk, speed drying after minor intrusions, and simplify future repairs.
Seasonal checks and early leak detection techniques
When seasons change, make a simple checklist and inspect vulnerable areas—roof, flashing, gutters, attic vents, and ceiling seams—at least twice a year so you can spot minor issues before they become stains or structural damage.
- Walk roof, clear gutters, check flashing.
- Inspect attic for damp, mold, or drips.
- Monitor ceilings for discoloration or soft spots.
- Install moisture sensors and act on alerts.
Cost, Time, and When to Hire a Pro
You can usually tackle a ceiling paint-up yourself for a few hours and a modest material cost, while pros quote higher rates that include labor and prep.
Watch for signs you need a contractor—extensive water damage, sagging drywall, recurring leaks, or hidden mold. If any of those show up, don’t hesitate to call a specialist for an assessment and estimate.
DIY cost and time breakdown vs. professional estimates
A few factors—size of the damaged area, the amount of prep required, and whether stains need sealing—determine whether you’ll save money doing the job yourself or should hire a pro.
DIY materials: $30–$100, 2–6 hours.
Pro estimate: $150–$600, 1–4 hours.
| Item | Typical cost/time |
|---|---|
| DIY materials | $30–$100 / 2–6 hrs |
| Pro labor | $150–$600 / 1–4 hrs |
| Primer/paint | $20–$80 / 1–2 hrs |
| Tools rental | $10–$50 / as needed |
Signs the job requires a contractor or specialist
If the damage goes beyond surface stains or your ceiling shows structural issues—sagging, widespread mold, crumbling drywall, or recurring leaks—you should call a contractor; these problems need professional assessment, specialized repairs, and sometimes permits that DIY work won’t cover.
You should also hire a pro if stains cover large areas, require electrical/plumbing fixes, or you lack tools, time, or confidence to guarantee safe, lasting repairs.
Tools, Materials, and Product Recommendations
Before you start repainting, you’ll want a clear materials checklist for repair and painting so you don’t stop halfway through.
I’ll recommend specific primers, paints, and applicators for both budget and premium options, plus the safety gear you’ll need.
Finally, you’ll get simple disposal and cleanup guidelines to handle contaminated materials and leftover products responsibly.
Complete materials checklist for repair and painting
You’ll need a compact, specific kit of tools and materials to repair water damage and repaint a ceiling properly; this list covers everything from safety gear and patching supplies to primers and paint so you won’t be shopping mid-job.
Gather safety gear, patching supplies, surface prep items, and painting tools.
- Respirator, goggles, gloves, drop cloths
- Joint compound, repair mesh, putty knife
- Degreaser, sandpaper, mildew cleaner
- Rollers, brushes, extension pole, paint tray
Recommended primers, paints, and applicators (budget vs. premium)
One good primer and the right paint will save you time and give the ceiling a uniform finish after a water stain has been repaired.
Use a stain-blocking oil or shellac primer for heavy tannin bleed; water-based stain-blocking for light stains.
Budget: acrylic primer and flat ceiling paint, 3/8” nap roller.
Premium: shellac/oil primer, mildew-resistant paint, microfiber roller, angled brush.
Safety gear and disposal guidelines
Grab goggles, a respirator or dust mask, gloves, and a disposable coverall before you start—these protect your eyes, lungs, and skin from paint, mold spores, and dust kicked up during prep.
Dispose contaminated materials safely. Follow local hazardous-waste rules. Clean tools per paint type.
- Bag and seal debris
- Label moldy waste
- Use HEPA vacuum
- Take to proper facility
FAQs
You’ll want answers to a few common questions before you start painting, like whether you can skip primer over a water stain or how long to wait after a leak.
You’ll also need to know if bleach will remove mold, whether a spray texture can hide a repair, and which primer stops heavy tannin or rust stains.
Read on for clear, practical guidance on each point.
Can I paint over a water stain without priming?
While it might be tempting to paint right over a water stain, you shouldn’t—unless the stain is fully dry and you’re using a stain-blocking primer.
You can’t rely on regular paint to hide tannin bleed or mildew. Primer seals and prevents discoloration from reappearing.
Skip priming only if the stain is negligible, perfectly dry, and you accept a higher risk of bleed-through and uneven finish.
How long should I wait after a leak before painting?
If you’ve confirmed the stain is dry and primed as recommended, the next question is how long to wait before painting.
Wait at least 24 hours for primer to cure; check manufacturer directions. If humidity’s high or primer feels tacky, give 48–72 hours.
Verify the surface is stable and fully dry; rushing can cause adhesion problems or bleed-through, so be patient.
Will bleach remove mold stains on the ceiling?
Wondering whether bleach will remove mold stains on your ceiling?
Bleach can lighten surface mold stains on nonporous paint, but it won’t penetrate porous drywall or textured surfaces to kill roots.
You should clean with a detergent first, use a mold-killing product or diluted bleach carefully, dry thoroughly, then prime with a stain-blocking sealer before repainting to prevent recurrence.
Can I use a ceiling spray texture to hide a repaired spot?
Can you use a ceiling spray texture to hide a repaired spot? Yes — matching texture helps blend the patch if you prep properly.
Feather edges, sand smooth, and practice spray on scrap to match pattern and pressure. Use same material (popcorn, knockdown, orange peel) and apply in thin layers, building to blend.
Prime before final paint to guarantee uniform finish.
What primer works best for heavy tannin or rust stains?
Which primer do you reach for when tannin or rust stains refuse to budge?
Use a solvent-based or oil-based stain-blocking primer (Zinsser BIN or Kilz Original) for severe tannin/rust. These seal and isolate stains better than latex.
Apply per instructions, allow full cure, then topcoat with latex ceiling paint.
For persistent stain bleed-through, consider a shellac-based primer for maximum coverage.