
How to Remove Ceiling Paint in a Bathroom Without a Mess
You can remove bathroom ceiling paint cleanly by prepping the room, sealing vents and fixtures, and using a low-dust method like wet-scraping or a low‑VOC chemical gel. Mist sections to soften paint, scrape gently with a wide blade held flat, and capture debris with a vacuum or tarp. Wear proper PPE and shut power off. Control humidity and ventilate after work, then prime repaired areas. Keep going for step-by-step tips, tool choices, and safety checks.
Quick Decision: Best Method for Your Bathroom Ceiling

Before you start, decide fast which method suits your bathroom: wet scraping for flaking paint, chemical strippers for stubborn layers, or sanding for smooth prep.
You’ll weigh ceiling safety, ventilation, and moisture. Choose paint alternatives like washable mildew-resistant coatings if repainting.
Prep tools, drop cloths, and a respirator, then pick the quickest, safest approach that fits your ceiling’s condition and your comfort level.
What Problem Does Removing Bathroom Ceiling Paint Solve?
If your ceiling paint is peeling or stained, removing it helps stop mold and mildew from taking hold in damp bathroom air.
It also instantly improves the room’s appearance by eliminating blotches and flaking paint.
And by stripping down to a clean surface, you’re setting the ceiling up for a smooth, longer‑lasting repaint.
Prevent Mold And Mildew
Because bathroom ceilings get constant moisture, old or peeling paint can trap water and create the perfect breeding ground for mold and mildew.
So removing compromised paint stops ongoing moisture retention and lets you address the underlying cause.
You’ll improve mold prevention and mildew control by exposing damaged substrate, drying the area, treating spores, and applying proper primers and breathable coatings to prevent recurrence.
Improve Bathroom Appearance
When you strip away peeling, stained, or discolored ceiling paint, you reveal a clean surface that instantly refreshes the whole bathroom and makes fixtures, tiles, and lighting look sharper. You’ll boost bathroom aesthetics, highlight details, and make ceiling upgrades feel worth it.
| Benefit | Result |
|---|---|
| Clean look | Brighter space |
| Highlight trim | Enhanced value |
| Visual cohesion | Modern feel |
| Perceived size | Airier room |
Prepare For Repainting
Now that the ceiling looks cleaner and more cohesive, prepare for repainting by addressing the root problems that peeling or stained paint causes: poor adhesion, trapped moisture, and uneven texture.
You’ll remove loose flakes, sand or skim imperfections, treat mold or leaks, and choose appropriate paint types for humidity.
Match finish and pattern to existing ceiling textures so new coating bonds and lasts.
How to Assess Your Ceiling Condition Fast
Start by scanning the ceiling for water stains, bubbling, or soft spots that signal past or ongoing leaks.
Then press gently and tap to find areas where paint is loose or peeling.
These quick checks tell you whether you need repairs before you remove the paint.
Inspect For Water Damage
If you spot peeling paint, discolored patches, or soft spots on the bathroom ceiling, pause and assess for water damage before scraping or sanding.
- Look for water stains and note their size and location.
- Smell for mildew or mustiness indicating hidden leaks.
- Probe soft areas gently to find sagging drywall.
- Plan repair techniques or call a pro if structural damage appears.
Check For Loose Paint
Before you grab a scraper, give the ceiling a quick hands-on check for loose paint so you can target only the problem areas.
Gently press and score small sections with a fingernail or putty knife to reveal flaking. Note blistering, powdery spots, or areas where paint peels away easily.
These indicate poor paint adhesion and tell you where surface preparation and repair are required before repainting.
Test Paint Adhesion on a Bathroom Ceiling

Wondering whether that peeling patch on your bathroom ceiling will come off cleanly or take the underlying surface with it?
Do small paint adhesion tests: score a tiny X, press tape, peel sharply, and inspect for substrate damage. Assess ceiling paint compatibility with moisture and existing finish before wider removal.
Follow these steps to decide whether spot repair, full stripping, or repainting’s best.
- Score X
- Tape pull
- Inspect edge
- Note finish
Check for Lead Paint and Next Steps if Detected
If your house was built before 1978, test the ceiling paint for lead using a certified kit or by hiring a professional tester.
If the test is positive, don’t sand or scrape—follow safe containment and cleanup procedures and contact a licensed lead abatement contractor.
Dispose of contaminated materials per local hazardous-waste rules to protect yourself and others.
Test For Lead
How can you tell whether the ceiling paint contains lead? Use certified lead testing kits or hire a professional inspector; both clarify risk and health implications.
If positive, stop sanding and isolate the area. Follow these steps:
- Purchase EPA-recognized lead testing kit.
- Wear PPE and minimize disturbance.
- Contact a certified lead inspector.
- Document results and plan remediation.
Safe Disposal Steps
Once you know whether the ceiling paint contains lead, take steps to safely dispose of contaminated materials and plan remediation to protect yourself and others. Follow local regulations, minimize environmental impact, and hire certified abatement if needed. Seal waste, label it, and use authorized drop-off sites. Notify occupants and document actions for compliance.
| Step | Action | Notes |
|---|---|---|
| 1 | Seal waste | Use heavy bags |
| 2 | Label | Include test results |
| 3 | Transport | Authorized site only |
Locate and Assess Water Damage or Mold
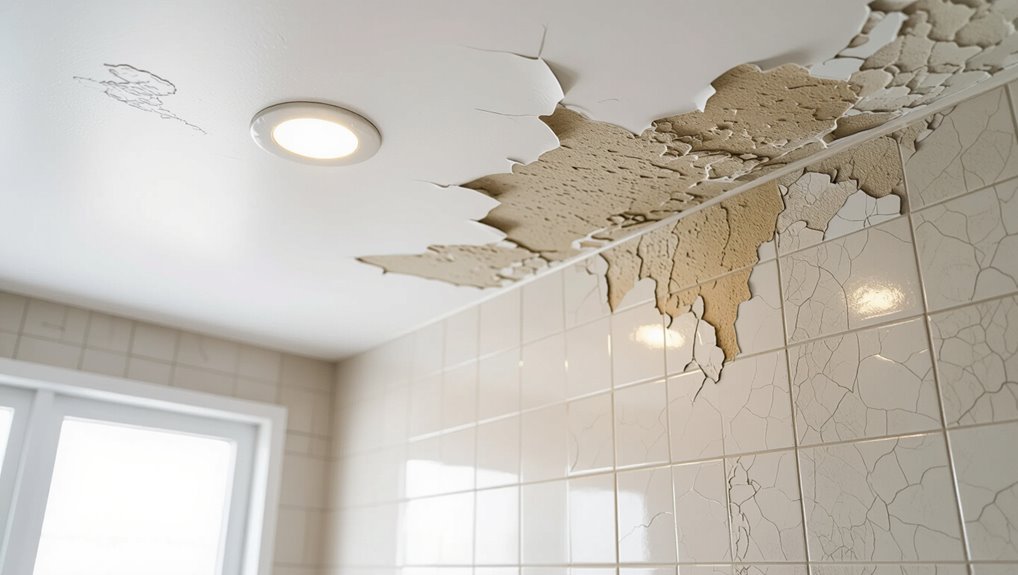
Before you touch the paint, inspect the ceiling for stains, soft spots, peeling, and visible mold so you can plan the right repair and safety steps.
Before painting, inspect for stains, soft spots, peeling, and visible mold to plan repairs and safety.
- Note locations and severity of water damage for targeted fixes.
- Do a quick mold assessment—color, texture, spread.
- Photograph areas for records and contractor consultations.
- Wear gloves and a mask; avoid disturbing suspect spots until repaired.
How Humidity and Ventilation Affect Removal
After noting damage and evaluating mold, pay attention to humidity and ventilation because they directly change how paint and repair materials behave.
You’ll need humidity control to prevent peeling, bubbling, or slow drying; run exhaust fans, open windows, and use a dehumidifier.
Adopt simple ventilation strategies to speed drying, limit dust spread, and guarantee safer scraping or patching without triggering more mold or adhesion problems.
Choosing Between Stripping, Sanding, or Scraping
You’ll weigh chemical stripping’s faster paint removal against its fumes and need for ventilation and protective gear.
For less toxic options, sanding gives a smoother finish while scraping is quicker for loose or peeling paint.
Pick the method that fits the ceiling condition, your tolerance for dust or chemicals, and how much prep you want to do.
Chemical Stripping Pros & Cons
Chemical stripping can be the fastest way to remove multiple paint layers from a bathroom ceiling, but it comes with trade-offs you should weigh against sanding or scraping.
- You’ll get speed, but prioritize chemical safety with ventilation and PPE.
- Strippers reach crevices sanding misses.
- Clean-up and disposal matter; consider eco friendly options.
- Test a small area first to avoid substrate damage.
Sanding Vs. Scraping Choices
When deciding whether to sand or scrape your bathroom ceiling, consider the paint’s condition, your skill level, and how much dust and mess you can tolerate; you’ll choose based on adhesion, texture, and ventilation.
If paint peels, use scraping tools and a dust sheet. For smooth, bonded paint, apply gentle sanding techniques with a vacuum sander.
Seal and prime afterward to prevent future peeling.
Which Removal Method Fits Each Ceiling Type
Because ceilings differ in texture, material, and condition, the best removal method changes with what you’re working on.
You’ll match technique to ceiling materials and paint types, minimizing damage and mess.
Consider these quick guides:
- Smooth plaster: gentle scraping, minimal abrasion.
- Popcorn/textured: soft wet-scrape, test first.
- Drywall: light sanding, patching after.
- Painted wood: heat or stripping, protect fixtures.
Methods Overview: Chemical, Heat, Wet-Scrape, Sanding
If you’re tackling ceiling paint removal, choose a method that matches the ceiling material, paint age, and your tolerance for dust or odor.
You can use chemical alternatives for low-odor stripping, heat guns for stubborn layers, wet-scrape to minimize dust, or careful sanding for spot repairs.
Always follow safety precautions: ventilation, eye and respiratory protection, and drop cloths to contain debris and runoff.
Which Chemical Strippers Are Safe for Bathrooms
Which chemical stripper should you pick for a bathroom?
You’ll want low-VOC, water-soluble products that balance eco friendly options with strong stripper effectiveness.
Consider these choices:
- Soy-based gel — gentle, low odor.
- Citrusy solvent — biodegradable, moderate strength.
- Caustic paste — high effectiveness for stubborn layers.
- Peel-away system — controlled application, reduced runoff.
Using Chemical Strippers on a Bathroom Ceiling Safely
Start by ventilating the room and protecting surfaces: open windows, run an exhaust fan, and cover fixtures, trim, and flooring with plastic and drop cloths to prevent drips and fumes from spreading.
Wear goggles, gloves, and an appropriate respirator, read labels for chemical safety, test a small area, work in sections, neutralize per instructions, and dispose of waste per local regulations.
Which Water-Based Strippers Work Best Indoors
Wondering which water-based stripper will give you the safest, cleanest results indoors?
You’ll want eco friendly options labeled low-VOC, non-caustic formulas and mild gel strippers for ceilings.
Prioritize indoor safety with good ventilation and respirator use.
- Citrusy gel (low odor)
- Soy-based paste (biodegradable)
- Waterborne paste (non-caustic)
- Enzyme remover (gentle)
How to Use a Heat Gun Safely on a Bathroom Ceiling
Use a heat gun carefully on a bathroom ceiling—it’s an effective way to soften paint for scraping, but it can also damage drywall, produce fumes, or start a fire if you’re not cautious.
Wear eye, respiratory, and heat-resistant gear, ventilate the space, keep a fire extinguisher handy, and work in short passes.
Follow heat gun techniques and safety precautions, testing a small area first.
When to Avoid Heat and What to Use Instead
Even with careful technique, a heat gun isn’t always the right tool—don’t use it if your bathroom ceiling has lead-based paint, warped or sagging drywall, close-set flammable fixtures, or poor ventilation.
When to Avoid heat, choose Safe Alternatives that protect you and the room:
- Chemical strippers (low-odor, bathroom-safe)
- Manual scrapers with dust control
- Hand sanding with HEPA vacuum
- Professional removal service for hazards
How to Wet-Scrape Paint to Reduce Dust
Start by covering fixtures, floors, and vents with plastic and drop cloths so paint and water don’t spread.
Wet the ceiling with a light mist or a damp sponge, then use a wide putty knife at a shallow angle to gently lift softened paint.
Keep your strokes steady and rinse the blade often to reduce dust and prevent gouging the drywall.
Prep Surfaces And Area
Before you wet-scrape, clear the room and protect every surface that might catch drips or dust: move towels, rugs, and toiletries out, cover fixtures and the floor with plastic sheeting, and tape seams tightly so nothing shifts.
Follow surface cleaning and area organization steps to keep dust minimal:
- Remove loose items.
- Seal vents and light fixtures.
- Lay overlapping plastic.
- Tape edges securely.
Use Proper Wet-Scraping Technique
Dampen the ceiling lightly and work in small sections so the paint softens without dripping; keeping the surface just wet enough prevents dust while letting your scraper lift old paint cleanly.
Use proper tools—a wide, flexible scraper and a spray bottle—and follow safety precautions like goggles and a mask.
Scrape at a low angle, rewet stubborn spots, and wipe residue with a damp microfiber cloth.
How to Dry-Sand Without Filling the Room With Dust
You can keep dust under control by using the right tools and techniques—vacuum-backed sanders, fine-grit sanding blocks, and sanding screens—and working slowly so particles get captured instead of airborne.
- Choose sandpaper types and grit for minimal dust.
- Use dust control methods: vacuum attachment and sealed work zone.
- Sand gently across small sections to limit fallout.
- Wipe surfaces with a damp microfiber cloth between passes.
Sanding Tools That Cut Cleanup Time
When you’re sanding a bathroom ceiling, choose tools that cut cleanup time so you’re not stuck scrubbing dust afterward.
Vacuum-integrated sanders, wet/dry sanding pads, and dust-containment attachments each keep particles off surfaces and simplify disposal.
We’ll compare how they work and which suits tight, moisture-prone spaces.
Vacuum-Integrated Sanders
Although sanding is dusty work, vacuum-integrated sanders cut cleanup time by trapping most of the debris as you work.
So you’ll spend less time wiping down walls and scrubbing vents afterward.
- Check vacuum features for suction and filter type.
- Match sanding techniques to surface preparation needs.
- Prioritize dust control with sealed systems and HEPA filters.
- Make sander selection based on weight, reach, and tool compatibility.
Wet/Dry Sanding Pads
A damp sponge can make all the difference when you switch to wet/dry sanding pads: they let you sand ceiling paint with far less airborne dust by combining moisture with abrasive backing to trap particles as you work.
You’ll appreciate wet/dry techniques for controlling mess and preserving finish. Choose compatible pads and gentle pressure to maximize sanding benefits while avoiding gouges or water damage.
Dust-Containment Attachments
One smart upgrade is using dust-containment attachments on your sanding tools, which capture most particles at the source so you don’t spend hours cleaning up.
- Choose attachments matching your tool selection and power rating.
- Connect to a shop vac with HEPA filtration for effective dust control.
- Test fit to verify seals and adapters prevent leaks.
- Replace filters often to maintain suction and performance.
How to Use a Drywall or Paint Scraper Efficiently
Start by scoring loose or bubbled paint with the scraper’s razor edge, working gently to avoid gouging the drywall.
Hold the scraper at a low angle, apply steady pressure, and push rather than pry for efficient scraping.
Hold the scraper low, apply steady pressure, and push forward—don’t pry—to scrape efficiently and protect the surface.
Use drywall techniques: short strokes, frequent blade checks, and dust collection.
Replace dull blades promptly and keep a consistent pattern to minimize texture damage and cleanup.
Removing Peeling Paint Without Gouging the Ceiling
Start by softening the edges of the peeling paint with a putty knife held at a low angle so you lift flakes without digging into the drywall.
Work slowly across fragile areas and brace your hand against the ceiling to keep pressure even and controlled.
If a patch looks unstable, stabilize it with a strip of painter’s tape or a light coat of adhesive before continuing.
Gentle Scraping Techniques
Work slowly and keep your tool flat against the ceiling so you lift loose paint without gouging the surface beneath.
Use gentle scraping and effective techniques to remove flakes, holding a wide blade at a low angle and tapping stubborn spots.
Stay patient, keep dust contained, and inspect for adhesion.
- Wide putty knife
- Low-angle scraping
- Light tapping
- Frequent inspection
Stabilize Fragile Areas
After you’ve loosened and removed the obvious flakes, focus on stabilizing the fragile areas so you don’t gouge sound ceiling beneath.
Work in small sections, misting with water or a mild remover to soften paint.
Use a wide putty knife at a shallow angle and apply targeted stabilization techniques like consolidant or diluted PVA to bond loose fibers, then gently scrape and sand.
Handling Textured Ceilings: Popcorn and Knockdown
Tackle textured ceilings carefully, since popcorn and knockdown finishes can hide loose material, mold, or asbestos in older homes and require different removal methods than smooth surfaces.
- Test for asbestos and document textured ceiling maintenance steps.
- Choose methods matched to ceiling paint types and texture—gentle scraping or wet sanding.
- Use HEPA vacuuming and containment.
- Repair with matching texture compound and prime before repainting.
Removing Paint From Metal Fixtures and Vents
Before you start, cover nearby surfaces and mask off walls and floors so paint chips and solvent don’t cause damage.
Pick a solvent rated safe for the metal finish and ventilate the room, testing on a small area first.
Use a plastic scraper or brass brush and gentle strokes to lift paint without scratching the fixture or vent.
Protect Surrounding Surfaces
Protect nearby metal fixtures and vents by covering or removing them before you start scraping or stripping paint; if you can’t remove a vent or towel bar, mask it tightly with painter’s tape and heavy-duty plastic to keep solvents and chips off the finish.
Use cleaning techniques and surface protection to prevent damage.
- Remove small fixtures.
- Tape seams tightly.
- Shield grills with plastic.
- Clean edges gently.
Choose Safe Solvents
Once fixtures and vents are covered or removed, pick solvents that’ll remove paint without harming metal finishes or nearby seals.
Test small areas, choose labeled safe products for brass, chrome, or aluminum, and consider eco friendly options like citrus-based removers.
Use solvent alternatives—rubbing alcohol or mild ammonia solutions—when compatible.
Wipe thoroughly, rinse, and dry to protect finishes and seals.
Gentle Scraping Techniques
Start by loosening paint gently with a plastic or wooden scraper so you don’t nick chrome, brass, or painted surfaces; hold the tool at a shallow angle and work in short, controlled strokes to lift flakes without gouging metal.
- Use gentle scraping to test adhesive spots.
- Protect surrounding finishes with tape.
- Work slowly, collecting flakes as you go.
- Finish with a soft brush and mild solvent for effective techniques.
Tools That Minimize Mess When Stripping Paint
A few key tools will keep dust and debris contained while you strip ceiling paint in a bathroom: a HEPA-rated vacuum with a brush attachment, a wet/dry shop vac for cleanup, plastic sheeting and painter’s tape to seal off vents and fixtures, and a handheld scraper or oscillating tool with dust-collection shrouds.
Use mess free tools and plan efficient cleanup: set up containment, work in small sections, and vacuum frequently.
What Protective Gear Keeps You Safe and Clean
You’ll want protective eyewear or a respirator to keep dust and fumes out of your eyes and lungs.
Wear chemical-resistant gloves, long sleeves and pants, and sturdy, non-slip footwear to protect skin and prevent slips.
We’ll cover what to choose for each item and how to use it safely.
Protective Eyewear And Respirators
One pair of well-fitting goggles and a properly rated respirator will keep you safe and clean while removing ceiling paint in a bathroom; goggles protect your eyes from drips and irritant dust, and a respirator blocks paint fumes and airborne particulates that simple masks can’t handle.
- Choose goggles sealed to your face.
- Use N95 or better respirators.
- Follow safety practices for fit.
- Replace filters regularly.
Gloves, Clothing, And Footwear
Start by choosing durable gloves, coveralls, and slip-resistant shoes that keep paint, dust, and chemicals off your skin and clothes.
Pick effective gloves—nitrile or chemical-resistant—pair with reusable coveralls for smart clothing choices, and prioritize foot protection with sturdy soles.
Follow safety precautions, decontaminate gear after use, and adopt cleanup methods that prevent tracking paint through the house.
Protecting Fixtures, Walls, and Floors From Fallout
Because dust and paint chips will fall everywhere, cover fixtures, walls, and floors before you sand or scrape the ceiling.
Cover fixtures, walls, and floors before sanding—dust and paint chips will fall everywhere, so protect everything in the room.
Use fixture protection like plastic sheeting and secure it tightly. Lay heavyweight floor coverings and tape edges to prevent slips.
Work from center outward and remove hardware only if needed. Clean up promptly to avoid residue and clogged drains.
- Seal vents and lights
- Protect mirrors
- Cover tubs and toilets
- Tape seams tightly
Which Drop Cloths and Tape Work Best in Bathrooms
You’ll want waterproof drop cloths like vinyl or heavy-duty plastic to keep floors and fixtures dry during scrapping or washing.
Pair those with strong adhesive tapes that cling in humid conditions, and keep surface-safe alternatives (like painter’s or low-tack masking tape) on hand for finished trim and painted walls.
I’ll cover pros, uses, and how to apply each so you don’t damage surfaces.
Waterproof Drop Cloth Options
One good waterproof drop cloth can save you hours of cleanup and protect fixtures from stripper, paint chips, and runoff.
You’ll want water resistant materials and eco friendly options; choose lightweight, non-slip, and puncture-proof varieties that won’t trap moisture.
- Vinyl reinforced
- TPU reusable sheet
- Waxed canvas (recycled)
- Poly with grommets for securing
Adhesive Tape That Sticks
After you’ve laid down a waterproof drop cloth, pick tape that actually sticks to tile, painted trim, and wet-prone surfaces so your barriers don’t shift.
Choose high-adhesive strength painter’s tape for short runs and waterproof duct tape for seams.
Consider foam-backed or rubberized options where surfaces are uneven.
Compare tape types for residue risk and removal ease before you start.
Surface-Safe Tape Alternatives
Pick drop cloths and tapes that protect surfaces without causing damage—vinyl or rubber-backed cloths repel water and grip tile, while felt or rosin paper works on dry floors and trim.
- Use vinyl for wet zones; prioritize Tape durability.
- Choose felt for dry, delicate trim.
- Try eco friendly alternatives like recycled cotton drop cloths.
- Test low‑tack painter’s tape on a hidden spot first.
How to Cover Vents, Lights, and Exhaust Fans Safely
Before you start scraping or sanding, seal off vents, lights, and the exhaust fan so dust and paint chips don’t spread through the house; you’ll protect wiring and HVAC components by using the right materials and techniques.
Use painter’s plastic, low-tack tape, and disposable filters.
Follow ventilation techniques and safety precautions: label covers, avoid adhesive on grills, and secure edges to prevent gaps or sagging.
When to Turn Off Electricity Before Ceiling Work
Before you start scraping paint, shut off power to the bathroom at the breaker to eliminate shock risk from exposed fixtures.
Pay extra attention to lights, exhaust fans, and any ceiling-mounted outlets, since dust or a slipped tool can create dangerous contact.
If you can’t reach the correct breaker confidently, switch off the whole bathroom circuit or isolate individual switches and confirm power is off with a tester.
When To Shut Power
How do you know when to cut power for ceiling work? You should prioritize electrical safety during any ceiling maintenance.
Turn power off when you’ll sand, scrape near wiring, or remove paint around fixtures. Use a breaker switch and test with a noncontact tester.
Restore power only after cleaning, drying, and confirming no exposed conductors remain.
- Plan
- Test
- Lockout
- Verify
Risks Around Fixtures
Shutting power is only the start; fixtures and their wiring create specific hazards you need to watch for. You’ll use fixture protection strategies and follow fixture removal tips so water and debris don’t contact live parts. Check junction boxes, secure hanging lights, and cover fans before scraping.
| Hazard | Action |
|---|---|
| Wet contacts | Cover, dry, inspect |
| Loose wiring | Tighten, support |
| Hanging fixtures | Secure, brace |
| Hidden junctions | Open, verify |
Safe Switch Isolation
If you’re working near switches, always cut power at the appropriate breaker rather than relying on the wall switch alone—switches can control multiple circuits or be miswired, and you don’t want live voltage near wet tools or metal scrapers.
- Confirm breaker label and flip it off.
- Test with a voltage tester.
- Lockout/tagout or tape the breaker.
- Keep a partner informed for ceiling safety and electrical precautions.
Create a Dust- and Drip-Free Work Zone
Start by sealing off the bathroom so dust and paint drips stay contained: tape plastic sheeting over the door, vents, and any fixtures you can’t remove, and cover the floor and tub with drop cloths or layered plastic to catch debris and spills.
Set up dust barriers at ceiling level, position a tarp under your ladder, and plan cleanup strategies—keep bins, vacuums, and disposable wipes handy.
Containing Paint Chips While Scraping
When you scrape, keep chips from scattering by working slowly and holding a stiff putty knife or wide scraper close to the ceiling so most debris falls onto your tool instead of the floor.
Use drop cloths and a dust pan to manage paint chip containment and speed cleanup solutions.
Use drop cloths and a dustpan to catch chips and speed cleanup for safer, tidier scraping
- Scrape toward the tarp edge.
- Tap tool into pan.
- Fold and seal cloth.
- Vacuum remaining bits.
Minimizing Drips With Liquid Strippers and Solvents
Although liquid strippers and solvents speed paint removal, you’ll want to control their flow to prevent drips that can stain walls, fixtures, or floors.
Work in small sections, apply with a brush rather than pouring, and use drip trays and painter’s tape to protect edges.
Choose solvent types suited to the paint, keep applicators saturated—not dripping—and wipe excess immediately.
Rinse and Neutralize Stripper Residue Safely
After scraping away softened paint, rinse the area thoroughly to remove stripper residue and prevent chemical reactions with new coatings.
Use water and mild detergent, then apply recommended neutralizing agents per product instructions to complete residue removal.
Dry between steps and ventilate well. Avoid spreading chemicals.
- Flush with clean water
- Dab with detergent solution
- Apply neutralizing agents
- Rinse and dry thoroughly
Prep a Cleaned Bathroom Ceiling for Priming
Start by inspecting the cleaned ceiling for any remaining residue, loose paint, cracks, or stains so you know exactly what needs attention before priming.
Wipe with a damp microfiber to remove dust, allow full drying, and sand glossy spots lightly. Use ceiling cleaning techniques to guarantee surface adhesion.
Follow priming tips: choose a stain-blocking primer and apply even, thin coats for best results.
Repairing Cracks, Seams, and Damaged Drywall
Once the ceiling is clean and sanded, you’ll want to address any cracks, seams, or damaged drywall before priming so the surface will be smooth and stable.
- Remove loose material and widen hairline cracks for proper crack repair.
- Apply joint compound over seams, embedding tape.
- Use drywall patching for holes, feathering edges.
- Sand smooth, vacuum dust, and inspect for remaining defects before priming.
Primers That Block Stains and Stop Bleed-Through
If stains from water, smoke, or mold can show through new paint, choose a stain-blocking primer specifically formulated to seal and neutralize those contaminants so your finish coat stays clean and even.
You’ll apply stain blocking primers to repaired areas and entire ceilings for consistent coverage.
Look for fast-drying, mold-resistant formulas designed for bleed through prevention, and follow manufacturer instructions for best adhesion and durability.
Choosing Paint and Finish for Bathroom Ceilings
Now that stains are sealed and your ceiling’s surface is sound, pick a paint and finish that handle moisture and cleaning without sacrificing appearance.
- Choose mildew-resistant paint types rated for bathrooms.
- Use satin or semi-gloss for easy cleaning.
- Match finish to existing ceiling textures to hide imperfections.
- Test a small area to confirm adhesion and sheen in humid conditions before committing.
Speed-Dry Plaster and Joint Compound Before Painting
Because bathroom humidity can hold moisture in plaster and joint compound, speed-drying them before painting prevents tackiness and adhesion problems.
You’ll use speed dry techniques like fans, dehumidifiers, and gentle heat to accelerate plaster curing. Keep airflow steady, avoid high heat that cracks compound, and check dryness with a clean fingertip.
Only paint when surfaces feel fully dry and hard to the touch.
Troubleshooting Stubborn Paint Patches
Tackle stubborn paint patches by first identifying why they’re clinging—old oil-based layers, trapped moisture, poor adhesion, or incompatible primers all behave differently and need different fixes.
- Test adhesion with a blade, then sand or score.
- Use a chemical stripper for oil-based layers.
- Dry and treat moisture before removing techniques.
- Prime adhesion problems, then scrape and recoat.
Common Mistakes That Create Extra Mess
Once you’ve identified and addressed why paint won’t come off, watch for common mistakes that turn a simple ceiling job into a bigger cleanup.
Don’t skip prep, use overly aggressive scrapers, or let drips run unchecked—those messy techniques multiply work.
Protect fixtures, cover surfaces properly, and apply deliberate strokes.
Use proven cleanup strategies so you won’t trade one task for another.
How Long to Ventilate After Chemicals or Sanding
How long should you keep the bathroom ventilated after using chemical strippers or sanding? Aim for a clear ventilation duration to reduce fumes and dust; prioritize chemical safety and fresh air.
- Run exhaust fan continuously for at least 2 hours.
- Open windows for cross-ventilation if possible.
- Wait 24 hours before prolonged occupancy.
- Use an air purifier with HEPA after sanding.
Dispose of Paint Chips and Stripper Waste Responsibly
1 clear rule: treat paint chips and stripper residue as potentially hazardous waste and handle them carefully.
Bag and seal debris, label containers, and check local paint disposal rules before hauling anything to curb. Use designated hazardous-waste drop-offs or community programs.
Avoid rinsing chemicals down drains. Choose eco friendly practices like biodegradable solvents and minimized waste to protect plumbing and local ecosystems.
Estimate Time and Cost for a Bathroom Ceiling Job
Because bathrooms vary in size, condition, and ventilation, you should base your time and cost estimate on specific factors:
Because bathrooms differ in size, condition, and ventilation, base time and cost estimates on specific factors.
- Ceiling area and accessibility affect time estimation.
- Paint type and number of coats influence labor and materials in cost analysis.
- Prep and drying time add hours, especially with poor ventilation.
- Disposal and protective supplies raise material costs; factor in contingencies.
When to Call a Pro Instead of DIY
If your ceiling has extensive water damage, mold, structural cracks, or lead paint, call a pro—these issues require specialized testing, repair, and safety measures you shouldn’t tackle alone.
You should also hire someone when you lack tools, time, or confidence.
Recognize DIY Limitations and prioritize Professional Expertise for complex ceilings, electrical or ventilation concerns, and guaranteed safe, code-compliant repairs that protect your home and health.
Frequently Asked Questions
Can Humidity Cause Fresh Paint to Peel After I Remove Old Paint?
Yes — humidity effects can make fresh paint peel after you remove old paint. You’ll see reduced paint adhesion when surfaces stay moist, so control ventilation, dry thoroughly, and use moisture-tolerant primers to prevent failures.
Can Bathroom Ceiling Insulation Be Damaged During Paint Removal?
Yes — you can damage insulation during paint removal. When you use aggressive paint removal techniques or excessive moisture, you’ll compress, tear, or wet insulation, so work carefully and plan for ceiling repair if insulation’s compromised.
Will Paint Removal Affect Bathroom Exhaust Fan Performance?
Like a gust clearing leaves, you’ll notice paint removal techniques can clog or loosen blades, so you’ll protect the fan, perform exhaust fan maintenance, clean filters and motor, and test airflow to keep performance steady.
Can I Remove Paint Without Disturbing Existing Light Fixtures?
Yes — you can remove paint without disturbing light fixtures. You’ll use controlled paint stripping, turn off power, mask and secure fixtures, and apply gentle tools and barrier-based fixture protection so paint and debris won’t infiltrate or damage them.
How Long Before Repainting Can I Safely Use the Bathroom Again?
You can usually use the bathroom after 2–4 hours for brief visits, but wait 24–48 hours for full use. Guarantee good paint drying by running bathroom ventilation and fans to speed curing and reduce fumes.
