How to Spray Paint a House Exterior Like a Professional
You can spray-paint your house like a pro by planning, prepping, and using the right gear: inspect and repair surfaces, clean and treat mold, prime bare or patched areas, and mask windows and landscaping. Choose an appropriate sprayer and tip for your siding, test settings on scrap, use steady overlapping passes to keep wet edges, and flush gear after use. Follow recoat times, do a final inspection, and stick around to learn detailed techniques and troubleshooting.
Who Should Spray-Paint a House (DIY vs Pro)
If you’re comfortable with ladders, masking trim, and handling a spray gun, you can spray-paint your house yourself and save significant money; otherwise hire a pro to guarantee even coverage, proper prep, and safe handling of equipment and solvents.
You’ll weigh DIY Enthusiasts’ enthusiasm against Professional Painters’ expertise, assess Skill Assessment, Project Scope, Time Commitment, Equipment Access, Cost Considerations, and Safety Awareness.
Spray vs Brush & Roller: Finish, Speed, and Cost
Choosing between spray and brush-and-roller comes down to three practical trade-offs: finish quality, application speed, and total cost.
You’ll weigh spray paint advantages like smooth, fast coverage against brush roller drawbacks such as visible strokes and slower pace.
Use a finish quality comparison to match aesthetics, consider project time efficiency for scheduling, and review a concise cost analysis summary before deciding.
Is Your House a Good Spray Project? Key Criteria
Now that you’ve weighed finish, speed, and cost, let’s look at whether your house is a good candidate for spraying.
Check surface type, age, and repairs needed—smooth, continuous siding is ideal.
Assess exterior conditions: wind, temperature, humidity, and nearby landscaping.
Consider access, masking complexity, and neighborhood rules.
These factors determine spray paint suitability and whether spraying will save time without causing problems.
Choose Paint for Exterior Spraying (Types Explained)
Because the right paint determines durability, coverage, and finish, you should match product type to your siding, climate, and sprayer, not pick solely on color or price. Choose between acrylic, latex, and oil for paint durability options; use color selection tips; consider finish types overview and environmental considerations when buying.
| Type | Best for | Notes |
|---|---|---|
| Acrylic | Wood, stucco | Durable, flexible |
| Latex | Siding | Easy cleanup |
| Oil | Metal, trim | Smooth finish |
| Low-VOC | Sensitive areas | Eco-friendly |
Match Finish to Siding and Trim Materials
After you’ve picked the right paint type and color for your siding and climate, pick finishes that suit each surface and the look you want.
Match finish types to siding materials—matte for rough surfaces, satin for fiber cement, semi-gloss for metal.
Use higher-sheen trim materials to highlight edges.
Test small areas for color matching and durability before spraying the whole facade.
Choose a Spray System (Airless, HVLP, Conventional)
Choosing the right spray system—airless, HVLP, or conventional—will determine your paint speed, finish quality, and how much overspray you’ll deal with, so pick the one that fits your siding type, project size, and skill level. Compare spray system options and airless vs. hvlp tradeoffs below.
| System | Best for |
|---|---|
| Airless | Large exteriors |
| HVLP | Detail work |
| Conventional | Versatile |
Pick Sprayer Size and Motor Power for Your Job
Think about the scale of your project and pick a sprayer size that matches — a small handheld for touch-ups, a medium unit for trim and siding, or a large rig for whole-house jobs.
Check motor power and flow rate to guarantee consistent coverage and to avoid overworking the pump.
Matching size and power to the job will save time and produce smoother results.
Match Sprayer To Project
Match the sprayer’s capacity and motor to the size and scope of your exterior job so you don’t waste time or struggle with underpowered equipment.
Evaluate project scope—surface area, trim detail, and access—then pick sprayer types that match: handheld for small touch-ups, medium for siding, and larger cart or airless for whole-house work.
Balance tank size with maneuverability and refill frequency.
Choose Appropriate Motor Power
Because motor power determines spray consistency and how long you can work without strain, pick a sprayer whose horsepower and flow rate suit your house’s size and the paint’s viscosity. Consider motor power options and check spray system compatibility to match nozzle and hose. Balance portability with duty cycle so you won’t overheat or slow the job.
| Power (HP) | Use case |
|---|---|
| 0.5–1.0 | Small trims |
| 1.5–2.5 | Full siding |
Best Spray Tip Sizes for Siding, Trim, Soffits
Choosing the right spray tip makes the difference between a smooth, even coat and a blotchy finish, so pick sizes based on surface texture and paint viscosity:
Use larger tips (0.015–0.019″) for rough or lap siding and thick latex,
For rough or lap siding and thick latex, choose larger 0.015–0.019″ spray tips for better coverage.
medium tips (0.011–0.013″) for smooth siding and most exterior enamels,
and small tips (0.009–0.011″) for trim, soffits, and detailed work where control matters.
Use siding spray tips and trim spraying techniques to match tip size to paint, test on scrap, and adjust pressure for even coverage.
Essential Accessories: Hoses, Extensions, Guards
Once you’ve picked the right tip, make sure your gear can deliver paint consistently—starting with quality hoses, sturdy extension wands, and safety guards.
You’ll perform regular hose maintenance to avoid clogs and leaks, use extension benefits for reach and even spray patterns, and select appropriate guard types to control overspray.
Keep fittings tight and inspect seals before each job.
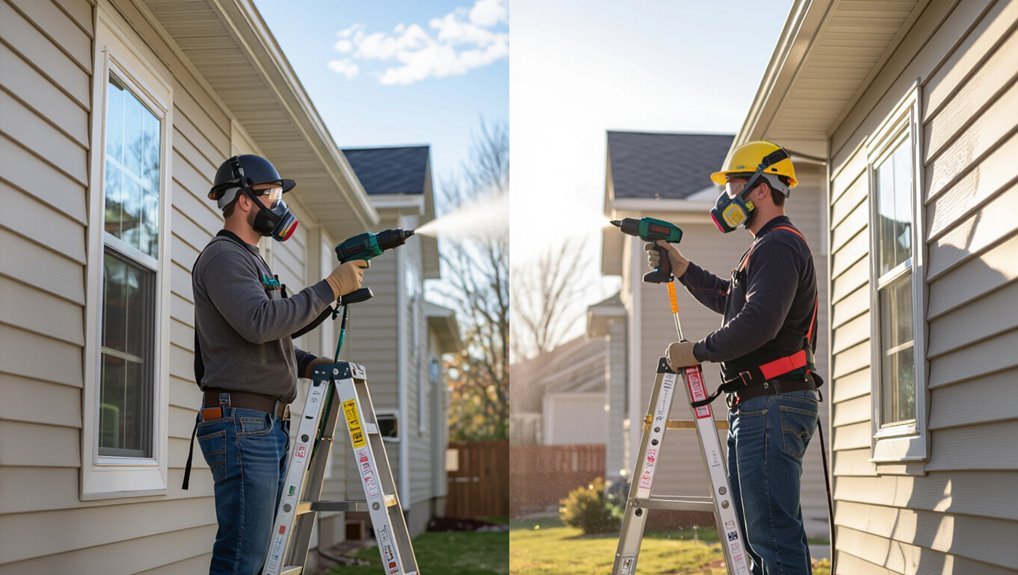
Safety Gear Checklist for Exterior Spray Painting
Before you start spraying, make sure you’ve got the right personal protective equipment—gloves, eye protection, and coveralls—to keep paint and solvents off your skin and out of your eyes.
You’ll also need proper respiratory protection, like a NIOSH-rated respirator with the correct cartridges for paint fumes and particulates.
We’ll cover how to choose, fit, and maintain PPE so you stay safe on the job.
Personal Protective Equipment
One essential step is equipping yourself with the right personal protective equipment so you can spray safely and avoid inhaling fumes, getting paint on your skin, or damaging your eyes and ears.
Wear goggles, chemical-resistant gloves, coveralls, and hearing protection.
Follow safety protocols for donning and disposal, inspect gear before use, and perform regular equipment maintenance to guarantee seals and straps stay effective.
Respiratory Protection Guidelines
Anyone working with spray equipment should prioritize respiratory protection to prevent inhaling paint mist, solvents, and particulates. You’ll assess respiratory hazards and choose proper protective equipment: fit-tested N95 or P100 respirators for low-VOC jobs, and supplied-air or cartridge respirators for heavy solvent use.
| Item | Use |
|---|---|
| N95/P100 | Low particulates |
| Cartridge | Solvents |
| Supplied-air | Heavy exposure |
| Inspect | Before each shift |
Weather and Seasonal Tips for Exterior Spraying
When you’re planning to spray your home’s exterior, check the forecast and pick a stretch of mild, dry days so paint can atomize and cure properly; avoid painting in direct sun, high humidity, strong winds, or when temperatures will fall below the paint manufacturer’s recommended range.
Consider weather conditions, seasonal timing, temperature considerations, humidity levels, wind effects, precipitation risks, ideal painting seasons, climate adaptability.
- Choose calm days
- Avoid high humidity
- Paint in recommended temp range
- Skip forecasted rain
Inspect Surfaces Before You Paint (What to Look For)
Now that you’ve picked the right weather window, inspect every surface before you spray to make sure the paint will stick and last.
Look for surface damage: rot, peeling, mildew, cracks, loose trim, and rust.
Check substrate type and previous coating to confirm paint compatibility.
Note repairs, clean areas, and replace damaged pieces so your finish bonds evenly and endures.
Test Paint Adhesion Quickly and Safely
Before you spray the whole wall, do a quick tape-and-peel test to see if old paint lifts away and to check adhesion.
Follow that with a solvent rub check in an inconspicuous spot to confirm the new coating won’t soften or smear.
If either test shows poor adhesion, strip or sand the area before proceeding.
Tape And Peel Test
Do a quick tape-and-peel test to confirm your primer or old paint will hold before you commit to spraying the whole surface.
You’ll use simple taping techniques for adhesion testing: press a quality tape, peel sharply, and inspect for flakes.
Repeat across problematic spots so you know where to sand or re-prime.
- Use high-tack tape
- Test multiple locations
- Mark failing areas
- Re-test after prep
Solvent Rub Check
If you want a quick, reliable way to confirm paint adhesion, perform a solvent rub check: dampen a clean cloth with denatured alcohol or a commercial solvent, rub a small test patch firmly for 20–30 seconds, then inspect for lift, smearing, or softening.
Use appropriate solvent types for your paint, follow a consistent rub technique, and record results before full application.
Repair Surfaces: Wood, Stucco, Brick, Metal
Tackle repairs on each material methodically so paint adheres and lasts: strip loose paint and rot from wood, patch cracks and re-point brick mortar, remove loose stucco and fill hairline gaps, and sand or de-rust metal before priming.
You’ll do wood preparation, stucco repair, brick sealing, and metal priming to create a sound substrate.
- Inspect for movement
- Remove contaminants
- Use compatible patching products
- Prime repaired areas
Remove Old Paint and Lead-Safe Practices
Now that repaired areas are sound and primed, address old paint removal and lead-safe practices before you spray.
Test for lead testing first; if positive, follow OSHA/EPA containment, use HEPA vacuums, wet methods, and hire certified contractors.
For non-lead surfaces, choose appropriate paint stripping—chemical, heat, or sanding with dust control—and dispose of debris per local regulations to protect workers and occupants.
Clean Siding for a Lasting Sprayed Finish
Before you spray, inspect the siding for mold and soft spots so you can treat any growth and repair damage.
Scrape or sand away loose paint, then degrease stubborn grime with a cleaner designed for exteriors.
Rinse thoroughly and let the surface dry completely to guarantee the new finish adheres and lasts.
Inspect For Mold
Mold often hides in shaded, damp areas of siding, so walk the perimeter of your house and look closely at eaves, window trim, and behind shrubs for dark spots or fuzzy growth.
Use simple inspection techniques for mold prevention and note locations, size, and texture. If you find growth, plan cleaning or professional treatment before painting.
- note location
- assess extent
- photograph evidence
- schedule treatment
Remove Loose Paint
After you’ve marked and treated any mold, address loose or peeling paint so your sprayer has a sound surface to work on. You’ll use paint scraping, sanding, and a stiff brush for solid surface preparation. Remove flakes, feather edges, and vacuum dust. Follow with primer on bare spots before spraying.
| Task | Tool |
|---|---|
| Scrape | Scraper |
| Sand | Sandpaper |
| Brush | Stiff brush |
| Vacuum | Shop vac |
Degrease And Rinse
Degrease and rinse the siding so paint will adhere properly and won’t trap dirt or oils that cause peeling.
You’ll focus on surface preparation using proven cleaning techniques: remove grease, mildew, and residues before painting.
Follow safe rinsing practices and let surfaces fully dry.
- Use a degreaser solution
- Apply soft bristle scrubbing
- Pressure-rinse cautiously
- Inspect for remaining contaminants
Sanding and Feathering Edges for Seamless Coverage
1 key step to professional-looking spray paint is sanding and feathering the edges so your finishes blend without ridges or visible changes.
You’ll use sanding techniques like progressive grit sanding to flatten high spots, then apply feathering methods—light, overlapping strokes—to taper shifts.
Work dry, inspect under light, and re-sand any raised edges. Clean dust before you paint for invisible joins.
When to Prime, Which Primer, and How to Spray It
You’ll prime whenever bare wood, patched areas, or stains show through, or when you’re switching from oil to latex.
Pick a primer matched to the substrate and finish—stain-blocking for tannin bleed, bonding primers for slick surfaces, and mildew-resistant formulas for humid climates.
When spraying, thin and tip the primer per manufacturer instructions and keep a steady, overlapping pass to guarantee even coverage.
When To Prime
Before you spray, decide whether the surface actually needs primer: bare wood, new siding, patched areas, heavy stains, or drastic color changes all require it, while well-adhered, uniform paint on smooth surfaces often doesn’t.
You’ll evaluate surface preparation, choose appropriate primer types later, and prime when adhesion, stain sealing, or uniform coverage are necessary.
- Bare wood
- Stained areas
- Patches
- Color shifts
Choosing The Right Primer
Several factors determine whether you need primer and which type to use, so assess the substrate, existing finish, and problem areas before mixing a single spray cup.
Choose primer types for wood, metal, or masonry and pick oil- or water-based based on adhesion and rust prevention.
For spraying, thin per manufacturer, use correct tip and pressure, and follow recommended application methods for even coverage.
Mask Windows, Doors, and Fixtures Correctly
When you mask windows, doors, and fixtures correctly, you’ll protect trim and glass from overspray and cut down cleanup time later.
Use precise masking techniques and tape application to create protective barriers, ensuring window sealing and door protection. Cover lights and hardware for proper fixture coverage.
Use precise masking and tape to protect windows, doors, lights, and hardware—seal edges firmly for spotless results.
- Choose low-tack tape
- Overlap plastic sheeting
- Seal edges firmly
- Remove tape warm
Protect Landscaping, Cars, and Neighbors
Masking doors and windows is only part of the prep—you also need to shield your yard, vehicles, and nearby homes from overspray and paint dust.
Lay drop cloths, secure plastic over shrubs and mulch for landscaping protection, and cover cars with fitted tarps.
Post a neighbor notification with timing and contact info, and ask neighbors to move fragile items indoors or park elsewhere during the job.
Containment Techniques to Control Overspray
Containment is your best tool for preventing overspray from drifting onto neighboring properties, landscaping, and vehicles—start by creating physical barriers like temporary walls, zippered drop curtains, or scaffold-mounted plastic sheeting to enclose the work area.
Use containment methods and active ventilation for overspray prevention, and follow these steps:
- Seal gaps with tape
- Hang plastic sheeting
- Use weighted bases
- Create airflow exits
Set Up Staging, Ladders, and Scaffolding Safely
Before you start spraying, check the ground and surroundings for levelness, soft spots, and overhead hazards so you can pick safe footing.
Make sure ladders are properly angled, tied off, and anchored to prevent slipping.
If you need scaffolding, set up a stable system with planks, guardrails, and load ratings that match your work.
Assess Ground And Surroundings
When you’re ready to set up staging, ladders, and scaffolding, take a few minutes to walk the site and check for soft ground, overhead hazards, and nearby obstructions that could compromise stability or access.
You’ll perform ground preparation and a surrounding assessment to position equipment on firm, level surfaces and clear work zones.
- Check soil firmness
- Note tree limbs/wires
- Clear debris and tools
- Mark uneven areas
Secure Ladders And Anchors
If you’re working at height, secure ladders and anchors firmly so every platform stays stable while you paint; proper setup prevents falls and makes the job faster.
Position ladders on level ground, tie off tops, and test ladder stability before climbing.
Use correct anchor placement for ropes or straps, follow load limits, maintain three-point contact, and recheck connections after moving.
Erect Stable Scaffolding System
Set up a stable scaffolding system so you can reach every exterior surface safely and work without risking falls or constant repositioning.
Choose sturdy platforms and level footings for stable support, inspect components, and follow scaffolding safety guidelines. Use guardrails, toe boards, and proper anchoring.
Don’t overload decks; move scaffolding rather than overextending ladders.
- Inspect before use
- Use guardrails
- Anchor securely
- Limit load
Plan Painting Sequence for Speed and Coverage
Because you’ll be working on large surfaces, plan a painting sequence that minimizes overlaps and keeps wet edges continuous so you can finish each section before the paint skins over. You’ll work top-to-bottom, side-to-side, matching wind, sun, and ideal weather. Keep sprayer maintenance handy. Coordinate team roles for speed and consistent coverage.
| Task | Order |
|---|---|
| Prep | 1 |
| High areas | 2 |
| Mid sections | 3 |
| Trim | 4 |
Starting and Stopping Without Lap Marks
When you begin spraying, start each pass with a smooth, steady rhythm and keep the nozzle moving until you finish the section so the paint lays down evenly and you avoid lap marks.
Use consistent spray techniques and overlap edges lightly while avoiding streaks. Pause only at natural breaks.
Use steady, consistent spray strokes; lightly overlap edges to feather seams and pause only at natural breaks.
- Wet edge maintenance
- Controlled starts/stops
- Feathering overlaps
- Clean, steady motion
Spraying Technique: Gun Distance, Speed, Overlap
Keeping a consistent gun distance, speed, and overlap is what makes a spray job look professional, so carry the same steady motion you used to avoid lap marks into how you handle the gun.
Hold the gun 8–12 inches away, move at an even pace, and overlap passes 50%.
Watch spray patterns and make minor nozzle adjustments between surfaces to maintain uniform coverage.
Adjust Pattern and Pressure for Even Coats
Start by dialing in your spray pattern and pressure so each pass lays down a smooth, even coat without runs or dry edges.
Begin by tuning spray pattern and pressure so each pass lays down a smooth, even coat without runs.
You’ll make spray pattern adjustments and tweak pressure settings as conditions change. Keep consistent motion and watch for overlap. Adjust slowly, test on scrap, and correct before continuing.
- Test on scrap material
- Watch overlap lines
- Adjust incrementally
- Recheck for runs
Spray Trim, Corners, and Tight Details Like a Pro
1 key to a professional-looking exterior is tackling trim, corners, and tight details with deliberate, controlled passes so you avoid overspray and buildup.
You’ll use a narrow spray technique, keep the gun moving parallel to edges, and feather starts and stops.
Mask where needed, work from top down, and focus on detail precision—short, overlapping strokes deliver clean lines without heavy buildup.
Handling Different Materials: Wood, Vinyl, Stucco, Brick
Because each exterior surface absorbs and holds paint differently, you’ll adjust prep, pressure, and technique for wood, vinyl, stucco, and brick to get an even, durable finish.
Because exterior surfaces absorb paint differently, tailor prep, pressure, and technique for each material for a durable finish.
Focus on surface-specific steps: wood preparation for sanding and priming, vinyl considerations to avoid high heat, stucco techniques for textured coverage, and brick application with masonry primers.
- Clean thoroughly
- Use correct tip/pressure
- Match primer to substrate
- Test small area
Blending and Feathering Between Coats
Once the surface-specific prep and priming are done, you’ll need to master blending and feathering to hide overlap lines and guarantee coats sit smoothly on varied textures. Use gentle spray passes, adjust distance, and practice blending techniques while feathering edges with light strokes so shifts vanish.
| Tool | Motion | Tip |
|---|---|---|
| Spray gun | Overlap | Speed |
| Brush | Feather | Angle |
| Roller | Blend | Pressure |
How Many Coats and Proper Recoat Timing
You’ll usually need two coats for good coverage, but some colors or porous surfaces may call for a third.
Wait the manufacturer’s recommended recoat window and check that the paint’s surface is dry to the touch before spraying again.
Factor in temperature, humidity, and sunlight, since those conditions can speed up or slow down drying and change your recoat timing.
Number Of Coats
Most exterior projects need two coats for durable, even coverage: a single coat rarely hides imperfections or withstands weather long-term.
You should plan the number of coats based on surface porosity and color change, aiming for ideal layering to build protection without runs. Apply thin, even passes and inspect between coats so you don’t overwork the finish.
- Porous wood needs more coats
- Dark over light may need extra
- Thin, even passes prevent runs
- Final inspection confirms coverage
Recoat Timing Guidelines
Now that you’ve planned the number of coats, timing between them becomes just as important to achieve a smooth, durable finish. You’ll follow recommended recoat intervals on the paint can, adjust for weather considerations, and test adhesion before the next coat. Keep conditions stable and avoid rushes.
| Coat | Typical Interval |
|---|---|
| Primer | 2–4 hours |
| Finish | 4–24 hours |
Drying Factors To Consider
Drying times depend on more than the paint can’s recommendations, so account for temperature, humidity, wind, surface porosity, and coat thickness when planning how many coats and when to recoat.
You’ll monitor drying time with attention to humidity levels, temperature effects, wind conditions, sunlight exposure, surface materials, paint thickness, and ideal ventilation to decide recoat timing and coat count.
- Check humidity levels
- Note temperature effects
- Avoid strong wind conditions
- Manage sunlight exposure
Fix Runs, Drips, and Orange Peel Without Stripping
One simple trick will save you from stripping the whole job: level the problem areas by sanding and blending, then feather in fresh paint only where needed.
For fixing imperfections like runs, drips, and orange peel, sand smooth, wipe clean, and apply thin, even coats.
Use proper painting techniques—light passes, correct tip, distance—and let each coat cure before evaluating.
Troubleshoot Blotches, Fisheye, and Sagging
When you see blotches, fisheye, or sagging, start by identifying the cause—contamination, improper primer, or incorrect product can all be culprits.
Make sure the surface prep is right: clean, sand, and prime as needed before you paint.
Then adjust your spray technique—pressure, distance, and overlap—to eliminate defects on the next pass.
Identify The Cause
If your spray-painted exterior shows blotches, fisheyes, or sagging, don’t assume it’s just bad luck—you can usually trace each defect to a specific cause.
Check paint preparation and surface conditions first. Inspect for contamination, wrong reducer or tip, high humidity, and overapplication.
Fix the root cause before recoating.
- contamination
- wrong equipment
- moisture
- heavy coats
Correct Surface Prep
Now that you’ve identified likely causes, correct surface prep will stop blotches, fisheyes, and sagging before they start.
Start with thorough surface cleaning to remove dirt, oils, and old paint. Allow full surface curing after repairs.
Apply appropriate surface priming to promote adhesion, then use surface sealing where needed for porous areas.
Inspect for contamination before you spray.
Adjust Spray Technique
Because spray technique directly controls how paint lays on the wall, tweak your gun settings and motion to eliminate blotches, fisheye, and sagging before they ruin a coat.
You’ll make precise spray technique adjustments: control overlap, maintain consistent distance, choose ideal spray patterns, and adjust pressure for viscosity.
Follow these steps:
- Keep 50% overlap
- Move at steady pace
- Test patterns on cardboard
- Adjust pressure incrementally
Clean Your Sprayer to Prevent Clogs and Damage
Flush your sprayer immediately after each use to stop paint from drying inside and causing clogs or component damage.
Rinse with the recommended solvent, run it until clear, and disassemble nozzles and filters for cleaning.
Inspect seals and passages, replacing worn parts.
Regular sprayer maintenance guarantees reliable performance and effective clog prevention, saves repair time, and keeps finish quality consistent on every job.
Maintain and Store Spray Equipment Between Seasons
Store your sprayer and accessories properly between seasons to prevent corrosion, sticking seals, and degraded performance. You’ll perform thorough equipment cleaning, drain fluids, lubricate moving parts, and label components for seasonal storage.
Follow spray equipment maintenance steps to guarantee tool longevity and quick startup.
- Flush and dry fully
- Replace worn seals
- Store indoors, climate-controlled
- Pack small parts separately
Cost Estimate Template for an Exterior Spray Job
You’ll want a clear cost estimate template that breaks the project into scope items like surfaces, square footage, and prep work.
List materials and labor separately so you can adjust quantities, rates, and subcontractor fees easily.
Don’t forget a contingency and overhead line to cover unexpected repairs and admin costs.
Project Scope Breakdown
A clear project scope breaks the exterior spray job into measurable tasks and costs so you know what’s included, what’s optional, and where contingencies sit.
You’ll define the project timeline, budget considerations, inspection checkpoints, and warranty terms so estimates stay accurate and expectations align.
- Prep and masking
- Surface repairs
- Paint application stages
- Cleanup and final review
Material And Labor
Materials and labor drive the bulk of your exterior spray estimate, so you’ll want a clear, line-item template that separates unit costs, quantities, and labor hours for each task.
List material considerations—paint type, primer, masking, solvents—and assign unit prices.
Calculate labor costs by task and hour, noting crew size and productivity rates, so you can total accurate per-area and project-wide pricing.
Contingency And Overhead
After you’ve itemized materials and labor, set aside contingency and overhead so your estimate won’t get upended by common job-site surprises or business costs.
You’ll include a contingency percentage for unexpected repairs and a fixed overhead to cover permits, insurance, and admin.
Good cost analysis guarantees realistic budget considerations and protects profit.
- Unexpected repairs
- Permit fees
- Insurance/admin
- Profit buffer
When to Call a Pro: Complexity, Cost, and Safety
If your home’s exterior has multiple stories, intricate trim, extensive repairs, or you’re uncomfortable with ladders and power sprayers, call a pro—these factors raise complexity, risk, and cost in ways DIY work often doesn’t cover.
Evaluate complexity factors, perform a cost analysis, and check safety regulations.
You’ll gain professional benefits: warranties, proper equipment, trained crews, and reduced liability.
Time-Saving Tips to Finish Faster With Quality
When you plan tasks in logical stages—prep, priming, spraying, and touch-ups—you’ll work faster and keep quality high; grouping similar jobs, prepping while coatings dry, and using the right tools for each step cuts wasted time and rework.
Use time management and efficient techniques:
- Stage tasks by area
- Keep supplies organized
- Use extension poles and quality tips
- Schedule ideal weather windows
Eco-Friendly Choices: Low-VOC Paint and Disposal
Saving time on prep and spraying also gives you room to make smarter, greener choices without slowing the job down.
Choose low-VOC paints and water-based primers to reduce fumes and exposure.
Use eco-friendly options for brushes, drop cloths, and sealable containers.
Dispose of leftovers at hazardous-waste facilities and recycle empty cans.
These sustainable practices protect your family, neighbors, and the environment.
Warranty, Touch-Up Planning, and Record-Keeping
Check your paint and contractor warranties so you know what’s covered and for how long.
Keep a simple touch-up plan that lists paint codes, batch numbers, and the areas you’ll likely need to recoat.
Store photos and receipts in one place so you can prove coverage and match colors later.
Warranty Coverage Details
A clear warranty gives you peace of mind and a roadmap for dealing with defects or premature failure, so read it closely before the crew finishes the last coat.
Check warranty types and coverage duration, exclusions, and required maintenance.
Keep records and photos to support claims. Know who handles touch-ups and response times.
- coverage limits
- claim process
- maintenance duties
- contact info
Touch-Up Documentation Plan
Why keep detailed touch-up records? You’ll protect warranties and speed repairs by logging touch up techniques, paint batches, dates, and conditions.
Use clear documentation methods: photos, labeled swatches, short notes, and cloud backups.
Share records with contractors and homeowners for consistent future work. A concise plan guarantees accountability, accurate materials matching, and faster, warranty-compliant touch-ups.
Final Inspection Checklist: Before-and-After Quality
Before you call the job done, walk the perimeter and inspect every wall, trim, and seam for consistent coverage, even sheen, and clean edges where masking was removed.
Use a concise final touches checklist for quality assurance: perform a paint inspection, surface evaluation, touch up runs, and note defects for documentation.
- Check coverage uniformity
- Verify edge cleanliness
- Confirm sheen consistency
- Record touch-up actions
Frequently Asked Questions
Can I Spray Paint Over Existing Lead-Based Exterior Paint Safely?
You can, but you shouldn’t unless you follow strict safety precautions: test for lead paint, consider professional paint removal, use proper containment and PPE, and guarantee thorough surface preparation before repainting to prevent lead dust exposure.
How Do I Estimate Paint Quantity for Multi-Story or Complex Roofs?
Like mapping a maze, you’ll measure each plane and valley, calculate square footage, account for paint coverage per gallon, add 10–20% for waste, factor roof preparation time and steepness, then round up to full gallons.
Can I Spray When Humidity Is High but Temperature Is Ideal?
You can, but humidity effects matter: high humidity slows drying, causes blistering and poor adhesion even if temperature’s ideal. You’ll want to wait for lower humidity or use fast-dry coatings, dehumidifiers, or longer cure times.
What Permissions or Permits Do I Need for Exterior Spray Painting?
Think of traversing a maze: you’ll need permits from your local zoning office, check neighborhood covenants, and follow local regulations and safety guidelines; you’ll also get required waste/disposal approvals and follow any contractor licensing rules.
How Do I Match Repaired Areas’ Gloss After Years of Weathering?
You’ll assess gloss finishes, scuff and clean weathered surfaces, then test small patches with matched sheen and aging techniques; feather edges, thin translucent glazes, and blend multiple coats until the repaired area visually matches surrounding weathered surfaces.
Conclusion
You’ll save time and often money by spraying, but only if you plan carefully and pick the right paint. Did you know pros can cover up to 1,500 square feet a day with a sprayer—about three times faster than rolling? With that speed comes responsibility: prep thoroughly, protect landscaping, keep records for touch-ups and warranty claims, and choose low-VOC options. Follow the checklist, and your exterior will look professional and last longer.