What Is Hammered Finish Paint? Uses and Benefits Explained
Hammered finish paint gives you a dimpled, metallic-looking coat that hides scratches, brush marks, and surface flaws while adding corrosion resistance and vintage character. You can use it on metal, wood, plastic, and outdoor fixtures with minimal prep, though sanding and priming help on rusty or bare surfaces. It comes oil- and acrylic-based, plus spray options for even texture, and requires one to three coats for depth and durability—keep going and you’ll find tips on application, care, and troubleshooting.
What Hammered Finish Paint Is
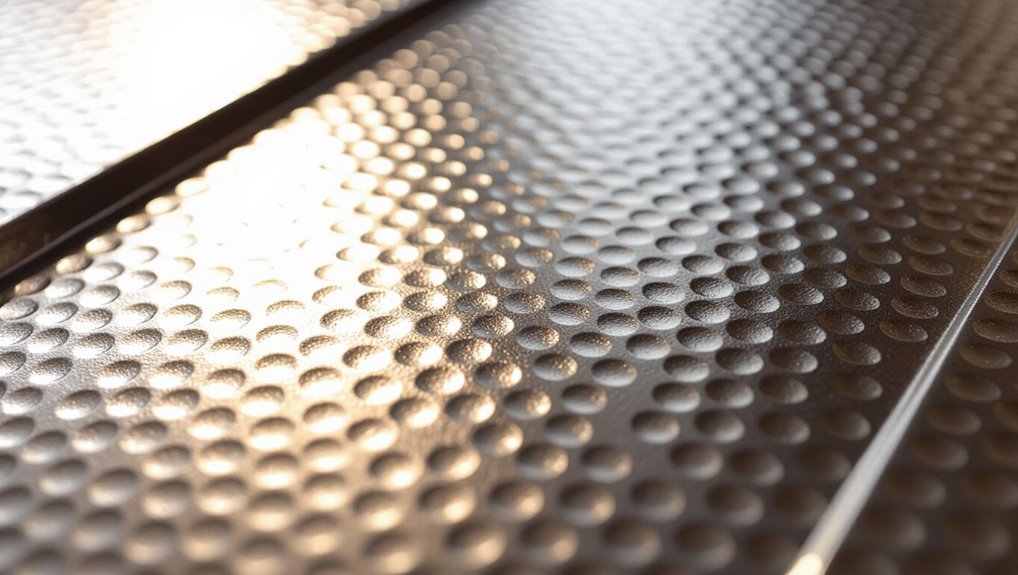
Hammered finish paint gives surfaces a textured, dimpled look that disguises imperfections and hides brush strokes.
You’ll find it’s a durable coating that combines metallic pigments with a bonding formula, producing hammered aesthetics suited for metal, wood, and décor.
You’ll appreciate its corrosion resistance, quick coverage, and ability to create unique finishes without elaborate prep or complex application techniques.
How Hammered Finish Paint Creates Texture
You’ve seen how hammered finish paint masks flaws and adds metallic sparkle; now let’s look at how it actually builds that textured effect.
You’ll notice tiny particles and pigments clump during drying, creating irregular dimples and subtle ridges that catch light.
This texture contrast enhances depth and boosts design versatility, letting you create vintage or industrial looks without heavy surface prep.
Hammered Paint Types: Oil, Acrylic, Spray
Choice matters when you pick a hammered finish—oil, acrylic, and spray formulas each behave differently and suit different projects.
You’ll weigh oil based options vs acrylic finishes, consider spray applications, and match surface compatibility.
- oil based options: robust durability factors
- acrylic finishes: quicker drying
- spray applications: even texture effects
- color variations: easy layering
- application techniques: prep matters
When to Pick Hammered vs Metallic Paint
When you want texture that hides flaws and adds visual depth, pick hammered paint; when you need a reflective, metal-like sheen or a truly metallic color shift, go with metallic paint.
Choose hammered for durability, easy touch-ups, and hammered advantages on imperfect surfaces.
Choose metallic for sleek, high-gloss metallic aesthetics on focal pieces.
Consider light, wear, and desired mood when deciding.
Best Surfaces for Hammered Finish Paint
Because hammered finish paint masks imperfections and resists wear, it works best on metal, wood, and textured surfaces where flaws or heavy use are likely.
You’ll appreciate its surface compatibility and straightforward application techniques for durable, attractive results.
- Metal furniture
- Outdoor railings
- Wooden cabinets
- Textured masonry
- DIY metal accents
Preparing Metal, Wood, and Plastic Surfaces
Now that you know which surfaces benefit most from a hammered finish, get the prep right to guarantee the coating sticks and looks its best. You’ll follow metal preparation, wood priming, and plastic cleaning steps: sand for surface smoothing, degrease, and use adhesion promotion products. Finish testing small areas confirms compatibility.
| Material | Key Step | Check |
|---|---|---|
| Metal | Sand, prime | Rust-free |
| Wood | Prime, sand | Smooth |
| Plastic | Clean, scuff | Test adhesion |
Applying Hammered Paint: Brush, Roller, Spray
Whether you’re touching up a small accent or covering a full piece, choosing the right application method—brush, roller, or spray—determines texture, coverage, and drying time.
You’ll follow surface preparation to guarantee paint adhesion and avoid application mistakes. Tools needed and finish comparisons guide texture variations.
Prepare surfaces well to ensure paint adhesion and prevent application errors; choose tools and finishes to shape texture.
- brush techniques
- roller application
- spray tips
- drying methods
- paint adhesion
Drying and Curing Times
When you apply hammered finish paint, understand that “drying” and “curing” are different stages: drying means the solvent evaporates and the surface feels dry to the touch, while curing means the paint fully hardens and reaches its maximum durability.
Use proper drying techniques—temperature, ventilation, thin coats—and monitor curing conditions like humidity and temperature.
Allow full cure time before heavy use to avoid damage.
How Many Coats You Really Need
After your hammer finish feels dry and has had time to cure, decide how many coats you’ll need based on coverage, the look you want, and the manufacturer’s guidance.
You’ll balance coat thickness and application technique to get the desired texture. Consider:
- One thin coat for light texture
- Two coats for standard coverage
- Three for depth and durability
- Spot touch-ups as needed
- Sand between coats for adhesion
Color Selection and Pigment Effects
Though you might pick a color for its look alone, consider how pigment type and concentration will change the hammer finish’s depth and sheen.
You’ll want to think about color psychology to set mood—cool tones calm, warm tones energize.
Pigment interaction affects metallic flake visibility and texture contrast, so test samples under real light before committing to a full project.
Hammered Paint for Furniture Makeovers
When you’re prepping furniture for a hammered finish, you’ll sand away old finishes and clean the surface so the paint grips properly.
Use finer sanding between coats to keep the texture even without rough patches.
The result gives worn pieces a controlled, vintage textured look that hides imperfections while adding character.
Prep And Sanding
Start by clearing and cleaning the piece so the hammered finish will adhere properly — wipe away dust, grease, and old wax with a solvent or mild degreaser, then rinse and let dry.
Use proper sanding techniques and surface preparation to guarantee adhesion and smoothness.
- Assess damage
- Choose grit sequence
- Sand with the grain
- Remove dust thoroughly
- Apply primer where needed
Vintage Textured Look
Because hammered paint naturally mimics aged metal and worn surfaces, you can give a piece instant vintage character without complex distressing techniques.
Use muted tones and light sanding to reveal underlying layers, then apply hammered finish for texture.
You’ll achieve vintage aesthetics and subtle retro charm on dressers, tables, or lamps, creating durable, low-maintenance surfaces that read authentically aged.
Hammered Paint for Outdoor Fixtures and Garden Décor
Though outdoor metal and wood take a beating from sun and rain, hammered paint gives your fixtures and garden décor a durable, low-maintenance finish that masks imperfections and resists wear.
You’ll enjoy outdoor aesthetics, garden protection, decorative accents, weather resistance, color variations, surface compatibility, design versatility, and texture appeal:
- Enhances planters and trellises
- Shields metal from rust
- Hides surface flaws
- Offers varied hues
- Suits wood and wrought iron
Hammered Paint on Appliances and Hardware
Hammered paint gives your appliances and hardware a tough, attractive finish that hides scratches and fingerprints while cutting down on visible wear.
You’ll boost appliance aesthetics with textured sheen, matching modern or vintage styles.
Apply to knobs, handles, fridge panels, or small appliances for consistent look and added hardware protection against daily handling.
It’s an easy upgrade that masks imperfect surfaces and refreshes appliances.
Durability and Chip Resistance
When you choose hammered finish paint, you’ll want to know how it stands up to impacts and scratches in everyday use.
Consider how formulation and thickness affect chip resistance so you can prevent flaking over time. That way you’ll preserve the long-term surface integrity of appliances and hardware.
Impact And Scratch Resistance
Durability matters most when your finish faces everyday knocks and scrapes, so you want a hammered finish that resists impact and minimizes chipping.
You’ll focus on impact resistance and scratch resistance to boost surface durability and preserve aesthetic appeal. Use proper application techniques and follow maintenance considerations to keep results strong.
- Choose high-toughness formula
- Prep surface thoroughly
- Apply recommended coats
- Allow full cure time
- Inspect and touch-up chips
Long-Term Surface Integrity
Long-term surface integrity depends on how well the finish resists chips, cracks, and wear over years of use.
So you’ll want a system that combines a tough formulation, correct substrate prep, and proper curing to keep the hammered look intact.
Choose a durable protective coating, guarantee adhesion with cleaning and priming, and maintain finishes to maximize surface longevity and minimize chipping or corrosion.
Maintenance and Touch-Up Tips
Because hammered finishes hide minor imperfections, you don’t need to touch them up as often, but timely care still matters to keep the texture and color consistent.
Use proper touch up techniques and follow maintenance schedules to prevent buildup and fading.
- Clean gently with mild detergent
- Inspect yearly for chips
- Sand and blend edges before repainting
- Match finish sheen
- Store extra paint for fast repairs
Troubleshooting Runs, Uneven Texture, Flaking
If you spot runs, uneven texture, or flaking on a hammered finish, act quickly to diagnose the cause—improper application, contamination, or substrate issues are usually to blame—and you can often fix the problem without stripping the entire surface.
Sand affected areas, clean thoroughly, and feather edges. Reapply with proper thinning and technique to guarantee run prevention, texture consistency, and address flaking causes from uneven application.
Safety, Ventilation, and Cleanup Best Practices
When you’re working with hammered finish paint, protect yourself and your space by wearing proper PPE—respirator, gloves, and eye protection—and by ensuring good airflow so fumes don’t build up.
Follow safety precautions, ventilation tips, cleanup methods, and health considerations below:
- Open windows and use fans
- Use NIOSH-rated respirator
- Wear chemical-resistant gloves
- Contain and wipe spills promptly
- Dispose of rags safely
Comparing Brands, Performance, and Price Points
Choosing the right hammered finish paint means balancing appearance, durability, and cost—so you’ll want to compare brands on coverage, adhesion, corrosion resistance, and how true the hammered effect looks after drying.
Check brand reputation and user reviews for real-world results, review performance metrics like cure time and abrasion resistance, and do a price comparison to guarantee you get the best value without sacrificing quality.
Frequently Asked Questions
Can Hammered Finish Hide Surface Imperfections Like Deep Dents or Gouges?
No, it won’t hide deep dents or gouges; you’re relying on surface texture and aesthetic appeal to disguise minor flaws, but you’ll need filler or bodywork to fix significant damage before painting for a smooth result.
Will Hammered Paint Affect Electrical Conductivity or Grounding of Metal Surfaces?
No, hammered paint won’t noticeably affect electrical conductivity if you need grounding; you’ll guarantee electrical safety by removing paint at grounding points. You’ll still follow proper surface preparation to assure reliable metal-to-metal contact and secure bonds.
Can Hammered Finish Be Used on Heat-Exposed Surfaces Like Grills or Stove Parts?
About 70% of consumer heat paints fail outdoors; you shouldn’t rely on hammered finish for grills or stove parts because it typically lacks high-temperature durability—choose purpose-made coatings for grill protection and proven heat resistance instead.
Are There Eco-Friendly or Low-Voc Hammered Paint Options Certified Green?
Yes — you can find eco-friendly, low-VOC hammered paints certified green. You’ll enjoy sustainability benefits like reduced emissions; follow proper application techniques (thin coats, ventilation, recommended primer) to guarantee durable, compliant, attractive finishes.
How Does Hammered Paint Perform Under Industrial Chemical Exposure?
Hammered paint resists mild solvents but won’t withstand strong acids or prolonged industrial chemical exposure; it offers moderate chemical resistance, suits light-duty industrial applications, protects surfaces cosmetically, and requires tougher coatings for harsh environments.
Conclusion
You’ve seen how hammered finish paint can turn plain surfaces into something ruggedly elegant, like a familiar old tool that keeps on working. When you choose the right type, prep carefully, and follow simple touch-up steps, you’ll get lasting texture and charm that resists wear. Take safety and ventilation seriously, and compare brands so your project feels like craftsmanship, not guesswork — a small transformation that quietly tells a durable story.