Why Is My Basement So Humid? Causes and Fixes
Your basement’s humidity usually comes from water intrusion, poor drainage, plumbing leaks, or warm indoor air hitting cold surfaces, and it can also spike from damp soil, clogged gutters, or inadequate insulation. Start by fixing leaks, regrading soil, extending downspouts, sealing cracks, and running a dehumidifier or timed exhaust fan. Monitor with a hygrometer and aim for 30–50% RH to prevent mold. Keep going for practical steps and cost-conscious fixes you can implement next.
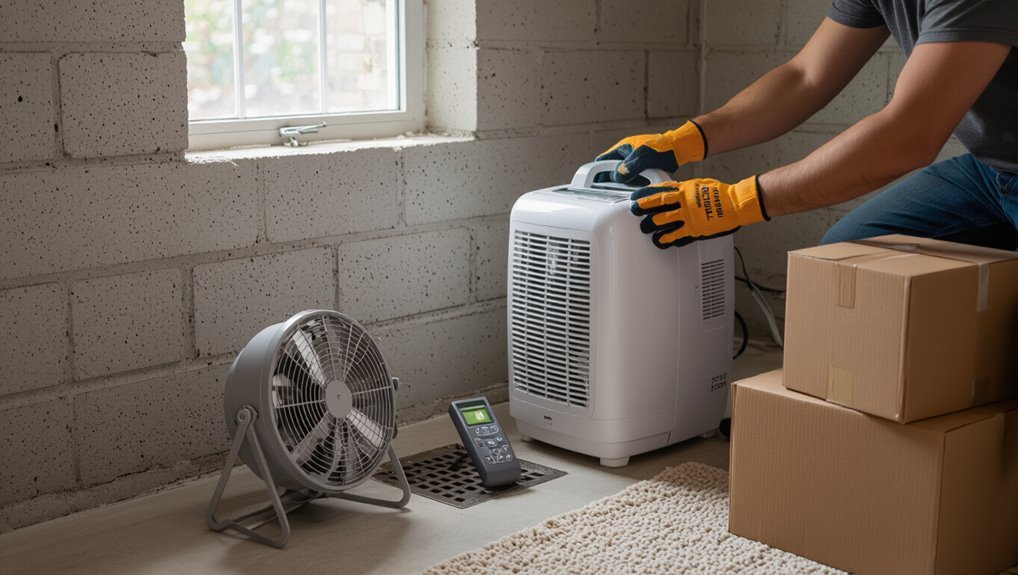
Quick Fix: What to Do First for a Humid Basement
Wondering where to start when your basement feels like a sauna? You’ll first assess sources: fix leaks, clear gutters, slope soil away from foundation.
Try portable dehumidifier options or a whole-basement unit, and run fans.
Use a portable dehumidifier or a dedicated whole‑basement unit—and keep air moving with fans for best results.
Improve ventilation strategies by opening vents, installing vents or an inline fan, and sealing cracks.
Monitor humidity and adjust equipment for steady 45–55% RH.
How to Tell Humidity From Visible Water Damage
Check walls and floors for stains or discoloration that suggest past or ongoing leaks rather than just high humidity.
Look for peeling paint or plaster and note whether mold is in isolated patches (likely water intrusion) or as a fine, widespread film from condensation.
Those signs will help you tell visible water damage apart from general dampness.
Visible Stains And Discoloration
How can you tell if those brownish patches on your basement walls are from humidity or from actual water damage?
Check texture—mildew stays powdery, water leaves crusty deposits.
Smell for mustiness and watch for recurring spots after drying.
For stain removal and discoloration prevention, clean with a mildew solution, fix ventilation, and monitor to see if marks reappear, which signals active leaks.
Peeling Paint Or Plaster
If those brown stains came back after drying, you’ll want to inspect nearby paint and plaster next — they often tell a clearer story. Check for peeling plaster vs. continuous paint deterioration: peeling plaster flakes in patches from repeated wetting; paint deterioration peels in sheets from trapped moisture. Note location, texture, and timing to decide if humidity or hidden leaks cause damage.
| Location | Texture | Timing |
|---|---|---|
| Corner | Flaky | After storms |
| Wall center | Sheet-like | Seasonal |
| Near floor | Crumbly | Continuous |
| Around pipe | Bubbling | Intermittent |
| Ceiling | Powdery | After dry-outs |
Mold Growth Versus Condensation
Wondering whether those fuzzy black spots are mold or just condensation?
Check texture and smell: mold is fuzzy, musty, and won’t wipe away easily; condensation leaves wet streaks and evaporates.
Use mold prevention like dehumidifiers, ventilation, and cleaning with fungicide.
For condensation solutions, insulate cold surfaces, improve airflow, and seal leaks to stop recurring visible water damage and growth.
Early Signs of Basement Humidity (Before Mold)
Because basement humidity usually builds slowly, you’ll often notice subtle clues before mold appears: musty odors that aren’t yet overpowering, damp spots on walls or carpet, condensation on pipes or windows, and a chilly, clammy feeling when you go downstairs.
- Visible damp patches
- Persistent musty scent
- Condensation on surfaces
- Warped wood or peeling paint
Watch humidity indicators and trace moisture sources to act early.
Measuring Humidity: Hygrometers and Safe Levels
You should use a reliable hygrometer to get accurate readings of your basement’s moisture levels, so pick one with digital readout and ±2–3% accuracy.
Aim to keep the relative humidity between 30% and 50% to prevent mold and protect belongings.
Check readings in different spots and times to spot patterns and decide if dehumidifying is needed.
Choosing A Hygrometer
How do you pick the right hygrometer for your basement? Consider hygrometer types, digital versus analog, accuracy, and features.
- Accuracy: choose ±2–3% where possible.
- Display: digital shows numbers; analog gives dial reading.
- Placement: keep away from walls and vents.
- Calibration: pick a model you can recalibrate or replace easily.
Ideal Basement Humidity
Want to know the ideal humidity for your basement? Aim for 45–55% relative humidity to prevent mold, musty odors, and structural damage.
Use a reliable hygrometer to monitor daily and record trends. If levels rise, act with dehumidifiers, improved ventilation, or sealing foundations.
Consistent monitoring supports effective basement moisture management and helps you maintain a healthy, dry space.
Poor Ventilation and Trapped Air in Basements
Because basement spaces are often sealed tight against drafts, stale, moist air can get trapped and keep humidity levels high.
Because basements are often tightly sealed, stale, moist air can become trapped, raising humidity levels.
You’ll want to improve air circulation and address humidity sources. Consider these ventilation strategies and moisture barriers:
- Install exhaust fans.
- Add passive vents.
- Use a dehumidifier.
- Seal foundation cracks and vapor barriers.
Condensation on Cold Walls and Windows
Notice water beading on your basement windows or damp patches on cold walls?
You’re seeing condensation caused by warm, humid indoor air meeting cool surfaces.
Condensation causes include inadequate insulation and poor airflow.
For fast condensation solutions, increase ventilation, add dehumidification, and insulate or thermal-break cold walls and window frames.
Wipe surfaces dry promptly to prevent mold growth and monitor humidity levels.
Exterior Water Entry: Cracks, Grading, and Leaks
Condensation often points to indoor humidity problems, but moisture can also come from outside through foundation cracks, poor grading, and roof or gutter leaks.
You should act fast: get a foundation inspection and improve drainage solutions.
- Seal visible cracks
- Regrade soil away from foundation
- Repair gutters and downspouts
- Install exterior drains or extensions
Rising Groundwater and Hydrostatic Pressure
When groundwater rises after heavy rain or a high water table, it creates hydrostatic pressure that pushes moisture and even water through foundation walls and floor joints.
You’ll notice damp spots, efflorescence, or actual seepage where that pressure finds weak points.
Understanding how hydrostatic pressure works helps you target fixes like drainage, sump pumps, or exterior waterproofing.
Hydrostatic Pressure Basics
Because groundwater pushes upward against anything in its path, hydrostatic pressure can turn a dry basement into a damp one without any visible leaks. You’ll feel it when the water table rises and pushes moisture through walls and floor joints.
Key points:
- Pressure increases with higher water table.
- Forces seepage through weak points.
- Raises vapor transmission.
- Needs exterior drainage fixes.
Basement Water Seepage
In heavy rains or after a rapid thaw, rising groundwater and the hydrostatic pressure it creates can force water through basement walls, floors, and joints even if you don’t see a distinct crack.
You should inspect for damp spots, efflorescence, or musty odors and address sources with waterproofing techniques and drainage solutions—exterior grading, French drains, interior sump pumps, and sealed wall coatings to control seepage.
Roof and Gutter Problems That Increase Basement Moisture
If your roof or gutters aren’t directing water away from your house, that runoff can seep into the foundation and raise basement humidity.
You should prioritize gutter maintenance and regular roof inspections to prevent overflow and ice dams.
Check and fix issues promptly:
- Clear debris
- Repair leaks
- Extend downspouts
- Replace damaged shingles
Plumbing Leaks and Hidden Pipe Condensation
When water quietly escapes from a hidden pipe or condensates on cold plumbing, you’ll notice basement humidity spike even without obvious puddles.
Check for damp spots, musty odors, and peeling paint. Use leak detection tools and inspect joints, fittings, and crawlspaces.
Add pipe insulation to cold lines, repair leaks promptly, and consider a moisture meter to monitor improvements.
Appliances That Add Moisture: Dryers, Water Heaters, and Sump Pumps
You’ll want to check appliances that can pump humid air into your basement, especially a dryer with blocked or improperly routed venting that dumps moist air inside.
A water heater can add some humidity, but a sump pump with poor discharge or a discharge line that backflows can introduce water and raise dampness more directly.
Fixing vent paths and ensuring proper sump discharge routes usually cuts appliance-related moisture quickly.
Dryer Venting Issues
Because dryers expel warm, moist air, a clogged or improperly routed vent can quickly raise basement humidity and leave you wondering why the room feels damp.
Check ventilation systems and prioritize dryer maintenance to avoid moisture buildup.
- Inspect vent path.
- Clean lint trap and duct.
- Confirm exterior hood opens.
- Use rigid, short venting.
Sump Pump Discharge
While fixing dryer vents cuts a common source of basement moisture, other household systems can add water you mightn’t spot—sump pump discharge is a frequent culprit.
Check that discharge pipes lead away from your foundation and aren’t pooling. During sump pump installation, route water downhill and use extensions.
Regular sump pump maintenance prevents leaks and backups, keeping your basement drier and mold-free.
Crawlspaces and Wet Soil That Affect Basements
If your basement sits over a damp crawlspace or is surrounded by wet soil, moisture will keep migrating upward through the foundation and into your living space, raising humidity and encouraging mold growth.
You should act:
- Schedule crawlspace inspections to find leaks and rot.
- Improve soil drainage away from the foundation.
- Install proper vapor barriers.
- Add ventilation or a dehumidifier to control humidity.
Poor Insulation, Thermal Bridging, and Cold Spots
If you have gaps or seams in your insulation, warm moist air can sneak into cold areas and condense.
Cold bridging at joists and other structural members creates chilly spots where moisture will collect first.
Fixing those gaps and insulating thermal bridges stops the localized condensation that drives basement humidity.
Insulation Gaps And Seams
Because insulation that’s poorly fitted or missing creates cold spots, you’ll get thermal bridging where warm, moist air meets colder surfaces and condenses, raising basement humidity.
You should seal gaps and seams in insulation materials to stop moisture and heat loss.
Fixes:
- Tape seams tightly
- Add foam sealant
- Replace torn batts
- Insulate exposed rim joists
Cold Bridging At Joists
Those same gaps and poorly fitted insulation around your walls often show up again where floor joists meet the foundation, creating cold bridges that pull heat out of the joist area and let moisture condense on those colder surfaces.
You should seal gaps, add continuous joist insulation, and use vapor retarders as cold bridging solutions to stop condensation and reduce basement humidity.
Simple DIY Fixes to Reduce Basement Humidity Today
When you want to cut basement humidity quickly, start with a few simple DIY steps you can do today: improve ventilation by opening windows and running fans, seal obvious cracks and gaps in walls or around pipes, and set up a portable dehumidifier or moisture-absorbing desiccants in problem areas.
- Check dehumidifier maintenance.
- Use desiccant packs.
- Seal rim joists with foam.
- Add insulation upgrades.
Ventilation Solutions: Fans, Vents, and Controlled Airflow
Wondering how airflow can actually cut basement humidity? You can use different ventilation types—exhaust fans, passive vents, and inline fans—to expel damp air and bring fresh air in.
Position vents to promote cross-ventilation, seal gaps that bypass planned paths, and use timed or humidity-controlled fans for airflow management.
Regularly inspect and clear vents to keep the system effective.
Basement Dehumidifiers: Types and How to Choose One
A good dehumidifier can cut basement humidity quickly and prevent mold, musty odors, and structural damage, so you’ll want to match the unit to your space and needs.
Choose by dehumidifier types and dehumidifier capacity:
Choose by dehumidifier type and capacity to match your basement’s temperature, size, and moisture control needs.
- Refrigerant — best for moderate temps.
- Desiccant — works in cold basements.
- Whole-house — ties into HVAC.
- Portable — flexible, budget-friendly.
Sealing and Interior Waterproofing for Walls and Floors
Sealing and interior waterproofing stop groundwater and indoor moisture from making your basement damp, musty, and mold-prone.
You should apply waterproof membranes to walls and floors and choose sealant types suited to concrete, masonry, or block.
Use hydraulic cement for active leaks, epoxy or polyurethane for cracks, and vapor-barrier coatings for long-term protection.
Regular inspections keep systems effective and prevent mold.
Exterior Drainage Fixes: Grading, Gutters, and French Drains
Because most basement moisture starts outside, fixing exterior drainage is one of the smartest first steps you can take.
You’ll want practical drainage solutions and grading techniques to channel water, plus gutter maintenance to prevent overflow.
Consider french drain installation, landscaping adjustments, and waterproof coatings where walls meet soil.
- Regrade soil
- Clean gutters
- Add French drain
- Use coatings
Sump Pump Selection, Basins, and Installation Tips
1 clear, properly chosen sump pump can keep your basement dry during heavy storms, so pick one that matches your risk level and power reliability.
Consider sump pump types (submersible vs. pedestal), battery backup, and basin size for expected inflow.
Follow installation guidelines: level basin, proper discharge piping with check valve, sealed lid, and GFCI power.
Test monthly and secure outlet access.
When to Call a Pro: Structural, Plumbing, or Persistent Leaks
A reliable sump pump and proper installation handle many water problems, but some issues demand a professional’s eye—especially when you spot structural damage, persistent leaks, or complicated plumbing failures.
- You should call when structural integrity is compromised: cracks, bowing walls, or settling.
- Persistent leaks that recur after DIY fixes need pros.
- Schedule plumbing inspections for hidden or complex pipe issues.
- Hire a contractor if mold or safety risks appear.
Cost Ranges and ROI for Common Basement Fixes
Numbers matter when you’re weighing basement repairs: you’ll want clear cost ranges so you can prioritize fixes that protect your home and offer the best return on investment. Use cost estimation and return analysis to compare options quickly.
| Fix | Typical Range |
|---|---|
| Dehumidifier | $200–$1,200 |
| Sump pump | $300–$1,500 |
| Waterproofing | $1,000–$10,000 |
| Drainage | $500–$4,000 |
Preventive Maintenance Checklist to Keep Humidity Low
Start by sealing any foundation cracks you spot to keep groundwater and humid air from seeping in.
You should also maintain proper drainage—clean gutters, extend downspouts, and slope soil away from the foundation.
Tackling these basics regularly will prevent most humidity problems before they start.
Seal Foundation Cracks
Inspect your foundation for cracks and you’ll stop a major route for moist soil vapor and groundwater to enter your basement.
You should address small gaps quickly with DIY crack sealing or call pros for foundation repair on larger faults.
Steps:
- Clean cracks.
- Inject sealant.
- Monitor for movement.
- Re-seal as needed.
Maintain Proper Drainage
Fixing foundation cracks helps keep water out, but you also need to manage how water moves around your home to prevent basement humidity.
Check gutters, extend downspouts away from the foundation, and slope soil to direct runoff.
Maintain and inspect drainage systems regularly, install or repair interior/exterior drains, and add moisture barriers where needed.
These steps prevent seepage and reduce basement dampness.
Common Mistakes to Avoid When Fixing Basement Humidity
While it’s tempting to tackle basement humidity with quick DIY fixes, you’ll often make the problem worse by skipping diagnosis or using the wrong tools. Common mistakes—like over-relying on portable dehumidifiers, sealing vents without addressing sources of moisture, or blocking drainage—can cost time and money and let mold take hold.
- Ignore humidity misconceptions
- Believe ventilation myths
- Block drainage paths
- Oversize/simple fixes
Quick Resources: Checklist, Local Pros, and Next Steps
Before you start buying equipment or calling someone, gather a short checklist so you know what to look for, which pros to call, and what the next steps will be.
Before buying gear or ringing a pro, make a short checklist so you know what to look for and do next
List checklist items: moisture sources, dehumidifier size, insulation gaps, and drain status.
Research local experts for sump, waterproofing, or HVAC work.
Prioritize tasks, schedule inspections, and follow clear next steps to fix humidity.
Frequently Asked Questions
Can a Dehumidifier Cause Respiratory Issues or Health Problems?
Yes — if you neglect dehumidifier maintenance, you’ll risk mold, bacteria, or dirty filters that can worsen respiratory health. Clean and service the unit regularly, use proper humidity settings, and replace filters to protect breathing.
How Does Basement Humidity Affect Home Insurance or Claims?
You risk denied humidity claims if you neglect maintenance; insurers often limit insurance coverage for gradual moisture damage. Check policy details, document conditions, fix issues promptly, and you’ll improve chances of covered repairs and successful claims.
Will Humidity Damage Stored Electronics or Musical Instruments Long-Term?
Absolutely — yes: prolonged basement humidity will damage electronics and instruments; you’ll face corrosion, mold, warped wood, and shorting. Prioritize electronic safety and instrument preservation with dehumidifiers, sealed cases, silica packs, and climate control.
Can Houseplants Significantly Increase Basement Humidity Levels?
Yes, they can: tropical houseplant types (ferns, ivies, palms) release moisture through transpiration and can raise basement humidity levels noticeably if you have many plants, poor ventilation, or waterlogged soil.
Are There Tax Credits or Rebates for Waterproofing or Dehumidifier Purchases?
Yes — you might qualify, but details vary by location and program. You’ll want to search federal, state and local tax incentives and utility rebates for moisture reduction measures; keep receipts and claim credits or rebates promptly.
Conclusion
Basements stay humid for many reasons, but you can act now. Start with a dehumidifier and check vents—78% of homes report higher basement humidity than upstairs, increasing mold risk. Watch for musty smells, efflorescence, or water stains, and use a hygrometer to keep RH below 50%. Fix grading, gutters, and vents, and schedule regular checks. Small upgrades pay off fast; prioritize drainage and ventilation first.