Will Double Sided Tape Damage Wall Paint? What to Expect
You can use double‑sided tape on painted walls, but it can pull paint off older, poorly cured, matte, or flaky finishes, so expect some risk. Test a small hidden spot for 24 hours first and choose low‑tack or removable strips for light items. Warm stubborn adhesive before removing and peel slowly at a low angle while supporting the paint edge. If you keep going, you’ll find safe alternatives, testing tips, and repair steps to handle any damage.
Will Double-Sided Tape Strip Paint?
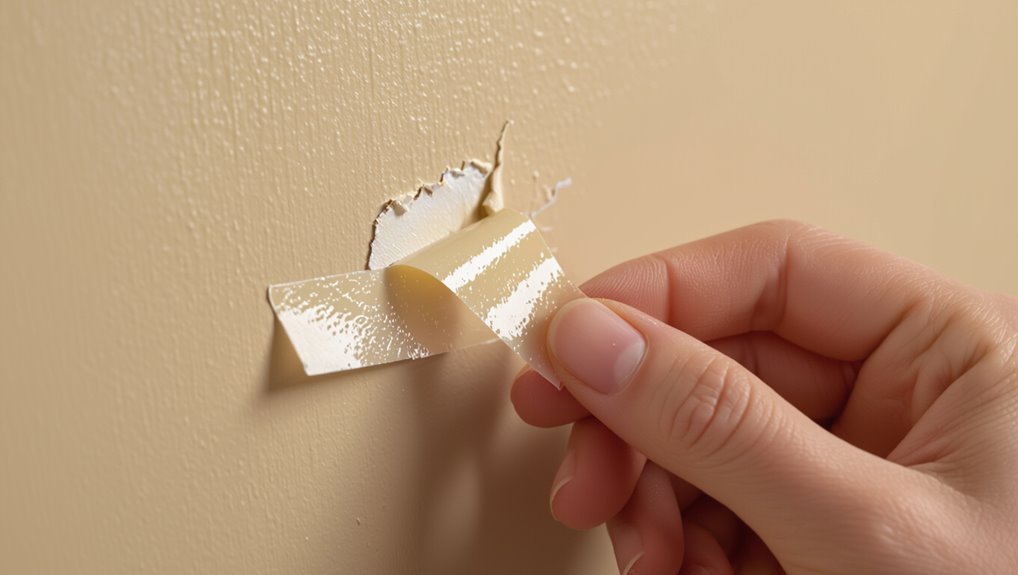
Can double-sided tape pull paint off your wall? You’ll sometimes peel paint when adhesive grips weak finishes or when wall textures catch the tape’s edges.
Smooth, well-cured paint resists better, but older, flaking layers can lift.
Remove tape slowly at a sharp angle, warm stubborn spots, and expect some tape residue—clean gently to avoid further damage to delicate surfaces.
Quick Checklist: When Tape Is Safe to Use
Knowing when double-sided tape is safe to use helps you avoid peeling paint or leaving stubborn residue.
Check paint type, age, and finish; smooth, fully cured surfaces hold better. Use light-weight items, test a small hidden spot, and limit exposure time.
If unsure, consider tape alternatives or non-damaging mounting solutions like removable hooks or museum putty for safer results.
How to Test Paint Adhesion First
Before you stick anything permanent, check the paint’s grip on a small, inconspicuous area so you don’t risk peeling a visible patch.
You’ll want simple paint testing to judge adhesion methods. Try these quick checks:
- Press a small tape square, wait 24 hours.
- Use a fingernail to gently scrape.
- Apply a damp cloth, observe transfer.
Proceed based on results.
Tape Types: Foam, VHB, Removable Strips
Different tapes suit different jobs, so pick one based on surface texture, weight, and how permanent you want the hold to be.
You’ll use foam tape applications for uneven walls and light fixtures, rely on vhb tape advantages for heavy items and outdoor resilience, and choose removable strip benefits for temporary decor.
Learn basic tape adhesion techniques to prep surfaces and reduce paint risk.
Adhesive Strength vs. Brand: What Matters
You’ll want to focus on the tape’s adhesive formulation, since chemical makeup often determines how aggressively it bonds to paint.
Prepare the surface properly—clean, dry, and smooth walls reduce the chance of damage regardless of brand.
And don’t assume a well-known name always means gentler adhesive; quality varies, so check specs and test a small area first.
Tape Adhesive Formulation
Adhesive formulation is the key factor that decides whether double-sided tape will hold fast or peel away—and whether it’ll take paint with it when you remove it.
You should check adhesive properties and expected tape longevity; formulation beats brand name for risk.
Consider:
- Acrylic vs rubber: permanence and temperature tolerance
- Tack level: initial grab vs removability
- Curing time: bond strength over days
Surface Preparation Importance
Because even the strongest tape can fail on a dusty or greasy surface, prepping the wall matters as much as the tape itself. You should use simple surface preparation techniques and proven wall cleaning methods so the adhesive bonds and paint survives. Follow steps, test discreetly, and remove carefully.
| Feel | See | Act |
|---|---|---|
| Relief | Clean | Test |
| Trust | Smooth | Peel |
| Confidence | Bonded | Protect |
Brand Quality Variability
1 key factor to watch is that not all double-sided tapes are made equal—brands vary widely in adhesive formulation, backing materials, and designated use, and that affects both holding power and how gentle they’re on paint.
You should compare tape durability and adhesive technology claims, test small areas, and choose based on expected load.
- Manufacturer specs
- User reviews
- Target surface
How Paint Finish Affects Tape Removal
If you’re removing double sided tape, the paint finish matters: matte paints grip more and can pull, while glossy surfaces are smoother and release easier.
Porous or textured finishes soak up adhesive and increase the risk of residue or paint lift.
Also remember that paint that hasn’t fully cured will come off more readily than well-cured coatings.
Matte Vs. Glossy
When you peel double-sided tape off a painted wall, the finish makes a big difference: matte paints are more porous and grip adhesives more tightly, while glossy finishes have smoother, less absorbent surfaces that release tape more easily.
You’ll notice differences in removal and potential paint lift.
- matte durability: expect stronger adhesion
- glossy aesthetics: easier clean removal
- Use gentle, steady peeling to minimize damage
Surface Porosity Matters
Because paint finishes vary in how porous they are, the surface texture directly affects how strongly double-sided tape bonds and how likely it’s to pull paint off.
So you should consider porosity before sticking anything to a wall. You’ll find rough, porous surfaces grip tape more, risking paint lifting, while smooth, sealed finishes reduce adhesion.
Consider paint layering—thin coats peel easier than well-built layers.
Curing Time Impact
Although paint may feel dry to the touch within hours, it can take days to weeks to fully cure, and that difference changes how tape pulls against the finish.
You should wait for curing effects to subside before removing tape.
Paint flexibility matters: less flexible finishes crack, more flexible ones peel.
- Glossy: stiffer, higher risk
- Eggshell: moderate risk
- Matte: more forgiving
Which Paint Finishes Are Safest for Tape?
If you want to minimize the chance of peeling or residue, choose harder, less porous finishes—like semi-gloss or satin—because their smooth surface lets tape adhesive grip without bonding into the paint.
You’ll get better paint durability and tape compatibility on these finishes versus flat or eggshell.
Still test a small area, remove slowly, and avoid prolonged heavy loads to protect the finish.
Surface Prep and Cleanliness Tips
Before you stick anything, make sure the wall is clean — wipe away dust and lint with a dry cloth.
Then remove oils or fingerprints using a mild cleaner and let the surface fully dry.
Proper prep cuts the chance of tape failing or pulling paint when you remove it.
Clean Surface First
1 simple step can save you paint headaches: clean the wall thoroughly.
You’ll prep different surface types with appropriate cleaning methods to improve tape adhesion and reduce residue risk.
- Wipe painted drywall with a damp microfiber cloth.
- Use mild detergent on semi-gloss or satin finishes.
- Test a small hidden spot first to verify the method won’t affect paint.
Remove Oils And Dust
Because oils and dust cut down on adhesion, you’ll want to remove them thoroughly so double-sided tape sticks cleanly and won’t pull paint when removed.
Wipe with a microfiber cloth and a mild detergent solution, then rinse and dry.
For dust removal use a vacuum brush or tack cloth.
Test a small spot first.
These cleaning techniques reduce residue and improve tape performance.
Wall Material Risks: Drywall, Plaster, Brick, Paneling
When you consider using double-sided tape, remember that wall materials react differently: drywall’s paper surface can peel, plaster may crack or crumble under stress, brick offers rough, uneven adhesion, and wood paneling can split or lift its veneer.
- Check drywall considerations to avoid paper tear.
- Note plaster vulnerabilities around weak spots.
- Expect brick challenges and paneling risks with heavy pulls.
How Long Tape Changes Removal Risk
If you leave double-sided tape on a wall for longer, the adhesive bonds will strengthen and the risk of paint damage rises, since prolonged contact lets glue soak into paint layers and harden—especially on porous or aged finishes.
You’ll notice tape lifespan affects how stubborn residue is; plan timed checks and gentle removal techniques (slow peeling, heat, adhesive remover) to reduce lifting or peeling paint.
Temperature, Humidity, and Adhesive Behavior
You’ll notice tape performance changes with temperature: heat can soften adhesives and cold can make them brittle, both affecting how well they stick.
High humidity can weaken tack or cause adhesive pickup on paint, while very dry conditions might reduce contact.
Seasonal expansion and contraction of surfaces also raises the chance of residue or paint lifting when you remove the tape.
Temperature Effects On Adhesion
Because adhesives respond to their surroundings, temperature and humidity play a big role in how well double-sided tape sticks and how gently it comes off walls.
You’ll notice temperature sensitivity affects tack and adhesive longevity. Consider:
- Cold reduces flexibility, lowering immediate stick.
- Heat increases flow, risking residue.
- Rapid swings weaken bonds over time, so test before committing.
Humidity’s Impact On Stickiness
Along with temperature swings, humidity has a direct and often overlooked effect on how double-sided tape behaves on painted walls.
You’ll notice humidity effects like softened adhesive in high moisture, reducing immediate hold, while very dry air can make tack brittle.
Control humidity to preserve tape longevity; moderate, stable conditions keep adhesion reliable and lower the risk of paint damage when you remove the tape.
Seasonal Expansion And Residue
When temperatures and humidity swing with the seasons, the paint and the tape expand and contract at different rates.
So you’ll often see gaps, buckling, or sticky residue as a result. You’ll notice how seasonal humidity shortens adhesive longevity and creates residue.
Tips:
- Inspect edges regularly
- Use climate-stable tapes
- Remove slowly to reduce paint lift
Weight Limits: When Tape Can Hold Safely
If you need double-sided tape to hold something up, check the product’s specified weight limit and match it to the item and surface type. Manufacturers usually list maximum loads per inch or per strip, and those numbers assume ideal conditions (clean, smooth surfaces and moderate temperatures).
You’ll compare weight capacity across tape types—foam, acrylic, or removable—to choose one that safely supports your object without overloading the bond.
Signs a Wall Will Peel When Tape Is Removed
Choosing the right tape and load matters, but you also need to spot whether the paint will come off when you peel it away.
Watch for clear peeling indicators so you can plan damage prevention. Check these signs before sticking:
- Visible flaking or powdery finish
- Freshly painted or low-cure paint
- Loose or bubbling areas that lift under light pressure
Step-by-Step: Apply Double-Sided Tape Safely
Start by prepping the surface so the tape sticks firmly and won’t pull paint when removed. Clean with a mild detergent, dry fully, and test surface compatibility on an inconspicuous spot.
Cut and apply tape with even pressure, avoiding stretched placement. Use appropriate tape for weight to preserve tape longevity.
Wait recommended cure time before hanging items and avoid slotted or heavily textured areas.
Best Methods to Remove Tape Without Peeling Paint
Once you’ve let the tape set and the adhesive has bonded, remove it carefully to avoid pulling paint off the wall.
Check tape longevity and paint compatibility first, then follow these precise steps:
- Peel slowly at a low angle to reduce stress on the paint.
- Support the paint edge with your finger as you lift the tape.
- Use a steady, even motion to minimize sudden pulls and damage.
Low-Tech Removal Tricks That Work (Heat, Floss, Oil)
You can often get tape off without ruining paint by using simple household tricks.
Heat the adhesive gently with a hairdryer to soften it, but don’t overheat or you could damage the finish.
If heat isn’t enough, slide dental floss under the edge like a saw or apply a little oil to break the bond.
Use Heat Carefully
If the tape’s been stuck for a while, applying gentle heat can soften the adhesive and make removal much easier.
You should test a small spot, use low heat, and avoid prolonged exposure.
Consider these heat application tips and safe heat sources:
- Hold a hairdryer 6–8 inches away, moving constantly.
- Use a heat gun on low, brief bursts only.
- Stop if paint softens or discolors.
Try Floss Or Oil
While heat can loosen stubborn tape, floss and household oils offer simple, low-risk alternatives that often remove adhesive without harming paint.
You’ll slide dental floss behind tape using gentle sawing floss techniques to cut the bond.
For residue, apply a few drops of olive or vegetable oil, let it sit, then wipe gently.
Rinse with mild soap to remove oily film.
Safe Product Alternatives (Removable Hooks, Putty)
Because damage-free hanging matters, consider removable hooks and museum putty as your go-to alternatives to double-sided tape. You’ll protect paint and still display items neatly.
Pick options based on weight and surface.
- removable hooks for light frames and keys
- adhesive putty for small, irregular objects
- painter-friendly strips that peel cleanly
Test a small spot before full use.
Heavy-Duty Mounting: Protecting Paint and Backing
When you need to hang heavier pieces without sacrificing your paint or the item’s backing, choose mounting systems rated for the load and designed to distribute weight—like French cleats, toggle bolts with wide washers, or wall anchors paired with a rail.
You’ll prefer heavy duty options that spread stress, use protective pads between hardware and finishes, and pre-drill to guarantee secure wall protection and intact backing.
Products and Chemicals to Avoid
Watch out for solvent-based adhesives, since they can soften or strip paints you’ll regret touching.
You should also be cautious when using double-sided tape on oil-based finishes, because the oils can interact with adhesives and leave stains or lift the paint.
Before applying tape, test a small hidden spot to make sure the combination won’t damage the surface.
Solvent-Based Adhesives
If you plan to use double-sided tape near solvent-based adhesives, be cautious: those solvents can dissolve paint binders and lift finishes, causing discoloration or peeling when tape is removed.
You should check adhesive longevity and surface compatibility before applying tape.
Avoid these products near painted walls:
- Strong solvent cleaners (acetone, toluene)
- Industrial adhesives
- Paint strippers
Oil-Based Paint Interactions
Because oil-based paints cure to a harder, more solvent-resistant film than latex, you’ll still need to steer clear of certain products that can react with the paint or leave stains when double-sided tape is removed.
Avoid solvent-heavy cleaners, rubberized backing tapes, and adhesive removers that swell finishes.
With oil based paint, test small areas first to prevent adhesion issues and staining.
How to Repair Paint If Tape Peels It Off
When tape rips paint off your wall, don’t panic—you can restore a smooth, seamless finish with the right steps.
Start by cleaning loose flakes, then use paint touch ups and precise repair techniques to blend.
Try:
- Gently sand edges and wipe clean
- Use a primer before filling gaps
- Apply matching paint with a small brush for seamless blending
Patch and Repaint Small Areas Cleanly
After you’ve removed loose paint and smoothed the area, prepare to patch and repaint small spots so the repair blends with the surrounding wall.
Choose patch techniques like thin filler and sanding for a seamless surface.
Match paint selection: same finish and pigment, or bring a sample to the store.
Feather edges, apply thin coats, and let each dry before evaluating color match.
Common Myths About Tape Damage, Debunked
Once your touch-up is dry and matches the wall, it’s a good moment to clear up common myths about tape damage so you don’t undo your work with the wrong adhesive.
You’ll learn tape myths vs. adhesive truths and practical tips:
- Strong isn’t always worse; removal method matters.
- Low-tack often works for painted surfaces.
- Age and heat affect stickiness and risk.
Quick Pre-Mounting Checklist
1 clear checklist will save you time and protect your paint: inspect the wall for dust, grease, or damp spots; confirm the paint is fully cured; choose tape rated for painted surfaces or low-tack adhesives; test a small hidden area for 24 hours; and gather tools (level, measuring tape, and a clean cloth) so you can mount confidently and remove without damage.
Use pre mounting materials wisely and follow tape application steps carefully.
Frequently Asked Questions
Will Double-Sided Tape Damage Wallpaper Seams?
Yes, it can. You’ll risk weakening wallpaper adhesion and compromising seam integrity if tape’s too strong or you peel it quickly. Use low-tack tape, test a hidden seam, and remove slowly to minimize damage.
Can Tape Adhesives Harm Wood Trim or Baseboards?
Like walking on eggshells, you can damage wood trim or baseboards with strong tape, but you’re fine if you use proper adhesive removal techniques and trim protection methods; remove slowly, use heat, adhesive remover, and gentle tools.
Are There Tapes Safe for Painted Metal Surfaces?
Yes — you can use tapes formulated for painted metal surfaces; choose ones matching paint types and moderate adhesive strength so they won’t lift finish. You’ll want low-residue, removable acrylic or foam tapes and test a hidden spot first.
Will Tape Residue Attract Insects or Mold?
You won’t usually attract insects or mold; sticky residue can collect crumbs and moisture, inviting pests if ignored. Different tape types leave varying residue—clean promptly with suitable residue removal methods to keep surfaces fresh and pest-free.
Can Tape Affect Soundproofing or Acoustic Panels?
Yes — you can alter acoustic panel effectiveness if adhesive strength comparison favors rigid, hard-mounted fixes; weaker double-sided tape may loosen panels, reducing performance, while overly strong adhesives can compress material and degrade acoustic response over time.
Conclusion
In most cases, double-sided tape won’t strip paint if you use the right type and follow a few precautions. Did you know studies show about 60% of household adhesive failures come from poor surface prep, not the tape? Test a small spot, pick removable or low-tack options on fresh, cured paint, and peel slowly at an angle. If paint does lift, you can patch and repaint small areas quickly—so you shouldn’t need to avoid tape altogether.