How to Wash Latex Paint Brushes the Right Way
You should rinse wet latex paint from your brush immediately, pulling excess paint off into a rag, then run lukewarm water from ferrule to tip while loosening bristles with your fingers or a comb. Work mild dish soap into the bristles until suds turn clear, rinse thoroughly, reshape the tip, and dry flat or bristle-down to keep the shape. For stubborn residue use a commercial cleaner or vinegar, and keep brushes stored properly to extend life—more tips follow.
Quick Wash: 3‑Step Method to Clean Latex Paint Brushes
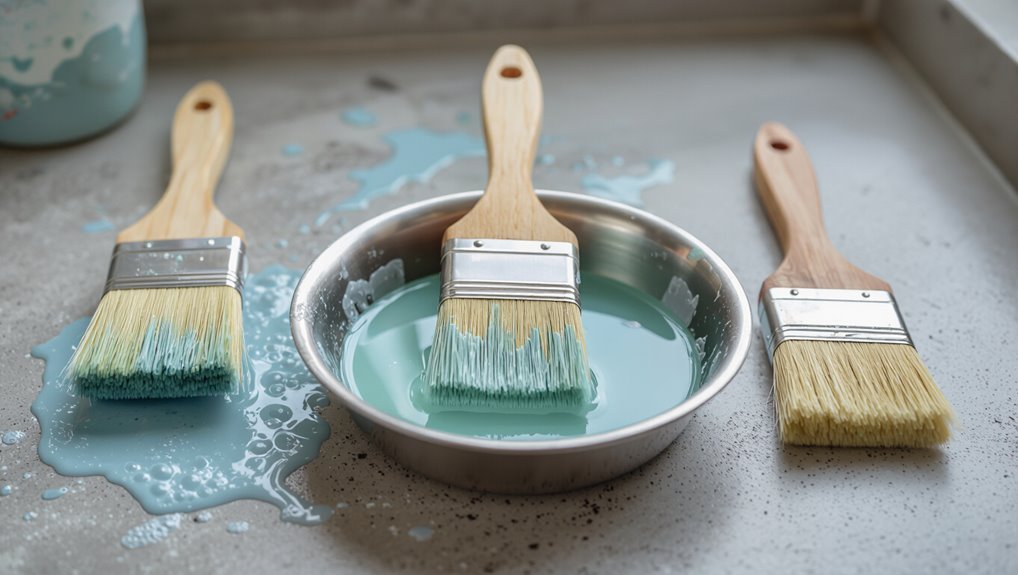
1 quick, simple routine will get your latex brush usable again: rinse, comb, and reshape.
You’ll rinse thoroughly under warm water, working bristles to remove paint.
Then comb bristles with a brush comb to realign fibers and remove residue.
Then comb the bristles with a comb to realign fibers and lift out remaining residue.
Finally, reshape the tip and lay flat to dry.
These cleaning techniques form core brush maintenance to keep performance and lifespan.
Why Cleaning Matters for Latex Finishes
If you skip proper cleaning, dried bristles and leftover paint can mar the smoothness and longevity of your latex finish.
Regularly washing your brush also prevents bristle splay and loss, so the tool keeps performing correctly.
Taking a few extra minutes to clean saves you from touch-ups and having to replace brushes sooner.
Protecting Paint Finish
Because dried paint and bristle damage can leave visible brush marks, you should clean latex brushes promptly to protect the finish you’re trying to achieve.
Regularly washing preserves a smooth paint finish and prevents uneven gloss or texture.
Clean brushes also reduce contaminants that mar surface protection, so you’ll get consistent coverage, fewer touch-ups, and a professional-looking result every time.
Preventing Brush Damage
When you clean latex brushes promptly and correctly, you’ll prevent bristles from splaying, lose fewer hairs, and avoid the hardened clumps that ruin a smooth finish.
You’ll extend brush longevity with simple maintenance tips and proper cleaning techniques. Use consistent bristle care for brush protection and damage prevention:
- Rinse until water runs clear.
- Comb and reshape bristles.
- Store sealed, upright.
When to Wash During a Paint Job and After
You should wash your brush whenever you switch colors to prevent tint contamination.
If you’re stopping for the day, clean the brush thoroughly so dried paint doesn’t ruin the bristles overnight.
For longer breaks during the job, give the brush a quick rinse and wrap it to keep paint from skinning over.
Wash Between Color Changes
If you’re switching to a different color mid-job, wash your brush whenever the current color could contaminate the next one—especially when moving from a dark to a light shade or from a gloss to a flat finish.
Maintain proper color change and adjust cleaning frequency based on paint contrast.
Quick tips:
- Rinse thoroughly between colors
- Use mild soap and comb
- Store temporarily in water if returning
Clean At Day’s End
Wrap up your tools before calling it a day: clean brushes at the end of each painting session to prevent dried latex from stiffening bristles and shortening the brush’s life.
You’ll make brush maintenance part of your daily routine, remove paint residue with proper cleaning solutions, use drying techniques and bristle care, set brush storage correctly, and stick to a sensible cleaning frequency to guarantee paint adhesion and brush longevity.
Rinse After Long Stops
When you pause painting for more than 20–30 minutes, rinse your brushes to stop latex from building up and turning bristles gummy; a quick cold-water flush and gentle combing keeps paint from drying into the ferrule and saves you a tough cleanup later.
Don’t let paint drying ruin bristles; rinse, reshape, and use proper brush storage.
- Rinse briefly in cold water
- Comb and reshape bristles
- Store upright, ventilated
Tools and Supplies to Clean Latex Paint Brushes
Gathering the right tools makes cleaning latex paint brushes faster and keeps bristles in good shape.
Having the right tools speeds up cleaning latex brushes and preserves the bristles’ shape.
You’ll need a bucket, mild dish soap, brush comb or old fork, rubber gloves, and clean rags.
Use lukewarm water for common cleaning techniques and a gentle scrub to remove paint.
Regular brush maintenance includes reshaping bristles, drying flat or hanging, and storing covered.
Choosing the Right Brush for Latex Paint
When you’re picking a brush for latex paint, choose synthetic bristles because they hold up to water-based formulas better than natural bristles.
Natural bristle brushes are best left for oil-based paints to avoid splaying and damage.
Also match the brush width to your job—narrow for trim and wide for walls—to make cleanup and application easier.
Natural Bristle Brushes
Although natural bristle brushes excel with oil-based paints, you should avoid them for latex; their split, porous fibers soak up water-based paint, causing poor coverage and loose bristles.
You’ll want to focus on natural bristle care if you insist on using them occasionally.
- Check bristle integrity before use
- Rinse gently, avoid soaking
- Store flat to prevent splaying
Synthetic Bristle Brushes
Because synthetic bristles resist water and keep their shape, they’re the best choice for latex paints and will give you smoother, more consistent coverage.
You’ll want synthetic materials with appropriate bristle types for paint compatibility and performance factors.
Consider brush durability, cost efficiency, and user experiences.
Follow cleaning techniques, maintenance tips, and proper drying methods to extend life and preserve performance.
Brush Width Selection
1 simple rule will steer your choice: match brush width to the surface you’re painting.
You’ll pick brush size for control, paint coverage, and speed. Consider width benefits and brush flexibility for edges versus broad areas.
- Narrow: precision, trim, better brush flexibility
- Medium: balanced paint coverage and control
- Wide: fast coverage on large surfaces
How Paint Type Affects Cleanup: 100% Acrylic vs. Blends
When you’re rinsing brushes, knowing whether the paint is labeled 100% acrylic or an acrylic blend will change how you clean them.
Pure acrylics tend to dry harder and bond more strongly to bristles, while blends usually stay a bit softer and are easier to remove.
You’ll need stronger agitation and longer rinses for acrylic differences, whereas blend characteristics allow gentler cleaning and quicker restoration.
Remove Excess Paint Before Washing
Before you rinse, wipe off as much wet latex as you can on a clean rag or paper towel.
Then gently scrape the bristles against the edge of the paint can or a putty knife to loosen thicker buildup.
Doing both cuts down on washing time and protects the brush shape.
Wipe Off Excess Paint
Scrape and blot as much wet latex paint from the brush as you can before rinsing—this cuts down on the scrubbing and solvent you’ll need later.
Use quick, gentle actions and these paint removal techniques as part of your brush maintenance tips:
- Wipe on old rags to lift bulk paint.
- Tap bristles to shed drips into a waste jar.
- Roll brush along cardboard to shape and remove residue.
Scrape Bristles Gently
After wiping off drips and rolling the brush, grab a putty knife or the edge of a can and gently run it down the bristles to lift remaining paint.
Work from heel to tip, avoiding splaying. Do this before rinsing to reduce cleaning frequency and protect bristle care.
Repeat until little pigment transfers, then proceed to soap and water for a thorough wash.
Palm‑Scrape and Comb Method (Step‑by‑Step)
While the brush is still wet, you’ll use your palm and a comb to force paint out of the bristles without damaging their shape.
Use the palm scrape technique gently, then the comb method to align bristles. Repeat until mostly clean.
Use the gentle palm-scrape, then comb from ferrule to tip — repeat until the bristles are mostly clean.
- Press bristles against your palm, pull downward
- Comb from ferrule to tip, removing trapped paint
- Shake off loosened debris and reshape bristles
Rinsing Brushes Under Running Water Correctly
Turn the brush under a steady stream of lukewarm water and let the flow carry paint out from the ferrule toward the tips, using your fingers to gently separate bristles so water reaches the core.
For effective brush rinsing, monitor water temperature and water pressure, maintain bristle alignment while removing paint residue, vary rinse technique by angle, and schedule regular cleaning frequency for proper brush care.
Deep Cleaning With Mild Soap or Dish Detergent
Once the running water has loosened most of the latex, give the brush a thorough wash with mild soap or dish detergent to remove the remaining film and oils.
Use effective methods and gentle cleaning solutions to protect bristle care and paint residue removal. Balance brush maintenance and cleaning frequency.
Use gentle cleaners and smart techniques to protect bristles while effectively removing paint—balance care with regular maintenance.
- Work soap into bristles
- Rinse until clear
- Reshape and dry upright
Using Brush Cleaners and Restorers Safely
If a simple soap wash doesn’t restore the bristles, reach for a commercial brush cleaner or restorer formulated for water-based paints and follow the product instructions carefully to avoid damaging the brush.
Wear gloves, work in a ventilated area, and test a small amount first.
Use gentle agitation, rinse thoroughly, reshape bristles, and dry flat.
Prioritize brush safety and proper cleaning techniques.
Cleaning Synthetic vs. Natural Latex Paint Brushes
When you’re choosing a cleaning method, remember synthetic and natural brushes need different care:
- Rinse synthetic brushes thoroughly; synthetic benefits include durability and easy soap removal.
- Handle natural hair gently; natural drawbacks are sensitivity to water and swelling.
Use mild detergent for both, reshape bristles, and dry flat to preserve performance and extend brush life.
Cleaning Angled Sash Brushes vs. Round Trim Brushes
When you clean angled sash brushes, you’ll focus on flushing paint from the heel and keeping the bevel crisp for precise cuts.
For round trim brushes, you’ll concentrate on splaying the filaments and rinsing thoroughly to preserve the round profile.
Use gentle combing and the right solvent for both to maintain shape and performance.
Angled Brush Techniques
Master the differences in technique for angled sash brushes and round trim brushes to get both shapes clean and ready for the next coat.
You’ll focus on angled brush techniques and effective strokes to preserve the bevel.
Follow quick steps:
- Rinse along bristle angle to lift paint without splaying.
- Work soap into the ferrule with gentle, angled strokes.
- Shake and reshape before drying, keeping the tip aligned.
Round Trim Care
After keeping angled sash brushes sharp and aligned, switch focus to round trim brushes—they need a different touch. You’ll use round trim techniques: rinse gently, reshape tip, spin out water, and air dry upright to protect brush shape.
| Feel | Memory |
|---|---|
| Calm | Pride |
| Care | Trust |
Cleaning Roller Covers and Other Tool Parts
If you want your roller covers and other tools to last, rinse them promptly and thoroughly to remove as much wet latex as possible before it starts to skin over.
Use warm water, mild soap, and gentle agitation for roller cover care and general tool maintenance.
Use warm water, mild soap, and gentle agitation to keep roller covers and tools clean and long-lasting.
- Rollers: squeeze out paint, rinse until clear.
- Trays: scrub with brush.
- Frames: wipe and dry.
Removing Paint From the Ferrule and Handle
Don’t ignore the ferrule and handle when you’re washing brushes — paint build-up there can loosen bristles and ruin the grip.
Use a small brush or cloth with warm soapy water to scrub around the ferrule, taking care not to bend the bristles.
If the handle’s finish is dull or has dried paint, gently sand or use a mild solvent and then reapply a protective coat to restore it.
Clean Around The Ferrule
Now focus on the ferrule and handle, where dried latex often hides; you’ll need steady hands and a few simple tools to remove buildup without damaging the brush.
For effective ferrule cleaning and ongoing brush care, do this:
- Scrape gently with a plastic scraper or old credit card.
- Use a soft toothbrush and warm soapy water.
- Wipe dry and reshape bristles promptly.
Restore The Handle Finish
When paint splatters or dried drips mar the ferrule and handle, you can restore the finish with a few targeted steps that avoid gouging the wood or scratching the metal.
Gently scrape softened paint with a plastic scraper. Use rubbing alcohol or mild solvent on a cloth for stubborn spots.
Sand very lightly if needed, then apply a thin coat of oil or wax for handle care and finish restoration.
Preventing Ferrule Rust After Washing
Because the ferrule stays wet after rinsing, you should take a few simple steps to stop rust before it starts.
You’ll focus on ferrule protection and corrosion prevention with quick habits that keep metal dry and clean:
- Wipe the ferrule with a dry cloth immediately.
- Store brushes hanging or bristle-down to drain moisture.
- Apply a light coat of mineral oil for long-term protection.
Reshaping Bristles After Each Wash
After rinsing, gently comb the bristles with your fingers or a brush comb to restore smooth alignment.
Twist and shape the tip so it dries in its original profile, not splayed or flattened.
Let the brush dry hanging or lying flat with the bristles supported to maintain that proper drying shape.
Smooth Bristle Alignment
Reshape the bristles while the ferrule is still damp to restore their natural taper and keep the brush painting smoothly.
You’ll use simple bristle care and alignment techniques to prevent splaying and maintain edge precision.
- Comb bristles with your fingers toward the tip.
- Tap gently to settle loose hairs.
- Wrap in paper to hold shape briefly before drying.
Proper Drying Shape
One simple habit will keep your brush performing like new: set the bristles in their final painting shape while they’re still slightly damp.
After rinsing, comb and smooth for consistent brush alignment, squeezing gently to remove excess water.
Hang or lay flat to dry without pressure on tips.
This bristle conditioning prevents splaying, maintains edge precision, and extends brush life.
Drying Brushes to Avoid Mildew and Damage
While the solvent or soap you used removes paint, proper drying prevents mildew and damage:
Hang brushes bristle‑down to let water drip away and speed drying.
Use a clean towel to blot excess moisture first.
Store fully dry to guarantee mildew prevention and extend life.
- Hang bristle-down
- Blot with towel
- Confirm dry before brush storage
Short‑Term Storage Between Paint Sessions
If you’re pausing for a few hours or a day, protect the bristles and keep paint workable by wrapping the brush in plastic—cling film, a resealable bag, or even aluminum foil will do—then store it flat or hanging bristle‑down in a cool place out of direct sunlight. For short term storage and brush preservation, label and note condition.
| Item | Purpose |
|---|---|
| Wrap | Prevent drying |
| Position | Maintain shape |
| Cool spot | Slow curing |
| Label | Track paint type |
Long‑Term Storage for Months or Years
When you need to store latex paint brushes for months or years, clean them thoroughly, reshape the bristles, and package them to keep out dust and moisture; proper prep prevents hardening and extends their usable life.
- Wrap each brush in paper, label with date for long term preservation.
- Use airtight containers and silica packs as storage techniques.
- Store flat in a cool, dry place.
Reviving Hardened Latex Paint Brushes
Even with careful storage you may find a brush that’s stiffened from dried latex; you can often restore it with the right approach. You’ll use brush rejuvenation techniques: soak in warm soapy water, work bristles, use vinegar or commercial remover for paint residue removal, rinse, reshape, and dry.
| Soak | Work | Rinse |
|---|---|---|
| Warm | Comb | Clear |
| Vinegar | Massage | Dry |
| Repeat | Inspect | Store |
| Restore | Reshape | Ready |
When a Brush Is Beyond Repair
Sometimes it’s clearer to cut losses and replace the brush rather than keep trying to revive it. You’ll save time once you’ve done an honest evaluating brush condition check: bristles split, metal ferrule rusted, or handle warped.
Don’t waste energy on futile brush restoration techniques if damage is severe. Consider:
- Toss if bristles won’t align
- Replace when ferrule fails
- Keep only mildly salvageable brushes
How Often Pros Replace Latex Brushes
Pros often swap out latex brushes after a season of heavy use or once the bristles stop performing reliably.
Watch for fraying, loss of shape, persistent paint buildup, or shedding — those are clear signs you should replace a brush.
If you take care of brushes and store them properly, you can stretch their life, but don’t hesitate to retire one that’s costing you time or finish quality.
Typical Replacement Frequency
A good rule of thumb is that professional painters typically replace their latex brushes every 6 to 12 months depending on use and care.
You can extend brush longevity with good cleaning habits and storage, but heavy daily use shortens life.
Consider:
- Replace more often if you use brushes daily.
- Keep strict cleaning habits to prolong use.
- Store dry and protected.
Signs To Replace Brushes
When you’ve cleaned and stored brushes correctly but still notice frayed bristles, uneven paint laydown, or shedding, it’s time to replace them.
Professionals typically swap out latex brushes as soon as performance drops rather than waiting a set interval.
You should track brush performance: poor edge control, streaking, or persistent clogging mean replacement.
Don’t cling to a tool that shortens brush longevity.
Cleaning Brushes on Jobsites Without Running Water
If you’re working where there’s no running water, you can still keep latex brushes usable by flushing and trapping the paint with portable solutions like rinse buckets, disposable squeeze bottles, or pre-mixed brush cleaner.
Use jobsite alternatives and portable cleaning to avoid ruined brushes.
Try these quick methods:
- Rinse into sealed buckets for settling
- Use squeeze bottles to flush bristles
- Carry solvent-free brush cleaner packets
Disposing of Rinse Water and Following Regulations
Because rinse water carries paint solids and additives that can harm waterways and soil, you’ve got to handle it as a regulated waste stream rather than pouring it down drains or onto the ground.
Collect and filter or evaporate rinse water, label and store residues, and use licensed hazardous waste pick-up when required.
Follow local regulatory compliance rules and document disposal for eco friendly disposal and audits.
Biodegradable and Eco‑Friendly Cleaning Options
Although latex paint cleanup often calls for strong solvents, you can use biodegradable, low-toxicity options that protect your health and the environment.
Use plant-based options and eco-friendly detergents to break up latex without harsh fumes. Try a vinegar solution or biodegradable soap, and choose natural solvents like citrus cleaners.
Tip list:
- Reusable cloths for wiping
- Diluted vinegar solution
- Biodegradable soap for rinsing
Sanitizing Brushes Between Different Coatings
When switching between different coatings, rinse your brush thoroughly to remove loose paint and prevent contamination.
If water won’t cut it, use the appropriate solvent for the types of coatings you’re using.
Finish by wiping or soaking the ferrule briefly in isopropyl alcohol to sanitize before the next coat.
Rinse Thoroughly Between Coats
Rinse your brush thoroughly between coats to prevent color contamination and guarantee a smooth finish; even a small amount of old paint can affect adhesion and gloss.
Use proper rinse techniques and respect coat timing so layers bond correctly.
Quick steps to follow:
- Flush bristles until water runs clear.
- Shake and blott on a rag between coats.
- Reinspect for stray fibers before reusing.
Use Appropriate Solvent
Flushing your brush between coats keeps water-based paint from mixing, but if you’re switching between different types of coatings—like latex to oil-based or to a solvent-based primer—you’ll need a proper solvent to sanitize the bristles.
Choose solvent selection based on paint compatibility: use mineral spirits for oil and solvent-based primers, lacquer thinner for lacquers, and follow label guidance.
Rinse and dry thoroughly.
Sanitize With Alcohol
Alcohol offers a quick, effective way to sanitize brushes between incompatible coatings, and you’ll find it especially useful when switching from water-based latex to solvent-based paints or primers.
You’ll use alcohol application to remove residues, reduce contamination, and speed drying. Keep sanitizing brushes part of brush maintenance, note cleaning frequency, and guarantee safe storage afterward.
- Quick rinse with alcohol
- Blot and reshape
- Store dry and covered
Common Cleaning Mistakes That Ruin Brushes
Mistakes like leaving latex to dry on bristles, soaking a wooden-handle brush in water, or using harsh solvents will shorten a brush’s life and ruin its shape—so don’t assume a quick wipe or prolonged soak is harmless.
You should follow proper brush care and cleaning techniques: rinse promptly, reshape bristles, avoid wire brushes or boiling, and store dry. Treat ferrules gently.
Speeding Up Cleanup Without Hurting Brush Life
When you’re rushing to finish a job, small habits can cut cleanup time without damaging your brush: rinse immediately with warm water, use a paint comb or old fork to loosen bristles, and wipe excess paint on a rag before it dries.
Keep brush maintenance simple and set a cleaning frequency.
- Rinse thoroughly after each use
- Use mild soap and comb bristles
- Dry flat, reshaping hairs
Brush Care: How It Saves Money Over Time
If you clean and store your latex brushes properly, they’ll last much longer and keep their shape.
That means you won’t be replacing frayed or stiff brushes as often.
Over time those savings add up, making proper brush care a smart financial move.
Extend Brush Lifespan
A few simple habits — rinsing thoroughly, combing bristles, and storing brushes flat or hanging — can double how long your latex paint brushes last, saving you money on replacements and keeping finishes consistent.
Use brush maintenance and longevity techniques so you can reuse tools confidently.
- Rinse until clear
- Comb and reshape bristles
- Dry flat or hang
Reduce Replacement Costs
Protecting your brushes with regular cleaning and proper storage cuts replacement costs by keeping bristles in working condition longer.
You’ll save money using cost effective techniques like rinsing promptly, using mild soap, reshaping bristles, and hanging to dry.
These simple habits boost brush longevity, reduce waste, and mean you replace fewer tools, freeing budget for better paint and projects.
Training Helpers or Crew to Clean Brushes Properly
Start by showing your helpers the right steps and explaining why each one matters so they don’t just follow motions but actually understand the process.
Teach clear training techniques and insist on proper brush care. Use demos, supervise first attempts, and give feedback.
- Demonstrate rinse and combing
- Check for residual paint
- Store bristles upright and protected
Building a Simple Brush‑Care Kit for DIYers
Once you’ve taught the basics, assemble a compact brush‑care kit so you and your helpers can clean properly wherever you’re working.
Include a mild detergent, brush comb, disposable gloves, jar for rinse water, wire brush for stubborn bits, and a bottle of conditioning solution.
Add labeled containers for wet brushes to aid brush storage and note cleaning frequency on the kit to keep routines consistent.
How to Test a Cleaned Brush Before Repainting
Before you dip the brush into fresh paint, give it a quick functional check so you don’t ruin your next finish.
Test for brush flexibility and bristle integrity with simple moves:
- Flick bristles to check spring and shedding.
- Fan the tip against scrap wood to see stroke consistency.
- Press gently to guarantee shape recovery and no splaying.
If any fail, clean or replace before painting.
How Temperature and Humidity Affect Drying
When you’re drying latex-painted brushes, temperature and humidity directly control how fast water evaporates from the bristles: higher temps speed drying while high humidity slows it.
Extremes can stiffen bristles or trap moisture that causes mildew or rust in the ferrule.
You should monitor temperature impact and humidity effects — dry at moderate warmth with airflow, avoid damp or overheated storage.
Cleaning Brushes After Waterborne Enamels and Specialty Coatings
Cleaning brushes used with waterborne enamels and specialty coatings takes a different approach than plain latex—these products often contain binders, solvents, or additives that can leave a tacky film or hard residue.
So you’ll need targeted cleaners and a bit more agitation to restore bristle performance.
- Rinse with recommended product recommendations for coating compatibility.
- Use gentle scrubbing to protect bristles and preserve paint adhesion.
- Track drying times and brush maintenance; follow specific cleaning techniques.
Cleaning Brushes After Additives, Extenders, or Thinners
Additives, extenders, and thinners change a paint’s viscosity and drying behavior, so you’ll need to flush brushes differently than with straight latex.
Start by wiping excess product from the bristles, then work a solvent or compatible cleaner through the hairs to break down the specific additive before rinsing and reshaping the brush.
Note additive effects; match cleaner to extender choices, test on a stray brush, then dry.
Maintaining Brush Performance for Fine‑Finish Work
Preserve a brush’s edge and spring by rinsing and shaping it immediately after use, then storing it properly so hairs don’t splay or harden—fine‑finish work depends on crisp lines and a responsive tip.
Rinse and reshape brushes right after use, then store them properly to keep hairs crisp and responsive.
Small habits like gently combing bristles, removing trapped paint near the ferrule, and keeping the brush hung or flat will keep performance consistent.
- Clean thoroughly after each job.
- Practice consistent brush technique.
- Inspect ferrule and bristles for residue to protect finish quality.
Choosing Replacement Brushes Based on Wear
When the brush no longer holds a sharp edge or the bristles start to splay, it’s time to contemplate a replacement rather than trying to coax performance from worn tools.
Inspect bristle flexibility, judge how wear affects paint quality, and weigh brush durability against replacement cost.
Choose brushes that match your projects: higher durability and proper flexibility save time and improve finish, making the expense justified.
Reading Manufacturer Cleaning Recommendations
Although the basics of rinsing and drying apply, you should always check the manufacturer’s cleaning recommendations before you start—those instructions tell you which solvents, temperatures, and techniques are safe for the brush’s bristle type and adhesive.
Always check the manufacturer’s cleaning instructions first—use recommended solvents, follow temperature limits, and heed drying guidance.
Follow labels to protect performance, extend brush maintenance, and set proper cleaning frequency.
- Use recommended solvents only
- Note max water temperature
- Follow drying/storage tips
Integrating Brush Cleaning Into Your Painting Workflow
If you plan your cleaning steps into each work session, you’ll save time and keep brushes usable for longer. You should schedule short rinse stops, designate a cleaning station, and track drying times to improve brush maintenance and workflow efficiency.
| Task | When |
|---|---|
| Rinse | Mid-session |
| Deep clean | End-session |
| Dry/storage | After cleaning |
Quick Daily Routine to Guarantee Ready‑to‑Use Brushes
You’ve already built cleaning moments into your painting routine; now make a short daily checklist that keeps brushes ready without extra fuss.
For reliable daily brush maintenance, follow quick cleaning tips and a simple end‑of‑day drill:
- Rinse thoroughly, spin out water, reshape bristles.
- Store upright or hang to dry.
- Inspect ferrule, remove debris before next use.
Frequently Asked Questions
Can I Use Vinegar to Remove Latex Paint From Brushes?
Yes — you can use vinegar; its acidic vinegar effects soften dried latex, aiding paint removal, but it’s slow and less effective than soap and water for fresh paint. You’ll need soaking, scrubbing, and patience.
Will Fabric Softener Soften Stiff Brush Bristles?
Yes — you can use diluted fabric softener to help soften stiff bristles; you’ll soak briefly, rinse thoroughly, and reshape. For lasting brush maintenance and bristle care, avoid harsh chemicals and store brushes properly after cleaning.
How Do I Prevent Paint Smell Lingering in Stored Brushes?
You’ll rinse brushes thoroughly, dry them, store them sealed in airtight containers or wrap handles in plastic to limit odor; add a fabric softener sheet or activated charcoal for scent control—routine brush maintenance prevents paint storage smells.
Are Paintbrush Conditioners Safe for Foam Roller Cores?
Yes — most paintbrush conditioners are safe for foam roller cores if they’re water-based; you’ll use them sparingly during foam roller maintenance to boost paintbrush longevity, but always test a small area first to avoid breakdown.
Can I Wash Brushes in a Dishwasher or Washing Machine?
Dishwasher danger: don’t. You can’t safely sanitize brushes in a dishwasher or washing machine; these cleaning techniques harm bristles, loosen ferrules, and warp handles. For proper brush maintenance, wash by hand and reshape while damp.
Conclusion
You’ve learned the simple steps, tools, and timing to keep latex brushes ready, and by coincidence your clean brushes mirror the fresh surfaces you’ve just painted—both ready for the next coat. Keep rinsing, reshaping, and storing after every session; when you do, brushes last, finishes stay smooth, and projects finish faster. It’s a small routine that protects your investment and makes painting less work and more craft—so make cleaning part of every paint day.