How to Remove Dried Paint From Shingles Quickly and Safely
You can remove dried paint from shingles quickly and safely by first identifying the paint and shingle type, then protecting plants, gutters, and yourself with tarps, gloves, eye protection, and a respirator. Start with a plastic scraper and soft brush, try water or mild detergent for latex, or a citrus/biodegradable solvent for oil-based paint, rinse gently with low pressure, and avoid harsh chemicals or pressure washers; follow with inspection and repairs, and keep going to learn safe techniques and prevention.
What This Guide Covers

Before you start scraping or scrubbing, this guide tells you exactly what to expect: the types of shingles and paint involved, safe tools and cleaners to use, step-by-step removal methods, and when to call a pro to avoid damage.
You’ll get shingle maintenance tips and paint prevention strategies, clear safety cautions, recommended cleaners, and practical sequencing so you can remove dried paint efficiently without causing further harm.
Quick Answer: Remove Dried Paint From Shingles Safely
Start by putting safety first: wear gloves, eye protection, and a mask, and work from a stable ladder or platform.
Use gentle removal methods—soft brushing, low-pressure rinsing, and mild solvents tested on a small area—before trying anything abrasive.
If paint won’t come off or the shingle surface looks damaged, stop and consult a pro.
Safety First
When you tackle dried paint on shingles, prioritize safety: wear eye protection, chemical-resistant gloves, and a respirator rated for organic vapors if you’ll use solvents, and avoid working alone on steep roofs or in hot, windy conditions.
Follow basic safety precautions, set up stable ladders, use fall protection, keep bystanders clear, and factor safety into routine roof maintenance plans before starting any cleanup.
Gentle Removal Methods
If the paint is just surface-level and the shingles aren’t damaged, you can usually remove it with gentle, nonabrasive methods that won’t shorten the roof’s lifespan.
- Soft-bristle brush plus mild detergent for small spots.
- Garden hose rinse, avoiding pressure washers.
- Eco friendly methods: vinegar or biodegradable citrus cleaners.
- Try alternative solutions like clay bar or gentle solvent, testing first.
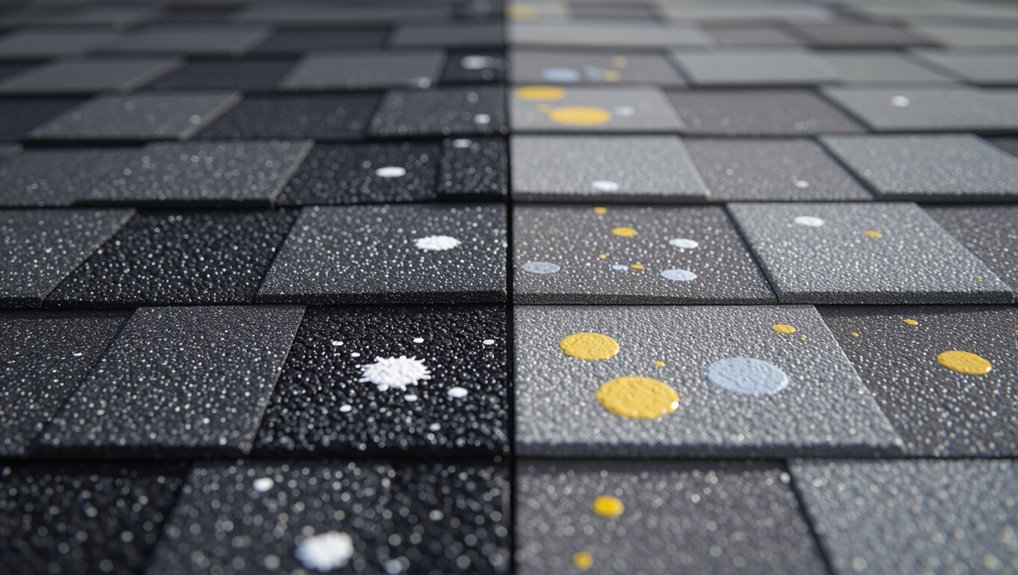
How to Identify the Type of Paint on Your Shingles
Start by checking visual paint characteristics like sheen, color consistency, and whether it looks chalky or glossy.
Then feel the spot—see if the paint is brittle, soft, or firmly adhered to the shingle.
Finish with a simple solvent test (water first for latex, then mineral spirits for oil-based) to confirm the paint type.
Visual Paint Characteristics
Paint’s appearance gives you the first clues about what you’re dealing with: check sheen, texture, and how the paint bonds to the shingle surface to distinguish between latex, oil-based, and specialty coatings.
- Glossy, smooth — often oil-based.
- Matte, slightly elastic — common latex.
- Thick, layered — specialty or enamel.
- Cracked or flaky — older coatings; note paint types and surface textures.
Touch And Adhesion
Surface feel and how firmly the coating sticks tell you a lot about its makeup. Run a fingertip across the dried paint to gauge touch sensitivity and note if granules lift.
Flexible, slightly tacky films often mean latex; hard, brittle chips suggest oil-based.
Use gentle adhesion techniques like a fingernail scrape and visual comparison to identify paint type before choosing removal methods.
Perform A Solvent Test
Want to know whether the coating on your shingles is latex or oil-based? Use simple testing methods:
- Dampen a cloth with water—rub a small spot.
- Try denatured alcohol next.
- Use mineral spirits for stubborn areas.
- Note reactions and record solvent types that dissolve or smear paint.
This lets you choose safe removal steps.
How to Identify Your Shingle Material
Before you start scraping or solvent-testing, take a close look at your shingles so you can identify the material—fiberglass, asphalt, wood, metal, or composite—because each reacts differently to cleaners and tools. Examine texture, weight, and granules to distinguish shingle types and material characteristics.
| Visual | Touch | Edge |
|---|---|---|
| Granules | Lightweight | Straight |
| Grain | Rough | Layered |
How Paint Chemistry and Shingle Type Affect Removal
Because paint formulas and shingle materials interact differently, you’ll need to match your removal method to both the type of paint (latex, oil-based, or enamel) and the shingle substrate.
Latex softens with water and mild solvents, oil-based and enamel resist water and often require stronger solvents or heat, and brittle materials like wood or older asphalt can be damaged by aggressive scraping or harsh chemicals.
- Test small area.
- Prioritize shingle durability.
- Target paint adhesion.
- Adjust solvent or heat.
Safety Gear to Wear Before Climbing
Wear sturdy, non-slip shoes, protective gloves, eye protection, and a fitted respirator or mask before you climb so you’re protected from slips, chemical fumes, and paint dust. Check harness fit, secure tool belt, and practice safe climbing techniques; confirm ladder stability elsewhere. Use this quick gear checklist:
| Item | Purpose |
|---|---|
| Shoes | Traction |
| Gloves | Grip |
| Goggles | Shield |
| Mask | Filter |
| Harness | Fall protection |
Set Up Your Ladder and Work Area Safely
Now that you’ve checked your gear and harness, set up your ladder and clear the work area so you can work steadily and safely.
Follow these steps to guarantee ladder stability and a tidy work zone:
Follow these steps to ensure ladder stability and maintain a tidy, hazard-free work area.
- Position ladder on firm, level ground.
- Secure base and angle at 75 degrees.
- Tie off or brace the ladder top.
- Keep tools in a belt, clear surrounding hazards.
Protect Gutters, Plants, and Siding First
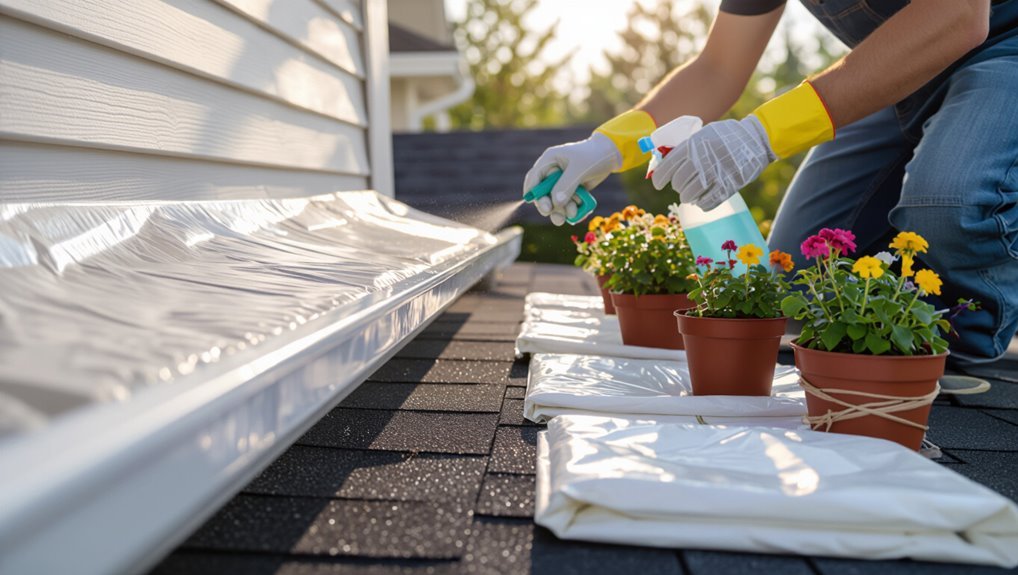
Start by covering gutters, plants, and nearby siding before you scrape or wash so paint chips and thinner won’t cause damage or staining.
Use tarp and plastic sheeting for gutter protection, securing edges so debris can’t slip underneath.
Shield shrubs and flowers with lightweight breathable covers to guarantee plant safety.
Tape edges on siding to prevent runs, and remove coverings carefully after cleanup.
Gather Tools and Supplies
Before you start scraping, make sure you’ve got the right protective gear—gloves, safety glasses, and a mask—to keep debris and fumes off you.
Gather essential tools like a plastic scraper, soft-bristle brush, bucket, and rags.
Finally, choose an appropriate solvent for the paint type, testing it on a hidden shingle area first.
Necessary Protective Gear
One essential step is equipping yourself with the right protective gear so you can remove dried paint from shingles safely and efficiently.
You’ll want basic items to protect skin, eyes, and breathing while working.
- Protective gloves for chemical and abrasion resistance.
- Safety goggles to block splashes and dust.
- Respirator mask with appropriate cartridges.
- Non-slip work boots for roof stability.
Essential Cleaning Tools
With your protective gear on, gather the right tools and supplies so you can remove dried paint from shingles safely and effectively.
Grab soft-bristle brushes, plastic scrapers, microfiber cloths, a garden hose with spray nozzle, buckets, and sturdy ladders.
Include products for gentle cleaning techniques and eco-friendly options like biodegradable wash and vinegar mixes.
Keep a waste bag for debris.
Appropriate Solvent Choices
Choose solvents based on the paint type and shingle material so you remove the stain without damaging the roof.
You’ll match solvent types to paint compatibility, test a small area, and protect adjacent shingles.
Follow this brief checklist:
- Water-based: mild, for latex.
- Solvent-based: stronger, for oil paints.
- Citrus: gentler alternative.
- Rinse and neutralize after use.
Gentle Cleaners Safe for Asphalt Shingles
While you can reach for strong solvents, they’ll often damage asphalt granules and the underlying sealant; instead, use mild, roof-safe cleaners that lift paint without degrading shingles.
You’ll prefer eco friendly alternatives and biodegradable solutions like diluted dish soap, ammonia-free roof detergents, or oxygen bleach mixes.
Apply gently with a soft brush, rinse thoroughly, and avoid pressure washing to protect shingle integrity.
When to Use Rubbing Alcohol or Mineral Spirits
If mild, roof-safe cleaners don’t soften the dried paint, you can consider stronger solvents like rubbing alcohol or mineral spirits—but only in specific situations.
Use these when:
Use stronger solvents only when spot treatment is needed and surface tests confirm safe use.
- Paint removal techniques need a spot treatment.
- You’ve tested surface compatibility on an inconspicuous area.
- Paint is thin and flaky, not deeply set.
- You’ll rinse thoroughly and protect surrounding shingles.
Solvents to Avoid : They Damage Shingles
Don’t reach for harsh solvents that can eat away at shingle granules and weaken the roofing material.
You should never use acetone, since it’s too aggressive and can cause discoloration or surface damage.
Stick to milder options and test a small area first.
Avoid Harsh Solvents
Because harsh solvents can strip granules, soften asphalt, and warp shingles, you should avoid using strong chemicals to remove dried paint.
Choose safer options: eco friendly solvents or simple alternative cleaning methods.
Consider these steps:
- Test small area.
- Use gentle degreaser.
- Soft-brush with soapy water.
- Rinse thoroughly and inspect for damage.
Never Use Acetone
While acetone can dissolve stubborn paint, it also eats away at the asphalt binder and strips the protective granules on shingles, so you shouldn’t use it for paint removal. You should choose paint removal techniques that rely on gentle scraping, low-pressure washing, or commercially recommended safe solvents to protect shingles.
| Solvent | Effect | Recommendation |
|---|---|---|
| Acetone | Damages binder | Avoid |
| Citrus | Mild | Test first |
| Water-based | Safe | Preferred |
How to Patch-Test a Cleaner on One Shingle
Before you tackle the whole roof, pick one inconspicuous shingle to patch-test your cleaner so you can confirm it won’t damage color or granules.
Follow steps:
- Wear gloves and eye protection.
- Try a small amount of cleaning alternatives noted in paint removal techniques.
- Wait 15–30 minutes; blot gently.
- Inspect for discoloration, granule loss, or residue.
Dry Scraping Technique for Flaky Paint
Start by gently scraping loose, flaky paint with a flat plastic scraper or a putty knife held at a low angle so you lift flakes without gouging the shingle surface.
Continue dry scraping in short passes, clearing paint flakes into a container. Work along the grain, avoid excessive pressure, and stop when only firmly adhered paint remains so you can switch to a gentler removal method.
Use a Plastic Putty Knife Without Gouging Shingles
Grab a plastic putty knife and keep the blade nearly flat against the shingle so you lift paint instead of digging into the material. You’ll protect shingles and follow shingle maintenance best practices by working gently.
- Angle blade shallowly.
- Work from edge inward.
- Wipe debris often.
- Test paint alternatives first to avoid damage.
Soft-Bristled Brushing for Thin Paint Films
First check how thin the paint film is so you know if brushing will lift it without damaging the shingle.
Pick a soft-bristled brush—nylon or natural fibers—that’s flexible enough to remove flakes but gentle on the surface.
Brush along the shingle grain with light, even strokes to avoid abrading the material.
Assess Paint Film Thickness
Before you decide on a removal method, gently test the paint’s thickness with a soft-bristled brush so you can tell whether it’s a thin, flaky film or something more substantial.
Use paint analysis to guide safe removal techniques. Then:
- Lightly brush a small area.
- Note adhesion and flaking.
- Check for multiple layers.
- Decide on gentle action or stronger approach.
Choose Gentle Brush
If your brush test showed a thin, flaky film that lifts easily, switch to a soft-bristled brush and work gently to avoid damaging the shingle surface.
Choose among gentle bristle types like nylon or natural-hair, considering brush material options for flexibility and abrasion.
Use short, light strokes, rinse bristles often, and stop as soon as paint loosens to prevent wear.
Brush With Grain
Work along the shingle’s grain with your soft-bristled brush, using light, even strokes so you lift the thin, flaky paint without abrading the surface.
You’ll rely on careful brush techniques for efficient paint removal:
- Test a small area first.
- Use consistent, gentle passes.
- Clean bristles often.
- Stop if shingles roughen, reassess.
Wet‑Soak and Blot Method for Stubborn Paint
Soak a clean cloth or sponge in warm, soapy water and press it onto the dried paint to soften the film before you attempt removal.
Test a small area, then use wet soak effectiveness by keeping the patch damp several minutes.
Use gentle blotting techniques to lift softened paint—dab, don’t rub—to avoid damaging shingles.
Repeat until paint releases, then rinse and dry.
Apply Solvents Safely and Avoid Runoff
Pick a solvent that’s safe for your shingle material and follow the label directions.
Protect plants, gutters, and siding with drop cloths or plastic sheeting before you work.
Contain and collect any runoff with absorbent pads or a shallow trench so it doesn’t reach landscaping or drains.
Choose Appropriate Solvent
1 key decision before you apply any solvent is choosing one that’s effective on the paint type yet safe for shingles and surrounding plants; read labels to match solvent (e.g., mineral spirits for oil-based paint, denatured alcohol for shellac, paint stripper gel for stubborn enamel) and avoid anything labeled corrosive or flammable for roofing use.
- Identify solvent types.
- Check compatibility.
- Minimize environmental impact.
- Test a small area.
Protect Surrounding Areas
Now that you’ve selected and tested a compatible solvent, take steps to protect plants, gutters, and landscaping before you apply it.
Lay down plastic sheeting or tarps, secure edges, and cover nearby foliage. Use absorbent pads at roof edges and mask vents.
Work in small sections, keep tools steady, and follow shingle maintenance guidelines to guarantee effective paint prevention without harming surroundings.
Manage And Contain Runoff
Because solvents can harm plants, gutters, and water systems, you’ll want to control every drop as you work—apply solvents sparingly, use disposable applicators or small brushes, and blot rather than pour to loosen paint.
- Lay tarps to collect drips and practice runoff management.
- Use absorbent pads for edges.
- Funnel residues into sealed containers.
- Follow local containment strategies for disposal.
Low-Pressure Rinsing to Protect Shingle Granules
When rinsing dried paint from shingles, use low pressure so you don’t wash away the protective granules that give the roof its weather resistance and color.
You should aim for gentle, angled sprays that loosen debris without stripping granules.
Low pressure benefits include reduced granule loss and extended shingle life, promoting shingle preservation while letting you move to targeted cleaning methods safely.
Use Poultices to Lift Embedded Paint
Apply a poultice to draw out paint that’s soaked into shingle pores and granules without scrubbing harshly. You’ll target paint absorption and reduce abrasion via controlled poultice application.
Follow steps precisely:
- Mix absorbent base and solvent.
- Spread paste over stain.
- Cover and wait per instructions.
- Gently lift residue and rinse, repeating if needed.
Remove Oil-Based vs. Latex/Acrylic Paint From Shingles
Although both oil-based and latex/acrylic paints can stain shingles, they require different solvents and techniques for safe removal.
For oil-based differences, use mineral spirits or specialty solvent, test a small area, and work gently to avoid shingle damage.
For latex advantages, water-based cleaners, mild detergent, and scrubbing or pressure-wash on low usually lift residue more easily and with less risk.
Special Steps for Cedar, Wood, or Slate Shingles
Oil-based solvents and water-based cleaners won’t affect cedar, other wood, or slate the same way they do asphalt, so you’ll need gentler, material-specific steps.
- Test a small area for Cedar maintenance before treating larger sections.
- Use mild detergent and soft brushes for Wood preservation, avoiding power washing.
- For Slate care, employ gentle scrapers and pH-neutral cleaners.
- Rinse thoroughly and apply treatments that promote Shingle longevity.
Handle Paint on Edges, Hips, and Roof Penetrations
Concentrate on edges, hips, and roof penetrations first, since paint tends to accumulate there and those areas are most vulnerable to damage; use gentle edge cleaning techniques with a soft brush and plastic scraper to lift paint without gouging shingles.
Work around vents, chimneys, and flashing slowly, observing roof penetration considerations like seal integrity, and stop if you risk loosening roofing materials.
When Are Heat Tools Safe : and When They’re Not?
If you use heat tools on shingles, know they’re powerful but risky: they can soften and lift asphalt granules, warp the shingle mat, or melt flashings if applied too hot or held too long.
- Use heat gun safety: keep moving.
- Test low temps first.
- Respect temperature considerations for different materials.
- Stop at smoke, bubbling, or smell — that’s unsafe.
Inspect and Repair Shingle Damage After Removal
After you’ve removed the paint, inspect each shingle closely for loosened granules, cracks, tears, or softened spots that heat or solvents may have caused.
During shingle inspection, note damaged areas, take photos, and mark locations.
During shingle inspection, document damage, photograph affected spots, and clearly mark each location for repair.
Use repair techniques like adhesive patching, replacing individual shingles, or sealing minor cracks with compatible roof cement.
Confirm fasteners and flashing remain secure before finishing.
Eco-Friendly Cleanup and Disposal of Paint Waste
Once you’ve documented and repaired any shingle damage, it’s time to clean up paint residues and dispose of waste in ways that protect your roof and the environment.
- Use eco friendly alternatives like biodegradable cleaners for softening paint.
- Collect flakes and chips with a brush and tarp.
- Bag contaminated materials securely.
- Follow local paint disposal rules and drop off hazardous waste at approved centers.
Prevent Future Drips: Masking and Tarping Tips
Because prevention is always easier than cleanup, take time before you start painting to mask and tarp thoughtfully: secure high-quality painter’s tape to edges, overlap tarps to channel drips away from shingles, and fasten corners with weighted clips or sandbags so wind won’t expose roof surfaces.
Use proven masking techniques, position tarping strategies downhill from work, check seals periodically, and remove debris before painting.
How Long Removal Typically Takes
Removal usually takes anywhere from 15 minutes for a small drip to a few hours for stubborn, dried-on paint spread across multiple shingles.
You’ll estimate removal duration by checking paint age, thickness, shingle condition, and weather.
Follow steps:
- Assess paint age and thickness.
- Test a small area.
- Choose a gentle method.
- Monitor progress and adjust technique.
DIY Cost vs. Hiring a Pro
If you’re weighing options, DIY will usually cost far less upfront than hiring a pro, but it demands more time, effort, and some risk to your shingles.
You’ll get DIY benefits like lower expense and flexible timing, but you’ll trade off Professional Expertise, warranties, and faster, safer completion.
Balance budget, skill, and risk when deciding which route to take.
How to Choose a Qualified Roof Pro
Want someone who’ll fix your roof without creating new problems? You should vet contractor credentials, ask for references, and confirm insurance before hiring.
Follow this quick checklist:
- Verify licenses and contractor credentials.
- Check reviews and references.
- Confirm insurance and bonding.
- Ask about roof maintenance plans and guarantees.
That way you’ll hire a pro who protects your shingles and investment.
Common Mistakes That Damage Shingles : Avoid Them
Don’t use harsh chemical cleaners that can strip granules and weaken shingles.
Avoid scraping with metal tools, since they gouge and shorten the roof’s life.
And don’t ignore protective underlayment—if it’s damaged or missing, your repairs won’t hold up.
Using Harsh Chemical Cleaners
One common mistake is reaching for harsh chemical cleaners like bleach, paint strippers, or oven cleaners to get dried paint off shingles. They may remove paint quickly but also strip granules, degrade asphalt, and eat away sealants.
You should avoid them because chemical reactions can weaken surface integrity.
- Test small area
- Prefer mild cleaners
- Rinse thoroughly
- Wear protection
Scraping With Metal Tools
Grab a plastic putty knife instead of a metal scraper—using metal tools on shingles can gouge granules, tear the asphalt layer, and create weak spots that lead to leaks.
Don’t try aggressive metal scraping techniques; they’ll damage edges and void warranties.
Work gently with plastic tools, loosen paint slowly, and prioritize shingle preservation to avoid costly repairs and reduced roof life.
Ignoring Protective Underlayment
If you skip or damage the protective underlayment while removing dried paint, you risk exposing the roof deck to moisture and shortening the shingles’ lifespan.
You should avoid tearing layers that support shingle durability and worsen paint adhesion.
Follow steps:
- Inspect underlayment first.
- Use nonabrasive methods.
- Patch any tears immediately.
- Re-seal edges to protect decking.
Troubleshooting: If Paint Won’t Come Off
When dried paint resists your usual methods, don’t panic—you’ve got options to escalate safely and effectively.
Assess paint adhesion to determine if it’s surface film or chemically bonded; test solvent on a small area.
Check whether paint is just a surface film or chemically bonded—always test a solvent on a small, inconspicuous area first.
For stubborn stains, use a gentle paint remover or heat gun at low setting, scrape carefully, then neutralize and rinse.
Wear PPE and avoid damaging shingles.
Frequently Asked Questions
Can Paint Removal Void My Roof Warranty?
Yes — removing paint can void your warranty if paint removal methods damage shingles or coatings; you’ll want to check warranty implications, follow manufacturer-approved techniques, and document permission or professional service to avoid disputes.
Will Cleaning Affect Shingle Fire Rating or Insurance Coverage?
Sure—short and snappy. You won’t usually void fire safety or insurance implications if you’re careful; use approved cleaners, avoid heat or harsh chemicals, document the process, and notify your insurer to keep coverage clear and compliance confirmed.
Can Birds or Wildlife Be Harmed During Removal?
Yes—you can avoid harm: you’ll pause work if nests or animals are present, use non-toxic removers, cover or deter wildlife, and follow bird safety and wildlife protection guidelines so you won’t disturb or injure creatures nearby.
How to Remove Paint From Attic-Side (Underside) Shingles?
Picture a flashlight beam revealing paint streaks; you’ll use gentle paint removal techniques like soft scraping, low‑odor solvent, and gentle sanding, balancing shingle preservation tips to avoid delamination, fastening damage, or roof-vent interference.
Is It Safe to Walk on Wet-Treated Shingles After Cleaning?
You shouldn’t walk on wet shingles; they’re slippery and can damage their granules. Follow safety precautions: wait until fully dry, use fall protection, wear soft-soled shoes, and have someone spot you to minimize risk.
Conclusion
You’ve got the tools now to safely remove dried paint without wrecking your roof. Start by identifying the paint and shingle type, test a small spot, and use gentle chemical or mechanical methods—call a pro for steep or complex jobs. For example, imagine a homeowner who removed latex splatters from asphalt shingles using a mild citrus remover and a soft brush, preserving granules and avoiding a costly roof replacement. Stay patient and proceed carefully.