How to Cover a Wall Without Painting: Easy Budget-Friendly Ideas
You can refresh a wall fast and affordably without painting by measuring first, fixing small holes, then choosing removable options like peel-and-stick wallpaper, fabric panels, decals, or adhesive shelving that won’t harm rentals. Pick patterns that suit the room, use a plumb line for straight application, and test adhesives on a hidden spot. Clean and maintain coverings gently, and plan for seasonal swaps or repairs—keep going to find tips on materials, costs, and installation tricks.
Measure and Inspect Your Wall
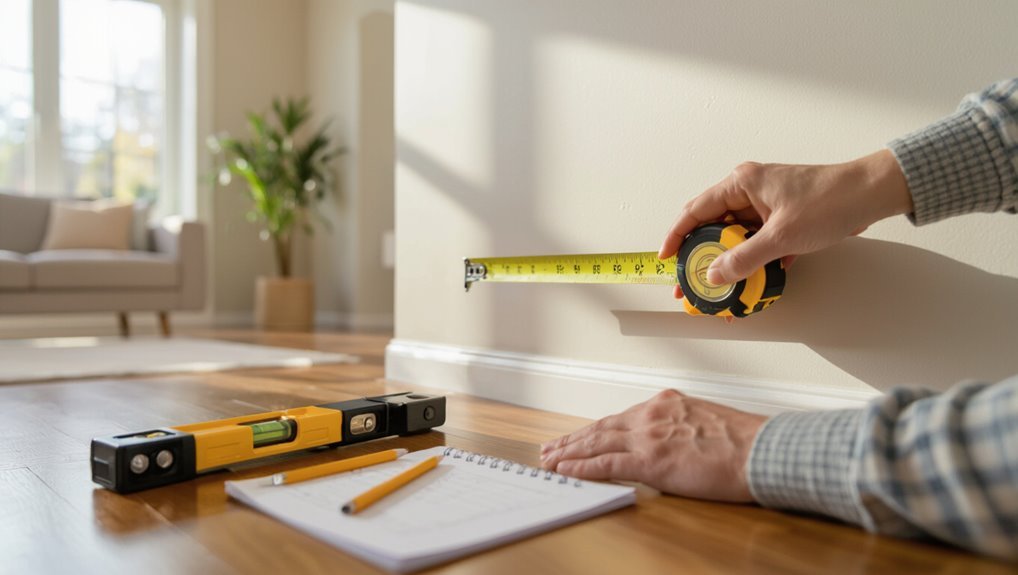
Start by measuring the wall’s width and height with a tape measure, recording dimensions at several points to catch any variations.
You’ll note wall dimensions precisely, then inspect the surface for cracks, moisture, holes, or unevenness.
Note wall dimensions precisely, then inspect for cracks, moisture, holes, or any unevenness before proceeding.
Assess wall condition honestly so coverings fit and adhere.
Take photos and jot measurements; that prevents mistakes and helps choose suitable, budget-friendly materials.
Quick Decision Framework: Budget, Timeline, Renter Rules
Start by setting your budget so you know which materials and methods are realistic.
Prioritize needs—whether you want a quick refresh or a longer-lasting solution—and match options to that timeline.
If you’re renting, check lease rules and landlord permissions before you buy or start.
Budget First, Then Prioritize
When you’re planning wall coverings, put your budget first so every choice that follows fits your financial limits. Next, map your timeline and any renter rules to narrow feasible options quickly.
Use budget strategies and prioritize essentials:
- Cover focal wall only
- Choose removable solutions
- Reuse or DIY materials
You’ll make faster, cheaper decisions that respect constraints.
Timeline: Quick Vs. Long-Term
With your budget set, you’ll next weigh how fast you need the job done versus how long you want the finish to last—this timeline check will steer choices between quick fixes and long-term solutions.
Decide if you want quick transformations like peel-and-stick panels or temporary fabric, or invest in long term solutions such as removable drywall overlays or professional-grade wood cladding for lasting impact.
Check Renter Rules
Because your lease sets the rules, check it before you buy anything: confirm what alterations are allowed, which fixtures you can add or remove, and any requirements for returning walls to their original condition.
You should review renter agreements and ask your landlord about wall modifications.
Decide quickly:
- Temporary options only
- Permission in writing
- Restoration plan kept on file
Top No-Paint Wall Coverings (Best Quick Options)
If you want a fast, low-commitment update, peel-and-stick wallpaper gives you bold patterns without the mess.
You can also hang fabric panels or tapestries for texture and easy removal.
Both options are renter-friendly and let you switch looks in minutes.
Peel-and-Stick Wallpaper
Peel-and-stick wallpaper gives you a fast, low-cost way to change a room without paint or a pro. You can follow peel and stick trends to pick patterns, install in a day, and remove without damage.
Consider simple wallpaper maintenance to wipe spills and check seams.
Benefits:
- Quick transform
- Low cost
- Removable for renters
Fabric Wall Hangings
Switching from peel-and-stick finishes to fabric wall hangings gives you a soft, textured way to cover walls without paint or tools.
You can drape tapestries, quilt panels, or stretch canvas-like textiles using simple hooks or Velcro.
Mix fabric types for durability and feel, and choose fabric patterns to set mood—geometric, floral, or neutral—so you change a room quickly and affordably.
When to Choose Removable Wallpaper
When you need style that won’t tie you down, removable wallpaper gives you bold pattern and easy changeability without commitment.
You’ll choose it for rental flexibility, quick updates, and minimal damage.
Remember removable wallpaper benefits and smart selection tips when planning.
Keep removable wallpaper perks and practical selection tips in mind when planning your next style refresh.
- Rentals or temporary spaces
- Seasonally rotating accents
- Testing long-term looks before committing
Pick the Right Removable Wallpaper Pattern
How do you pick a removable wallpaper pattern that actually works in your space? You’ll focus on pattern selection and color coordination: match scale to room size, repeat to furniture, and contrast or blend with existing tones. Use this quick guide:
| Room Size | Pattern Scale | Color Tip |
|---|---|---|
| Small | Small | Light hues |
| Large | Bold | Accent tones |
Install Peel-and-Stick Wallpaper (Step-by-Step)
You’ll want a few basic tools and materials—measuring tape, level, utility knife, smoothing tool, and a clean surface—to get the job done right.
Prep the wall by cleaning, patching holes, and measuring for pattern alignment.
Then peel, stick, and smooth each strip, trimming edges as you go for a flawless finish.
Tools And Materials
Before you peel the backing, gather the right tools and materials so the job goes smoothly.
For tool selection and material types, pick quality items to avoid mistakes. Essentials include:
- Utility knife, smoothing tool, measuring tape
- Level, pencil, seam roller
- Extra wallpaper, patching compound, cleaning cloth
You’ll want durable, clean supplies before you start.
Prep And Application
Once you’ve cleared the wall and smoothed any imperfections, mark a plumb line to guide your first strip and lay out the remaining sheets to check pattern alignment. Use wall preparation techniques and surface cleaning methods: clean, prime, measure. Apply peel-and-stick slowly, smoothing bubbles with a squeegee. Trim edges, match seams, and press firmly for lasting adhesion.
| Clean | Measure | Align |
|---|---|---|
| Prime | Cut | Smooth |
| Press | Trim | Inspect |
Avoid These Removable Wallpaper Mistakes
Wondering how a quick wallpaper swap could go wrong? You’ll avoid common mistakes by planning, testing adhesion, and matching pattern repeats.
Use removable wallpaper tips: clean surface, measure precisely, and smooth carefully. Don’t rush removal—heat stubborn spots.
- Prep properly
- Align patterns
- Remove gently
Temporary Fabric Panels: Why Choose Them
If you want an easy, renter-friendly way to transform a room without damaging walls, temporary fabric panels are a smart choice: they’re lightweight, reusable, and come in endless textures and patterns to suit any style.
You’ll get fabric panel benefits like sound dampening and quick style updates.
Follow simple installation tips to align seams, use gentle adhesives, and test placement before committing.
Mount Fabric Panels Without Nails
Mounting fabric panels without nails is simple and keeps your walls renter-friendly: use removable adhesive hooks, Velcro strips, or heavy-duty double-sided tape to secure panels while protecting paint.
You’ll choose fabric types and pattern choices, balance design inspirations with durability factors, and pick adhesive options matched to installation techniques.
- Measure precisely
- Test adhesives
- Smooth edges
Use Curtain Panels as Full-Wall Covers
When you hang curtain panels across an entire wall, you get an instant room makeover that’s easy to change and kinder to rental rules.
Choose curtain selection based on fabric weight and pattern to complement existing wall texture.
Mount a tension rod or simple track high and wide to hide edges. You’ll soften sound, conceal imperfections, and swap styles without damage.
Use Tapestries and Throws for Quick Swaps
Curtains work well for full-wall coverage, but tapestries and oversized throws give you even faster swaps and bolder visual impact.
You can change vibe instantly by swapping tapestry textures and bold throw patterns. Hang with clips, rods, or removable hooks.
Consider:
- Mix scales for depth
- Layer for warmth
- Rotate seasonally for fresh looks
Wall Decals: Best Uses and Limits
Think about placement and scale before you stick anything up—you’ll want decals sized to the wall and spaced so they don’t overwhelm a room.
Remember most vinyl decals handle normal indoor humidity but can peel in steamy bathrooms or on textured surfaces.
If you need longevity, pick higher-quality materials and test a small patch first.
Placement And Scale
How big should your decals be and where should you stick them to make the most impact?
Think of wall art as a focal anchor; balance size with furniture for spatial harmony.
Place decals at eye level, above key pieces, or as a border.
Use:
- One large focal decal
- Several medium groupings
- Small accents to connect spaces
Material Durability Limits
Because wall decals are made from thin vinyl or paper-backed adhesive, they work best on smooth, clean surfaces and aren’t suited for high-traffic or moisture-prone areas. You should evaluate surface compatibility and material lifespan before applying decals; expect fading or peeling over time.
| Area | Best Use | Limitation |
|---|---|---|
| Bedroom | Accent | Low abrasion resistance |
| Nursery | Decor | Sensitive to moisture |
| Hallway | Short-term | High wear |
Apply and Remove Large Wall Decals Safely
Applying large wall decals takes a little planning and the right tools to avoid bubbles, tears, or damage to the paint. You’ll use removable decals for temporary style while prioritizing wall safety.
Clean surface, apply slowly with a squeegee, and heat edges gently for removal.
Follow steps:
- Prep and measure
- Smooth with tool
- Warm then peel slowly
Peel-and-Stick Adhesive Tiles for Accents
You can install peel-and-stick tiles in minutes by cleaning the surface, planning a layout, and pressing each tile firmly into place.
Pick from geometric, faux-subway, or textured patterns to create an accent wall that fits your style.
To keep them looking fresh, wipe regularly, avoid excessive moisture, and replace any edges that lift to extend their lifespan.
Quick Installation Steps
When prepping for a quick peel-and-stick tile accent, start by measuring and marking the area so each tile lines up cleanly; this planning makes installation faster and reduces wasted pieces.
Gather installation materials and follow simple wall covering techniques.
Then follow these steps:
- Clean and dry surface.
- Peel backing, align tile.
- Press firmly, trim edges as needed.
Pattern And Texture Options
Although peel-and-stick tiles are quick to install, choosing the right pattern and texture will determine whether your accent feels subtle or striking; pick geometric shapes for a modern look, faux-subway for timeless warmth, or textured metallics to add depth and light.
You’ll use pattern mixing sparingly to avoid chaos and apply texture layering to create focal points that enhance scale and mood.
Maintenance And Longevity
Pattern and texture choices set the look, but upkeep will determine how long peel-and-stick accent tiles keep that look.
You’ll extend life with simple wall protection strategies and proper cleaning techniques. Follow routine steps:
- Dust and wipe weekly.
- Reseal edges or caulk gaps annually.
- Replace damaged tiles promptly.
You’ll avoid lifting, stains, and costly repairs with consistent care.
Install Peel-and-Stick Tiles (Step-by-Step)
Start by preparing a clean, dry wall — peel-and-stick tiles stick best to smooth, grease-free surfaces, so wipe the area with a mild detergent, rinse, and let it fully dry before you measure and mark.
Choose peel and stick varieties, plan layout, cut tiles to fit, peel backing, press firmly, and roll seams.
Follow installation tips for lasting adhesion and straight rows.
Use Contact Paper for Faux Wood or Stone
Pick a contact paper pattern and texture that matches the scale and lighting of your room so the faux wood or stone looks believable.
Measure carefully and use overlapping, smoothing, and a sharp blade to create nearly invisible seams as you apply each strip.
Take your time aligning grain or veining to keep the pattern continuous across the wall.
Choosing Pattern & Texture
Want the look of wood or stone without the cost or mess? You’ll use pattern selection and texture combination to create visual impact and mood setting.
Consider color harmony, design themes, seasonal trends, and material variety for aesthetic balance and artistic expression.
Prioritize:
- Scale vs. room size
- Finish and tactile feel
- Accent placement for focal points
Techniques For Seamless Application
Although using adhesive contact paper is an easy and affordable way to get a faux wood or stone look, getting a seamless result takes attention to surface prep, pattern alignment, and careful trimming.
You’ll smooth textured finishes, align grains like installing wall panels, match repeats as with decorative wallpapers or removable murals, and integrate wall stencils, fabric wallcoverings, adhesive art, and wall stickers for a polished, cohesive finish.
Temporary Murals and Removable Panels
If you’re renting or like to change things up often, temporary murals and removable panels let you transform a room without damaging walls. You can pick styles, swap art, or add texture quickly.
Consider:
- Peel-and-stick mural for bold visuals.
- Lightweight removable panels for depth.
- Fabric panels hung with clips for easy change.
They protect paint and won’t leave residue.
Removable Brick and Stone Veneer Sheets
You can give a room the look of brick or stone without heavy work by using peel-and-stick veneer sheets that install in minutes.
They’re made from lightweight faux materials, so they won’t stress drywall or require studs.
Choose removable adhesive options if you want a temporary upgrade that comes off cleanly later.
Peel-And-Stick Installation
Peel-and-stick brick and stone veneer sheets make upgrading a wall fast and affordable, since they cling to clean, dry surfaces without mortar or special tools.
You’ll get installation tips and design inspiration that simplify placement, cutting, and seams.
Follow basics:
- Measure and plan layout.
- Prep surface and test fit.
- Peel, stick, press firmly and trim for edges.
Lightweight Faux Materials
Lightweight faux brick and stone veneer sheets let you get the textured, rustic look of masonry without heavy materials, messy mortar, or permanent commitment. You can mix faux wood, textured panels and lightweight tiles for modern designs or colorful patterns. Consider removable stone, eco friendly options, durability factors and installation tips; check adhesive qualities before applying.
| Style | Use |
|---|---|
| Rustic | Accent wall |
| Modern | Full room |
Removable Adhesive Options
When you want the look of brick or stone without changing the wall permanently, removable adhesive veneer sheets give a fast, damage-free option that’s easy to install and reposition.
You’ll find various adhesive types and removable options suited to surfaces. Consider:
- Surface prep
- Panel alignment
- Edge sealing
Follow instructions, test a small area, and peel off cleanly when you’re ready to change.
Command-Friendly Shelving for Renters
If you want extra storage without risking your deposit, command-friendly shelving gives you sturdy, removable options that stick to painted walls and come down cleanly; you’ll find styles from slim picture-ledges to bracketed systems that hold books, plants, or kitchenware. You’ll balance shelf stability with aesthetic appeal, pick weight-rated strips, and arrange modular units for tidy, renter-safe storage.
| Style | Use |
|---|---|
| Ledge | Books |
| Bracket | Kitchen |
| Corner | Plants |
| Modular | Mix |
Create a Gallery Wall Without Nails
Although you’re renting, you can arrange a striking gallery wall without nails by using adhesive hooks, picture-hanging strips, and removable poster putty designed for framed art.
You get gallery inspiration and creative layouts using lightweight frames, fabric panels, and washi tape accents.
Try these no-damage options:
- Lightweight frames
- Fabric panels
- Washi tape accents
Layout Your Gallery on the Floor First
Before you hang anything, lay all the frames on the floor so you can plan your layout first and see how pieces relate.
Mix frame sizes to add interest and balance, then try different arrangements until the composition feels right.
Once you’ve settled on a layout, photograph it to use as your hanging guide.
Plan Your Layout First
When you’re covering a wall with multiple pieces, lay everything out on the floor first so you can test arrangements, spacing, and scale before you commit.
You’ll see layout inspiration and how pieces interact with your design aesthetics.
Try small mockups, adjust negative space, then pick the best grouping:
- Symmetrical
- Staggered
- Clustered
Mix Frame Sizes
Start by laying your frames out on the floor so you can see how different sizes play off each other and avoid surprises on the wall.
Mix large, medium, and small pieces to create frame variety, then step back and assess visual balance.
Group related themes or colors, keep consistent spacing, and note anchor pieces so mounting stays efficient and cohesive.
Trial Different Arrangements
If you want to avoid surprises on the wall, lay your frames out on the floor first and experiment with several arrangements until one feels balanced. You’ll test color combinations and pattern mixing, tweak spacing, and check focal points before committing.
Try these steps:
- Group by theme or size.
- Swap pieces to adjust contrast.
- Step back, refine spacing and alignment.
Use Washi Tape and Removable Hooks for Frames
Because you want a stylish, damage-free way to hang art, washi tape and removable hooks give you lots of options without drilling holes.
Use washi tape designs to create faux mats, geometric borders, or gallery grids that highlight prints.
Create faux mats, geometric borders, or gallery grids with washi tape to beautifully frame and highlight prints.
For heavier frames, stick removable hooks rated for the weight; for lightweight pieces, tape corners or make hanging tabs.
Rotate displays easily.
Decorative 3D Foam Panels and Tiles
While you’re updating a room on a budget, decorative 3D foam panels and tiles give you instant texture and depth without costly construction; they’re lightweight, easy to cut, and peel-and-stick or adhesive-friendly so you can install them yourself in an afternoon.
You’ll enjoy 3D panel benefits, design versatility, texture options, acoustic properties, budget considerations, maintenance ease, color choices, DIY creativity, market trends.
- Plan layout
- Clean surface
- Trim precisely
DIY Fabric-Wrapped Plywood Panels
Create custom, cushioned wall panels by wrapping thin plywood with fabric—an affordable way to add color, pattern, and subtle sound absorption to any room.
You’ll pick fabric types that suit style and durability, cut plywood to chosen panel sizes, glue batting and fabric, then staple or adhesive the edges.
Mount panels with picture-hanger clips or French cleats for a clean, removable finish.
Cover Big Walls With Shelves and Ledges
If you loved the texture and color that fabric-wrapped panels brought to a wall, think bigger: shelves and ledges can cover large expanses while adding storage and display space.
You’ll focus on shelf placement and ledge styling to balance scale and function. Consider:
- Vary heights for rhythm
- Mix open shelves with shallow ledges
- Use brackets that complement decor
Make a Living Wall With Mounted Pots
You can build a living wall with simple materials and basic tools like mounting brackets, screwdrivers, and waterproof trays.
Pick pots and soil suited for your space, then choose low-maintenance plants—think pothos, snake plant, or herbs if you have good light.
I’ll walk you through mounting options and plant-selection tips so your wall stays healthy and budget-friendly.
Materials And Tools
Start by gathering sturdy wall-mounted pots, corrosion-resistant brackets, and anchors rated for your wall type so your living wall stays secure.
Also collect fabric options for liners, adhesive types for lightweight mounts, and tools matching wall textures.
Follow design principles and color coordination; learn installation techniques and maintenance tips.
Consider removable choices for renters.
- Measure
- Level
- Secure
Plant Selection Tips
Which plants will thrive on your mounted pots depends on light, watering routine, and wall orientation.
Choose plant types that match light requirements—succulents for bright spots, ferns for shade, trailing pothos for medium light.
Plan care tips: drainage, regular but moderate watering, and easy-to-replace pots.
Balance aesthetic considerations with maintenance so your living wall stays vibrant without extra work.
Use Lightweight Mirrors as Removable Decor
When you want to brighten a room without nails or paint, lightweight mirrors offer a quick, removable solution that still looks intentional.
You can use mirror placement to amplify light and create reflective effects that make spaces feel larger. Try simple arrangements to customize mood:
- Cluster small mirrors
- Line a hallway
- Accent beside artwork
You’ll change ambiance without commitment.
Hang Rugs, Tapestries, or Blankets as Art
If you want an instant focal point without buying new art, hang a rug, tapestry, or decorative blanket on the wall—it’s an affordable, textured way to fill empty space and add color or pattern.
Consider rug selection and tapestry styles to match wall aesthetics; evaluate blanket textures, fabric colors and textile durability.
Plan art arrangement and choose hanging methods that protect the piece and your wall.
Build a Removable Trim or Molding Feature
Because you might want a polished look without permanent changes, build removable trim or molding to add depth and character while keeping walls intact.
You can DIY decorative trim with lightweight MDF or foam, paint before installing, and use adhesive strips or Velcro for removal.
Steps to follow:
- Measure precisely
- Cut and finish pieces
- Attach using removable mounting for easy changes and damage-free removal
Magnetic Sheets and Strips (Paint-Free)
Magnetic sheets and strips give you a quick, paint-free way to customize walls without tools or mess.
You can apply patterned magnetic designs or cut sheets to fit alcoves, creating an interchangeable gallery or functional board.
Use strips to mount baskets, hooks, and shelves for neat wall organization.
They peel off cleanly, so you’ll update looks or solve storage without damage or long-term commitment.
Use Lighting to Enhance Non-Painted Walls
When you don’t want to repaint, smart lighting can transform plain walls into focal points by adding depth, texture, and color without a single drop of paint.
Use ambient lighting to set mood lighting, adjust color temperature and light intensity, and position wall sconces, LED strips, or decorative lamps for accent lighting.
- Layer sources
- Highlight texture
- Control color temperature
How to Layer Textiles, Shelves, and Decals
Mix textiles, shelves, and decals to create layered interest that won’t break the bank; start by anchoring a wall with a textile—like a tapestry, rug, or woven panel—then add floating shelves for plants and framed prints, and finish with decals to tie colors and patterns together.
You’ll use textile layering for depth, shelf styling for balance, decal placement for focal points, and deliberate pattern mixing.
Clean, Maintain, and Remove Safely
Once your layered wall looks great, keep it that way by knowing how to clean, maintain, and remove pieces safely.
Use gentle cleaning techniques for fabrics and decals, follow maintenance tips like checking adhesives, and learn removal methods that won’t gouge paint.
Prioritize safety precautions: turn off power near shelves, wear gloves, and use proper tools.
- Inspect
- Clean
- Remove
Repair Minor Wall Damage Before and After Removal
Start by evaluating the damage so you know what’s needed: small nail holes, adhesive residue, and surface scratches all call for different fixes.
Use simple damage assessment tools like a flashlight and putty knife.
Apply appropriate wall repair techniques—fill holes with spackle, sand smooth, remove adhesive with solvent, and touch up texture.
Let repairs dry before re-covering to guarantee a seamless finish.
Cost Comparison: Cheap to Splurge Options
Now that your walls are prepped and blemishes fixed, you can weigh material and installation costs to match your budget and style.
Compare budget options vs. splurge ideas for impact and longevity.
Consider:
- Peel-and-stick wallpaper — cheap, DIY.
- Fabric panels — mid-range, removable.
- Wood or tile feature — splurge, durable with professional install.
Choose based on cost, time, and permanence.
Best Materials for Renters vs. Homeowners
If you’re renting, prioritize removable, low-impact coverings like peel-and-stick wallpaper, fabric panels hung with Command strips, or temporary adhesive tiles; if you own the place, you can opt for permanent, higher-durability options such as painted shiplap, real wood planks, or ceramic tile that add long-term value.
| For renters | For owners |
|---|---|
| renter friendly materials | homeowner upgrades |
| peel-and-stick | shiplap/wood |
| fabric panels | ceramic tile |
Switch Looks Seasonally Without Repainting
Whether you rent or own, you don’t have to repaint to refresh a room for a new season. You can switch looks seasonally without repainting by swapping textiles, art, and accents for clear seasonal themes and smart color coordination.
Try simple rotations:
- Pillows and throws
- Removable art and decals
- Rugs and table decor
Rotate pieces to change mood quickly and affordably.
Frequently Asked Questions
Can These Coverings Affect My Room’s Fire Safety or Insurance?
Yes — they can. You should use fire retardant materials, check insurance policy considerations, and confirm coverings meet local codes. If not, your insurer might deny claims or raise premiums, so document approvals and product specs.
Will Humidity or Mold Grow Behind Removable Coverings?
Yes — humidity concerns can let mold grow behind removable coverings if airflow’s poor or moisture’s trapped. You should use breathable materials, add spacing, control room humidity with vents or dehumidifiers, and inspect regularly for mold prevention.
Do Any Options Block Wi‑Fi or Smart Home Signals?
No, most fabric options, wallpaper choices, removable decals, and decorative panels won’t block Wi‑Fi or smart home signals; you’ll only see issues with very dense metal-backed panels or foil wallpapers, which can attenuate wireless signals.
How Do Coverings Impact Thermostat or HVAC Sensors?
They’ll act like a cozy blanket over your sensor: coverings with thermal insulation can make thermostats read warmer, so you’ll get skewed HVAC cycles; choose breathable materials to preserve accurate readings and maintain aesthetic appeal.
Can Pets or Children Permanently Damage Coverings?
Yes — kids and pets can permanently damage coverings, but you can prevent it by choosing pet friendly options like washable vinyl, cork, or high-impact fabric, and using child safe materials, secure fasteners, and protective trims.
Conclusion
You’ve got this: pick a practical plan that fits your pocket, period of stay, and personal style, then prep the surface properly. Choose removable wallpaper for renter-friendly revamps, textured panels for timeless transformations, or clever coverings for quick, cost-conscious changes. Mix and match seasonal swaps to stay stylish, simple, and satisfied. With careful choices, creative courage, and consistent care, you’ll cover walls confidently without painting and keep décor delightful.