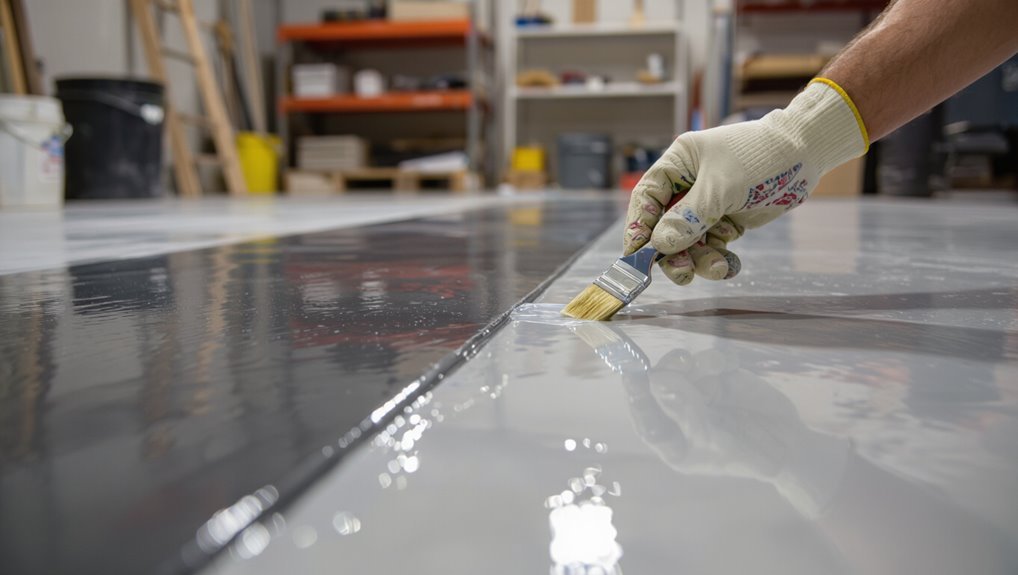
How Long Does Epoxy Paint Take to Dry? Complete Timing Guide
You’ll get a surface‑dry epoxy in hours but should plan days to weeks for full strength: touch‑dry is often 4–12 hours, recoat windows run 6–48 hours, light use in 1–3 days, and full cure can take 7–30 days depending on temperature, humidity, coat thickness and mix accuracy. Fast two‑part systems cure quicker; marine and floor epoxies often need longer. Keep conditions controlled to avoid defects, and the guide explains timing, tips and troubleshooting.
Epoxy Drying Time: Quick Answers and Cheat Sheet
Wondering how long epoxy paint takes to dry? You’ll get a concise cheat sheet: typical epoxy applications dry surface-fast in hours but need longer to develop strength.
You should factor temperature, humidity, and film thickness; follow recommended curing techniques and manufacturer times.
For best results, control environment, mix accurately, and avoid traffic until specified readiness to prevent defects and guarantee durable finish.
Epoxy Cure Stages: Touch-Dry, Recoat, Light Use, Full Cure
You’ll first notice a touch-dry time when the surface feels tack-free after a few hours, but that doesn’t mean the job’s done.
Pay attention to the recoat window so you apply additional layers at the right time without causing adhesion problems.
Expect light use in a day or two and a full cure that can take anywhere from several days to a week (or longer for thicker coats and cooler conditions).
Touch-Dry Time
Although full hardness takes days to weeks, the touch-dry stage happens much sooner: you can usually gently touch epoxy within 4–12 hours after application depending on temperature, humidity, and product formulation.
You’ll check touch dry indicators like a slightly tack-free feel and no transfer to your finger.
Touch dry factors include thinner coats, warmer temps, and lower humidity speeding this stage, so plan accordingly.
Recoat Window
The recoat window is the period after touch-dry when the first epoxy layer is still chemically active enough to bond with another coat without sanding.
You should catch it when the surface feels tack-free but not fully cured, typically between 6–24 hours for fast systems and up to 48 hours for slower formulations, depending on temperature and humidity.
Use proper recoat techniques to avoid adhesion issues; the recoat benefits include stronger intercoat bonding and smoother finish.
Full Cure Timeline
When you apply epoxy, it goes through distinct cure stages—touch-dry, recoat, light-use, and full cure—that tell you how soon you can handle, recoat, or fully load the surface.
Monitor times: touch-dry hours, recoat window days, light-use after several days, and full cure in 7–30 days.
Know full cure importance and watch full cure indicators like hardness, solvent resistance, and no tack.
Typical Dry Times by Product Type
Because epoxy formulas and application methods vary, you’ll see a range of dry times tied to product type and purpose. You’ll choose epoxy paint types and application techniques based on speed and finish. Typical ranges:
| Product | Touch Dry | Recoat/Light Use |
|---|---|---|
| Floor Epoxy | 6–24 hrs | 24–72 hrs |
| Spray Epoxy | 15–60 mins | 4–24 hrs |
| Marine Epoxy | 12–48 hrs | 48–96 hrs |
Two-Part vs. Single-Part Epoxy: Cure Timelines
If you want faster, more reliable curing, go with a two-part epoxy; its resin and hardener chemically react to form a strong, often quicker cure than single-part formulas.
You’ll see two part advantages in shorter tack and full cure windows, and you can control pot life and strength.
Know single part limitations: slower cure, less chemical resistance, and thinner workable performance.
Fast-Curing Epoxies: When to Choose Them
If you need a quick return-to-service, fast-curing epoxies let you finish jobs sooner and reduce downtime.
You’ll see advantages like shorter tack-free times, faster topcoating, and less risk of dust or debris settling during cure.
Choose them for small repairs, tight schedules, or projects in controlled environments where you can accept a slightly shorter pot life.
Faster Cure Advantages
When time’s tight and you need a usable surface quickly, fast-curing epoxies let you get projects back into service in hours instead of days.
You’ll appreciate fast curing for reduced downtime, quicker recoats, and earlier use.
Application benefits include less contamination risk, predictable scheduling, and faster return on investment.
You still follow proper mixing and surface prep for reliable results.
When To Use
Although they cure quickly, fast-setting epoxies aren’t the right choice for every job; you should pick them when speed outweighs the need for extended working time or for complex, slow applications.
Use them for small repairs, quick floor patches, or emergency fixes where minimal downtime matters.
Guarantee tight surface preparation and plan epoxy applications carefully since you’ll have little time to adjust or reposition materials.
High‑Solids vs. 100% Solids: Drying Expectations
Because high‑solids and 100% solids epoxy contain different proportions of solvents and reactive resins, you’ll notice distinct drying and curing behaviors: high solids benefits include faster surface set and easier leveling, but they still need solvent evaporation and longer full cure than coatings without solvents.
100% solids applications cure by chemical reaction only, so they often reach full strength faster and with less shrinkage, though they can be viscous.
Water‑Based Epoxy: Drying and Curing Schedule
Switching from solvent‑containing systems to water‑based epoxy changes how drying and curing unfold, so you’ll see different timing and handling requirements.
You’ll notice faster surface drying (usually 1–4 hours) but longer full cure (3–7 days).
Consider water based benefits like lower odor and easier cleanup.
Use proper application techniques: thin coats, humidity control, and moderate temperatures to guarantee consistent cure and durability.
Epoxy Floor vs. Countertop Resin: Timing Differences
When you compare epoxy floor systems to countertop resins, you’ll find significant differences in pot life, recoat windows, and full cure times driven by formulation, film thickness, and designed use.
For floors you’ll use longer pot life, broadcast flakes, and simpler application techniques; countertops need fast set, thin pours, and meticulous surface preparation to avoid bubbles and guarantee food-safe, glossy finishes—plan cure times accordingly.
Garage Floor Timelines: Walk, Drive, Heavy Loads
Flooring and countertops differ, but the same chemistry still governs how long an epoxy needs to set before you can use it; for garage floors, think in staged load-bearing milestones.
Flooring and countertops differ, but epoxy curing follows the same chemistry—garage floors gain load capacity in staged milestones.
You’ll wait for increasing load capacity before normal use:
- Walk: 24–48 hours for light foot traffic on a garage floor.
- Drive: 3–7 days for car weight under moderate load capacity.
- Heavy loads: 7–14 days before forklifts or heavy equipment.
Epoxy on Concrete: Substrate Temperature Effects
You’ll get the best epoxy cure when the concrete is between about 50–85°F (10–30°C), so check substrate temperature before you start.
If the slab’s too cold, the epoxy will cure slowly and may not fully crosslink; if it’s too hot, you risk rapid gelation, bubbles, and poor flow.
Plan work and use heaters or cooling measures as needed to stay within the ideal range.
Ideal Concrete Temperature
Although epoxy will cure across a range of conditions, concrete temperature strongly controls pot life, cure speed, and final hardness.
So aim to keep the slab between about 50°F and 85°F (10°C–29°C) during mixing, application, and initial cure. You should monitor ideal temperature and concrete conditions closely:
- Confirm slab is within range before mixing.
- Avoid rapid swings during cure.
- Use heaters or ventilation as needed.
Cold-Weather Curing
When temperatures drop below about 50°F (10°C), epoxy reactions slow dramatically and you’ll see longer pot life, slower tack-free times, and reduced early hardness on concrete; plan for extended cure windows, possible blush or amine-surfacing issues, and the need for temperature control or modified products to get reliable results.
| Issue | Cause | Tip |
|---|---|---|
| Slow cure | cold weather | Heat substrate |
| Blush | humidity + cool | Improve ventilation |
| Weak early strength | temperature fluctuations | Use low-temp epoxy |
Hot-Weather Risks
If concrete gets hot—typically above about 80–85°F (27–29°C)—epoxy will react faster, shortening pot life and tack-free time and making the mix harder to work with; you’ll face issues like flash curing, poor film formation, and trapped bubbles unless you lower substrate temperature, work in cooler hours, or use formulations designed for heat.
- Plan cooler application windows to avoid hot weather challenges.
- Use heat-tolerant formulations to stabilize epoxy performance.
- Pre-cool materials and substrate to maintain workable pot life.
Priming Concrete: Impact on Cure and Adhesion
Because concrete is porous and alkaline, priming it before applying epoxy greatly improves both adhesion and curing consistency.
You should use proper adhesion techniques like a solvent-based or epoxy primer to seal pores, neutralize alkalinity, and promote bond strength.
Priming benefits also include smoother cure times and fewer failures.
Priming yields more consistent cure times and reduces the risk of coating failures.
Apply per manufacturer instructions and guarantee the primer fully cures before topcoating.
Concrete Moisture: How It Changes Epoxy Cure
You should check concrete moisture with a moisture meter or a calcium chloride test before applying epoxy.
Too much moisture can slow or prevent proper curing, cause blisters, or lead to adhesion failure.
If readings are high, dry the slab with ventilation, dehumidifiers, or allow more time before coating to guarantee a reliable cure.
Concrete Moisture Measurement
Wondering how moisture in concrete affects epoxy cures? You’ll need reliable moisture testing to decide when to coat.
Measure surface and in-depth levels, watch vapor drive, and consider concrete permeability for accurate readings.
- Use a calcium chloride or relative humidity probe.
- Test multiple spots across the slab.
- Record results, temperature, and curing time before proceeding.
Effects On Epoxy Cure
Having solid moisture data lets you predict how concrete moisture will alter epoxy cure behavior.
You’ll see slowed reaction rates when excess moisture interferes with epoxy chemistry, causing tacky films and incomplete crosslinking.
Moisture can deactivate curing agents or create amine blush, so you’ll get reduced hardness and adhesion.
Monitor levels closely to understand likely cure times and final coating performance.
Mitigation And Drying
If concrete shows elevated moisture, you’ll need to both mitigate the source and speed drying before applying epoxy; otherwise cure problems will persist.
You should test, ventilate, and select proper materials while adjusting epoxy application techniques and curing environment considerations.
- Fix leaks and humidity sources
- Use dehumidifiers and fans to dry slabs
- Choose moisture-tolerant primers and slow-cure systems
How Temperature Affects Epoxy Drying Speed
Because epoxy curing is a chemical reaction, temperature directly changes how fast the molecules cross-link.
So warmer conditions speed drying while cold ones slow or even halt it. You’ll notice curing times halve with moderate heat and lengthen in cool spaces.
Avoid temperature fluctuations that stress the film; maintain consistent warmth for predictable results.
Monitor humidity levels too, since they interact with temperature.
How Humidity Slows or Stalls Curing
While humidity doesn’t change the chemistry of epoxy, it can slow or even stall the cross-linking process by interfering with how the resin and hardener react.
You’ll notice slower tack-free times and uneven gloss when moisture is high. Understand humidity effects to avoid curing challenges:
- Expect longer wait times and softer film.
- Watch for blush or amine bloom.
- Use ventilation to reduce moisture.
Why Coat Thickness and Film Build Matter
How thick you apply the epoxy affects its film thickness, which in turn changes how long each layer takes to cure.
Thicker films usually cure slower and can trap solvents or reactants, altering the final hardness and adhesion.
That film build also impacts surface performance—wear resistance, flexibility, and gloss—so you’ll want to match thickness to the job.
Film Thickness Effects
If you apply a thicker epoxy coat, you’ll speed up certain performance gains—better abrasion resistance and fewer passes needed to build protective film—but you’ll also slow down solvent release and risk surface defects like orange peel, sagging, or incomplete cure at the core.
Consider film thickness variations to find ideal coating balance:
- Thicker = better wear, higher risk.
- Thinner = faster drying, less protection.
- Split layers often achieve ideal coating.
Curing Time Relation
Because curing is a chemical process, thicker epoxy layers take longer to convert from a sticky film to a fully cross-linked coating. This directly affects both surface feel and long-term performance.
You should monitor curing factors like resin-to-hardener ratio and humidity; they influence cure depth.
Remember temperature impact: warmer conditions speed cross-linking, while cold slows it, so adjust film build accordingly.
Surface Performance Changes
When you build a thicker epoxy film, you change more than just appearance — you alter hardness, flexibility, and resistance to wear and chemicals.
You’ll notice surface durability and cure speed shift with film build, so adjust application techniques accordingly.
- Thicker coats increase abrasion resistance but slow full cure.
- Thin coats cure faster and stay flexible.
- Overbuild risks cracking, solvent entrapment.
How to Read Manufacturer Cure Charts
Although cure charts can look technical at first glance, you can quickly learn to read them and apply the data to your project.
Start by checking manufacturer guidelines for temperature, humidity, and pot life.
Locate charts showing tack, recoat windows, and full cure at specific conditions.
Use cure chart interpretation to adjust schedules and expectations, and record ambient conditions during application.
Testing Tackiness and Recoat Readiness
To check tackiness and recoat readiness, lightly press a clean fingertip or a piece of low-tack masking tape to a small, inconspicuous area and feel for stickiness or residue.
You’ll use simple tackiness testing and a quick recoat evaluation to decide next steps.
- If no tack, proceed with next coat.
- Slight tack: wait longer and retest.
- Sticky: cure incomplete, delay.
When to Sand or Grind Between Coats
You should wait for the cure time window specified by the epoxy manufacturer before sanding or grinding to avoid pulling uncured material.
Check surface tackiness with a finger—if it’s gummy, hold off; if it’s firm but not fully cured, light sanding is okay.
Use recommended grits (typically 120–220 for sanding, coarser for grinding) to create proper adhesion without damaging the film.
Cure Time Window
1–6 hours after the first coat has tackified is the typical “open” window when you can lightly sand or grind and still get good adhesion to the next coat; you’ll judge this based on cure time factors for different epoxy applications.
Follow these quick steps:
- Light sand to key the surface without cutting through.
- Remove dust and contaminants.
- Apply next coat within the window for best bonding.
Surface Tackiness Check
Wondering when it’s safe to sand or grind between epoxy coats? You’ll use tackiness testing and surface evaluation: press lightly—no residue means safe. If tacky, wait and retest; if fully cured, proceed carefully to avoid deep cuts.
| Condition | Action |
|---|---|
| No tack | Sand/grind |
| Slight tack | Wait, retest |
| Sticky | Do not sand |
| Fully cured | Proceed |
Recommended Grits
After confirming the surface isn’t tacky, pick the right abrasive to avoid gouging while ensuring adhesion.
For proper surface preparation, use recommended grits based on epoxy type and cure time. Light sanding removes sheen; aggressive grinding fixes runs. Match grit to stage and follow with dust removal.
- 220–320 for scuffing between coats
- 120–180 for heavier leveling
- 36–80 for grinding back defects
Topcoat Timing: When to Apply Sealant or Finish
When the epoxy feels dry to the touch and has reached its recommended cure window, you can plan your topcoat—don’t rush it, though, because applying a sealant too early or too late can compromise adhesion and appearance.
Check manufacturer cure specs, test a small area, and verify surface is clean and sanded.
For durable results, schedule sealant application based on finish timing and environmental conditions.
When Epoxy Is Ready for Furniture and Foot Traffic
You can walk on most epoxy floors after 24–48 hours, but full cure for heavy furniture and constant traffic often takes 7 days or more.
Consider the weight and point-load of furniture—heavy couches or cabinets can dent or sink a not-fully-cured surface.
Also remember that cooler surface temperatures slow cure, so keep the area warm to reach safe traffic times sooner.
Cure Time vs. Traffic
Although the surface may feel dry within a day, epoxy needs more time before you move furniture or expect regular foot traffic. Full curing determines strength, abrasion resistance, and adhesion, not surface tackiness.
You’ll base timing on cure factors and traffic considerations. Plan staggered use and wait recommended times.
- Wait manufacturer cure time.
- Limit traffic for 3–7 days.
- Check hardness before heavy use.
Furniture Weight Considerations
Having waited for the recommended cure window and limited traffic, consider how furniture weight concentrates load and affects epoxy’s readiness for placement.
You should stagger heavy items, use wide protective pads, and test a small area first. Excessive concentrated loads can compromise epoxy adhesion and cause indentations or stress cracks.
Lighter, distributed loads reduce risk while full cure continues over several days.
Surface Temperature Effects
If the surface temperature’s too low or too high, the epoxy won’t cure at the expected rate and you shouldn’t assume it’s ready for furniture or foot traffic.
You need consistent conditions to prevent delays or soft spots that harm epoxy performance and react to temperature fluctuations.
- Check surface temp before placing items.
- Allow extra cure time when temps vary.
- Use heaters or vents to stabilize conditions.
When Epoxy Is Ready for Vehicle Traffic and Heavy Equipment
When you’re planning to drive vehicles or run heavy equipment over a newly coated epoxy floor, wait for full cure rather than just dry-to-touch times. You’ll assess traffic readiness by cure time, ambient conditions, and expected equipment weight. Lighter cars need less time than forklifts. Check manufacturer’s specs and test spots before full use.
| Factor | Time | Note |
|---|---|---|
| Car traffic | 3–7 days | light loads |
| Forklifts | 7–14 days | high point load |
| Heavy trucks | 14+ days | consult spec |
| Safety margin | +2 days | variable conditions |
Decorative Broadcasts, Flakes, and Metallics: Timing
When you broadcast decorative chips or flakes, expect the base coat to be tacky but not fully cured before scattering so they bond properly.
The flake layer itself needs additional cure time—typically 24–48 hours—before sealing or walking on it.
Metallic pigments can seem set sooner, but they still need the same full cure schedule to avoid smearing or adhesion problems.
Broadcast Application Dry Time
Because broadcast systems add texture and layers, drying and cure times differ from smooth epoxy coats—you’ll often wait longer between stages and before light use.
You’ll monitor temperature and humidity, adjust for thicker build, and guarantee proper adhesion to varied application surfaces using recommended broadcast techniques.
- Allow longer tack time before sealing
- Check for solvent entrapment
- Wait full cure before heavy traffic
Flake Layer Cure Time
If you’re working with decorative broadcast systems—flakes, metallic chips, or multi-size decorative blends—expect the flake layer to need more time to settle and tack-up than a smooth epoxy coat; the added texture and variable thickness slow solvent release and extend cure windows.
You should follow proper flake application techniques, monitor ambient temperature and humidity, and address flake adhesion factors to guarantee full cure before topcoating or heavy use.
Metallic Pigment Setting Time
Though metallic pigments and decorative flakes often look dry quickly, they still need extra time to settle and chemically set before you topcoat or expose the floor to traffic.
You should wait to preserve metallic sheen and color intensity. Monitor tackiness and cure window, then proceed.
- Check tack-free surface
- Confirm full chemical set
- Avoid early traffic or topcoating
Common Mistakes That Prolong Epoxy Drying
When you rush mixing, skip surface prep, or ignore temperature and humidity, you’ll often stretch epoxy’s drying time far beyond the label’s estimate.
You’ll also slow cures by using wrong thinning solvents, overapplying thick coats, or relying on myths about faster drying.
Learn proper drying techniques, challenge common misconceptions, follow pot life and recoat windows, and maintain recommended climate controls for predictable cures.
Troubleshooting Soft, Tacky, or Uncured Epoxy
If your epoxy stays soft or tacky, first check the resin-to-hardener ratio—incorrect measurements are the most common cause of uncured epoxy.
Also look at the cure conditions, since low temperatures or high humidity can slow or prevent proper curing.
Fixing the mix ratio and bringing the workspace into the manufacturer’s recommended temperature and humidity range will usually resolve the issue.
Check Resin-to-Hardener Ratio
Because epoxy cures through a chemical reaction, getting the resin-to-hardener ratio right is essential—too much resin or hardener will leave the coating soft, tacky, or uncured.
Check manufacturer mix ratios for your resin types and hardener options, measure carefully, and mix thoroughly. If problems persist, verify batch accuracy and consider re-mixing small test samples before full application.
- Measure precisely
- Follow product instructions
- Test small batches
Address Temperature And Humidity
Temperature and humidity play a huge role in epoxy curing, so you’ll want to control both to avoid soft, tacky, or uncured finishes.
Keep workspace within the manufacturer’s recommended range; temperature effects speed or slow chemical reactions, causing tackiness if too cold or fish-eyes if too hot.
Manage humidity impact by dehumidifying or delaying pours during high moisture to prevent amine blush and incomplete cure.
Blush, Amine Spotting, and Sticky Residues: Causes
When epoxy develops a waxy bloom, small amine spots, or stays tacky after cure, it’s usually due to moisture, humidity, or wrong product choice interfering with the chemical reaction; you’ll most often see blush and amine spotting when atmospheric moisture reacts with hardeners, while sticky residues come from incomplete cure caused by low catalyst ratio, incorrect mix, or poor ventilation.
- Check humidity and temperature.
- Use correct mix ratios and thorough stirring.
- Choose products and procedures focused on blush prevention and reducing amine spotting.
Recoat Failures and How to Avoid Lifting
If you’ve ever applied a fresh epoxy coat only to see the new layer peel or lift from the one beneath, recoat failures are usually down to surface contamination, over-curing between coats, or applying the new layer outside the recommended recoat window.
Prevent lifting by cleaning and scuffing the existing film, following the manufacturer’s recoat times, and ensuring proper mix and application to promote adhesion.
Use consistent recoat techniques and prioritize lifting prevention.
Additives & Accelerators: Effects on Cure and Finish
Beyond surface prep and correct recoat timing, additives and accelerators change how epoxy cures and what the final film looks like.
You’ll want to understand additive impact and choose appropriate accelerator types to avoid defects, altered pot life, or compromised gloss.
- Fillers: adjust viscosity and texture.
- Pigments: affect opacity and UV resistance.
- Catalysts: speed crosslinking but shorten working time.
Safe Ways to Speed Epoxy Drying
Although you can’t rush chemical reactions, there are safe methods you can use to accelerate epoxy drying without harming the finish. Use heat lamps at a modest distance, improve airflow techniques with fans, and keep humidity low. Monitor temperature and avoid direct overheating.
| Method | Effect | Caution |
|---|---|---|
| Heat lamps | Speeds cure | Don’t overheat |
| Fans | Improves airflow | Avoid dust |
| Dehumidifier | Lowers humidity | Watch dryness levels |
How to Slow Curing for Better Flow and Leveling
When you want a smoother, self-leveling surface, slowing the epoxy’s cure gives you more working time to remove bubbles and even out the pour.
Use slow curing techniques and control ideal temperature to extend flow time without compromising strength.
- Mix resin and hardener precisely, stirring slowly.
- Slightly lower ambient ideal temperature within product specs.
- Use slow-curing formulations or additives for longer pot life.
Ventilation and Airflow Strategies to Improve Cure
Slowing the cure gives you more time to work the surface, but proper ventilation and controlled airflow will help the epoxy harden evenly and reduce surface defects like amine blush or trapped moisture.
You should use ventilation methods like exhaust fans and air circulators, optimize workspace design for airflow enhancement, monitor humidity control and temperature regulation, and consider drying chambers to maintain a stable curing environment and air quality.
Using Heat Lamps or Heaters: Safe Temperature Limits
If you’re going to speed epoxy curing with heat lamps or space heaters, keep temperatures steady and conservative: aim for a workspace air temperature between 70–85°F (21–29°C) and avoid local surface temperatures above about 120°F (49°C), since excessive heat can yellow resin, accelerate solvent release, cause blushing, or warp substrates.
- Check heat lamp safety: keep distance, shields, timers.
- Follow heater guidelines: gradual ramp, consistent airflow.
- Monitor surface temps with IR gun; stop if hot spots appear.
Maintenance After Cure: Cleaning and Resealing Schedule
Although epoxy reaches its cured hardness in days to weeks, you’ll need a simple maintenance routine to keep the surface looking and performing its best over time.
Use gentle cleaning techniques—mild detergent, soft mop, avoid abrasive pads—to remove dirt and spills.
Inspect quarterly for wear; adjust resealing frequency to traffic and UV exposure, typically every 1–3 years, or sooner if finish dulls.
Project Planning: Build a Realistic Epoxy Timeline
After you’ve established a maintenance routine and reseal schedule, plan the epoxy project timeline so each step gets the time it needs to cure and perform.
You’ll use epoxy project planning to set realistic timeline estimation, account for prep, curing windows, and inspections so you don’t rush.
- Prep and substrate repair
- Mixing, application, and flash-off
- Full cure verification and final touches
Quick‑Reference Chart: Typical Drying Times by Product & Conditions
Think of this quick-reference chart as your go-to summary for typical epoxy drying times across common products and conditions; it gives you a fast way to match product type, temperature, humidity, and coat thickness to expected tack-free, recoat, and full-cure windows so you can schedule each step without guesswork.
Use it to compare resin types, note epoxy durability factors, adjust for environmental impact, and plan cure stages precisely.
Frequently Asked Questions
Can Epoxy Be Applied Over Old Paint or Coatings Without Removal?
Yes—you can often apply epoxy over existing paint if it’s sound; you’ll clean, degrease, sand, and use adhesion-promoting primers. Follow painting tips, test patch adhesion, and repair peeling or compromised coatings before epoxy adhesion.
How Long After Curing Can Epoxy Be Chemically Cleaned or Sterilized?
Like a sunrise finishing its arc, you can chemically clean or sterilize epoxy after full cure time—typically 7 days; use approved cleaning methods (mild detergents, isopropyl alcohol, diluted bleach) and avoid harsh solvents that’ll damage it.
Will Epoxy Release Harmful Fumes After It Has Fully Cured?
No, once epoxy’s fully cured you won’t be exposed to ongoing harmful fumes; the curing process finishes off volatile compounds. You should still follow fume safety during curing and confirm cure per manufacturer instructions.
Can UV Exposure Yellow Epoxy Over Long Periods?
Yes — you’ll see yellowing from UV effects over time; clear epoxies will degrade, shortening epoxy longevity unless you use UV-stable formulas or topcoats with UV inhibitors, which will help preserve clarity and durability.
Is Epoxy Repairable if Scratched or Gouged After Full Cure?
Sure — yes, epoxy’s repairable. Smoothly sanding, spot-cleaning, and applying compatible epoxy fills scratch repair and gouge treatment; you’ll sand, feather, cure, then recoat so repaired areas blend and bond back to strength.
Conclusion
You’ve got a clear roadmap now, so plan your epoxy job like a pro and don’t rush the cure — patience pays off. Touch-dry happens fast, but full cure can take days to weeks depending on product and conditions. Use fast-curing formulas or gentle heat if time’s tight, but respect safe temperature limits. After curing, maintain with regular cleaning and occasional reseal. Follow the timing guide and your floor or countertop will shine like a mirror for years.