How to Orange Peel Texture Walls: Step-By-Step Guide
You can create an orange‑peel texture by thinning joint compound to a sprayable consistency (about 1:1–2:1 compound to water), loading a hopper or HVLP sprayer, and testing on scrap drywall until the dimples look even. Prep walls by patching, sanding, and masking trim, then spray in steady, overlapping passes from 18–24 inches away, working top to bottom. Sand or spot‑skim any highs, prime, then paint for a seamless finish—keep going and you’ll learn setup tweaks, troubleshooting, and pro tips.
Quick Steps: Orange‑Peel Texture in 5 Minutes
Five quick steps will get you an orange‑peel texture in about five minutes once the prep’s done.
Five quick steps deliver an orange‑peel texture in about five minutes once prep is finished.
You’ll mix the compound to the right consistency, load the hopper, test spray on cardboard, adjust air and pattern, then spray evenly.
Follow quick tips: keep distance consistent, overlap passes, and let it dry.
Try small texture variations by tweaking pressure and nozzle size.
Tools & Supplies: Sprayers, Hoppers, and PPE
You’ll want to pick the right sprayer—airless, HVLP, or compressor-fed—based on the size of the job and your budget.
Choose a hopper gun that matches your sprayer and the texture thickness you’re after for consistent orange‑peel results.
And don’t skimp on PPE: a respirator, eye protection, and disposable coveralls keep you safe from overspray and inhalation.
Essential Sprayer Types
When you’re tackling orange peel texture, choosing the right sprayer makes the job faster and gives you a more consistent finish.
You’ll pick between airless, HVLP, pneumatic, and texture-specific units; consider nozzle size, pressure, and ease of sprayer maintenance for efficient texture applications.
Compare portability, power, and cleanup needs before renting or buying.
- Airless
- HVLP
- Pneumatic
- Texture-specific
Hopper Gun Selection
Choosing the right hopper gun matters because it directly affects pattern consistency, material flow, and how much prep and cleanup you’ll face.
You’ll pick a gun with adjustable nozzle sizes, durable seals, and easy-clean paint cups to control spray and texture.
Consider portability, air consumption, and simple hopper gun maintenance routines so you spend more time spraying and less time fixing or cleaning tools.
Protective Gear Essentials
One clear rule: gear that protects your lungs, eyes, skin, and hearing is as important as the sprayer you pick.
You’ll choose protective gear, follow safety precautions, and avoid inhalation, splashes, and noise. Wear respirator, goggles, coveralls, and ear protection.
Maintain gear, replace filters, and keep a clean workspace.
- Respirator
- Safety goggles
- Disposable coveralls
- Ear protection
HVLP vs. Texture Hopper: Which to Use
Curious which sprayer will give you the best orange peel finish? You’ll weigh hvlp advantages—better finish quality, less overspray, easier maintenance tips—against hopper disadvantages like uneven spray on large areas.
Consider texture application, material costs, user experience, project scale, drying time, and professional recommendations to choose the sprayer that matches your skill level and job size.
Match Existing Orange‑Peel Texture First
After picking the right sprayer, you’ll want to match the existing orange‑peel texture before spraying to avoid a patchy look.
Use texture matching techniques to study spray pattern, droplet size, and distance. Follow wall preparation tips to clean and test on cardboard.
- Inspect texture closely
- Adjust nozzle and pressure
- Test spray samples
- Compare and refine
Prep Drywall & Plaster: Patch, Sand, Prime
Start by repairing any dents, holes, or loose tape so the texture will stick evenly.
You’ll perform drywall repair, apply plaster application where needed, sand smooth, and wipe dust.
Prime patched areas to guarantee uniform absorption before texturing.
Mix Orange‑Peel Texture: Ratios and Visuals
You’ll want to get your mix ratios right—common recipes use 1 part joint compound to 1–2 parts water for a medium orange‑peel, with thicker mixes for heavier texture and thinner for a finer finish.
Test small samples on scrap drywall so you can see how spray settings change the look. Compare those samples side‑by‑side to pick the ratio and nozzle that match the visual texture you want.
Mix Ratios Explained
Mixing the right ratio of joint compound to water determines how the orange‑peel texture will lay and how easy it’s to spray; thinner mixes produce finer, more splattered peels while thicker mixes give larger, more pronounced droplets.
You’ll refine mixing techniques to control texture consistency. Follow target ratios and test sprays, adjusting water slowly.
- 2:1 light
- 1.5:1 medium
- 1:1 heavy
- Adjust gradually
Visual Texture Examples
Below are clear visual examples that show how the three target ratios translate into actual orange‑peel patterns so you can match a look to your space; try each on a scrap board and photograph the results to compare scale and density.
You’ll see texture patterns vary from fine to coarse, understand spray techniques, evaluate finish options, and judge visual appeal.
Use photos to pick wall aesthetics aligned with design trends.
How the Texture Should Look and Feel
When you look closely, orange peel texture should read like fine, evenly spaced dimples—neither too flat nor so heavy that the wall looks bumpy.
You want consistent texture consistency and a subtle tactile experience that catches light without shouting. Check for uniform coverage, soft shadows, and smooth shifts.
- Even pattern
- Subtle depth
- No harsh ridges
- Consistent finish
Set Up Your Sprayer for Orange‑Peel
You’ll want to pick a spray tip sized for medium droplets so the orange‑peel pattern forms correctly.
Adjust the compressor or gun pressure until you get a consistent, fine spray without spitting.
Test on cardboard and tweak tip or pressure until the texture matches what you want.
Choose Proper Spray Tip
Choosing the proper spray tip is essential for getting a true orange‑peel finish without wasting material or causing overspray.
You’ll pick tips based on spray patterns and tip sizes to match texture material and nozzle distance.
Consider these options:
- Wide fan for even coverage
- Round for concentrated droplets
- Medium for balanced texture
- Experiment small increments to find sweet spot
Adjust Pressure Settings
After you’ve settled on a spray tip, set the sprayer’s air or fluid pressure to match that tip and the texture material; too low and you’ll get heavy globs, too high and the pattern blows out into fine mist.
Make small pressure adjustments while testing on cardboard, watch texture consistency, and note settings.
Lock pressures, maintain distance, and recheck periodically to keep even coverage.
Practice Your Spray Pattern Safely
Before you start on the wall, practice your spray pattern on a large piece of cardboard or scrap drywall so you can dial in distance, pressure, and stroke speed without risking the finished surface.
You’ll refine spray technique and follow safety precautions. Practice these steps:
- Test nozzle size and fan width.
- Adjust PSI and material flow.
- Hold consistent distance.
- Wear mask and eye protection.
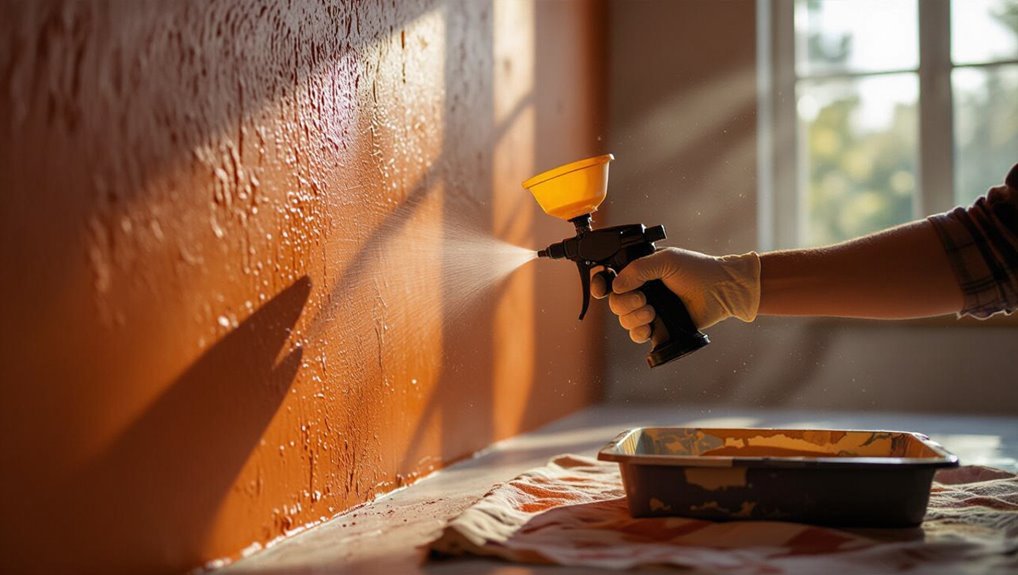
Apply Orange‑Peel Texture to a Full Wall
Start by prepping the wall—clean it, patch holes, and mask trim so the texture goes only where you want.
Stand a consistent distance from the surface and use overlapping, steady passes to keep the orange‑peel even.
Work in sections from top to bottom so you can maintain the same spray rhythm and coverage across the whole wall.
Prep The Wall
Clear the room and protect surfaces so you can work without worrying about splatter or dust.
You’ll do wall preparation: perform surface cleaning, wall inspection, and address moisture control.
Choose primer choice carefully for drying time and texture consistency.
Maintain tools for tool maintenance before you start.
- Clean surface
- Inspect walls
- Control moisture
- Prime appropriately
Spray Technique Steps
Now that the wall’s prepped and primed, you’re ready to apply the orange‑peel texture across the full surface.
Hold the hopper gun 18–24 inches away, spray in steady overlapping passes, and keep a consistent speed for even spray consistency.
Vary nozzle distance slightly to blend seams, watch for uniform texture patterns, and let sections dry before touching up edges.
Feather and Blend Small Repairs Seamlessly
When you’ve patched a small gouge or nail hole, feathering the joint compound and blending it into the surrounding orange peel is the step that makes the repair disappear.
You’ll work from the center of the patch outward with thin, overlapping strokes, smoothing the edges so the texture flows uninterrupted.
Use feathering techniques and blending methods to match texture.
- Thin layers
- Light pressure
- Directional strokes
- Blend outward
Sanding, Skimming, and Spot Treatments
After you’ve feathered and matched the orange peel, you’ll sand lightly to level high spots.
Skim any remaining low areas with thin joint compound, and apply targeted spot treatments where texture or adhesion is inconsistent.
Use proper sanding techniques to avoid overworking texture, employ precise skimming methods for seamless fills, and follow spot treatment strategies for local texture repair to retain consistent orange peel appearance.
Prime and Paint for a Seamless Finish
Seal the repaired surface with a quality primer before you paint so your orange peel texture reads uniform and the finish hides any patched areas.
You’ll want consistent paint consistency and thin, even coats to achieve a seamless finish.
Follow these steps:
- Stir primer thoroughly.
- Apply thin coat, let dry.
- Use matching texture paint mix.
- Roll or spray evenly, inspect and touch up.
Troubleshooting Runs, Clumps, and Uneven Spray
Check your spray technique and material consistency first — most runs, clumps, and uneven texture come from too-thick mix, slow nozzle movement, or overlapping passes. Adjust texture consistency and maintain proper spray distance. Troubleshoot by thinning slightly, increasing pass speed, and keeping even overlap. Use this quick guide:
| Issue | Fix |
|---|---|
| Runs | Thin mix |
| Clumps | Clean nozzle |
| Uneven | Adjust distance |
Common Mistakes That Ruin Orange‑Peel Texture
When you rush the job or ignore prep, orange‑peel texture can go from crisp to messy fast.
Rushing or skipping prep turns crisp orange‑peel texture into a messy finish fast — take your time.
You’ll avoid problems by focusing on proper texture application and maintaining spray consistency.
Common mistakes ruin results:
- Skipping surface cleaning
- Incorrect compressor pressure
- Overthinning or thick mix
- Uneven overlap or speed
Fix these to get a uniform finish.
When to Call a Pro and Cost Checklist
If your orange‑peel texture keeps coming out uneven despite repeated tries, it’s time to call a pro—especially for large rooms, high ceilings, or matching existing texture on older walls.
You should weigh cost considerations like labor, materials, and repair time. Get written estimates from professional services, check references, and compare warranties so you’ll know whether DIY or hiring experts gives the best value.
Frequently Asked Questions
How Long Does Orange‑Peel Texture Last on Interior Walls?
You can expect orange‑peel texture longevity of several decades if cared for; regular cleaning and prompt repairs are key. For maintenance tips, dust gently, touch up paint after damage, and avoid excessive moisture to preserve finish.
Can Orange‑Peel Texture Be Applied Over Wallpaper or Paneling?
You can, but you’ll need thorough wall preparation: remove loose paper, repair seams, and prime. For paneling, fill gaps and sand. Then proceed with texture application, testing a small area first for adhesion and finish.
Is Orange‑Peel Texture Safe for Kitchens (Oil/Splatter Resistance)?
Yes — studies show 68% of homeowners report textured walls trap more grime, so you’ll want sealed, washable paint to maintain kitchen cleanliness; orange‑peel can resist oil splatter if you clean promptly and use durable, wipeable coatings.
Will Orange‑Peel Texture Affect Smoke or Fire Alarm Sensitivity?
Unlikely — orange‑peel texture won’t considerably change alarm sensitivity, though texture impact can slightly trap dust or soot near detectors. You should keep alarms clean and follow manufacturer placement guidelines to avoid reduced performance.
Can Orange‑Peel Texture Be Removed Without Damaging Drywall?
Yes — you can remove orange‑peel without ruining drywall if you use careful texture removal techniques, wet sanding, scraping, and skim coating; you’ll follow drywall repair steps, patch imperfections, sand smooth, then prime and repaint.
Conclusion
You’ve learned how to create an orange‑peel finish, but remember: the wall’s surface is like a blank sky—your sprayer the cloud that paints texture. When you prep, match, and mist with care, that sky turns even and calm; rush or skip steps and it storms. Take your time, trust the process, and patch mistakes early. If the forecast looks bad, call a pro—better to hire sunshine than chase rain.