How to Paint a Painted Wall: Proper Repainting Techniques
When repainting a painted wall, start by clearing the area, cleaning grease or dirt, and protecting floors and furniture. Inspect for flaking, chalkiness, mold, or water damage and repair holes or cracks with compound, sand smooth, then prime—use a bonding primer on glossy surfaces and tinted primer for dark colors. Cut edges with an angled brush, roll evenly, feather edges, and allow proper dry and cure times for a durable finish; keep going to learn detailed tips and troubleshooting.
How to Repaint a Painted Wall : Step-By-Step
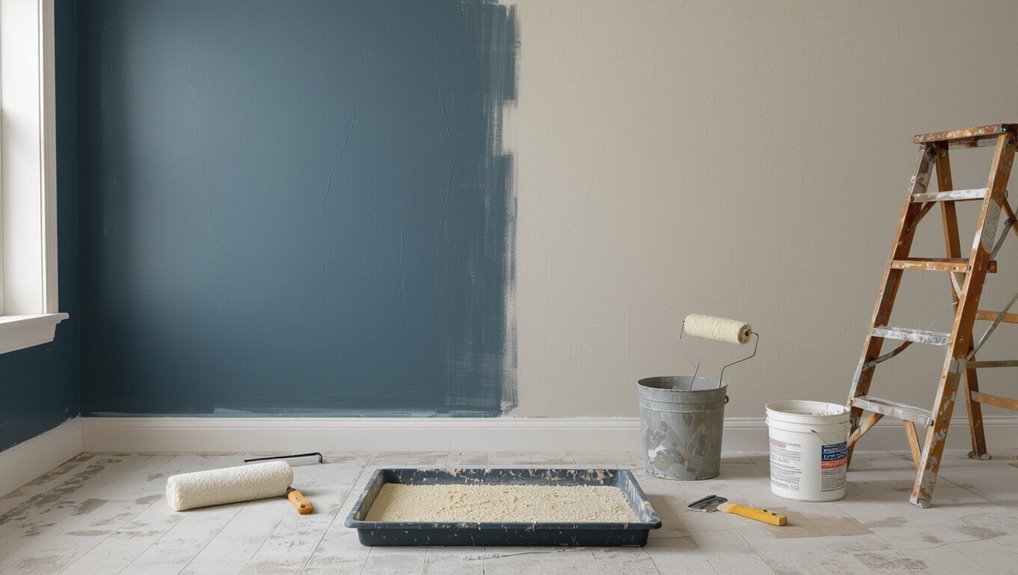
Start by clearing the area and protecting floors and furniture with drop cloths or plastic sheeting. Then remove switch plates and outlet covers so you’ve got a clean workspace.
Sand glossy spots, fill holes, and wipe dust. Prime repaired areas, choose paint mindful of color psychology, and test swatches against existing wall textures.
Roll or brush in even strokes, allow proper drying, and apply a second coat.
Quick Checklist: What You Need Before Repainting a Wall
Now that you’ve prepped the wall and fixed any holes or glossy spots, gather the tools and materials that’ll keep the job smooth and efficient.
Consider your paint color and any wall textures so you pick appropriate primer and finish.
Factor in paint color and wall texture to choose the right primer and finish for a flawless result.
- Drop cloths, tape, sandpaper
- Primer, chosen paint, brushes/rollers
- Putty, patching tools, cleaning supplies
When to Repaint vs. Touch Up Scuffs and Marks
Wondering whether a few scuffs justify a full repaint or just a quick touch-up? You’ll assess damage size, color match, and wall sheen.
Use simple touch up techniques for isolated marks: clean, spot-prime if needed, feather paint with a small brush.
Reserve full repainting when coverage is uneven, multiple areas show wear, or repaint frequency suggests aging.
Keep records of past jobs.
Inspecting Existing Paint for Adhesion Problems
Before you start painting, check the wall for flaking paint and loose areas that won’t hold a brush.
Rub a damp cloth over the surface to test for chalkiness and see if color or powder comes off.
Also look for grease, mildew, or dust that could prevent new paint from sticking.
Check For Flaking
If the paint flakes off when you scrape it lightly with a fingernail or putty knife, you’ve got an adhesion problem that needs fixing before you repaint.
Do a careful surface inspection for flaking paint and loose edges, then:
- Scrape and sand loose areas.
- Clean dust and grease.
- Prime bare spots before repainting.
Test For Chalkiness
After scraping and sanding loose paint, check for chalkiness to spot adhesion problems that mightn’t show as flakes.
Rub a damp white cloth across the surface; review the residue for chalkiness effects and color loss.
Use simple testing methods—dry rub, solvent spot, and tape tests—to confirm binders have broken down.
If residue appears, plan for cleaning and proper priming before repainting.
Assess Surface Contamination
While you’ve checked for chalkiness and loose paint, you also need to look for contamination that’ll stop new coatings from sticking.
Inspect surface contaminants and contamination types, noting adhesion factors and environmental impacts. Follow inspection tips, then apply cleaning methods and preparation techniques.
Consider safety precautions during cleaning.
- Check oil, grease, mildew
- Use degreaser, bleach, sanding
- Reinspect before priming
Detecting Water Damage, Mold, and Stains on Painted Walls
Detecting water damage, mold, and stains on painted walls starts with a careful visual and tactile inspection: look for discoloration, bubbling, peeling paint, or dark fuzzy patches.
Then press gently to check for soft or damp spots.
You’ll perform surface inspection, moisture assessment, mold detection and stain identification, address health concerns, apply prevention strategies, and plan appropriate repair techniques before repainting.
How to Test for Lead Paint and What to Do If It’s Present
Before you start sanding or painting an older wall, test for lead with an EPA-approved home kit or hire a certified inspector.
If the test shows lead, don’t attempt dry sanding or scraping—follow safety steps like using wet methods, HEPA vacuums, and containment, or hire a certified abatement contractor.
Protect yourself and others by keeping children and pregnant people away until the area’s been properly handled.
Test With EPA Kits
If you’re working on a home built before 1978, test for lead paint before you scrape or sand, because disturbing old coatings can release dangerous dust and chips; EPA-approved test kits make that quick and affordable.
Follow EPA kit testing, safety precautions, and consider testing frequency for home testing vs. professional testing to assess lead exposure, paint toxicity, environmental impact, compliance standards, and risk assessment.
- Read instructions.
- Wear PPE.
- Seal area.
If Lead Is Found
When a lead test comes back positive, stop work immediately and don’t sand, scrape, or dry-sweep the area—you’ll need to contain the site, reduce exposure, and decide whether to hire a lead-safe certified professional or follow safe DIY abatement steps.
You should prioritize professional testing, follow regulatory guidelines, assess health risks, consider safe removal or remediation options, use paint alternatives, and protect home safety against lead exposure.
Determining the Wall Substrate: Drywall, Plaster, Wood, or Masonry
Start by identifying what your wall is made of—drywall, plaster, wood, or masonry—because each material needs different prep and paint.
Consider wall textures, substrate types, paint compatibility, surface preparation, environmental factors, paint finishes, adhesion issues, and moisture barriers.
- Drywall/plaster: patch, skim, prime.
- Wood: sand, seal, prevent tannin bleed.
- Masonry: clean, repair, use masonry primer.
How Previous Paint Sheen Affects Your Repainting Approach
Because the existing sheen influences adhesion and appearance, you should always note how glossy the previous coat was before you repaint.
Knowing paint sheen guides repainting techniques and surface preparation: high gloss needs scuffing and adhesion testing, satin or eggshell may need light sanding, flat accepts touch-ups easily.
Also consider color matching and desired paint finish to guarantee consistent coverage and durability.
Primer: Pick the Right One for Existing Paint
If your wall already has a glossy or oil-based coat, pick a bonding primer designed for slick surfaces so your new paint will adhere properly.
For porous or repaired areas, use a high-quality latex primer to even out absorption and hide stains.
- Assess primer types for surface and stain-blocking needs.
- Test adhesion on a small patch.
- Follow manufacturer primer application rates and dry times.
Choosing the Right Topcoat: Finish and Formula for Durability
Now you’ll pick the topcoat based on where the wall is and how it gets used: sheen level affects cleanability and hide, so choose flat for low-traffic rooms and satin or semi-gloss for kitchens and bathrooms.
Decide between waterborne and alkyd formulas—waterborne dries fast and has lower odor, while alkyd offers extra leveling and toughness.
Consider durability additives or stain-resistant options if the surface needs extra protection against scuffs, moisture, or heavy cleaning.
Sheen Level Selection
Sheen matters: it determines how durable your paint will be, how easy it’s to clean, and how much texture or imperfections will show.
Choose based on room use, light, and surface.
Consider these sheen types and sheen finishes:
- Flat/matte — hides flaws, low washability.
- Satin/eggshell — moderate durability, easy to clean.
- Semi-gloss/gloss — very durable, highlights imperfections.
Waterborne Vs. Alkyd
Beyond sheen, the binder type in your topcoat—waterborne (latex) or alkyd (oil-based)—affects durability, drying time, and how the finish responds to cleaning and wear.
You’ll weigh waterborne advantages like easy cleanup process, lower odor differences, faster drying times and good color retention against alkyd benefits: superior finish durability, different application techniques, slower drying times, stronger odor, and higher environmental impact during paint selection.
Durability Additives Choice
Pick additives that match how you’ll use the room and how much wear the surface will take.
Choose durability additives balancing paint longevity, surface protection, formulation benefits, environmental impact, application techniques, material compatibility, and cost effectiveness.
- High-traffic: abrasion-resistant polymer
- Moisture-prone: mildew inhibitors, water repellents
- Low-impact: low-VOC modifiers for finish consistency and easier touch-ups
Which Paint Sheen to Pick for High-Traffic Versus Low-Traffic Walls
Wondering which finish will hold up best where you live? You’ll choose satin or semi-gloss for high traffic textures like hallways and kitchens; they scrub clean. Use matte or eggshell for low traffic finishes in bedrooms and ceilings for subtlety.
| Area | Best Sheen |
|---|---|
| Hallways/Kitchens | Satin/Semi-gloss |
| Bedrooms/Ceilings | Matte/Eggshell |
How to Calculate How Much Paint and Primer You’ll Need
Start by measuring each wall’s width and height to get the total square footage you’ll be painting.
Then check the paint and primer labels for their coverage per gallon and divide your total square footage by that number to find how many gallons you need per coat.
Don’t forget to account for the number of coats you plan to apply and add about 10–15% for waste and touch-ups.
Measure Wall Surface
Before you open a can, measure each wall’s height and width and subtract areas for doors and windows so you know the exact square footage you’ll be painting.
Then follow these steps to plan surface preparation and paint selection:
- Record dimensions per wall.
- Subtract door/window areas.
- Total square footage and note high-traffic surfaces for primer decisions.
Calculate Coat Coverage
Now that you’ve got your total square footage, figure how many coats of paint and primer you’ll actually need and convert that into gallons. Choose paint type, note coverage factors per gallon, and adjust for texture or porosity. Use this quick reference:
| Item | Value |
|---|---|
| Area | |
| Coats | |
| Coverage/gal | |
| Gallons needed |
Budgeting for Repainting: Single Room vs. Entire House
Whether you’re revitalizing a single bedroom or repainting the whole house, your budget will change a lot—materials, labor, and the time you’ll spend scale differently.
You’ll use budgeting strategies and room prioritization to decide scope. Consider:
- Cost per square foot vs. whole-house discount
- Staged repainting to spread cost
- DIY vs. pro labor trade-offs
Paint Tools You Need for Repainting Walls
A handful of reliable tools will make repainting walls faster and produce smoother results, so you’ll want to gather quality brushes, rollers, trays, painter’s tape, drop cloths, a putty knife, sandpaper, a ladder, and a sturdy paint can opener before you start.
Add a paint roller with extension pole, a paint brush, paint tray, paint scraper, paint bucket, paint stirrer, caulking gun, and extra drop cloths.
How to Prepare the Room: Furniture, Flooring, and Ventilation
Start by clearing the room so you can move freely and protect everything you’re not painting: push furniture to the center and cover it with drop cloths or plastic. Remove small items and wall hangings, and roll up area rugs or cover floors with canvas or plastic sheeting taped at the edges.
Start by clearing the room: move furniture center, cover items, remove hangings, and protect floors.
- Check furniture arrangement for access.
- Confirm flooring protection is secure.
- Open windows to emphasize ventilation importance and test how color selection affects room ambiance.
How to Protect Trim, Outlets, and Fixtures Before Painting
Before you open a paint can, take time to shield trim, outlets, and fixtures so paint lines stay crisp and devices stay safe.
Use trim protection and outlet covers, employ masking techniques with painter’s tape for edge sealing, and lay drop cloths to prevent paint splatter.
Fixture safeguarding includes removing or wrapping hardware.
Follow surface preparation and cleanup tips for a neat, professional result.
How to Clean Painted Walls for Best Adhesion (Dirt, Grease, Nicotine)
Wipe down painted walls thoroughly to remove dirt, grease, and nicotine so new paint will stick and look even.
Use proper cleaning solutions and cleaning tools for effective dirt removal and grease removal.
Follow these adhesion techniques and surface preparation steps:
- Degrease high-contact areas, target nicotine stains with trisodium phosphate.
- Rinse, dry, and assess.
- Light wall scrubbing before priming.
How to Remove Mold and Mildew Safely From Painted Surfaces
Know how to spot mold (usually fuzzy, darker patches) versus mildew (powdery, lighter spots) so you treat each properly.
Use mild cleaners like diluted bleach or vinegar with a soft brush, wear gloves and a mask, and test a small painted area first.
After cleaning, dry the area thoroughly and fix ventilation or leaks to prevent regrowth.
Identify Mold vs. Mildew
Mild dark spots on painted walls can be mildew, while larger, fuzzy patches that spread and discolor surrounding paint are usually mold; distinguishing them helps you choose the safest removal method.
Use mold identification and mildew prevention steps so you act correctly:
- Inspect texture, size, and smell.
- Check moisture sources and ventilation.
- Isolate affected area and wear protection.
Safe Cleaning Solutions
1 simple, safe cleaner can often remove mildew, but tougher mold needs stronger, targeted solutions and care to protect your paint and health.
You’ll choose eco friendly products or non toxic cleaners and natural alternatives for DIY solutions, follow proper cleaning techniques, use safe solvents sparingly, perform thorough surface preparation, and confirm residue removal so paint adhesion and your health stay protected.
Post‑Cleaning Preventative Steps
After you’ve removed visible mold and rinsed away cleaners, take steps that keep spores from returning and protect the paint you just restored.
Maintain paint preparation and surface inspection routines, control moisture, and follow cleaning methods for lasting results.
- Monitor environmental factors and drying conditions.
- Use proper application techniques and guarantee paint consistency.
- Practice tool maintenance, color matching, and moisture control.
How to Sand Painted Walls Effectively Without Overdoing It
While a light sanding can smooth brush marks and help new paint stick, you shouldn’t sand more than necessary; aim to remove imperfections without stripping the existing finish.
Choose sanding methods—hand sanding with fine grit or orbital sanders on low—match sanding tools to the surface.
Sand gently, follow contours, clean dust, and spot‑check adhesion.
Stop when the surface is uniformly dull, not bare.
How to Remove Flaking or Peeling Paint the Right Way
If paint is flaking or peeling, don’t try to coat over it—you’ll only hide problems that will come back; remove loose material first so new paint can adhere properly.
- Use a scraper or wire brush for flaking paint, follow with light sanding for paint removal.
- Clean and degrease surfaces to improve surface preparation.
- Apply primer and proper repair techniques to guarantee paint adhesion.
How to Repair Holes, Cracks, and Dents in Painted Drywall
You’ll start by fixing small holes with a quick patch and touch-up so the wall looks smooth before priming.
For larger cracks or dents, you’ll use joint compound and reinforcing tape or a patch kit to restore stability and shape.
Once repairs are sanded and primed, you’ll be ready to repaint for a seamless finish.
Small Hole Patch
A small hole patch lets you hide nail holes, minor dents, and hairline cracks quickly so your wall looks smooth and ready for paint.
You’ll use basic small hole repair and simple patching techniques. Follow steps:
- Clean, sand, and apply spackle.
- Smooth, let dry, and sand again.
- Prime and paint to match.
Large Crack Repair
When cracks or larger holes mar your painted drywall, you can restore a smooth, durable surface by widening the damage, removing loose material, and filling it with the right patching compound and reinforcement.
This approach prevents future cracking and gives a clean base for primer and paint. You’ll follow surface preparation, choose repair materials, use crack sealing and proven fill techniques, blend wall texture, and select compatible paint adhesives.
How to Patch Plaster Walls and Blend Repairs Invisibly
If your plaster has small cracks, holes, or loose patches, you can repair them so the wall looks seamless.
Use plaster repair techniques and invisible blending methods to match texture and finish.
Steps:
- Clean, widen cracks, apply patching plaster.
- Feather edges, texture-match while damp.
- Sand lightly, prime spot, then repaint for an invisible repair.
Prepping Glossy Surfaces Before Repainting
Once your plaster repairs are smooth and primed, you’ll want to tackle any glossy surfaces before repainting so the new paint adheres and looks even.
Assess sheen, clean thoroughly, and mask adjoining areas.
For glossy surface preparation, scuff lightly to create tooth and remove contaminants.
Use recommended deglossing techniques or products suited to the original finish, then wipe clean and allow full drying before priming.
How to Remove Glossy Paint Residue With Deglosser or Sanding
You’ll start by picking the right deglosser for your old finish—solvent-based for tough gloss, water-based for milder sheen.
If you choose sanding, use a fine-grit and light, even strokes to scuff without gouging.
After either method, wipe the residue clean and apply primer so paint will bond properly.
Choose Deglosser Type
When deciding whether to use a chemical deglosser or sanding, consider the surface, the paint’s sheen, and how much prep you want to do; each method removes glossy residue differently and has trade-offs in time, dust, and finish.
- Choose deglosser types by surface—mild for painted drywall, stronger for enamel.
- Weigh deglossing methods: chemical for speed, sanding for control.
- Prioritize ventilation and safety gear.
Proper Sanding Technique
If you decide sanding is the right approach, start by gathering the right tools—medium- and fine-grit sandpaper (120–220), a sanding block or orbital sander, tack cloths, and a vacuum with a brush attachment—and set up ventilation and dust containment.
Choose sanding methods and grit selection based on gloss level. Use proper sanding tools, practice controlled strokes for surface preparation, and focus on finish smoothing while maintaining dust control.
Clean And Prime Surface
Prepare the surface by removing glossy paint residue so new primer will stick—either wipe on a liquid deglosser to chemically dull the sheen or sand lightly with fine-grit paper to scuff the surface; both methods need a clean, dust-free finish before priming.
- Use cleaning techniques and cleaning products to remove contamination sources and mold removal.
- Choose primer types for paint compatibility and paint adhesion.
- Use prep tools respecting wall texture and surface preparation.
How to Feather Edges and Blend Old-to-New Paint Transitions
Since brush and roller edges can leave visible ridges, you’ll want to feather them so the new paint blends seamlessly with the old.
Work from the center of the new area outward, using light pressure and a slightly drier brush or roller to soften the edge.
Then back-roll or lightly skim any overlaps until the change reads even to the eye.
Use feathering techniques and blending methods: soften, overlap, inspect.
How to Prime Problem Spots: Stains, Tannin Bleed, and Patched Areas
Before you paint, you’ll want to seal any stains and tannin bleed so they don’t show through the topcoat.
Use a stain-blocking primer on those spots and let it dry fully.
For patched areas, prime the repaired surface to match its porosity before rolling or brushing the finish coat.
Seal Stains First
1 step you shouldn’t skip: seal any stains, tannin bleed, or patched spots before you paint.
Inspect defects, clean surfaces, and choose sealing techniques that guarantee stain blocking and paint adhesion.
Use primer application tailored for repair options and color matching to preserve wall protection.
- Defect inspection and cleaning methods
- Primer application and sealing techniques
- Final paint adhesion check
Prime Patched Areas
Start by spot-priming every repaired or stained area so the sealant locks out tannin bleed and creates a uniform surface for topcoat adhesion. Use appropriate primer types after proper surface preparation; choose stain blocking and color matching primers based on patching techniques and paint finishes. Apply with recommended application tools for consistent paint adhesion.
| Item | Purpose |
|---|---|
| Primer types | Stain blocking |
| Tools | Application tools |
| Prep | Surface preparation |
| Match | Color matching |
How to Block Stains (Water, Smoke, Marker) With Stain-Killing Primer
When stains from water, smoke, or marker show through your topcoat, you’ll want a stain-killing primer to lock them in so the finish looks clean and uniform.
These primers chemically seal and block pigments and tannins that ordinary paint can’t stop. You’ll prep, apply, and finish correctly:
- Clean surface for stain removal.
- Follow primer application directions.
- Recoat with topcoat after cure.
When to Use Tinted Primer for Colour Changes or Hiding Dark Colours
When you’re switching to a lighter shade or covering a deep base, tinting your primer can save coats and time.
Match the primer to the undertone of the dark colour so the final paint hides evenly.
If the current wall is very bold or stained, a tinted primer is usually worth it before you roll on your finish.
When To Tint
Curious whether you need a tinted primer? Use it when you want better color matching or to reduce coats. Consider tint types and coverage before starting.
- Switching to a much lighter hue — tint primer evens tone.
- Painting over stains — tint helps block bleed-through.
- Painting glossy surfaces — tint improves adhesion and evens base.
Choose tint carefully for efficient repainting.
Matching Dark Bases
If you’re covering a deep or richly colored wall, a tinted primer can cut the number of topcoats and give you truer color payoff on the first try.
You’ll choose tinted primer when dark color blending would otherwise need multiple coats.
Assess base coat options: use a close-match tint for big shifts, gray or brown blockers for stubborn pigments, then apply your finish coat.
Water vs. Oil Primers and Paints: When to Use Each
Although both water- and oil-based primers and paints can protect and beautify your walls, they behave very differently and suit different jobs.
Choose by primer selection, paint adhesion, surface preparation, drying times, environmental impact, and cost considerations.
Consider:
- Water based benefits: easier cleanup, lower VOCs, faster drying.
- Oil based drawbacks: stronger odor, longer cure, better adhesion on glossy surfaces.
- Finish comparisons and application techniques matter.
How Temperature and Humidity Affect Paint Application and Drying
When you paint, temperature and humidity directly shape how the paint flows, dries, and ultimately looks—too cold or too humid and the paint can sag, blister, or take forever to cure, while too hot and it can skin over before it levels. You should monitor temperature effects and humidity impacts to optimize drying times, adjust application techniques, and guarantee ideal conditions for paint performance and seasonal considerations.
| Factor | Effect |
|---|---|
| Temperature | Alters drying times |
| Humidity | Slows curing, risks blushing |
| Wind | Rapid evaporation |
| Season | Guides ideal conditions |
| Surface | Changes application techniques |
How to Mix and Thin Paint for Consistent Colour and Flow
Because consistent colour and smooth flow start in the can, you’ll always stir thoroughly and check viscosity before you paint.
Use proper mixing techniques to guarantee color matching and color uniformity. Follow blending methods and paint ratios; make tint adjustments sparingly for flow consistency.
- Measure ratios
- Thin gradually
- Recheck viscosity
How to Cut In Edges Cleanly With Brush Techniques
After you’ve confirmed paint consistency and viscosity, move to the edges with a quality angled brush so you get crisp lines where walls meet trim, ceilings, and corners. Use proper cutting techniques: adjust brush angles, maintain a steady hand, and use practice strokes. Employ painter’s tape or an edge guide sparingly. Know brush types for edge precision and clean lines.
| Tool | Tip |
|---|---|
| Angled brush | Brush angles |
| Small brush | Practice strokes |
| Tape | Edge guide |
| Soft bristle | Paint consistency |
| Flat brush | Clean lines |
How to Roll Walls for Smooth, Streak-Free Coverage
Start by loading your roller evenly—dip only the nap into the tray and roll back and forth on the grid until the roller’s surface is saturated but not dripping—so you’ll lay down a consistent coat without runs or heavy ridges.
Start by evenly loading the roller—dip the nap, roll on the grid until saturated but not dripping.
- Choose roller selection and nap for wall texture.
- Use consistent paint application and proper paint consistency.
- Employ a coverage strategy with gentle edge blending and practiced rolling technique.
How to Avoid Lap Marks and Flashing While Repainting
When you repaint, work wet edges and keep a consistent sheen by maintaining a wet edge and blending each pass into the last so paint dries uniformly and you don’t get visible lap marks or flashing.
Use consistent roller type and speed, feather edges, and overlap minimally.
Consider color selection strategies and wall texture considerations to reduce contrast and highlight uniform drying for seamless results.
How Many Coats You Really Need and When to Stop
How many coats do you really need depends on the color change, paint quality, and surface condition; aim for the fewest coats that deliver full, even coverage and proper durability.
You’ll judge by coverage, not count. Consider:
- Light change + quality paint — 1–2 coats;
- Significant change — 2–3 coats;
- Uneven surface — spot prime, then add coats.
Watch coat thickness and paint application.
Covering a Dark Wall: How to Prevent Ghosting?
If you’re covering a dark wall, start by priming it to block the old color and any stains.
Then apply multiple thin coats of your topcoat instead of one heavy layer so each pass dries evenly and hides ghosting.
That combo—proper primer plus thin, even coats—gives the best chance of full, uniform coverage.
Prime For Full Coverage
Because dark paint can bleed through lighter colors, you’ll want to prime the wall to block stains and guarantee true coverage from the first topcoat.
Prepare and clean surfaces, then choose primer for stain blocking and paint adhesion.
Consider paint selection, color matching, sheen options, finish durability, and coverage techniques.
- Surface preparation
- Primer application
- Surface cleaning
Use Multiple Thin Coats
When you’re covering a dark wall, apply several thin topcoats rather than one heavy one to prevent ghosting and guarantee even color; thin layers dry faster, level better, and hide the old shade more reliably.
You’ll control coat thickness, improve paint application, and reduce drying time.
With proper surface preparation, primer selection, quality paint, precise roller technique, careful brush strokes, edge blending, and color matching, you’ll succeed.
How to Achieve Even Coverage Over Dark or Bright Existing Paint
Even though dark or vivid colors can make coverage trickier, you can get an even finish by priming, choosing the right paint, and using proper technique.
Use these steps:
- Prime with stain-blocking primer, apply color blocking techniques and dark color solutions.
- Use paint layering methods, tint adjustment strategies and brightness balancing tips.
- Consider color theory principles, paint finish options and surface texture considerations.
How to Maintain Consistent Sheen and Colour Across Multiple Cans
Check batch codes before you buy so you’re working with cans from the same production run.
Stir and strain each can thoroughly to mix pigments and remove skin or lumps.
Test a small area and blend cans on a tray or roller to confirm sheen and colour match before you paint the whole wall.
Match Batch Codes
If you’re painting a large area or returning for touch-ups, matching batch codes is essential to keep sheen and colour uniform across cans.
You’ll avoid subtle shifts in color matching and paint finishes by checking labels and buying from the same batch when possible.
- Inspect batch codes before purchase.
- Keep receipts and photos.
- Buy extra cans from same lot.
Stir And Strain
Stir each can thoroughly and strain the paint before you pour or load your roller, because pigment and sheen can separate during storage and transport; consistent mixing and filtering will keep colour and finish uniform across multiple cans.
Use proper stirring techniques—slow, deep strokes to avoid air—and strain paint through a fine mesh or nylon stocking to remove skin and debris before application.
Test And Blend
Now that your cans are mixed and strained, you’ll want to test and blend small sections to confirm sheen and colour match before tackling the whole wall.
Follow this quick checklist:
- Roll a 1×1 ft patch from each can to compare color blending.
- Let patches dry; inspect under different light for paint texture.
- Blend adjacent patches with a thin feathered pass to guarantee uniform sheen.
Troubleshooting Paint Adhesion and Peeling After Repainting
When paint peels or won’t stick after a fresh coat, you’ll want to diagnose the cause before repainting again.
Check for adhesion issues by inspecting peeling paint, inadequate surface preparation, or incompatible primers and topcoats.
Inspect for adhesion problems: peeling paint, poor surface prep, or incompatible primers and topcoats.
Evaluate paint compatibility and environmental factors like humidity or temperature.
Use troubleshooting techniques: test adhesion, remove failed paint, correct paint layering, then apply proper repair methods and suitable products.
How to Fix Visible Brush Marks, Roller Stipple, and Drips
1 common cause of an uneven finish is poor technique — visible brush marks, roller stipple, and drips all come from incorrect pressure, overloaded tools, or letting paint start to set before you finish a section.
- Sand and feather edges, then spot-prime for consistent paint finishes.
- Use proper brush techniques and thin coats to eliminate marks.
- Re-roll wet edges with correct roller methods; apply repair techniques for drips.
How to Handle Trim, Baseboards, and Ceilings When Repainting Walls
If you’re repainting walls, don’t treat trim, baseboards, and ceilings as an afterthought — they need different prep and paint techniques to get crisp lines and durable results.
You’ll use trim techniques like sanding and high-quality enamel, apply baseboard blending for seamless shifts, follow ceiling preparation steps to avoid drips, and employ masking methods for clean edges.
Work systematically and check for touch-ups.
How to Paint Around Windows and Doors Without Bleed-Through
Start by protecting adjoining surfaces and creating a crisp boundary so paint won’t seep into trim, glass, or adjoining walls. Use painter’s tape and masking techniques, then employ precision painting and edge cutting with steady brush techniques.
Follow these bleed proofing methods:
- Score tape edges.
- Cut with an angled brush along window trim and door edges.
- Remove tape while slightly damp.
How Long to Wait Between Primer and Topcoat, and Between Coats
Check the primer can for its recommended drying time, since most primers need anywhere from 30 minutes to a few hours before you can topcoat.
Wait the full recommended interval between topcoats too — usually 2 to 4 hours for latex and longer for oil-based paints — to guarantee proper adhesion.
If humidity or temperature are high, add extra drying time to avoid trapping moisture.
Drying Times For Primer
Primer drying times vary by product, temperature, and humidity, so you’ll want to plan your topcoat application accordingly.
You should check the label, ideal conditions, and surface before proceeding.
- Read manufacturer primer drying recommendations.
- Wait longer in cool or humid rooms.
- Lightly sand between coats once dry to touch, ensuring adhesion and smooth finish—don’t rush the topcoat.
Interval Between Topcoats
While you can often apply a topcoat once the primer feels dry to the touch, you should follow the manufacturer’s recommended wait time and consider room temperature and humidity before proceeding. You’ll respect drying time, then use proper application techniques for even coverage. Check tackiness; if dry, apply; if not, wait.
| Condition | Wait |
|---|---|
| Warm/dry | 2–4 hrs |
| Cool/humid | 8–24 hrs |
How to Cure Painted Walls and When to Replace Furniture and Hang Art
After the paint feels dry to the touch, give it time to cure fully before moving furniture back or hanging art—you’ll avoid scuffs, dents, and adhesive failures if you wait the recommended window for your paint type.
- Wait recommended curing walls time before furniture replacement.
- Lift, don’t slide, when returning pieces to avoid marks.
- Test adhesives and hardware for art hanging on cured surfaces.
How to Store Leftover Paint and Label Cans for Future Touch-Ups
If you keep a small amount of each paint you use, you’ll save time and guarantee perfect color matches for future touch-ups; store cans tightly sealed, label them clearly with the room, paint line, color name or code, finish, and date, and keep them upright in a cool, dry place away from direct sunlight and freezing temperatures.
| Room | Color Code | Finish |
|---|---|---|
| Living | SW7008 | Eggshell |
| Bath | BMOC-27 | Satin |
| Kitchen | NAVAJO | Semi |
| Hall | 12345 | Flat |
How to Touch Up Scuffs and Chips After Your Repainting Project
Start by evaluating each scuff and chip to decide whether you need spot repairs or a light retouch over a larger area; clean the blemish, sand any rough edges, and remove dust so the patch will blend smoothly.
Start by assessing each scuff or chip, clean and sand rough edges, and remove dust for a seamless patch.
- Use gentle scuff removal techniques with a melamine sponge or light cleaner.
- Apply appropriate chip repair methods—filler, sand, prime.
- Feather paint edges and match sheen for an invisible finish.
How to Maintain Painted Walls for Longevity and Easy Cleaning
A few simple routines will keep your painted walls looking fresh and make cleaning easier over time. You’ll follow maintenance tips like regular wall inspections, choose gentle cleaning products and effective cleaning methods, and set cleaning frequency to prevent buildup.
Focus on stain prevention, surface protection, and improving paint durability to boost wear resistance. Consistent wall care extends finish life and eases upkeep.
Cost-Saving Tips and When It’s Worth Hiring a Pro
Start by evaluating the complexity of your project—tall ceilings, lots of trim, or repairs can add time and skill requirements.
Estimate material costs carefully so you know if buying primer, multiple gallons, and proper tools still saves you money versus renting or hiring.
If the job’s large, hazardous, or you’re short on time, hire a pro to avoid costly mistakes.
Assess Project Complexity
Before you pick up a brush, figure out how complex the job really is so you can save money where it makes sense and hire help when it doesn’t.
Assess project scope, time commitment, skill level, wall conditions, environmental factors, and safety precautions.
Consider cost estimation, necessary tools, paint types, and color choices.
- Small rooms
- Repairs needed
- High ceilings or trim
Estimate Material Costs
You’ll save time and money by tallying exact material needs up front: measure wall square footage, count coats, and list supplies (paint, primer, rollers, tape, patching compound, drop cloths) so you can compare prices and avoid last-minute runs.
Check paint types for coverage and durability, calculate gallons, factor primer and tools, and perform a cost comparison between brands and retailers to spot savings.
Know When To Hire
If tackling the whole job would cost you more in time, stress, or mistakes than hiring help, bring in a pro—especially for high ceilings, textured finishes, extensive trim work, or rooms that must be ready on a tight schedule.
You’ll save money when complexity, matching paint color, or tricky wall texture exceed your skill.
- Time saved
- Quality guaranteed
- Warranty provided
How to Choose a Professional Painter: Questions to Ask and Red Flags
Wondering how to pick a painter who’ll do the job right and on time? Use interview techniques to confirm painter qualifications, ask about project timelines, budget estimates, scheduling flexibility and payment terms.
Check contractor reviews, evaluate communication styles, request written service agreements and warranty options.
Watch for vague answers, no references, or high-pressure sales—those are red flags you shouldn’t ignore.
Top Repainting Mistakes and How to Fix Them
When repainting, common mistakes like skipping prep, using the wrong paint, or rushing drying times can undo hours of work—so spot them early and correct course before they become costly.
- Skipped prep: sand, clean, prime to avoid peeling — common repainting errors.
- Wrong sheen/color: test swatches and match.
- Rushing dry: wait proper cure times.
These fixing paint issues save time and money.
Frequently Asked Questions
Can I Repaint Walls in Winter if My Home Heating Is On?
Yes — you can repaint in winter if your heating’s on. Winter painting works when you control indoor humidity, keep temperatures within paint’s recommended range, use low-VOC paints, and allow extra drying time for proper curing.
Will Scented Paint Emit Strong Odors After Curing?
No — scented paint usually won’t emit strong odors after curing; you’ll notice fragrance mainly during application and drying. Odor duration varies with formula and ventilation, but once fully cured, lingering smells are typically minimal.
How Do I Match Paint Colour From a Faded Wall Section?
You compare the faded area to nearby untarnished sections, take photos in natural light, bring paint samples to a store for color matching, and test small swatches on the wall to confirm before painting.
Are Faux Finishes or Textured Paints Harder to Repaint Later?
Absolutely — faux finishes and textured paints can be ridiculously stubborn, so you’ll need extra effort. You’ll want repainting tips like scuffing, priming, or partial paint removal; sometimes removing texture first makes future coats easier.
Can Wall-Mounted TVS and Heavy Fixtures Be Left During Repainting?
You can usually leave wall-mounted TVs and heavy fixtures if you’re careful, but TV removal often makes repainting easier; use fixture protection, drop cloths, and secure mounts, or remove items to prevent damage and guarantee full coverage.
Conclusion
You’ve got the tools and know-how to tackle repainting like a pro—clean, prep, prime, and finish with care. Remember, “measure twice, cut once” applies: inspect for adhesion, damage, and stains before you start to avoid wasted effort. Touch up small scuffs; repaint when problems are widespread. Keep surfaces clean and address moisture promptly to extend life. When in doubt or the job’s big, hire a reputable painter to save time and headaches.