How to Texture a Wall by Hand: Simple Diy Techniques
You can add professional-looking texture by hand with basic tools: drop cloths, a mud pan, trowel or knife, texture brush or roller, and joint compound. Prep and prime the wall, practice on scrap, then mix compound to the right consistency for knockdown, orange‑peel, or swirl effects. Apply evenly, create peaks or patterns, then flatten or blend before it sets. Prime and paint when dry for durability, and keep going to pick up tips for troubleshooting and finishing.
Quick Plan: Texture a Wall by Hand in One Afternoon
Start by gathering your tools and clearing the room so you can finish the job in one afternoon: drop cloths, joint compound, a hawk or mud pan, trowel or drywall knife, a texture brush or roller, a bucket of water, and a ladder if needed.
You’ll prep surfaces, mix compound, practice on scrap board, work systematically across panels, and clean up—matching current texturing trends and preferred wall finishes.
Choose the Right Texture for Your Room
Once you’ve got your tools and practiced your technique, pick a texture that fits the room’s function and style.
Consider texture styles: smooth Venetian for sleek rooms, subtle knockdown for living areas, or bold stipple for rustic spaces.
Match texture to room atmosphere—calm bedrooms, durable kitchens, or lively entryways—and balance scale, lighting, and furniture so the finish complements the space.
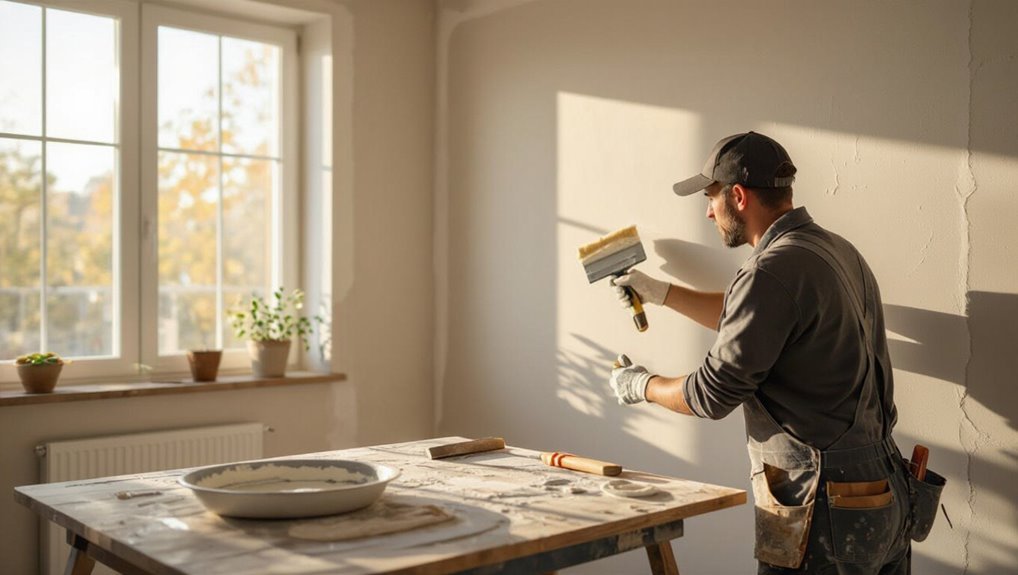
Which Tools You Need for Hand Texturing
Before you begin hand texturing, gather a compact kit of reliable tools: a hawk or mud pan to hold compound, a variety of trowels and drywall knives (6–12 inches) for spreading, a mixing drill or paddle, and at least one texture-specific tool like a knockdown knife, sponge float, or stippling brush depending on the finish you chose. You’ll focus on tool selection to execute texture techniques precisely.
| Tool | Purpose |
|---|---|
| Hawk/Mud pan | Hold compound |
| Trowels/Knives | Spread/smooth |
| Mixing drill | Mix consistency |
| Texture tool | Create finish |
Which Compounds to Use and Why
You’ll pick between pre-mixed and setting-type joint compounds depending on drying time and the texture you want.
Consider additives like latex modifiers for flexibility or accelerators if you need faster curing.
Remember primers seal the surface for even absorption.
I’ll explain how each choice affects workability, finish, and durability so you can make the right call.
Joint Compound Types
When you’re picking joint compound for hand texturing, choose based on working time, shrinkage, and strength—these factors determine how the compound handles, sands, and holds texture.
For joint compound types, use all-purpose for beginners, lightweight for easier sanding, and setting compounds for quick, crack-resistant builds.
When choosing compounds, match drying time to your schedule and texture complexity to avoid rework.
Additives And Primers
Once you’ve picked a joint compound that matches your timing and strength needs, consider additives and primers that change how the compound bonds, sets, and sands. You’ll choose based on additive benefits and primer types: latex for adhesion, acrylic for flexibility, and bonding agents for strength. Match primer type to substrate; additives adjust open time, texture, and sanding ease.
| Additive | Effect |
|---|---|
| Latex | Improves adhesion |
| Acrylic | Adds flexibility |
| Bonding agent | Increases strength |
| Retarder | Extends working time |
| Primer | Seals surface, aids bonding |
Prep Drywall and Plaster for Texturing
Prep the drywall and plaster by cleaning, repairing, and priming so your texture adheres evenly and looks professional.
Prep drywall and plaster by cleaning, repairing, and priming so textures adhere evenly and look professional.
You’ll focus on drywall preparation and proper plaster application: remove dust, patch holes, and sand smooth.
Prime sealed surfaces for consistent absorption.
Then follow these steps:
- Clean and dust surfaces
- Patch and sand imperfections
- Apply primer evenly before texturing
Protect Floors, Furniture, and Trim During Texturing
Before you mix texture, protect floors and rugs with heavy-duty drop cloths or taped plastic to stop spills and grit from soaking in.
Cover furniture with breathable fabric sheets or plastic and move smaller items out of the room to avoid dust buildup.
Tape off trim and baseboards with low-tack painter’s tape so you get clean edges and easy cleanup.
Protecting Floors And Rugs
Cover the entire floor area and any rugs with heavy-duty drop cloths or contractor plastic so paint and texture can’t seep through; tape seams and edges with low-tack painter’s tape to keep the coverings flat and to protect baseboards and trim.
Follow these steps for floor coverings, rug protection, surface preparation, and cleaning tips:
- Smooth and secure coverings to prevent trips.
- Sweep and vacuum before laying protection.
- Remove coverings carefully to avoid tracked debris.
Covering Furniture And Trim
Start by moving smaller pieces out of the room and grouping larger furniture in the center. Then drape each item with lightweight breathable cloths or plastic sheeting and secure edges with low-tack painter’s tape so dust and texture compound won’t settle into seams or crevices.
For furniture protection, cover legs and upholstery. For trim safeguarding, tape protective strips along baseboards and moldings, removing tape promptly.
Mix Joint Compound for Common Textures
Mix your joint compound to a creamy, spreadable consistency that’s right for the texture you’ll apply—thin and pourable for knockdown, slightly thicker for orange peel, and stiffer for skip trowel.
You’ll use simple mixing techniques to control texture variations. Test small batches, adjust water slowly, and note results.
- Start thin
- Increase thickness incrementally
- Keep records
Thin Compound for Spray‑Style Textures and Consistency
When you mix compound for spray-style textures, thin it to a milky, pumpable consistency so it atomizes cleanly.
Aim for a uniform texture with no lumps or stringy bits so your sprayer won’t clog.
Test and adjust water gradually until you get an even spray pattern.
Mix Thin Compound Properly
Aim for a milk‑shake consistency when preparing thin compound for spray‑style textures: it should flow easily through your hopper gun without separating, yet be thick enough to hold a small peak when lifted.
You’ll use precise mixing techniques and compound ratios. Follow these steps:
- Add water gradually, stir thoroughly.
- Use a drill mixer at low speed.
- Strain to remove lumps before loading.
Achieve Even Spray Consistency
To get an even spray, keep the compound consistently fluid so it flows smoothly through the hopper gun without sputtering or pooling.
Test viscosity on scrap, adjust with small water additions, and strain to remove lumps.
Maintain pump pressure and nozzle size for a steady spray technique.
Move at a consistent speed and overlap passes to guarantee uniform texture consistency across the wall.
Compound Drying Times and Environmental Tips
Although drying times vary with compound type and layer thickness, you’ll typically wait anywhere from 1 to 24 hours between coats.
Drying varies by compound and thickness, but expect about 1 to 24 hours between coats.
You should monitor drying times and environmental considerations to plan application timing. Temperature effects and humidity impact drying; use eco friendly materials when possible.
Tips:
- Keep room warm and ventilated
- Control humidity with a dehumidifier
- Avoid drafts during cure
How to Load and Hold a Trowel Properly
Load your trowel with a controlled scoop of compound so the blade carries enough material to cover a 2–3 foot stretch without slumping.
Hold it steady with a relaxed trowel grip near the center for balance.
Maintain a consistent trowel angle to feather edges and control thickness.
Adjust wrist pressure, keep motion smooth, and reload before the compound drags.
Skip‑Trowel Finish: Step‑by‑Step
Start by marking a clean, dry wall and gathering your skim coat compound, a clean trowel, and a hawk; you’ll work in manageable sections so the texture stays consistent.
Use the skip trowel technique: apply thin dabs, drag lightly, then lift to leave gaps. Choose preferred finish styles and repeat until even.
- Dab compound
- Drag trowel
- Inspect and touch up
Knockdown Texture: Step‑by‑Step
First, you’ll prep the surface by cleaning, patching holes, and applying a primer to guarantee the compound bonds.
Next, you’ll mix and apply the joint compound with a hopper or trowel to create raised peaks.
Finally, after the compound firms slightly, you’ll gently drag a wide knife across the peaks to knock them down into the characteristic flattened texture.
Preparing The Surface
Clear the work area and inspect the wall for loose paint, cracks, or nail pops before you mix any compound.
Perform a surface assessment to guarantee sound wall preparation and consider texture types and design considerations for aesthetic appeal.
Prep steps:
- Repair cracks and countersink nail pops.
- Sand glossy areas and remove dust.
- Prime porous patches to guarantee texture durability and uniform application techniques.
Applying The Compound
Mix a slightly thinned joint compound to a thick pancake-batter consistency, load your hawk and taping knife, and apply even, overlapping strokes so the wall’s surface is uniformly covered;
you’ll want to work in manageable sections to keep the compound wet for the knockdown phase.
Use consistent compound application techniques, varying stroke angle and pressure to create deliberate wall texture patterns.
Check edges and smooth seams as you go.
Knocking Down Texture
Once the compound is applied and still wet across a manageable section, you’re ready to knock down the texture to create the flattened, mottled look.
Use a broad knife, sweep gently, and vary angle to alter texture patterns. Practice the knocking technique on scrap drywall first.
- Hold knife nearly flat
- Light pressure, steady pull
- Overlap slightly for consistency
Stipple (Stomp) Texture: How to Do It by Hand
Stomp texture gives walls a subtle, raised pattern that hides minor imperfections and adds depth, and you can create it with just joint compound, a brush or broom, and a little practice. Use stipple techniques and the stomp method: press and twist the brush for random peaks, let dry, then lightly sand for softness.
| Emotion | Result |
|---|---|
| Pride | Visible craft |
| Calm | Soft surfaces |
| Relief | Hidden flaws |
| Joy | Textured warmth |
| Confidence | DIY success |
Combed/Dragged Texture: Technique and Tips
If you liked the organic peaks of a stomp finish, combed or dragged texture gives you a more linear, rhythmic look that still hides flaws and adds depth.
You’ll apply thin compound, then use a comb or brush to pull consistent combed patterns and dragged effects.
Apply a thin compound layer, then pull a comb or brush through it for consistent combed patterns and dragged effects.
Tips:
- Keep tool angle steady
- Work in panels
- Vary tooth size for subtle contrast
Create a Swirl/Circular Texture by Hand
When you’re ready to add flowing movement to a wall, apply a thin, even coat of joint compound and work in manageable panels so the material stays wet enough to shape; then use a rounded trowel or brush to make overlapping circular swirls, keeping pressure steady to maintain consistent depth and rhythm.
Move in controlled circular motion, varying size and overlap for organic texture; this swirl technique lets you blend edges.
How to Get a Venetian‑Plaster Look by Hand
To get a Venetian‑plaster look by hand, work thin, burnished layers of tinted joint compound or plaster, letting each skim dry until just firm before applying the next so you can compress and polish the surface.
Use a stainless steel trowel or wide putty knife, apply light pressure in overlapping strokes, and finish by buffing with a soft cloth to bring out a subtle sheen and depth.
- Prep smooth substrate
- Layer thin coats
- Burnish for sheen
Use Venetian techniques and Plaster finishes to create depth, vary tint slightly between coats, and sand minimally between layers for a polished, dimensional result.
Build a Pronounced Popcorn/Cottage Finish by Hand
Start by prepping the surface: clean, repair any holes, and prime so the compound adheres.
Mix a premade or custom texturing compound to a thick, lumpy consistency for that pronounced popcorn/cottage look.
Apply with a trowel, stomp brush, or hopper gun and work in small sections until the texture is consistent.
Prep The Surface
Before you mix compound, clear the wall and work area so nothing interferes with adhesion or your tools.
You’ll perform surface cleaning, wall inspection, damage repair, and moisture assessment before primer application and texture planning.
Do these steps deliberately:
- Remove dust, grease, and loose paint.
- Patch cracks, sand smooth, check for damp spots.
- Apply primer suited to your chosen texture.
Apply Texturing Compound
Mix your compound to a thick, peanut-butter consistency and keep it workable—too thin and the texture will sag, too stiff and you won’t get good peaks.
Use a hawk and trowel or scoop with a drywall knife, then flick or stipple to form popcorn/cottage texture.
Vary pressure and angle for distinct texture patterns.
Practice application techniques on scrap board before tackling the wall.
Blend New Texture Into Existing Walls
When you’re blending new texture into existing walls, match the pattern, thickness, and application speed so the repair disappears into the surrounding surface.
Match pattern, thickness, and speed when blending new texture so repairs vanish into the surrounding wall.
You’ll use texture blending techniques and check wall texture compatibility before proceeding.
Practice on scrap, feather edges, and blend wet-to-wet for seamless joins.
- Practice on scrap
- Feather edges toward old texture
- Blend wet-to-wet for seamless joins
Texture Around Outlets, Switches, and Fixtures
Tackle outlets, switches, and fixtures with care so your texture looks professional and the electrical components stay safe; shut power, remove covers, and mask edges.
Feather mud out from box rims, match pattern for seamless outlet texture, and use small tools for tight spots.
For switch blending, refit plates after drying, checking alignment and touch-ups so finishes match precisely.
Texture Corners, Seams, and Edge Detail
Corners, seams, and edges demand precision because they’re where texture mistakes show first, so take your time and work methodically.
You’ll focus on corner textures, seam finishes, edge detailing, and seamless texture blending. Use clean tools, feather joints, and match patterns.
Tips:
- Apply thin compound at seams, then texture.
- Blend edges into adjacent panels.
- Check corner profiles for uniformity.
Fix Common Texture Mistakes While Still Wet
If you spot excess mud while it’s still wet, smooth it out with your knife or trowel to prevent ridges.
Use a damp sponge to re-texture areas that lost pattern, matching the surrounding texture.
Feather the edges seamlessly so repairs blend in and won’t show after drying.
Smooth Out Excess Mud
Watch for drips and high spots as you work—the key is to act while the mud’s still wet so you can smooth mistakes without redoing the whole wall.
Use a clean taping knife for precise mud application and immediate texture smoothing.
Try these quick fixes:
- Scrape high spots gently
- Feather edges with a damp sponge
- Blend seams with light pressure and short strokes
Re-Texture With Sponge
Once you’ve smoothed high spots and feathered edges, you can re-texture with a damp sponge to fix small mistakes while the mud’s still workable.
Lightly pat or twist the sponge to match nearby texture variations, testing on scrap first. Use varied pressure for depth, keep the sponge damp (not dripping), and blend quickly so repairs disappear into surrounding sponge techniques.
Feather Edges Seamlessly
When the mud’s still wet, feathering the edges lets you blend repairs into the surrounding texture so seams disappear.
You’ll use a feather technique: pull a clean knife outward, reduce pressure, and smooth in one pass for seamless blending.
Practice on scrapboard, keep tools damp, and watch drying times to avoid ridges.
- Use light pressure
- Wipe blade often
- Work quickly
Sand and Smooth Textured Walls Without Losing Pattern
Anyone sanding a textured wall wants to retain the pattern while smoothing rough spots. So, you’ll use light pressure, the right grit sandpaper, and careful technique to avoid flattening peaks.
Work with a sanding block and 120–220 grit to sand texture selectively, feather edges, and knock off high points.
Finish by wiping dust away for a smooth finish before any next step.
Prime Textured Walls Before Painting
After you’ve smoothed high spots and wiped away dust, you’ll want to prime textured walls to seal the surface and improve paint adhesion.
Use proper priming techniques during wall preparation to guarantee even coverage and block stains.
Use correct priming methods during prep to ensure uniform coverage and prevent stains.
Consider these steps:
- Choose a high-adhesion primer suitable for texture.
- Use a thick-nap roller for consistent coverage.
- Spot-prime repairs before full coat.
Choose Paint and Sheen for Textured Surfaces
Choose a durable paint—like a high-quality latex or acrylic—that can stand up to cleaning and wear on textured surfaces.
Remember that higher sheens (eggshell to semi-gloss) will highlight texture more than flat finishes, so pick one based on how much definition you want.
Always test color and sheen samples on a small section to see how light and shadow play across the texture before committing.
Pick Durable Paint Types
Texture holds paint differently than smooth walls, so you’ll want a durable formulation that resists scuffs, hides inconsistencies, and stands up to cleaning.
Choose for paint durability and smart color selection to mask imperfections and simplify maintenance.
- Use washable acrylic or latex
- Pick mid-tone hues to hide texture shadows
- Test small areas for adhesion and coverage
Consider Sheen Visibility
Something about sheen will make a bigger visual difference on a textured wall than on a smooth one.
So pick a finish that balances durability with how much you want the bumps to show. You’ll choose flat for low sheen effects and subtle hides, satin for moderate durability, or semi-gloss where cleaning matters.
Consider visibility impact from light angles before deciding.
Test Color Samples
How will the color read once it lands on a bumpy surface? You’ll test hues on sample boards, seeing how texture shifts tone and sheen.
Create a small color palette, apply each finish, and view under different light. Take notes, then pick the best match.
- Paint the texture pattern
- Compare finishes side-by-side
- Photograph for reference
Paint Textured Walls for Even Coverage
Start by misting the wall lightly with water and laying down even, overlapping strokes so paint settles into every crevice of the texture.
Use a thick-nap roller or brush suited to paint application, working methodically top to bottom.
Keep a wet edge, reload tools frequently, and inspect for missed pockets to guarantee texture uniformity and consistent coverage without pooling or thin spots.
Highlight Texture With Glazing or Dry‑Brushing
Once the base coat is evenly applied, bring out the texture by using a glaze or dry-brushing to catch raised areas and deepen recesses.
You’ll work intentionally, applying subtle contrast without heavy color changes. Use glazing techniques and dry brushing tips to emphasize peaks and shadows.
- Load brush sparingly
- Work with long, light strokes
- Wipe excess glaze immediately
Add Color Variation Using Washes and Tints
Two simple tools—washes for subtle depth and tints for brighter highlights—let you introduce nuanced color without covering the texture. Use color theory to choose hues, control wash ratios, and practice wash techniques and tint application. Layer for blending colors and layering effects to adjust color saturation and achieve artistic finishes.
| Technique | Purpose |
|---|---|
| Wash | Subtle depth |
| Tint | Bright highlights |
| Layering | Blending colors |
| Ratios | Color saturation |
Estimate Time and Labor for Your DIY Texture Project
Estimate the hours and manpower before you mix your first batch of compound so you won’t be caught short mid-project.
You’ll plan time estimation and labor considerations, breaking the job into tasks and shifts. Consider drying times and prep work. Don’t forget cleanup.
- Prep and masking: 1–3 hours
- Application per coat: 2–6 hours
- Drying and sanding: variable based on humidity
Budget Materials and Tool Costs
Start by listing the materials and tools you’ll actually need so you can compare prices and avoid impulse buys. Focus on affordable options and smart material sourcing: buy joint compound, trowels, hawk, sandpaper, primer. Shop big-box sales, reclaimed stores, or bulk online to cut costs.
| Item | Typical Cost |
|---|---|
| Joint compound | $10–$20 |
| Trowel/hawk | $15–$40 |
| Sandpaper | $5–$15 |
| Primer | $10–$25 |
Pick Textures by Room Function and Style
Think about how the room will be used and pick a texture that stands up to that activity—you’ll want smoother, easy-to-clean finishes in high-traffic or moisture-prone areas and more pronounced textures where durability is less critical.
Match the texture’s visual weight to your decor so it complements your style rather than competing with it. That way your walls support both function and the overall look of the space.
Match Texture To Use
When you pick a texture, let the room’s function and style guide you: smooth or subtle finishes suit bedrooms and dining rooms where calm and refined aesthetics matter, while more pronounced textures work well in high-traffic areas like hallways or family rooms where they hide wear and add visual interest.
Consider:
- Choose texture styles and texture patterns for designated use.
- Balance texture contrast with texture consistency.
- Factor texture maintenance, texture longevity, texture inspiration, texture colorways.
Coordinate With Decor Style
After you’ve matched texture to room function, look to your decor style to refine choices that feel intentional.
You’ll choose a rough plaster for rustic charm, sleek skim for modern elegance, or light sand for coastal vibes.
Exposed concrete gives industrial edge, while layered patterns create an eclectic mix.
Use a minimalist approach with earthy tones and add vibrant accents sparingly.
Scale Texture for Small Rooms vs Large Rooms
Scale matters: the size and density of your texture will change how a room feels, so pick patterns that suit the space.
When thinking about scale considerations and room proportions, choose finer textures for small rooms and bolder patterns for large rooms.
Consider:
- Small rooms: subtle, tight patterns to avoid overwhelm
- Large rooms: larger, open textures for balance
- Connecting spaces: moderate scale to unify areas
Test Texture Samples and Mockups First
Now that you’ve picked a texture scale that fits the room, don’t commit without testing samples and mockups first.
You should test texture choices on sample boards, using texture experimentation and mockup creation to see scale and finish.
Do texture exploration with hands-on practice for visual comparison, tweak patterns, and gather design inspiration before you start the full wall.
Work Safely: Ventilation and Protective Gear
Before you start texturing, make sure the room is well-ventilated so dust and fumes can escape.
Wear a respirator rated for fine particles and any solvent vapors you might encounter.
Protect your eyes and skin with safety glasses, gloves, and long sleeves to avoid irritation.
Ensure Proper Ventilation
Because textured finishes kick up dust, fumes, and fine particles, make sure you ventilate the room well before and while you work.
Use these ventilation tips to improve air circulation and keep the space safer. Open windows, run exhaust fans, and create cross-breezes.
- Open windows and doors
- Use box or exhaust fans toward exterior
- Seal off other rooms to limit spread
Use Respiratory Protection
Good ventilation helps, but you should also protect your lungs directly—texturing kicks up fine dust and aerosols that masks alone may not stop.
Choose N95 or P100 respirators rated for dust and aerosols, fit them properly, and replace filters as needed.
Prioritize respiratory safety by inspecting seals and storing protective equipment cleanly between jobs to avoid contamination.
Wear Eye And Skin Protection
Wear splash-resistant goggles and long sleeves whenever you’re mixing or applying texture, since airborne droplets and abrasive compounds can irritate or injure eyes and skin.
You should also use proper safety gear and barrier cream to prevent skin irritation. Stay aware and stop work if you feel burning or swelling.
- Goggles
- Gloves
- Long sleeves
Avoid Cracking and Adhesion Problems
If you prep the surface properly and use compatible materials, you’ll prevent most cracking and adhesion failures before they start.
Check for loose paint, clean dust, and sand glossy areas.
Use a quality primer matched to your texture compound for cracking prevention and reliable adhesion techniques.
Apply thin, even layers, allow full drying, and avoid painting or sealing too soon to guarantee long-term bond.
Handle Texture on Uneven or Damaged Walls
When walls are uneven or damaged, you’ll want to address the biggest flaws first so your texture lays in smoothly and looks intentional; start with solid repair techniques and focused wall preparation.
Then choose a texture approach that masks imperfections.
- Patch deep gouges and sand smooth
- Use skim coat for moderate irregularities
- Match texture direction and thickness to surrounding areas
Remove Old Texture Before Reapplying
Before you retexture, assess the existing finish to identify loose, peeling, or uneven areas.
Scrape or wash away any loose material until the surface is firm and smooth.
Patch, sand, and prime problem spots so the new texture will bond evenly.
Assess Existing Texture
Although the surface might look fine at a glance, you should closely inspect the existing texture to decide whether to remove it before reapplying.
Do a quick texture assessment of overall wall condition, noting adhesion, damage, and compatibility with new finish.
- Look for cracking or bubbling.
- Check for uneven thickness.
- Test adhesion in small areas.
Remove Loose Material
Start by scraping away any loose or flaky texture so your new finish will bond to a solid surface. You’ll perform a quick surface assessment, remove debris, and sort fragments for responsible material disposal. Keep tools steady, work outward from damaged areas, and check for remaining weak spots before moving on.
| Feel | Action | Result |
|---|---|---|
| Frustration | Scrape | Relief |
| Doubt | Inspect | Confidence |
| Mess | Dispose | Calm |
| Hesitation | Steady | Control |
| Rush | Slow | Satisfaction |
Prep Surface For Reapplication
Now that you’ve removed loose material and inspected the surface, get ready to strip any remaining old texture so your new finish will adhere evenly.
You’ll focus on surface preparation and wall cleaning, then smooth and prime the area before retexturing.
- Scrape remaining texture with a wide blade.
- Wash and degrease for wall cleaning.
- Sand, patch, and prime for even adhesion.
Maintain and Clean Textured Walls Long‑Term
When you keep up with regular dusting and spot-cleaning, textured walls stay attractive and last longer.
You should follow simple wall maintenance tips: dust with a soft brush, vacuum crevices, and blot stains gently.
Use mild soap, water, and a sponge for tough spots, testing first.
Tackle stubborn spots with a mild soap-and-water solution and a soft sponge—always test first.
Avoid abrasive scrubbing and excessive moisture to protect texture and paint finish.
When to Hire a Pro vs DIY
If your project is small and straightforward, you can probably handle the texture yourself with a weekend and some practice.
But if walls are large, have complex surfaces, or you don’t have the time or confidence, hiring a pro will save headaches and likely give a cleaner finish.
Weigh your skill level and schedule against the job’s scope before you start.
Project Size & Complexity
Decide whether to tackle a wall texture yourself or hire a pro by honestly evaluating scope and skill: small repairs or a single accent wall are well within reach for most DIYers, but entire rooms, high ceilings, intricate patterns, or surfaces with extensive damage call for a contractor who’s the right tools, scaffolding, and experience to get consistent results.
- project scope, difficulty level, wall preparation
- time commitment, expected outcomes
- skill requirements, safety and equipment
Skill Level & Time
Though basic wall textures are within reach for many DIYers, honestly assess your skills and available time before starting a project.
Do a quick skill assessment: evaluate tool familiarity, steady hand, and problem-solving.
Do a realistic time estimation for prep, drying, and touch-ups.
Hire a pro if deadlines loom, the surface is large, or you doubt your ability to get a clean, durable finish.
When to Use a Texture Sprayer vs Hand Tools
You’ll choose a texture sprayer when you need speed and uniform coverage over large surfaces, and reach for hand tools when detail, control, or small repairs matter more.
Choose a sprayer for fast, even coverage; pick hand tools for control, detail, and small repairs.
Use texture sprayer advantages for big rooms; rely on hand tools benefits for edges and texture variation.
- Fast, even coats
- Precise touch-ups and patterns
- Less masking in tight spots
Practice Drills to Master Trowel and Stipple Techniques
Start small and build control by drilling basic trowel and stipple motions before you tackle a whole wall.
Practice short, even strokes with different angles to learn trowel techniques. Switch to varied pressure and quick wrist flicks to create stipple patterns.
Repeat on scrap drywall, increasing speed and distance. Focus on consistency, rhythm, and tool feel until movements become natural.
Record Mixes, Settings, and Photos for Repeatable Results
Because small changes in mix ratio, trowel angle, or drying time can make a big difference, record each batch, tool setting, and environmental condition so you can reproduce successful textures.
You’ll build texture documentation and technique consistency by noting details and photographing samples.
- mix ratios and additives
- tool settings and angles
- room temp, humidity, photos
Troubleshoot Adhesion, Curling, and Flaking
If your texture is peeling, curling, or failing to stick, diagnose the cause by checking surface prep, moisture levels, and product compatibility—these three factors account for most adhesion problems. You’ll tackle adhesion issues with proper surface preparation, choose material selection for texture consistency, control drying conditions, apply curling prevention methods, use flaking solutions, and follow repair techniques.
| Problem | Fix |
|---|---|
| Peeling | Prime, clean |
| Curling | Reduce moisture |
| Flaking | Recoat, sand |
| Poor bond | Change product |
Finish, Stage, and Photograph Textured Walls for Resale
When you’ve finished texturing and fixed any adhesion issues, treat the surface like a staged room: neutralize the finish, protect high-traffic areas, and present the wall so buyers can envision the space.
After texturing and repairing, neutralize and protect the wall so buyers can imagine living there.
You’ll boost resale value and buyer appeal by cleaning, photographing, and styling thoughtfully.
- Touch up paint and seal
- Stage with minimal decor
- Photograph in soft, even light
Frequently Asked Questions
Can Textured Walls Hide Thermal or Moisture Issues in Walls?
No, textured walls won’t hide serious thermal insulation or moisture retention problems; they might mask minor stains temporarily, but you’ll still need proper insulation, ventilation, and moisture remediation to fix underlying issues and prevent mold or damage.
Will Textured Surfaces Affect Smart-Home Sensor Readings?
Yes — textured surfaces can affect smart sensors: uneven wall materials and finishes may scatter signals, alter sensor mounting, or change readings for light, humidity, and motion. You’ll need calibration and proper sensor placement to compensate.
Can Pets Damage or Stain Textured Finishes More Easily?
Like a muddy paw print on suede, yes — you’ll see more pet scratches and tougher stain removal on textured finishes; you’ll want durable paint, regular cleaning, and quick spot treatment to prevent permanent damage.
Do Textured Walls Impact Home Insurance or Inspection Reports?
Yes — textured walls can affect insurance underwriting and inspection criteria; you’ll need to disclose finishes, since excessive texture masking damage may raise concerns, prompt closer inspection, or influence underwriting decisions and potential coverage conditions or premiums.
How Do Textures Affect Sound Absorption and Room Acoustics?
Textured walls absorb some mid–high frequencies and scatter sound, so you’ll get improved sound diffusion and modest acoustic enhancement; they won’t replace panels, but they’ll reduce flutter echoes and slightly warm the room’s acoustics.
Conclusion
You’ve got the skills to transform a room in an afternoon using simple hand-texturing techniques—pick a texture, prep the surface, practice your trowel and stipple, and record mixes and settings for consistent results. One neat stat: textured walls can boost perceived home value—buyers often prefer character over flat finishes, with 62% saying unique interior details make a property more attractive. Finish, photograph, and you’ll have a repeatable, resale-friendly skill set.