How to Get Oil Based Paint Out of Hair Without Damage
You can remove oil-based paint without damaging your hair by acting fast, sectioning hair, and using a gentle oil like baby, olive, or coconut to loosen the paint; massage it into the painted strands for 5–10 minutes, comb gently to lift softened paint, then rinse and wash with mild dish soap or a clarifying shampoo followed by a nourishing conditioner. Protect your scalp, patch-test if unsure, and follow up with a protein mask to restore strength—more steps and tips follow below.
How to Use This Guide (Quick Answer First)
Wondering where to start? You’ll get a quick answer first, then detailed steps.
Use the quick section to assess paint type, pick safe solvents, and decide if you need help. Follow best practices for hair care to minimize damage: test on a small section, protect scalp, and prioritize gentle removers.
Later sections expand on tools, timing, and cleanup.
Quick Safety Checklist Before You Start
Before you start, check for allergies to solvents or products so you don’t trigger a reaction. Protect your eyes and face with goggles and a towel or mask to keep splashes and fumes away. Work in a well-ventilated area or open windows to reduce inhalation of strong smells.
Check For Allergies
Since oil-based paint and the solvents used to remove it can irritate skin and lungs, check for any known allergies or sensitivities first.
Note past allergy symptoms to paints, solvents, or fragrances and watch for redness, itching, hives, coughing, or breathing trouble.
If you have heightened skin sensitivity or respiratory issues, skip DIY solvent use and consult a doctor or ask someone without sensitivities to assist.
Protect Eyes And Face
Because solvents and paint can splash unexpectedly, put on tight-sealing safety goggles and a face shield before you touch any remover or start scrubbing.
Guarantee eye protection and safety goggles fit well, use a hair wrap to keep paint from your face, apply a skin barrier or protective ointment around hairline, and cleanse exposed skin with a gentle cleanser.
Then support moisture retention after cleaning.
Ventilate The Area
1 quick step: open windows and doors and turn on a fan to pull fumes away from your face as you work. Use simple ventilation techniques and set fans for steady air circulation so you won’t inhale solvents. Keep kids and pets out, wear a mask if needed, and pause if fumes feel strong.
| Item | Action | Tip |
|---|---|---|
| Window | Open wide | Cross-breeze |
| Door | Open | Exit route |
| Fan | Point out | Continuous |
| Mask | Wear if needed | NIOSH-rated |
| Pets | Remove | Safety first |
Quick Fixes for Oil Paint Splatters in Hair
If you spot fresh oil paint splatters in your hair, act fast to prevent them from setting—quick, targeted fixes can often remove most of the paint before it dries.
Gently blot excess with a paper towel, apply a small amount of oil (olive or baby oil) to loosen paint, comb through, then shampoo.
These paint removal techniques double as simple hair care tips to limit damage.
What Oil-Based Paint Does to Hair (Why It’s Sticky)
Those quick fixes work because oil-based paint is formulated to cling and spread: its solvent-carried pigments and binders coat each hair shaft, then the solvent evaporates and leaves a sticky film behind.
You’ll notice paint properties interact with hair texture — coarse or fine strands trap more binder, increasing tackiness.
That film stiffens, attracts dirt, and resists water, so you’ll need solvents or oil to break the bond.
Gather These Gentle, Home-Friendly Supplies
Before you start, gather a few gentle, everyday items so you can remove oil-based paint without harsh chemicals:
- Olive oil or coconut oil — gentle alternatives to break paint bonds.
- Dish soap (mild) — lifts oil after treatment.
- Soft comb and microfiber towel — for safe removal and blotting.
These natural remedies help you work carefully, minimizing damage while easing paint out.
Why You Should Avoid Harsh Solvents on Your Scalp
Because harsh solvents strip natural oils and irritate skin, you shouldn’t use them on your scalp; they can cause dryness, redness, chemical burns, and damage hair shafts, making hair brittle and prone to breakage.
You should prioritize scalp health by choosing gentle alternatives like oil, mild shampoo, and conditioner.
Avoid alcohols, acetone, and strong cleaners that worsen irritation and hair loss.
Safe Step-by-Step Method for Larger Paint Patches
For larger paint patches, you’ll want to work methodically by sectioning hair so you can treat small areas without spreading paint.
Use a stain-safe oil breaker—like baby oil or an oil-based makeup remover—applied to the painted strands and gently comb from the ends toward the roots.
Repeat section by section until the paint loosens, then shampoo and condition to remove residue.
Sectioned Hair Removal
If you’ve got larger patches of oil-based paint, work in sections so you can treat each area thoroughly without spreading the mess.
Divide into sectioned hair panels, clip securely, and focus a single paint treatment per panel. Clean edges before moving on to prevent transfer.
- Isolate
- Treat
- Rinse
Stain-Safe Oil Breaker
1 reliable way to tackle larger oil-based paint patches is to use a stain-safe oil breaker—a gentle solvent or oil-based remover formulated to loosen paint without damaging hair fibers.
You apply a small amount, massage until paint softens, rinse, then shampoo with a clarifying formula.
Repeat sparingly, protect scalp, and follow with conditioning for proper paint removal and hair care.
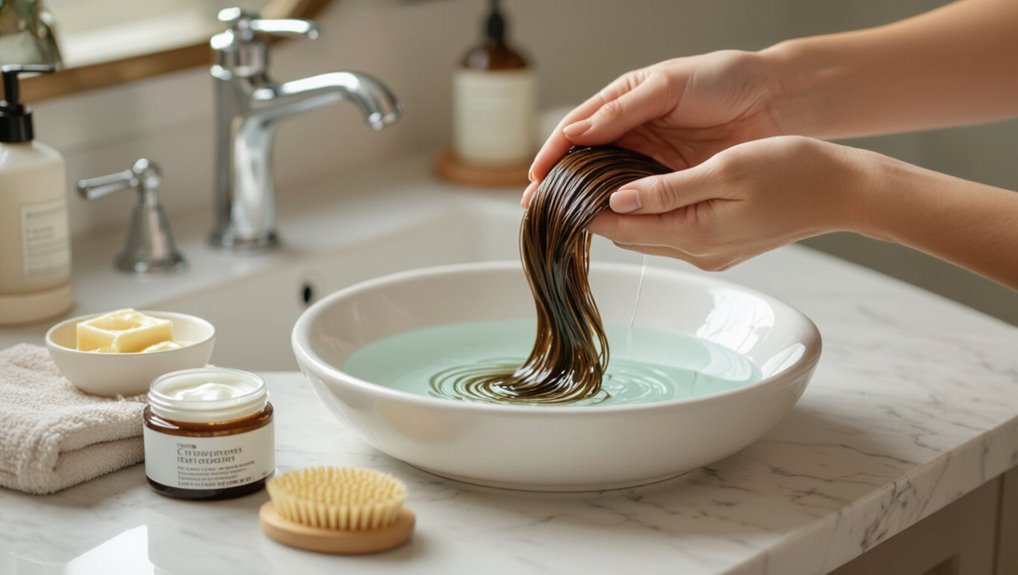
Use Vegetable or Olive Oil to Dissolve Oil Paint
Reach for a bottle of vegetable or olive oil to start breaking down oil-based paint in your hair—these oils dissolve the paint’s binders and loosen pigment without harsh chemicals.
Rub oil gently, let sit, then comb out softened flakes. Follow with shampoo for hair care.
Gently rub in oil, let it loosen flakes, then comb out and shampoo for clean, nourished hair.
- Massage oil into stained strands.
- Wait 10–15 minutes.
- Rinse and repeat if needed.
When Peanut Butter Helps : And When to Skip It
Although peanut butter can work because its oils break down paint binders, you should only use it on small, dried patches and when you don’t have nut allergies to worry about.
You’ll test peanut butter effectiveness on a tiny area, rub gently, then comb out residue.
If risks or smell bother you, choose alternative natural remedies like coconut oil or avocado instead of peanut butter.
How to Use Dish Soap to Lift Oil Without Overdrying
If peanut butter’s smell or allergy risk puts you off, dish soap is a safer, more practical next step for cutting oil-based paint from hair.
You’ll balance dish soap effectiveness with gentle technique to respect oil paint properties and hair moisture. Follow these steps:
- Wet hair, apply diluted dish soap to stained strands.
- Massage gently, let sit 2–3 minutes.
- Rinse and condition.
When to Use Rubbing Alcohol : And How Safely
When dish soap and gentle oils don’t budge oil-based paint, reach for rubbing alcohol as your next option—but use it sparingly and with care.
Test a small patch, protect skin with moisturizer or petroleum jelly, and apply with a cotton pad, blotting—don’t rub.
Rinse thoroughly, follow with a gentle conditioner, and limit frequency to guarantee safe application without drying or irritating scalp and strands.
Citrus-Based Removers: Pros, Cons, Technique
You can use citrus-based removers to break down oil-based paint effectively, but results vary by product and paint age.
Be aware they’re strong—use sparingly and rinse thoroughly to protect your scalp and hair health.
Follow a step-by-step routine: apply, let it sit briefly, work the paint out with a comb, then shampoo and condition.
Citrus Remover Effectiveness
Although citrus-based removers can be a gentle, natural option for lifting oil-based paint from hair, they work best on fresh stains and require careful technique to avoid drying your scalp.
You’ll find citrus alternatives and other natural removers useful, but effectiveness varies. Consider:
- Apply sparingly to fresh paint.
- Massage then rinse thoroughly.
- Repeat short cycles rather than long exposure.
Safety And Hair Health
Picking up from citrus removers’ practical use, let’s look at how they affect hair and scalp so you can weigh benefits against risks. You should balance paint prevention with hair safety: use gentle remedies, monitor oil effects, and prioritize scalp care. Follow health tips, patch-test first, and avoid overuse to prevent dryness or irritation.
| Benefit | Risk |
|---|---|
| Natural solvent | Dryness |
| Pleasant scent | Irritation |
| Readily available | Overuse |
Application Step‑By‑Step
Start by preparing your work area and testing the citrus remover on a small skin patch to make sure it won’t irritate your scalp.
You’ll use gentle motions for oil paint removal and follow hair care steps to protect strands.
- Apply remover sparingly, massage toward paint.
- Wipe softened paint with a cloth.
- Shampoo twice, condition immediately.
Best Order: Oil First, Then Shampoo – Exact Steps
Begin by applying oil to the painted area so you can break down the oil-based paint before you ever wet your hair.
Massage oil application gently, working toward the ends. Let it sit a few minutes, then comb through to lift softened paint.
Gently massage oil through hair toward the ends, let sit briefly, then comb to lift softened paint
Rinse briefly with warm water, apply shampoo, lather to exploit shampoo benefits, and rinse thoroughly.
Repeat if residue remains.
Protecting the Scalp and Skin During Treatment
Before you start, you’ll want to do a small patch test on your inner forearm to make sure the remover won’t irritate your skin.
Use a towel or petroleum jelly to protect your neck and ears from runoff.
If you feel burning or see redness, stop and rinse immediately.
Patch Test First
Because everyone’s scalp and skin react differently, do a small patch test on your inner forearm or behind the ear before treating your hair—this tells you whether the cleaner or solvent will irritate or cause an allergic reaction.
You’ll learn about patch test, hair sensitivity, product compatibility, and protect scalp health.
Follow these quick checks:
- Note redness or itching after 24 hours.
- Test with diluted product first.
- Avoid if irritation appears.
Protect Neck And Ears
1 simple step you shouldn’t skip is shielding your neck and ears so solvents and paint don’t sit on sensitive skin.
Use a towel or disposable cape for neck protection and cover ears with cotton balls or soft gauze secured with hypoallergenic tape. That prevents irritation and chemical burns.
Check periodically and replace wet coverings to keep skin dry and safe during treatment.
Removing Paint From Roots and the Hairline
Start by isolating the painted roots and hairline so you can work precisely without spreading oil-based paint to clean areas.
Use gentle methods focused on scalp protection and hair health: apply oil absorption via safe products or home remedies, then follow removal techniques for targeted roots treatment and hairline care.
- Spot-test product
- Blot, don’t rub
- Rinse gently
If Oil Paint Has Dried and Crusted in Hair
When oil paint has dried and crusted in your hair, you’ll need to soften and loosen it before attempting removal to avoid breakage; work patiently with solvent-safe methods and protect your scalp and surrounding clean hair. Use gentle oil or mild solvent, apply warm compresses, then rinse and shampoo.
| Step | Action |
|---|---|
| 1 | Soften with oil |
| 2 | Warm compress |
| 3 | Gentle solvent |
| 4 | Rinse carefully |
| 5 | Shampoo gently |
Avoid harsh pulling to prevent hair damage and cutting.
Detangling and Combing Techniques to Avoid Breakage
Before you begin combing, gently separate the softened paint from clean hair with your fingers. Then work in small sections so you don’t tug or stretch strands.
Focus on detangling methods that prioritize slip and minimal tension; use a wide-tooth comb and patience.
Follow these steps:
- Apply conditioner or detangler, finger-comb gently.
- Start at ends, progress upward.
- Use wide-tooth comb slowly.
How Long Each Method Should Sit in Your Hair
You’ll want to know exactly how long to leave each treatment on so you don’t irritate your scalp or let the paint set further.
For most oil-based paint removers (like oil, conditioner, or dish soap), start with 5–10 minutes and recheck; stronger solvents should be used for only 1–2 minutes and rinsed immediately.
If you’re repeating a treatment, wait a few minutes between applications and stop if your scalp feels sore or overly dry.
How Long To Wait
Because different removal methods rely on distinct chemical actions, the time you leave a treatment in your hair matters — and wrong timing can make paint harder to remove or damage your strands.
Consider timing considerations and hair type before deciding.
- Fine hair: shorter exposure to avoid weakening.
- Coarse or oily hair: slightly longer for penetration.
- Damaged hair: minimal time; prioritize gentler options.
Timing Per Treatment
Now that you’ve considered hair type and exposure risk, let’s look at how long each removal method should sit in your hair. You’ll follow timing considerations: oil pre-treat 5–10 minutes, solvent spot-treat 1–3 minutes, deep-clean shampoo 3–5 minutes. Stagger treatment intervals and rinse thoroughly between steps to avoid irritation.
| Method | Duration | Notes |
|---|---|---|
| Oil | 5–10 min | loosen paint |
| Solvent | 1–3 min | short, spot only |
| Shampoo | 3–5 min | deep clean |
Signs to Stop and Seek Medical or Professional Help
If you notice worsening scalp pain, blistering, swelling, or any signs of an allergic reaction—like widespread redness, hives, or difficulty breathing—stop trying home remedies and get medical help immediately.
Watch for clear medical signs and seek professional assistance when needed.
- Rapid spreading rash or persistent burning.
- Difficulty breathing or facial swelling.
- Fever, pus, or worsening pain despite rinsing.
Treating Chemical Irritation or an Allergic Reaction
When chemical irritation or an allergic reaction happens, stop using any products on your scalp and gently rinse the area with cool water for 10–15 minutes to remove residual chemicals; this reduces ongoing exposure and soothes burning.
Pat dry, avoid rubbing, and apply a cool compress.
If swelling, severe itching, blistering, or breathing issues occur, seek medical care immediately—these signs may mean serious chemical irritation or allergic reactions.
Deep Conditioning and Repair After Paint Removal
After you’ve rinsed away irritants and treated any reaction, focus on restoring moisture and strength to your hair; paint removal can strip natural oils and leave strands brittle.
Use targeted deep conditioning and gentle techniques for hair repair:
- Apply a protein-rich mask for 10–20 minutes to rebuild structure.
- Follow with an intensive moisturizing conditioner.
- Rinse with cool water and air-dry gently.
Trim or Cut? When to Snip Painted Ends
Decide whether to trim or cut based on how much paint and damage remain: small stubborn spots and a few split ends call for a targeted trim, but widespread stiffness, discoloration, or a heavy buildup of dried paint usually means you’ll need a longer cut to protect hair health and encourage proper regrowth.
If you choose trimming, consult a professional for precise hair trimming after thorough paint removal.
Preventive Steps for Future Painting Sessions
If you’d rather avoid another round of trimming or cutting, plan ahead before you paint so your hair never meets the brush or splatter.
Use preventive measures and smart painting techniques to protect strands. Follow simple steps to limit risk:
Protect your hair with simple, smart painting habits—tie it back, cover it, and work top to bottom.
- Tie hair back and cover with a cap.
- Wear a protective wrap or towel.
- Position drop cloths and work from top down.
Quick, Gentle Fixes for Children or Sensitive Scalps
If paint gets in a child’s hair or on a sensitive scalp, you’ll want to reach for gentle oil breakers like olive or coconut oil to loosen the paint without harsh chemicals.
Follow kid-safe removal steps—softly work the oil in, comb out softened paint, then shampoo with a mild, tear-free cleanser.
Finish by soothing the scalp with a light, fragrance-free moisturizer and avoid vigorous scrubbing.
Gentle Oil Breakers
When you need a quick, gentle fix for a child or someone with a sensitive scalp, reach for mild, oil-friendly options that loosen paint without harsh scrubbing.
You’ll prefer gentle alternatives that rely on oil absorption and mild emulsifiers.
Try these safe, simple breakers:
- Olive oil dabbed gently
- Cornstarch paste for oil absorption
- Baby oil with a soft cloth
Kid-Safe Removal Steps
You can move from gentle oil breakers to a step-by-step, kid-safe routine that keeps the process calm and effective. Use kid friendly techniques, gentle oils, and playful distractions to distract and comfort. Apply oil, comb gently, shampoo lightly, repeat if needed.
| Step | Action |
|---|---|
| 1 | Apply gentle oil |
| 2 | Comb softly |
| 3 | Shampoo lightly |
| 4 | Rinse and repeat |
Soothing Scalp Care
Although the focus is removing paint, soothe the scalp right away with cool compresses and a light, fragrance-free moisturizer to calm redness and sensitivity.
Use scalp hydration and nourishing treatments, avoid strong essential oils, and keep pH balance.
Try calming techniques and gentle exfoliation later.
- Short scalp massages
- Mild soothing masks
- Hydrating leave-in care
Clean Brushes, Clothes and Tools Without Contaminating Hair
If you’re cleaning brushes, clothes, or tools after using oil-based paint, set up a dedicated work area and keep hair out of the zone to prevent contamination.
Use gloves, cover surfaces for surface preparation, and secure long hair.
Follow brush cleaning steps separately, launder contaminated clothes promptly, and perform tool maintenance with recommended solvents.
These cleanup strategies prioritize paint prevention and hair protection.
Mistakes That Make Paint Worse (And How to Avoid Them)
Keeping hair and gear away from your cleanup zone helps, but a few common missteps can still turn a small smear into a bigger problem.
Avoid actions that cause paint damage; use hair care safe methods and gentle solutions. Prevention tips and kids safety matter—don’t improvise with harsh cleaning supplies or risky home remedies; prioritize scalp protection and proven removal techniques.
- Rubbing aggressively
- Using solvents directly
- Ignoring protective covers
Final Checklist: Safe Stepwise Plan to Remove Oil Paint
Start with these clear, ordered steps so you can remove oil-based paint from hair safely and efficiently.
Assess amount, protect skin, and clip excess paint.
Apply oil or remover to dissolve oil paint, work gently with fingertips, then shampoo twice using clarifying formula.
Rinse thoroughly, condition to restore moisture, and air-dry.
Follow up with hair care tips if irritation or residue remains.
Frequently Asked Questions
Can Hair Dye Affect Paint-Removal Outcomes?
Yes — you’ll see hair dye interactions change paint removal methods’ effectiveness; dyed hair can alter porosity and color, so you’ll need gentler solvents, test small areas, and choose treatments that avoid stripping or fading your dye.
Can Oil Paint Transfer to Furniture During Treatment?
Like a sneaky shadow, yes — paint transfer can happen to furniture during treatment, so you’ll protect surfaces with drop cloths and tape, isolate the area, work gently, and keep solvents contained to avoid stains.
Will Removing Paint Change My Hair Color Permanently?
Removing oil-based paint usually won’t permanently change your color treatment if you act gently; you’ll rinse, use oil-based removers carefully, and follow with conditioning to protect hair health, but repeated harsh treatment can alter dye.
Are There Eco-Friendly Disposal Options for Paint-Soaked Materials?
Yes — you can dispose responsibly: check paint recycling programs, use eco friendly solvents to reduce contamination, dry paint-soaked materials fully, seal them in labeled containers, and drop off at hazardous-waste or community disposal sites near you.
Can Pets Be Exposed to Removed Paint Residue at Home?
Yes—you should prevent pets’ exposure. You’ll contain and clean residues promptly, use pet-safe cleaners, ventilate areas, and discard contaminated materials properly to reduce residue effects and protect pet safety from toxins and irritation.
Conclusion
You can get oil-based paint out of hair without shredding it if you move slowly, use gentle solvents sparingly, and follow a clear step-by-step plan. Start with oil or conditioner to break up paint, switch to a mild solvent only if needed, and finish with a deep wash and conditioner to protect strands. Want your hair intact and your conscience clean? Take your time, protect the scalp, and don’t rush—safety and gentleness win.