How to Trim Paint Walls for Sharp Clean Edges
Prep surfaces, protect floors and furniture, then tape a clean straight line where wall meets trim or ceiling. Use a sharp angled sash brush or edger, steady your wrist, load the brush properly, and cut the line in one confident stroke. Score and remove tape at a 45° angle within an hour to avoid peeling. For textured walls, feather edges and use flexible brushes. Keep tools handy and follow a final checklist—more tips and fixes follow if you want.
One-Step Guide: Cut a Sharp Paint Edge
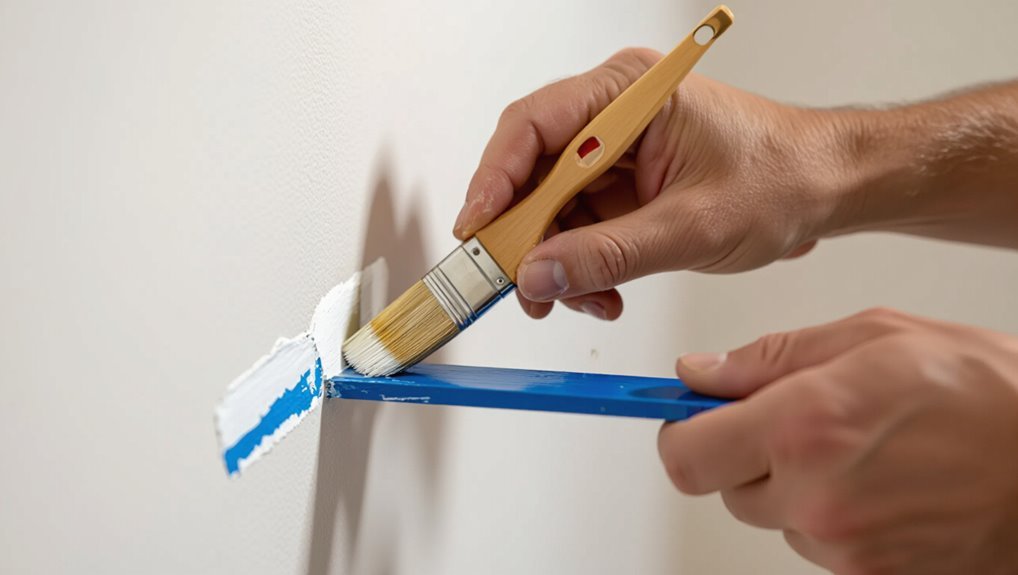
Start by taping a clean, straight line where the wall meets trim or ceiling so you can cut a crisp edge without worrying about slop.
You’ll score the tape lightly, load a razor-sharp blade, and use steady pressure to slice paint away.
Focus on cutting techniques and edge precision, keeping your wrist steady and your pace slow to prevent nicks or uneven lines.
Prep Steps That Make Trimming Paint Edges Easy and Fast
1 simple prep routine can cut your trimming time in half: clean the edges, protect surfaces, and assemble the right tools so you can work confidently and quickly.
Focus on color selection and paint finish to match trim. Prioritize wall preparation and assess surface texture.
Lay out brush types and edge techniques, set timing strategies, and maintain workspace organization so you move efficiently and avoid mistakes.
Protect Floors and Furniture Before You Trim
Before you touch a brush, cover floors and furniture with drop cloths or plastic sheeting and secure them so dust and drips can’t sneak underneath; tape the edges, move small pieces out of the room, and raise larger items on blocks or cardboard to create a safe working zone. Use floor protection and furniture covering to prevent stains and scuffs.
| Item | Purpose |
|---|---|
| Drop cloths | Protect floor |
| Plastic | Cover furniture |
Tools Overview: Brushes, Tapes, Edgers, and Shields
Now that your floors and furniture are protected, you’ll want the right tools to get crisp trim lines.
Pick a high-quality angled sash brush for control, painter’s tape that sticks without peeling paint, and a combo of edgers and shields to speed up straight edges.
I’ll walk you through the best options and how to use each one.
Best Brushes For Trim
Choosing the right brush makes cutting clean trim lines far easier, and you’ll want to match bristle type, shape, and size to the paint and surface you’re working with.
For trim, use angled sash brushes for control and flat nylon or natural bristles for oil or latex.
Learn brush types, practice steady strokes, and follow simple brush maintenance—cleaning, reshaping, and storing—to prolong life and performance.
Tape, Edgers, Shields
Three main helpers—painter’s tape, edgers, and shields—make getting crisp trim lines faster and less stressful.
You’ll learn tape types and proper tape application to protect surfaces, practice edger techniques and compare edger brands for control, and choose shield materials that suit corners or outlets.
Use them together: tape for protection, edgers for speed, shields for precision, and you’ll trim confidently.
Choosing the Right Angled Brush for Trim
A good angled brush makes clean, crisp edges and saves you time on touch-ups, so pick one that matches the trim size and paint type you’re using.
Choose among angled brush types—sash, short-flag, or long-flag—based on trim width and detail.
Prioritize brush handle comfort for control during steady strokes.
Match bristle stiffness to latex or oil paints for best results.
Best Painter’s Tape for Ceilings, Baseboards, and Windows
For clean lines on ceilings, baseboards, and windows you’ll want painter’s tape that sticks well without peeling paint when removed.
Choose the best painter’s tape for each surface, testing tape adhesion before you start. Be precise, press edges firmly, and remove slowly at a 45° angle.
Pick the right tape for each surface, test adhesion first, press edges firmly, and remove slowly at 45°.
- Low-adhesion for fresh paint
- Medium for trim
- High for textured surfaces
Priming and Patching for Flawless Trim Lines
Before you paint trim, fix holes and seal bare wood so the finish goes on smooth and the tape sticks properly.
Prep surfaces by sanding, cleaning dust, and applying a quality primer to patch joints and knots.
Prioritize surface preparation to guarantee adhesion.
Match primer and paint selection to trim material and sheen for uniform coverage and crisp, durable trim lines.
Cutting In at the Ceiling: Step-by-Step
Start by taping a clean edge along the ceiling and brushing a thin guide coat of paint to establish your cutting line; this keeps your brush from slipping and reduces visible overlap when you roll the walls.
- Use a quality angled brush and steady wrist—practice ceiling techniques for straight lines.
- Keep paint consistency thin but opaque to avoid drips.
- Feather edges, remove tape before fully dry for crisp results.
Trimming Around Windows and Door Frames Without Bleed
When you trim around windows and door frames, start with knife-edge taping to get a crisp barrier that stops bleed.
Keep a steady hand and use slow, controlled strokes to cut the paint line where tape ends.
Finish by feathering with a small brush to blend edges and hide any tiny imperfections.
Knife-Edge Taping
Knife-edge taping gives you a clean, paint-tight line around windows and door frames without the fuzzy bleed that ruins crisp trim work; it uses thin, flexible tape and careful pressure to seal the joint so paint won’t wick under the edge.
Use the knife edge technique during paint application, then:
- Press tape firmly into the corner.
- Smooth with a plastic card.
- Remove tape at a 45° angle.
Steady-Hand Cutting
Take your time and steady your wrist: steady-hand cutting is all about controlled, deliberate strokes that keep paint off trim while letting you work without tape.
You’ll position a high-quality angled brush, anchor your pinky on trim, and use steady hand techniques for smooth motion.
Focus on cutting precision, slow strokes, minimal paint load, and consistent pressure to avoid bleed and touch-ups.
Feathered Brush Technique
Start by loading your angled brush lightly and dabbing most of the paint off on the can’s lip so you’ve only a thin, even coat on the bristles; this lets you feather the edge against window and door trim with soft, short strokes that build coverage without bleeding.
- Use feathering technique with gentle pressure.
- Vary brush angles to match trim profiles.
- Overlap short strokes for seamless edges.
Neat Baseboard and Chair-Rail Trimming
Neat baseboard and chair-rail trimming makes a room look finished and professional, so prep carefully and work methodically.
Tape edges, fill gaps, and sand smooth. Match paint sheen to baseboard styles and pick complementary chair rail designs.
Use angled brush for clean strokes, steady pressure, and short strokes near corners. Remove tape while paint’s tacky for razor-sharp lines.
Trimming Textured Walls and Popcorn Ceilings
When you’re working on textured walls or popcorn ceilings, start by prepping the surface—clean loose debris and let it dry so paint will stick.
Tape the ceiling edges carefully to protect the texture and avoid smudges.
Use a flexible trim brush or pad to follow the contours for a clean line without flattening the texture.
Prep Textured Surfaces
Because textured walls and popcorn ceilings catch trim mistakes and excess paint, you’ll need to prep them differently than smooth surfaces.
You’ll focus on textured surfaces and careful wall preparation: clean dust, remove loose texture, and mask nearby areas.
Follow these steps:
- Vacuum and wipe down.
- Brush off loose bits.
- Apply minimal spray adhesive to mask edges.
Tape Around Ceiling Edges
If your ceiling has texture or popcorn, tape the edge carefully to prevent ridges and stray paint from sticking to the bumps; choose a high-quality, low-tack painter’s tape and press it firmly into the textured surface with a soft brush or your fingertips so it follows the contours.
For tape application during ceiling prep, smooth edges, overlap slightly at corners, and remove tape while paint’s tacky for a clean line.
Use Flexible Brush/Pad
A flexible brush or pad gives you better control on textured walls and popcorn ceilings, letting you follow the contours without crushing the texture.
You’ll prefer a flexible application to skim ridges and keep edges crisp. Use careful brush techniques, light pressure, and steady lines so paint nests in crevices without buildup.
- Feather edges
- Short strokes
- Clean tapers
Using Edgers, Shields, and Cutting-In Tools
Start by picking the right tool for the job—edgers, shields, and cutting-in brushes each give you different levels of speed and control when you paint trim, corners, and edges.
You’ll use edger techniques for straight runs, exploit shield benefits at awkward angles, and switch to a cutting-in brush for precision near trim.
Practice steady movement and minimal paint on tools.
Brush Control: Load, Angle, and Stroke
Three basics govern clean cutting-in: how much paint you load, the angle you hold the brush, and the stroke you use.
Three basics govern clean cutting-in: paint load, brush angle, and stroke — master these for sharp, bleed-free edges.
You’ll use steady brush techniques and focus on edge precision. Practice these steps to control bleed and keep lines sharp:
- Load: dip lightly, tap off excess.
- Angle: 30–45° for consistent contact.
- Stroke: long, unbroken pulls toward the line.
Roller-and-Brush Blending for Seamless Edges
Make sure your roller nap matches the one you used on the wall so the texture blends smoothly with your brushwork.
Feather your brush strokes at the edge to soften ridges and avoid hard lines.
Work into the wet edge so the roller and brush merge without leaving a visible seam.
Match Roller Nap Length
To get crisp, seamless edges, match the roller nap you use on the trim to the nap used on the adjacent wall—if the textures don’t line up, the blended area will show a noticeable stripe.
You should check roller nap and texture compatibility before starting, then follow a consistent pressure and direction.
- Test on scrap
- Match nap height
- Maintain even pressure
Feather Brush Strokes
Blend the brush into the roller-applied paint with light, feathering strokes so the shift between trim and wall disappears; you’ll use feather brush techniques to soften the line without overworking.
Hold the brush at a low angle, tap and lift gently, and keep a steady wrist. Focus on smooth edge application, blending color and texture until edges read seamless and controlled.
Blend Into Wet Edge
Work toward a wet edge by rolling a fresh section and immediately brushing the overlap so the paint merges before it starts to dry.
You’ll use quick, controlled strokes and simple blending techniques to prevent lap marks and edge fading.
Practice this routine:
- Roll adjacent panel, keeping paint even.
- Brush overlap with light, outward strokes.
- Re-roll lightly to unify texture.
Common Mistakes That Ruin the Edge : And Fixes
One common mistake is leaving tape on too long—paint bonds and peels when you pull it off days later—so remove it within 30–60 minutes of the final coat while the paint’s still tacky.
Also avoid overloaded brushes, uneven pressure, and rushing.
Use mistake identification to spot bleed or jagged lines, then edge correction: sand, scrape, feather with a small brush, and touch up for crisp results.
Removing Painter’s Tape Cleanly Without Tearing Paint
After you’ve fixed any bleeds or jagged lines, the next delicate step is pulling off the painter’s tape without tearing the new paint.
You’ll protect paint adhesion by removing tape correctly. Follow these steps:
- Pull tape back on itself at a 45° angle while paint’s tacky, not fully cured.
- Score stubborn edges with a utility blade.
- Remove slowly, keeping steady tension.
Quick Touch-Ups for Scuffs and Missed Spots
Small dings and tiny missed spots are normal, and you can fix most of them quickly with the right tools and technique.
For scuff repair, gently clean the area, sand lightly if needed, and use a small artist brush or touch-up pen with matching paint.
Feather edges into surrounding finish, let dry, and assess under good light.
Repeat thin layers for seamless coverage.
Paint Sheen and Color Choices for Crisp Edges
Choose the right sheen and color deliberately to make your trim pop against walls: pick a contrasting paint finish to highlight edges and use color psychology to set mood.
Balance gloss for easy cleaning with satin for subtlety. Consider these tips:
- Use high-gloss for durable, crisp trim lines.
- Match undertones to avoid clash.
- Test swatches under real light before committing.
Fast Strategies for Trimming Large Rooms
Before you start, clear furniture and tape edges so you can move quickly without stopping.
Use efficient cutting techniques—steady long strokes and a loaded angled brush—to keep lines straight and reduce touchups.
Pick speed-friendly tools like a quality edger, a wide brush for long runs, and an extension pole to cover more ground fast.
Prep The Room
When you’re tackling trim in a large room, clear the work area fast so you can move freely and keep a steady pace; roll furniture to the center, stack smaller items, and remove wall hangings and outlet covers.
Plan room layout, lighting considerations, wall preparation, surface cleaning, furniture arrangement, color selection, ventilation needs, access points, protective coverings, and time management.
- Seal floors and vents.
- Map access points.
- Stage lighting for accuracy.
Efficient Cutting Techniques
With the room prepped, start cutting strategically to save time and keep clean lines: work in long, continuous strokes along each wall, keep your cutting tool at a consistent angle, and move methodically around the space so you don’t double back.
Use measured cutting techniques, maintain steady wrist motion, and pause only to clean buildup.
Focus on edge precision, steady pacing, and consistent pressure for uniform results.
Speed-Friendly Tools
Pick two high-impact tools to speed up trimming large rooms: a quality angled brush for corners and a 2–3 inch sash brush or trim roller for long runs.
You’ll focus on speed efficiency and smart tool comparison to cut time without sacrificing edges.
- Angled brush — control corners.
- Sash brush — steady long strokes.
- Trim roller — fast fills.
Temperature and Humidity: Drying and Bleed Risks
Although you might rush to trim shortly after painting, temperature and humidity strongly affect drying time and the risk of paint bleed; cooler air and high moisture slow cure and let solvents migrate into fresh trim.
You should monitor humidity effects and use temperature control to wait until paint is tack-free.
Trimming too soon causes feathering, bleed-through, and uneven edges—patience preserves crisp lines.
Tips for DIY Beginners vs Experienced Painters
Once the paint’s fully tack-free and environmental conditions are right, you’ll find your approach to trimming changes based on experience.
You should adjust methods for paint edge techniques and wall texture considerations.
- Beginners: use quality tape, steady strokes, slow removal.
- Intermediate: try angled sash brushes and light touch for cleaner edges.
- Pros: freehand confidence, quick feathering, texture-aware pressure control.
Trimming Uneven or Sloped Ceilings
When ceilings slope or run unevenly, you’ll need to slow your pace and prioritize consistent brush angle and pressure to keep a straight-looking trim line.
Use short, controlled strokes, follow the ceiling’s contour, and readjust your wrist to match pitch changes.
Employ Ceiling techniques like angled sash brushes and steady tapers.
These Slope strategies reduce waviness and give crisp edges without overworking paint.
When Painter’s Tape Helps : And When to Skip It
After you’ve mastered steady brushwork on sloped ceilings, decide whether painter’s tape will help you keep lines crisp or just slow you down. You’ll weigh benefits against time, surface quality, and paint type.
Consider:
- Use tape for rough or textured edges.
- Skip tape when confident with cut in techniques.
- Try tape alternatives like edge guards or putty for small fixes.
Speed Hacks: Steadying Techniques That Save Time
Steady your hand and speed up your trim work with a few simple techniques that reduce mistakes and cuts. Use steadying techniques like bracing your forearm, anchor fingers on the wall, and a short, controlled stroke. These time saving tips cut rework. Practice light pressure and a guide edge.
| Technique | Benefit | Quick Tip |
|---|---|---|
| Forearm brace | Stability | Rest on ladder |
| Finger anchor | Control | Touch wall |
| Guide edge | Consistency | Use ruler |
Signs Your Trim Job Needs a Professional
If your trim lines keep wavering, paint’s pooling in corners, or you find yourself sanding more than painting, it’s time to contemplate calling a professional.
You want consistent trim quality and avoid wasted materials.
Consider professional help when:
- Edges won’t stay straight despite effort.
- Caulking or gaps persist after touch-ups.
- Time constraints or uneven results risk the finish.
Final Checklist and Timeline to Finish Clean Edges
Before you call the job done, check that you’ve got all final supplies on hand—extra brushes, caulk, and touch-up paint.
Note the drying and cure times so you don’t rush moving furniture or doing final touch-ups.
Then walk the room, handle any small fixes, and clean tools so your edges stay crisp.
Final Supplies Check
Grab these last items now so you don’t interrupt your trim work later: a clean angled brush, a small artist’s brush for touch-ups, high-quality painter’s tape, a sharp utility knife, a damp sponge, a lint-free rag, a container for clean water, and a flashlight to spot thin spots or missed edges.
Check final color selection and paint finish, then:
- Confirm tools are clean.
- Tape and score edges.
- Keep water and rags handy.
Drying And Cure Times
With your tools set and edges taped, you’ll want to plan the drying and curing timeline so you know when you can remove tape, do touch-ups, and return furniture to the room.
Check paint labels for drying times—surface dry versus recoat. Note cure durations for full hardness; avoid heavy use until complete.
Cooler or humid conditions extend both, so adjust your schedule accordingly.
Touch-Up And Cleanup
Finish strong by tackling touch-ups and cleanup in a focused sequence so your edges look sharp and the room’s ready on schedule.
- Inspect edges, use precise touch up techniques with a fine brush for nicks and runs.
- Remove tape slowly, catch bleed with a damp cloth, and smooth any ridges.
- Follow cleanup strategies: wash tools, ventilate, and set a short timeline to recheck and cure fully.
Frequently Asked Questions
Can I Use Caulk to Fix Gaps After Paint Dries and Tape Removed?
Yes — you can use caulk to fix gaps after paint dries and tape’s removed. You’ll prep, apply caulk application neatly, let it cure, then perform paint touch ups for a seamless, sharp-looking finish.
How Long Should I Wait Before Reinstalling Switch Plates and Hardware?
Like waiting for bread to cool, you should wait 24–48 hours before reinstalling switch plates and hardware; that drying time guarantees paint’s cured enough to avoid smudges, and you’ll avoid peeling or fingerprints.
Will Edge Quality Differ Between Latex and Oil-Based Paints?
Yes — you’ll notice differences: paint types affect edge durability and crispness; oil-based paints usually level better and resist scuffing, while latex dries faster and flexes more, so edges can be sharper but slightly less durable.
Can I Trim Painted Edges Over Wallpaper Safely?
Yes—you can, but cautiously: wallpaper durability varies, so you’ll test adhesion first and use paint-compatible primers and flexible trim caulk; otherwise, poor paint compatibility or fragile paper will lift or tear when you cut sharp edges.
How Do I Transport Wet-Trimmed Panels or Doors Without Smudging?
You’ll avoid smudges by using wet paint handling best practices: support panels vertically, carry with clean gloves, employ foam edge protectors, transport techniques like single-item racks or A-frame cradles, and secure doors to prevent shifting during transit.
Conclusion
Think of your freshly trimmed edge as a well-tied shoelace: small, steady efforts keep the whole look tidy. You’ve prepped, picked the right brush, and learned when tape helps or hinders. Protecting floors and steady hands are the quiet shoelace knot that holds the work together. If things fray, call a pro. With your checklist and a calm pace, those crisp lines will keep your room walking tall.