Can You Stain a Painted Deck? What Actually Works
You can stain a painted deck, but only if the paint is sound, well-adhered, and lightly weathered; test a small area first. Remove peeling paint, clean mildew and dust, feather edges, and sand glossy finishes so stain can penetrate or bond. Some paints repel stain, so incompatible coatings or extensive flaking mean you’ll need to strip to bare wood. Choose low‑VOC products, follow drying times, and get a pro for rot—keep going to learn which option fits your deck.
Can You Stain a Painted Deck?
Can you stain a painted deck? You can, but you’ll first assess paint longevity and surface durability.
Scrape loose paint, sand glossy areas, and clean thoroughly so stain adheres. If paint’s failing or the surface’s uneven, staining won’t solve root issues.
Choose a stain formulated for overcoating painted wood and test a small area to confirm adhesion and appearance before proceeding.
When Staining Over Paint Makes Sense
If the painted surface is sound and you’ve prepped it properly, staining over paint makes sense in a few specific situations.
You might want improved deck aesthetics without full strip-and-repaint, or you prefer different color options while keeping existing coverage.
It works for lightly weathered paint, low-traffic areas, or temporary updates.
Test a small patch to confirm adhesion and appearance before proceeding.
When Stain-Over-Paint Won’t Work
If the existing paint’s peeling or flaking, you won’t get a durable stain because it can’t bond to loose coating.
You’ll also run into trouble if the paint is an incompatible type—like some glossy enamels or oil-based finishes—that repel stain.
Before you proceed, check adhesion and paint type so you don’t waste time and materials.
Poor Paint Adhesion
When paint’s adhesion is failing—peeling, blistering, or flaking—you can’t simply apply stain over it and expect a durable finish.
You’ll face paint failure and adhesion issues that transfer to the stain. Remove loose paint, sand to solid edges, and clean the surface.
If remaining coating is well-bonded, prime and use a compatible stain; otherwise strip to bare wood before staining.
Incompatible Paint Types
Although some painted decks accept a stain coat, certain paint types repel or block stains and will keep the new finish from penetrating or bonding. You’ll face incompatible paint types like heavy latex, oil-based enamel, or high-gloss coatings causing paint compatibility issues. Test adhesion, strip or sand when needed, and choose a stain recommended for previously painted surfaces.
| Paint Type | Issue | Solution |
|---|---|---|
| Heavy latex | Repels stain | Sand/strip |
| Oil enamel | Blocks bonding | Strip/prime |
| High-gloss | Poor adhesion | Scuff/prime |
What Determines Success: Quick Overview
Deciding whether staining a painted deck will work comes down to three things: the paint’s condition, the paint type, and how well you prepare the surface.
You’ll assess peeling, adhesion, and mildew, then choose prep steps—cleaning, sanding, or stripping—to optimize adhesion.
Focus on deck aesthetics and appropriate staining techniques to guarantee durability and a cohesive finish that won’t delaminate or look patchy.
Paint Type and Your Options
Now that you know how condition and prep affect success, you’ll need to identify what kind of paint is on the deck—latex (water-based), oil-based, or a specialized deck/stain product—because each behaves differently under a new stain.
Once identified, assess paint durability and whether it’s peeling. That determines your options: strip, sand, or scuff and choose stain type and color options to match desired finish.
Oil vs. Latex Paint: Key Differences
Wondering which paint type matters most when you plan to stain a deck?
You’ll weigh oil benefits like deep adhesion and water resistance against latex drawbacks such as weaker bonding to some surfaces and quicker wear.
Oil often blocks stains better, but cleanup and fumes differ.
Oil tends to block stains more effectively, though cleanup is harder and fumes are stronger.
You’ll choose based on existing coating, desired finish, and how easily you can prepare and seal the surface.
Old or Thick Paint: How It Changes Things
If the paint on your deck is old or applied thickly, it can block stain penetration and cause uneven color.
You’ll need more aggressive surface prep—scraping, sanding, or even stripping—to thin or remove build-up before staining.
Assess the paint thickness and adhesion first so you can choose the right prep method and avoid poor results.
Paint Thickness Effects
Because multiple coats build up over years, an old or thick layer of paint changes how a deck accepts stain: thicker paint reduces penetration, hides wood grain, and often leads to more peeling when the stain can’t bond.
You’ll notice reduced paint durability in some areas, uneven stain compatibility, and variable finish. Thicker paint forces you to evaluate adhesion and may require stripping or selective sanding for consistent results.
Surface Prep Needs
Old or thick paint changes your surface prep: you’ll need to inspect for adhesion, remove loose layers, and abrade remaining paint so stain can penetrate or bond.
You’ll strip or sand to bare wood where possible, then perform deck cleaning to remove dust, mildew, and residues.
Proper surface preparation guarantees new stain bonds evenly and lasts — don’t skip these steps.
Deck Material: Softwood, Hardwood, Composite
Choosing the right decking material affects how well a stain will penetrate, adhere, and wear over time. You’ll want to know the differences between softwood, hardwood, and composite.
You’ll enjoy softwood benefits like affordability and easy staining. Hardwood durability resists wear but costs more. Composite maintenance is low, and you’ll weigh environmental impact, aesthetic choices, and cost considerations when deciding what to refinish.
Testing Adhesion: Peel-and-Scrape
Before staining, you’ll want to do a simple peel test to check whether the existing paint will hold or flake off.
Use a sharp blade or putty knife to score and scrape a small area, then try peeling a square of paint to see how much comes away.
If large sections lift or the paint crumbles, you’ll need to remove or recoat properly before staining.
Peel Test Basics
When you’re checking whether paint will hold to deck boards, a simple peel-and-scrape test gives a quick, practical read on adhesion: pull up a small section of coating with a utility knife and putty knife to see if it flakes off cleanly or takes wood fibers with it.
Use the peel test at several spots to assess adhesion factors like age, moisture, and surface contamination before deciding to stain.
Proper Scrape Technique
Start by scoring a small square of the coating with a utility knife and lift an edge with a putty knife so you can get a clean, controlled peel. You’ll use precise scraping techniques during deck preparation: steady angle, slow pull, remove flakes. Check adhesion across boards, note stubborn spots, and plan sanding or stripping as needed.
| Tension | Sound | Feel |
|---|---|---|
| Mild | Crisp | Smooth |
| High | Ripping | Rough |
| None | Quiet | Clean |
Interpreting Adhesion Results
How do you read the results of your peel-and-scrape test?
Compare how much paint lifts: isolated flakes mean good adhesion; large sections or bare wood indicate failure.
Note whether failure is at paint-film, primer, or wood—this guides fixes.
Record percent lifted for adhesion testing and include observations for surface evaluation like chalking, moisture, or contaminants to choose appropriate remediation.
Testing Porosity: Water-Drop Test
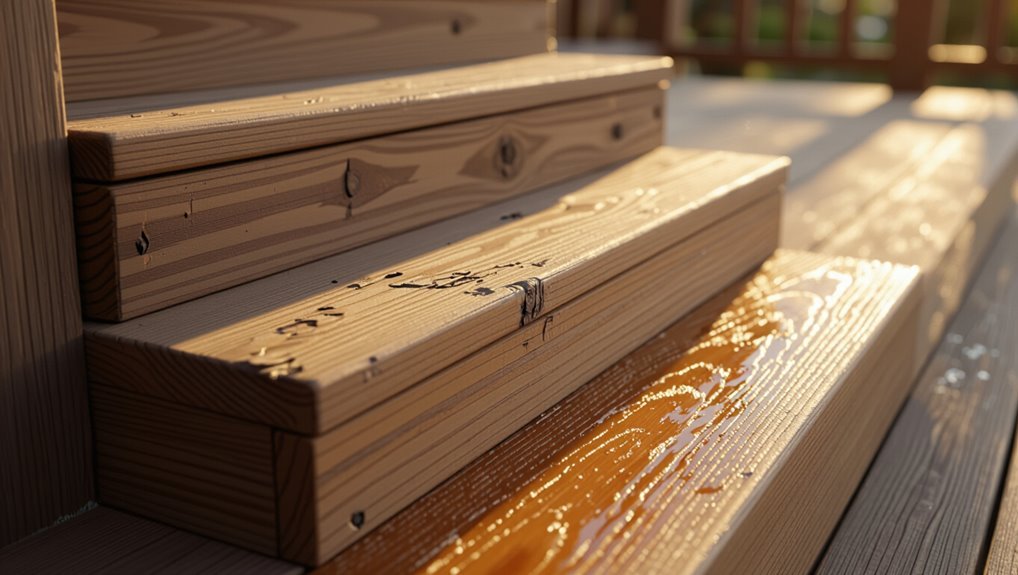
Curious whether your painted deck will accept stain? You can do a simple water-drop test to gauge water absorption and plan deck maintenance. Drop water on several spots; if it beads, paint resists; if it soaks in, surface is porous and may accept stain after prep.
| Reaction | Meaning |
|---|---|
| Beads | Resists |
| Soaks | Porous |
Products for Staining Over Paint
One clear choice you’ll face is whether to use a product specifically designed to penetrate painted surfaces or to strip/prime first and apply a conventional deck stain.
You’ll find gel stains, semi-transparent and solid-color options, plus specialty penetrating formulas.
Consider stain types and recommended application techniques for thin, even coats.
Test a small patch, follow dry times, and avoid high humidity during application.
Bonding Primers and Adhesion Stains
If the existing paint is glossy or chalky, you’ll need a primer made specifically for adhesion—these come in oil-based, shellac, and specialty bonding formulas.
Use a bonding primer when sanding won’t fully abrade the surface or when you’re switching from a glossy finish to a stainable base.
Choosing the right adhesion stain or primer up front is what lets the new finish stick and last.
Primer Types For Adhesion
Although a painted deck might seem ready for stain, getting good adhesion usually means applying a bonding primer or an adhesion-promoting stain first.
You’ll pick primers with strong bonding agents for paint-to-stain shifts and choose adhesion stains formulated for slick surfaces.
Check surface compatibility—latex, oil, or epoxy substrates need specific chemistries.
Apply per instructions, let cure fully, then test a small area before full staining.
When To Use Bonding
When your painted deck shows glossy surfaces, chalking, or previous coatings that repel water, reach for a bonding primer or an adhesion stain before staining—these products are designed to create a mechanical and chemical bridge so the new stain will stick.
Use bonding techniques when sanding won’t remove slick coatings, testing surface compatibility first. Apply per instructions, dry fully, then topcoat for lasting adhesion.
Non-Wood Decks: Concrete and Composite Fixes
Because concrete and composite decks won’t accept traditional wood stains the same way, you’ll need different preparation and product choices to refresh their look.
For concrete staining, clean, etch, and choose masonry dyes or acid stains that penetrate.
For composite maintenance, use composite-specific cleaners, avoid abrasive tools, and apply pigment-rich coatings designed for non-porous boards to restore color and protect surfaces.
Strip, Prime, or Stain-Over: Decision Framework
You’ve just learned how concrete and composite decks need different cleaning and color products, and now you need to decide whether to strip existing paint, prime first, or apply stain directly over the surface.
Use these quick criteria to choose, balancing substrate, adhesion, and appearance:
- Poor adhesion: strip.
- Sound paint: prime then stain.
- Good adhesion and compatible stain: stain-over.
Apply deck maintenance tips and paint adhesion techniques accordingly.
How to Strip Paint: Methods and Trade-Offs
If the paint’s failing or you want the wood’s natural grain back, you’ll need to strip it first — and choosing the right method affects labor, cost, and how much you damage the decking.
You can use chemical strippers for stubborn coatings, heat guns for small areas, pressure washing for bulk removal, or sanding techniques for finish.
Consider environmental concerns and check product recommendations before starting.
Sanding Painted Boards Safely and Fast
Once you’ve removed most of the old coating with chemicals, heat, or pressure, sanding lets you smooth rough spots and remove remaining paint quickly and precisely.
After stripping most old coating, sanding smooths rough spots and clears remaining paint efficiently and precisely.
You should choose sanding techniques, use appropriate grit progression, and follow safety precautions:
- Start coarse, finish fine.
- Use dust mask and eye protection.
- Control dust with a vacuum attachment and work steadily.
Cleaning and Degreasing After Removal
Scrub the deck thoroughly to remove dust, paint residue, and any oily spots left from previous coatings or stripping agents.
Use a degreaser and stiff brush, rinsing well to avoid residue.
For effective deck cleaning, target crevices and fastener heads, then let boards dry fully.
This surface preparation guarantees stain adhesion and prevents blotchy finish without jumping ahead to priming steps.
Using a Bonding Primer Correctly
Before you stain, pick a bonding primer formulated for your existing paint and for exterior wood so it will adhere and resist peeling.
Apply it evenly with the recommended brush or roller, follow the manufacturer’s spread rate, and avoid overworking the surface.
Let the primer dry fully to the specified time and check for tack-free readiness before staining.
Choosing The Right Primer
How do you pick a primer that’ll actually bond to old paint and accept stain? You’ll want to test compatibility, pick quality primer brands, and match primer colors to your stain.
Consider:
- Bonding formula for slick surfaces
- Tint options to reduce coats
- Manufacturer compatibility with stains
Follow label guidance and perform a small patch test so the primer will grip without blocking stain penetration.
Application And Drying
Start by applying the bonding primer in thin, even coats so it adheres and dries properly; use a high-quality brush, roller, or HVLP sprayer suited to the primer’s instructions, working along the wood grain and keeping a wet edge to avoid lap marks.
Use proper application techniques, avoid overworking, and follow manufacturer drying times.
Sand light imperfections between coats and inspect adhesion before staining.
Applying Stain Over Primer: Timing and Tips
If you’ve primed a deck and now want to switch to stain, timing and surface prep matter more than you might expect; get them wrong and the stain won’t adhere or will look uneven.
You’ll check primer selection, cure time, and surface cleanliness before stain application.
Follow these steps:
- Sand glossy primer.
- Clean thoroughly.
- Wait recommended cure time.
Choosing Stain: Oil vs. Water-Based and Opacity
Now that you’ve confirmed primer cure and prepped the surface, pick the right stain for durability and appearance: oil-based stains penetrate deeply and resist water and wear, while water-based stains dry faster, have lower VOCs, and keep color longer without yellowing.
Consider stain compatibility with existing coatings, test adhesion, and choose opacity choices—transparent for wood grain, semi-transparent for tint, or solid for full coverage and protection.
Matching Stain Color to Painted Areas
When you’re matching stain color to painted areas, prioritize visual continuity and edge changes so the deck reads as a cohesive surface rather than patchwork.
You’ll test small sections, compare under natural light, and adjust with tint or glaze for subtle shade blending.
Tips:
- Match undertones first.
- Layer thin glazes for color matching.
- Feather edges to avoid stark lines.
Drying Times: Wait Between Steps
Because staining over paint involves multiple steps, you’ve got to respect drying times between each coat and treatment to get durable, even results.
Check product labels for recommended drying times and ambient conditions. Allow full cure before sanding, priming, or applying additional coats.
Maintain consistent step intervals—longer in cool or humid weather. Rushing risks poor adhesion and uneven appearance; patience pays off.
Avoiding Common Mistakes
Letting each coat dry properly sets you up to avoid several common mistakes that can ruin a stained-over-painted deck. You should follow best practices, prep thoroughly, and test first.
Let each coat dry fully, prep carefully, and test first to avoid costly mistakes on a stained-over-painted deck.
Don’t rush. Remember these common pitfalls:
- Skipping surface cleaning
- Using incompatible products
- Ignoring small test patches
Follow these steps and you’ll get consistent, durable results without surprises.
Fixing Peeling, Blotchiness, and Poor Adhesion
Peeling, blotchiness, and poor adhesion are signs your painted deck needs surface work before staining; start by identifying loose paint, gummy spots, and areas where stain won’t soak in evenly.
Remove peeling paint with a scraper or sander, clean mildew and dust, feather edges, and spot-prime bare wood.
Address surface blotchiness by sanding and using a stain-blocking primer so the new stain adheres uniformly.
Maintenance After Staining a Painted Deck
Keep up with regular maintenance to protect the stain and extend the life of your deck.
Regular maintenance preserves your deck’s stain and longevity—clean, seal, and touch up routinely to prevent wear and fading.
You should follow simple deck care routines and maintenance tips to prevent wear, moisture damage, and UV fading.
Check seals, clean debris, and reapply topcoat as needed.
- Inspect annually
- Clean seasonally
- Touch up proactively
Cost Comparison: Strip-and-Stain vs. Stain-Over vs. Repaint
You’ll want to weigh the real costs before choosing a method: strip-and-stain typically costs more upfront for labor and materials but gives longer-lasting results.
Staining over paint can save money now but may need redoing sooner, while repainting can be cheaper than full stripping yet may hide problems.
Compare estimates for each approach and factor in future maintenance when you decide.
Strip-And-Stain Expenses
When weighing whether to strip-and-stain, stain over, or repaint, the biggest factor is how much time and money you’re willing to spend upfront versus the longevity you want.
For strip-and-stain, cost analysis and budget considerations matter: labor and materials raise initial cost but extend life.
Consider:
- DIY vs pro
- Grade of stain
- Disposal and prep costs
Stain-Over Versus Repaint
How much will each option actually cost you over time?
You’ll weigh upfront labor and materials: strip-and-stain needs more prep but boosts stain longevity, lowering future expenses.
Stain-over saves initial cash but depends on paint compatibility and may peel sooner.
Repaint is middle ground—easier now but requires regular repaint cycles.
Calculate replacement frequency, product cost, and labor for true lifetime value.
When to Call a Pro
If the paint is peeling heavily, the deck’s boards are warped, or the substrate shows signs of rot, call a pro—these problems need expertise and tools beyond DIY fixes.
When paint peels, boards warp, or the substrate rots, call a pro—these issues exceed DIY capability and need expert repair.
You should hire for complex repairs and rely on professional services for lasting results.
Consider these priorities:
- Structural repair
- Rot remediation
- Full refinish
Follow deck maintenance tips and get estimates before committing.
Safety and Environmental Best Practices
Once you’ve decided whether to call a pro or tackle the job yourself, take stock of safety and environmental concerns before stripping or refinishing the deck. Use proper safety gear, contain runoff, and choose low-VOC products to reduce environmental impact.
| Task | Protection | Disposal |
|---|---|---|
| Stripping | Gloves, respirator | Seal waste |
| Sanding | Eye, mask | HEPA vacuum |
| Staining | Gloves | Recycle cans |
Three Real-World Case Summaries
You’ll see two common scenarios in real life: one where someone removed old paint completely before staining, and another where they applied stain over existing paint.
Compare the prep steps, products used, and how well the stain adhered or faded. This will help you decide which approach fits your deck.
Previous Paint Removal
Before you decide whether to stain a painted deck, it helps to see how others handled paint removal in real situations; the three case summaries below show the common challenges, the methods used, and the results you can expect.
You’ll read concise lessons on previous paint and removal techniques:
- Chemical stripper restored wood grain.
- Pressure wash plus sanding cleaned deep flakes.
- Mechanical sanding finished stubborn layers.
Stain Over Paint
If you’re tempted to skip paint removal and apply stain directly, these three real-world cases show what can happen when people try staining over paint: sometimes it bonds acceptably, sometimes it peels, and sometimes it needs additional preparation to look right. You’ll learn about stain application, paint compatibility, and which prep steps saved or doomed each deck.
| Case | Outcome |
|---|---|
| Old oil paint | Bonded after sanding |
| Latex over wood | Peeling despite primer |
| Chalky finish | Needed stripping and recoat |
Decision Checklist: Strip, Prime-and-Stain, or Repaint
Wondering whether to strip the paint, prime-and-stain, or simply repaint? You’ll weigh Paint Removal, Deck Maintenance, Surface Preparation, Bonding Techniques, and Deck Materials.
Consider Stain Selection, Color Matching, Application Tips, Environmental Concerns, and Cost Factors. Decide based on adhesion tests, wear, and budget.
- Strip for failed adhesion.
- Prime-and-stain for coverage + bonding.
- Repaint for durability.
Frequently Asked Questions
Can You Stain a Deck With Lead-Based Paint Beneath?
You shouldn’t stain a deck with lead paint beneath; you’ll risk hazardous dust and exposure. Prioritize lead paint safety, hire certified abatement, and follow strict deck preparation protocols before considering any new finish or staining alternative.
Will Staining Affect Deck Structural Lifespan or Rot Prevention?
You won’t extend the deck’s bones by staining alone; think of stain as a raincoat that slows water, aiding deck maintenance and stain longevity, but you’ll still need repairs, sealing, and proper ventilation to prevent rot.
How Does Deck Stain Interact With Anti-Slip Additives?
Anti-slip additives bond in the top stain layer, so you’ll choose compatible anti slip formulations to avoid peeling; they can slightly reduce stain longevity but will improve traction—apply per manufacturer directions for best adhesion and wear resistance.
Can Pets or Humans Track Stain Indoors During Application?
Like fresh paint on your hands, yes—you’ll track stain indoors during stain application if you’re not careful. You should manage pets safety and human safety by using booties, absorbent mats, barriers, and prompt cleanup to prevent indoor tracking.
Are There Insurance Implications for DIY Deck Staining Projects?
Yes — DIY deck staining can affect insurance if accidents occur; you should check liability coverage, document DIY precautions, secure work areas, avoid hazardous chemicals, and notify your insurer if large projects or hired help increase risk.
Conclusion
Yes—you can sometimes stain a painted deck, but it’s tricky. About 80% of DIY deck failures come from poor surface prep, so check paint adhesion first. If the paint’s peeling or it’s a slick latex, you’ll likely need to strip or recoat with primer before staining. When paint’s sound and porous, light sanding and a bonding primer can let stain penetrate. If unsure, hire a pro to avoid wasted time and money.