Can You Put Polycrylic Over Latex Paint Without Yellowing?
Yes — you can put water-based polycrylic over fully cured latex paint without yellowing if you prep and apply it correctly. Clean and degloss the surface, sand lightly, and use thin, even coats with proper drying time between them. Avoid oil-based topcoats, high heat, or heavy builds that can cause discoloration. Test a small area first to confirm compatibility. Keep going to learn step-by-step prep, application tips, and troubleshooting for best results.
Quick Answer Can You Put Polycrylic Over Latex Paint Without Yellowing?
Yes — you can put polycrylic over latex paint and usually avoid yellowing if you use a water-based polycrylic and proper prep.
The main risk is yellowing from oil-based finishes, poor adhesion, or applying too thickly, while the best outcome comes from clean, fully cured paint and thin, even coats.
Follow product instructions and test a small area first to confirm compatibility and appearance.
Short direct answer
Wondering whether polycrylic will yellow over your latex-painted surface? You can put polycrylic over latex paint, and it rarely yellows if you use a water-based polycrylic (clear, non-yellowing) and apply thin, even coats.
Let the paint cure fully first, sand lightly between coats, and follow manufacturer directions to minimize any discoloration and guarantee durable, clear protection.
One-line summary of risks and best outcome
If you use a water-based (non-yellowing) polycrylic, let the latex paint fully cure, apply thin, even coats, and sand between layers, you’ll minimize yellowing—risks include solvent interactions with uncured paint, glossy blotching, and trapping stains.
But following those steps gives the best chance of a clear, durable finish.
You should test first, wipe dust, avoid oil-based undercoats, and cure fully.
Basic Understanding What Are Polycrylic and Latex Paint?
You’re working with two common finishes: latex paint is a water-based color coating that dries into a flexible, breathable film used for walls and trim.
Polycrylic is a water-based polyurethane topcoat that adds clear, durable protection without the amber tint of oil-based polyurethanes.
The main differences are that polycrylic gives a harder, more scratch-resistant finish and stays clear, while oil-based polyurethane tends to yellow over time and has stronger fumes.
What is latex paint?
Latex paint is a water-based coating made from acrylic or vinyl polymers that dries quickly, cleans up with soap and water, and resists yellowing, making it a popular choice for walls, trim, and furniture.
You’ll find it:
- Easy to apply and fast-drying
- Low-odor and simple to clean
- Available in flat to high-gloss sheens for different surfaces
What is polycrylic (water-based polyurethane)?
Polycrylic is a water-based protective finish—also called water-based polyurethane—that dries clear, has low odor, and gives surfaces a durable, non-yellowing topcoat.
You’ll use it to protect painted or bare wood without altering color much. It’s easy to clean up and fast-drying.
Consider these benefits:
- Clear, non-yellowing protection
- Low odor, quick drying
- Water cleanup, easy application
Key differences between polycrylic and oil-based polyurethane
While both protect wood and painted surfaces, oil-based polyurethane and polycrylic differ in composition, drying behavior, and long-term appearance. You’ll prefer polycrylic for quick drying, low odor, and non-yellowing on whites; oil-based offers tougher, ambering finish suited to high-wear floors.
| Feature | Polycrylic vs Oil |
|---|---|
| Base | Water vs Oil |
| Dry time | Fast vs Slow |
| Odor | Low vs Strong |
| Yellowing | Minimal vs Likely |
| Durability | Moderate vs High |
Will Polycrylic Yellow Over Latex Paint?
You’ll want to contemplate a few key factors—UV exposure, the substrate beneath the paint, the age of the paint job, and heat—that all affect whether a topcoat yellows.
Water‑based polycrylic is much less prone to yellowing than oil‑based varnishes, so it’s usually a safer choice over latex.
Still, yellowing can happen in high‑heat areas, on old or contaminated paint, or under strong sunlight.
Factors that influence yellowing (UV, substrate, age, heat)
Because clear protective finishes react to their environment, several factors determine whether a topcoat will yellow over latex paint.
You should watch exposure and conditions that accelerate discoloration:
- UV light breaks down resins and causes yellowing.
- Porous or contaminated substrates can trigger chemical reactions.
- Age and prolonged heat speed oxidation and color shift.
Manage these to reduce yellowing risk.
Why water-based polycrylic is less likely to yellow than oil-based finishes
If you want a clear topcoat that keeps whites and light colors true, water-based polycrylic is a better bet than oil-based varnishes because its waterborne resins and minimal ambering additives resist the oxidation and resin yellowing that oil formulas undergo.
You’ll get faster drying, lower VOCs, and a more stable, non-ambering cure that preserves paint color without the warm, yellow shift typical of oil finishes.
Situations where yellowing can still occur
Although water-based polycrylic resists the ambering that plagues oil finishes, it can still yellow in certain situations, so you should know when that’s likely to happen.
Excessive UV exposure, heat, and nicotine or cooking fumes can cause discoloration. Applying too-thick coats, using incompatible primers or stained wood, or prolonged dirt buildup also increase risk.
Proper prep, thin coats, and UV protection minimize yellowing.
When It’s Appropriate to Use Polycrylic Over Latex Paint
You’ll usually reach for polycrylic on interior, light-traffic projects like painted furniture, trim, or shelving where you want a clear, durable finish.
Don’t use it on high-heat areas (like stove surrounds), exterior surfaces, or over oil-based paint because it won’t hold up or bond properly.
Check the substrate and conditions first so you pick the right topcoat.
Ideal project types (interior, light-traffic, painted furniture)
When you’re protecting indoor, low-traffic surfaces—like painted furniture, trim, and decorative accents—polycrylic is a great choice because it dries clear, sands easily between coats, and won’t yellow over time.
You should use it for projects where durability and appearance matter but heavy wear isn’t expected.
- Painted nightstands and shelves
- Window trim and picture frames
- Decorative trim and molding
Inappropriate uses (high-heat areas, exterior, oil-painted surfaces)
1 key rule: don’t use polycrylic where extreme heat, constant outdoor exposure, or existing oil-based coatings are involved.
You’ll avoid failure because heat softens film, UV and moisture degrade acrylic, and polycrylic won’t adhere properly to oil-based paint without thorough deglossing or a bonding primer.
For kitchens, exteriors, or oil-painted furniture, choose heat-resistant, exterior-grade, or oil-compatible topcoats instead.
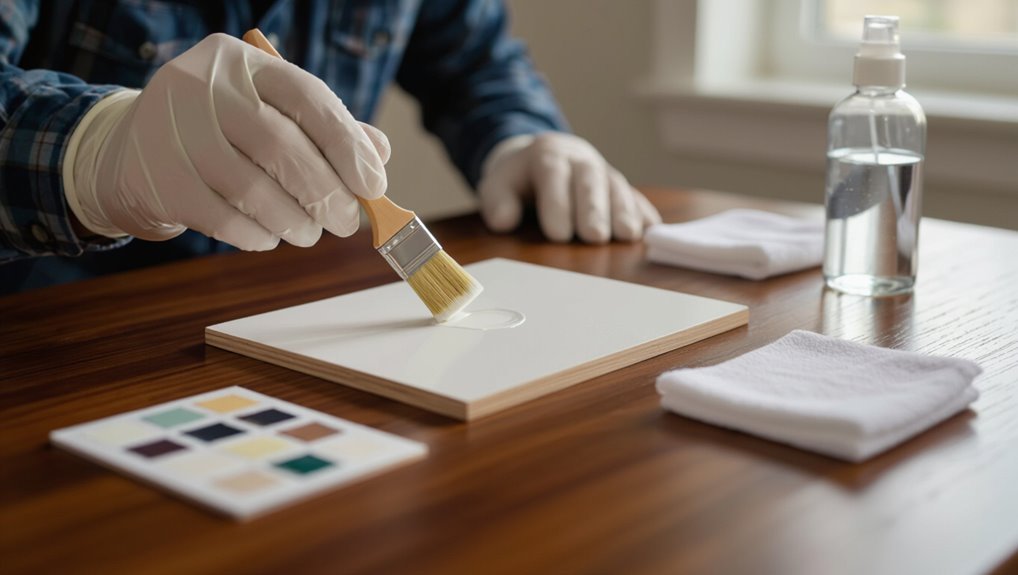
Step-by-Step Guide How to Apply Polycrylic Over Latex Paint Without Yellowing
Before you start, you’ll want to assess the existing paint for gloss, age, and compatibility so you know how much prep is needed.
Clean and degloss the surface, sand lightly with the recommended grits, and pick a polycrylic with the right finish and UV protection.
Always do a small test patch and wait the full cure time to confirm no yellowing before finishing the whole piece.
Step 1 Assess the existing paint (gloss level, age, compatibility)
Although it’s tempting to rush into finishing, you should first evaluate the existing latex paint’s gloss level, age, and formulation to guarantee polycrylic will bond and stay clear.
Check sheen—flat, eggshell, satin, semi-gloss, or gloss—note age (fresh vs. cured months) and whether paint is oil-modified latex or contains additives.
Only compatible, fully cured latex should be coated.
Step 2 Clean and degloss the painted surface
Now that you’ve confirmed the latex is fully cured and compatible, it’s time to clean and degloss the surface so polycrylic will adhere and remain clear.
Wipe away dust, grease, and residues with TSP or a mild detergent, rinse, and let dry. Lightly dull high-gloss areas to promote adhesion without exposing bare substrate.
- Remove contaminants
- Dull sheen uniformly
- Dry completely before coating
Step 3 Sanding: when and how much (grit recommendations)
When the surface is clean and dry, sand lightly to give polycrylic something to bite into—use 220–320 grit for latex paint that’s satin to semi-gloss, and 400–600 grit for high-gloss or tightly cured finishes.
Sand with the grain, apply gentle pressure, and avoid cutting through the paint. Wipe with a tack cloth, inspect for gloss reduction, and repeat only if necessary.
Step 4 Choosing the right polycrylic product (finish, UV inhibitors)
Before you pick a polycrylic, decide what finish and protection level you need—satin and semi-gloss hide imperfections better, gloss gives the most durable, scrubbable surface, and clear satin often looks most natural over latex.
Choose a water-based, non-yellowing formula labeled for interior use. Prefer products with UV inhibitors if sunlight exposure is likely.
Match sheen to the room and cleanability needs.
Step 5 Test patch method and waiting period
Someone should always do a small test patch before rolling polycrylic over latex paint—you’ll confirm compatibility, sheen, and drying behavior without risking the whole surface.
Apply polycrylic to a discreet area, note appearance once fully cured (24–72 hours), and watch for tackiness, film lift, or yellowing.
If results are clean, you can proceed; if not, adjust prep or product choice.
Step 6 Application technique (brush vs. spray, coat intervals, temperature/humidity)
Choose your application method based on the project size and finish you want: brushes give control for edges and small pieces, while a sprayer delivers the smoothest, most even film on large, flat surfaces.
Apply thin, even coats, sanding lightly between coats with fine grit. Wait recommended intervals on the can, work at 50–75°F and 40–60% humidity to avoid bubbles and poor adhesion.
Step 7 Curing time and post-application care
Once the final coat feels dry to the touch, give the polycrylic proper time to cure so it reaches full hardness and resists yellowing or damage.
Wait at least 24–48 hours for light handling and 7–30 days for full cure depending on humidity and temperature.
Avoid heavy use, clean gently with mild soap, and keep UV exposure minimal during curing to prevent ambering.
Comparison Polycrylic vs. Other Clear Coats Over Latex Paint
When you’re choosing a clear coat over latex paint, it helps to compare polycrylic with oil-based polyurethane, water-based polyurethane, and clear acrylic sealers.
You’ll want to weigh factors like yellowing risk, drying time, durability, and compatibility with latex finishes.
Below we’ll look at how polycrylic stacks up against each alternative so you can pick the best option for your project.
Polycrylic vs. Oil-based polyurethane
Although both polycrylic and oil-based polyurethane protect latex-painted surfaces, they differ in appearance, durability, and application traits you’ll want to weigh. You’ll choose polycrylic for non-yellowing, fast-drying, and easy cleanup; pick oil-based for tougher wear but expect ambering and longer cure.
| Feature | Polycrylic | Oil-based |
|---|---|---|
| Yellowing | Minimal | Likely |
| Dry time | Fast | Slow |
| Durability | Moderate | High |
Polycrylic vs. Water-based polyurethane
Shifting focus from oil-based finishes, you’ll find polycrylic and water-based polyurethane share many advantages—low odor, quick drying, and easy cleanup—but they perform differently enough to affect your choice.
You’ll prefer polycrylic for clear, non-yellowing protection on light paints and faster recoats.
Choose water-based polyurethane when you need tougher abrasion resistance and slightly better chemical durability, though it can alter sheen and clarity more.
Polycrylic vs. Clear acrylic/sealer
Curious which clear coat will best protect your latex-painted surfaces?
Polycrylic gives a non-yellowing, durable water-based finish with low odor and fast dry times, ideal for light trim and furniture.
Clear acrylic sealers are flexible, UV-resistant, and often clearer over time but can vary in sheen and durability.
Choose polycrylic for indoor clarity; pick acrylic sealer when outdoor UV protection matters.
Common Problems and Mistakes That Cause Yellowing or Poor Finish
If you rush and coat latex paint before it’s fully cured, you’ll risk trapped solvents that lead to yellowing or tacky spots.
Skipping surface prep or a small test patch can hide adhesion problems, and using an oil-based topcoat instead of a water-based polycrylic often causes discoloration.
Also watch coat thickness and drying time—too-thick layers or insufficient drying will give a cloudy, uneven finish.
Applying over non-cured latex paint
When you roll or brush polycrylic onto latex paint that hasn’t fully cured, you’ll likely trap solvents and moisture beneath the clear coat, which can soften the paint film, cause tackiness, or lead to uneven gloss and yellowing as it off-gasses.
Wait the manufacturer’s recommended cure time, test a small area, and apply thin, even coats to avoid sealing in moisture and causing finish failure.
Skipping proper surface prep or testing
Even after you wait the full cure time, skipping proper surface prep or failing to test first can undo your work fast.
If you don’t clean, scuff, or remove contaminants, polycrylic may not adhere evenly. Bubbling or patchy gloss can appear, and trapped solvents react unpredictably.
Always sand, degrease, and test a small, inconspicuous area to confirm adhesion and appearance before finishing the whole piece.
Using oil-based topcoats instead of water-based
Because oil-based topcoats chemically differ from water-based polycrylic, applying an oil finish over latex paint often leads to yellowing, uneven sheen, or poor adhesion.
So you should avoid swapping them indiscriminately. If you choose an oil topcoat, test first on a hidden area, sand lightly, and use a compatible primer.
Otherwise, stick with water-based polycrylic for clear, nonyellowing results.
Applying too-thick coats or inadequate drying time
If you lay on polycrylic too thickly or don’t allow each coat to dry fully, you’ll trap solvents and slow curing, which causes clouding, tackiness, and eventual yellowing.
You should apply thin, even coats, sand lightly between coats, and follow manufacturer dry times.
Tips:
- Wait full recommended time before recoating
- Use 2–3 thin coats
- Sand 220 grit between coats
Prevention, Tips, and Best Practices
To avoid yellowing and get a durable clear coat, pick polycrylics labeled for water-based paints and UV-resistant formulas.
Follow proper application conditions—work in the recommended temperature and humidity range, use good ventilation, and apply thin, even coats with proper dry times.
After sealing, maintain the finish by cleaning gently, avoiding harsh chemicals, and touching up any worn areas promptly.
Product selection tips (labels, UV-resistant formulas)
When choosing a polycrylic topcoat for latex-painted surfaces, read the label carefully and pick a product specifically marked for compatibility with latex/acrylic paints and for the designated surface (interior vs. exterior).
Look for UV-resistant or non-yellowing formulas, water-based clarity claims, and manufacturer application notes.
Avoid solvent-based finishes on latex, and choose reputable brands with clear warranty or testing information.
Environmental and application best practices (temperature, ventilation)
Because temperature, humidity, and airflow directly affect adhesion and drying, you should apply polycrylic only in the manufacturer’s recommended range—typically 50–85°F (10–29°C) and below about 60% relative humidity—while keeping the room well-ventilated to speed cure and reduce fumes.
Work in short, even strokes, avoid heavy coats, allow full flash time between coats, and wait longer before light use in cooler or damper conditions.
Maintenance tips to keep finish clear and non-yellowing
Good environmental control and proper application will only get you so far if you don’t maintain the finish afterward; keeping polycrylic clear and non-yellowing takes simple, regular care.
Dust gently with a soft microfiber, avoid abrasive cleaners, and wipe spills promptly.
Use pH-neutral cleaners sparingly, keep surfaces out of direct sunlight, and recoat thinly when wear appears to restore protection without adding yellowing risk.
Quick Troubleshooting Guide
If your polycrylic finish looks yellowed, check whether the discoloration sits on the surface or has stained the primer or paint—surface yellowing can often be fixed.
For mild cases, you can lightly sand, wipe clean, and recoat with a fresh layer; if the yellowing penetrates the paint or keeps returning, you’ll need to strip and start over.
We’ll walk through simple tests and the best next steps so you can decide which route to take.
How to tell if yellowing is reversible
When you spot yellowing on a painted surface, first check whether it’s surface-level or has penetrated the paint film.
Gently clean a small area with mild soap and water; if discoloration lifts, it’s likely surface residue.
If it persists after cleaning and a solvent test (denatured alcohol dab) softens but doesn’t remove the stain, the yellowing has probably penetrated and may be permanent.
Fixes for mild yellowing (light sanding, recoat)
Although mild yellowing can look discouraging, you can often fix it without stripping the whole finish: light-sand the polycrylic with 320–400 grit to dull the sheen, wipe dust with a tack cloth, then recoat using a water-based clear formulated to resist ambering.
Test a small area first. Allow full cure between coats and avoid heavy application that traps solvents and accelerates yellowing.
When to strip and start over
Because some problems can’t be corrected with spot repairs or recoats, you’ll need to strip the finish and start over when the polycrylic is severely yellowed, peeling, cracked, or has large, uneven buildups that won’t sand out cleanly.
Strip back to bare substrate, clean and degrease, repair any surface damage, and prime with a compatible high-quality primer before repainting and applying a fresh clear coat to guarantee adhesion and even appearance.
Real-World Scenarios and Recommendations
When you’re finishing painted cabinets and trim, polycrylic can give a durable, clear coat but you’ll want to test adhesion first.
For painted furniture and DIY projects, consider sheen and sanding between coats to avoid brush marks or clouding.
In high‑moisture or high‑heat areas, you may need a more water‑resistant or heat‑tolerant topcoat than standard polycrylic.
Painted cabinets and trim
If your cabinets or trim are already coated with latex paint, you can usually apply polycrylic to add durability and a clearer finish, but you’ll need to prep properly so it adheres and looks even.
Sand lightly, clean dust, and use a tack cloth.
Choose a water-based polycrylic to minimize yellowing, apply thin coats, and allow full cure between layers for lasting, non-yellowing protection.
Painted furniture and DIY projects
Anyone tackling painted furniture or small DIY projects will find polycrylic a convenient way to boost durability and clarity over latex paint—just prep correctly and pick the right product.
You should sand lightly, remove dust, and test on a hidden area to check adhesion and sheen.
Apply thin, even coats, avoid oil-based alternatives, and let proper cure time to prevent tackiness or uneven finish.
High-moisture or high-heat areas
Because polycrylic dries hard and water-based formulas can soften under prolonged steam or heat, you’ll want to think twice before brushing it over latex paint in bathrooms, kitchens near stovetops, or laundry rooms.
In those spots, opt for a high-heat or moisture-rated clear coat like polyurethane or oil-based sealer, guarantee proper ventilation, and test a small area to confirm adhesion and non-yellowing before full application.
Frequently Asked Questions
You’ve probably got specific questions like whether polycrylic will yellow white latex paint, if you can spray it on, or how long latex needs to cure first.
You might also wonder if polycrylic resists stains and scratches or whether you can mix or tint it. Below are clear answers to those common concerns.
Will polycrylic yellow white latex paint?
Wondering if polycrylic will yellow your white latex paint? You’ll be relieved: water-based polycrylic resists yellowing far better than oil-based finishes.
Properly applied over fully cured, clean latex paint, it maintains color clarity. Avoid high-heat or heavy sunlight exposure, and choose a non-yellowing formula.
Test a small area first to confirm compatibility and appearance before finishing the whole surface.
Can I spray polycrylic over latex paint?
Can you spray polycrylic over latex paint? Yes — you can spray polycrylic for a smooth, even finish, but prep properly: clean, lightly scuff, and verify paint is fully cured.
Use a high-quality HVLP or airless sprayer, thin according to manufacturer directions, apply thin overlapping coats, and allow adequate dry time between coats to avoid runs, bubbling, or poor adhesion.
How long should latex paint cure before applying polycrylic?
Although latex paint feels dry to the touch within hours, you should let it cure longer—typically 7 to 30 days—before applying polycrylic to guarantee proper adhesion and a durable finish.
Lighter coats and warmer, low-humidity conditions speed cure time; thicker coats and cool, humid environments need the full month.
Always follow the paint manufacturer’s cure recommendations before sealing.
Does polycrylic protect against stains and scratches?
Once your latex paint has fully cured, you’ll want to know how well polycrylic will protect that finish from everyday wear.
Polycrylic adds a hard, clear barrier that resists light scratches and most water-based stains, making surfaces easier to clean.
It’s not indestructible—heavy abrasion, oil stains, or sharp impacts can still damage the finish, so use care and suitable cleaners.
Can I mix polycrylic with paint or tint it?
Wondering whether you can tint or mix polycrylic with paint? You shouldn’t mix polycrylic into paint—it’s a clear water-based topcoat, not a pigment carrier.
Tinting polycrylic with universal tints can alter sheen, cure, and durability and may cause cloudiness. If you want color, tint the underlying latex paint or use a compatible colored sealer made for water-based finishes instead.