What Causes Paint to Bubble and Peel and How to Fix It for Good
Paint bubbles and peels when something stops it from properly sticking to the surface—usually moisture getting behind the paint, poor surface prep, incompatible coatings, or application errors like painting in wrong temps. You’ll need to fix the root cause (stop leaks, dry and seal surfaces), remove failed paint, prime with the correct product, then repaint under ideal conditions. Do that and you’ll stop repeat failures; keep going and you’ll learn the detailed tests, tools, and steps to do it right.
Quick Answer Why Paint Bubbles and Peels (Short Summary)
Paint bubbles and peels when moisture, poor surface prep, heat, or incompatible coatings break paint’s bond to the substrate.
You can usually fix isolated blisters or small flakes with drying, sanding, and a spot repaint, but widespread bubbling or paint lifting across a surface often signals trapped moisture, rot, or adhesion failure that needs more extensive repair.
Check the extent and underlying cause before you decide whether it’s a quick cosmetic touch-up or a structural fix.
One-paragraph direct explanation of the main causes
If water gets behind the coating, if the surface wasn’t prepped or primed properly, or if you apply paint under unsuitable temperature or humidity, the film will lose adhesion and start to bubble and peel.
Those are the core reasons what causes paint to bubble and peel: moisture intrusion, poor surface prep or adhesion to old coatings, and application in conditions that prevent proper curing.
When bubbling/peeling indicates a minor vs. major problem
Knowing the causes helps you judge how serious bubbling or peeling is: small, localized blisters from a single mistake are usually fixable, while widespread loss of adhesion often signals a bigger problem.
If blisters appear after moisture exposure or poor prep, you can spot-repair; if paint flakes across large areas, substrate rot, persistent moisture, or incompatible layers likely require full stripping, drying, and professional repair.
How Paint Should Normally Adhere Basic Understanding
To understand bubbling and peeling, you need to know how paint actually bonds to a surface—either by gripping pores and edges (mechanical adhesion) or by forming chemical links with the substrate.
You should also picture paint as multiple layers—primer, base coat, and topcoat—where failures often start at weak interfaces.
Finally, remember that moisture, temperature, and the condition of the substrate strongly influence whether those bonds hold.
How paint bonds to surfaces (mechanical vs. chemical adhesion)
Paint sticks to a surface through two main ways: by getting a physical grip in tiny pores and irregularities (mechanical adhesion) and by forming molecular bonds or attractions with the substrate (chemical adhesion).
You guarantee mechanical hold by cleaning, sanding, and using primers that penetrate textures.
You promote chemical bonding with compatible primers and curing conditions so paint wets and reacts with the surface.
Paint layers and common failure points
When layers bond correctly, each one plays a specific role: a primer seals and promotes adhesion, base coats provide color and build, and topcoats protect against moisture and UV.
You must guarantee proper curing and compatible products; trapped solvents, insufficient sanding, or painting over contaminants create weak interfaces.
Cracks, blisters, and edge lift usually trace to those failure points—address them in preparation and product choice.
Environmental and substrate variables that affect adhesion
Although many factors play a role, adhesion comes down to two essentials: the substrate’s surface condition and the surrounding environment at application and cure.
You need clean, dry, chemically compatible surfaces; remove rust, oil, chalking, and loose paint.
Control temperature, humidity, and ventilation so solvents evaporate and films cure properly.
Poor prep or adverse weather guarantees weak bonds and eventual bubbling or peeling.
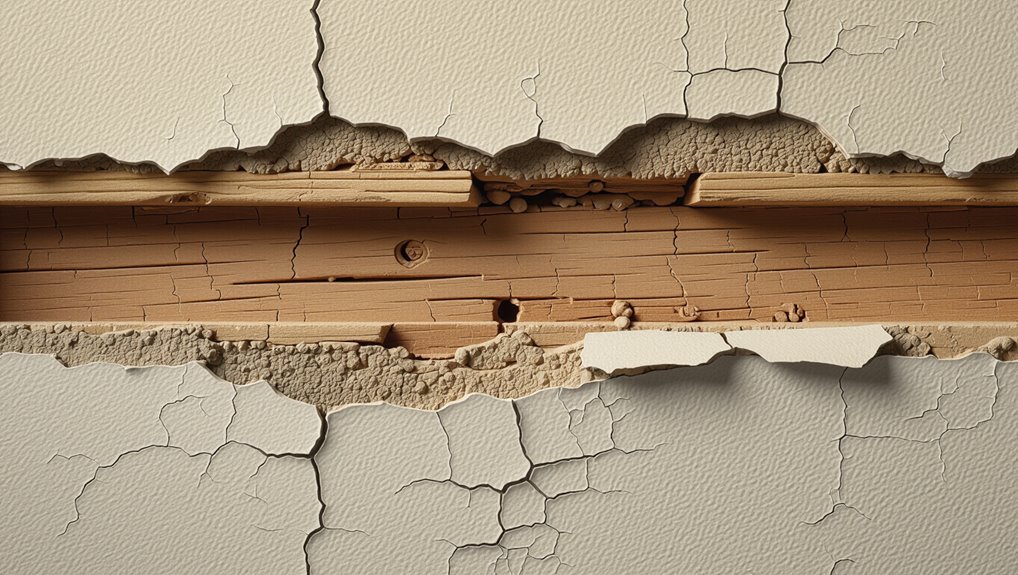
Common Causes of Paint Bubbling and Peeling
You’ll usually find paint starts bubbling or peeling for a few predictable reasons: moisture problems like leaks or rising damp, poor surface prep such as dirt, grease, or old flaking paint, and incompatible paints or coatings.
Application mistakes — painting in the wrong temperature or humidity, or laying on coats too thick — also cause failures.
Structural issues like vents or hidden leaks make all of these problems worse.
Moisture-related causes
Moisture is one of the most common reasons paint bubbles and peels, and it can come from several sources you mightn’t expect.
If humidity, leaks, or poor ventilation let water vapor reach painted surfaces, it breaks adhesion and forms blisters.
You should locate leaks, improve ventilation, dry surfaces thoroughly, and use moisture-resistant primers or paints to prevent recurrence.
Poor surface preparation (dirt, grease, old paint)
One common cause of bubbling and peeling is skipping proper surface prep: dirt, grease, and loose old paint keep new coatings from sticking.
If you don’t clean, degrease, and remove flaking layers, paint won’t bond and will lift or blister.
Sand, scrub, use appropriate cleaners, and prime bare spots so your finish adheres evenly and lasts instead of failing prematurely.
Incompatible paint types and coatings
Cleaning and prepping the surface matters, but using mismatched paints can undo your work fast.
If you apply oil-based over latex, or use paint incompatible with existing sealers or stains, adhesion fails and coatings separate.
Always check product specs, use recommended primers, and match paint chemistry.
That prevents bubbling, peeling, and costly repainting.
Follow manufacturer guidelines for lasting results.
Application errors (temperature, humidity, thickness)
If you paint in the wrong conditions or apply coats too heavily, the finish won’t bond properly and bubbling or peeling can start quickly.
You should check temperature and humidity: paint in recommended ranges, avoid direct sun or freezing cold, and guarantee proper ventilation.
Apply thin, even coats, let each dry fully before the next, and follow manufacturer recoat times to prevent trapping moisture.
Structural issues (leaks, rising damp, vents)
Even when you follow temperature, humidity, and drying guidelines, underlying structural problems can still make paint bubble and peel.
If you have leaks, rising damp, or poor ventilation, moisture will break adhesion and lift coatings. You should locate and fix water sources, repair flashing or plumbing, treat rising damp, and improve airflow before repainting.
Otherwise, problems will recur despite good surface prep.
Age and UV/weathering effects
As paint ages and gets hit by sun, wind, and temperature swings, its binders break down and the film becomes brittle.
So it starts to crack, lose adhesion, and flake off.
You’ll notice chalking, color fading, and surface weakening; repeated UV exposure and freeze-thaw cycles accelerate breakdown.
To fix it, remove failing paint, prep the surface, and apply UV-resistant primer and topcoat designed for outdoor durability.
Material-specific causes (wood, metal, drywall, masonry)
Because different substrates react to moisture, temperature, and chemicals in their own ways, the reasons paint bubbles and peels vary by material: wood swells and shrinks with humidity, metal corrodes and creates rust under the film, drywall absorbs and releases moisture from leaks, and masonry can wick water through porous surfaces.
You should match primers, fix leaks, remove rust, and use breathable masonry coatings to prevent failure.
Diagnosing the Problem How to Identify the Root Cause
Start with a focused visual inspection checklist to note bubbling patterns, blistering, discoloration, and suspected moisture sources.
Do a few simple tests—tap to check adhesion, press a damp cloth to see if moisture reappears, or peel a small edge—to tell moisture problems from adhesion failure.
If results are unclear or damage is extensive, remove a small sample for closer inspection or call a professional for moisture meters and expert analysis.
Visual inspection checklist
Begin by scanning the whole surface methodically, working in sections so you don’t miss patterns that point to the root cause.
Note locations, extent, and substrate. Look for discoloration, soft spots, and bubbling edges.
Then follow this checklist:
- Where’s failure concentrated?
- Are there prep or adhesion clues?
- Any nearby water sources or vents?
Simple tests to distinguish moisture vs. adhesion failure
When you need to tell moisture-related failure from poor adhesion, run a few quick, targeted tests that reveal whether water is still moving through the substrate or the paint simply didn’t bond.
Tape test, scrape probe, and a moisture meter check give fast clues: rising readings or damp back of paint indicate moisture; clean breaks, powdery substrate, or low moisture point toward adhesion issues requiring surface prep.
When to remove a sample for closer inspection
If your quick tests leave doubt about whether moisture or adhesion is to blame, remove a small sample for closer inspection so you can see what’s happening inside the layers.
Cut a 1–2 inch square from a discreet spot, include primer and substrate, then peel layers to check for trapped moisture, mold, salt deposits, or poor bond.
Photograph findings and compare to guides.
When to call a professional
Once you’ve ruled out simple fixes and the cause still isn’t clear, call a professional to avoid costly mistakes or missed damage. A trained inspector can do moisture mapping, adhesion tests, and substrate analysis that you probably can’t.
Hire someone when bubbling recurs, odors, mold, structural stains, or spreading peeling suggest hidden problems. They’ll recommend targeted repairs, not guesswork, saving time and money.
Fix It for Good Step-by-Step Repair Guide
Before you start, make safety first: ventilate the area and wear proper PPE.
Remove all failing paint by scraping, sanding, or using heat/chemical strippers, then repair the substrate with patches, drying, and sealing.
Finally, fix any moisture or structural causes and apply the right primer for the material before repainting.
Step 1 Safety and preparation (ventilation, PPE)
Start by making the work area safe: open windows and doors to create cross-ventilation, turn on fans to push fumes outside, and put on proper PPE — at minimum a respirator rated for paint fumes, chemical-resistant gloves, and eye protection.
Cover nearby furniture and floors with drop cloths, shut off HVAC to avoid spreading dust, and keep a fire extinguisher handy.
Step 2 Remove failing paint (scraping, sanding, heat/chemical)

Strip away all loose paint so the new finish can bond properly: use a wide metal scraper or a putty knife to remove blistered, flaking areas, then follow up with sanding to feather the edges into sound substrate.
Work systematically, keeping tools sharp. For stubborn spots, consider controlled heat or a chemical stripper per instructions, then clean residue before priming.
Step 3 Repair underlying substrate (patching, drying, sealing)
1 essential step is fixing what’s under the paint: patch holes or rot, let materials fully dry, and seal surfaces so your new finish will stick.
Remove loose debris, apply appropriate fillers or epoxy for wood, and smooth repaired areas. Use a moisture meter if unsure.
Prime patched spots with a compatible primer and allow recommended cure time before repainting to guarantee adhesion and longevity.
Step 4 Treat moisture sources and structural causes
Because paint problems almost always come from water or structural movement, you’ll need to find and fix those causes before repainting.
Inspect roofs, gutters, flashing, plumbing, and grading for leaks or poor drainage. Repair roof or gutter issues, seal gaps, improve ventilation, and address rising damp or failing vapor barriers.
Stabilize framing or trim movement to prevent future cracking and peeling.
Step 5 Prime correctly (choosing the right primer for substrate)
Once you’ve fixed the moisture and movement problems, prime the surface with a product matched to the substrate so the new paint will adhere and endure.
Choose a primer based on material, previous coating, and exposure. Consider:
- Masonry or concrete: breathable, alkali-resistant primer.
- Wood: stain-blocking, tannin-sealing primer.
- Metal: rust-inhibiting, adhesion-promoting primer.
Step 6 Repaint with proper technique (conditions, tools, coats)
Now that the surface is dry, stabilized, and primed for the substrate, you’re ready to repaint using the right conditions, tools, and number of coats so the job lasts.
Paint when temperature and humidity match product specs, use quality brushes/rollers or a sprayer, apply thin even coats, sanding lightly between coats if recommended, and follow manufacturer drying times to guarantee adhesion and a durable finish.
Step 7 Post-repair checks and curing time
After the paint has dried to the touch and you’ve cleaned up your tools, take a few systematic post-repair checks to confirm adhesion, surface uniformity, and complete curing before returning the area to regular use.
Gently press edges, test hardness with a fingernail, and inspect for color/texture mismatch.
Allow full manufacturer-recommended cure time (often 24–72 hours) before heavy use or cleaning.
Product and Material Guidance
To prevent bubbling and peeling, you’ll want the right primer and paint matched to the substrate—wood, metal, or masonry each need different chemistry.
Use recommended sealants, moisture barriers, and corrosion inhibitors where exposure or dampness is a risk.
Also pick quality brushes, rollers, or sprayers and the proper consumables to guarantee solid adhesion and a smooth finish.
Choosing the right primer and paint for common substrates
Because different surfaces absorb, flex, and bond in different ways, you should match primer and paint to the substrate rather than using a one-size-fits-all approach. Pick adhesion primers for slick metals, stain-blocking primers for tannin-rich woods, and flexible acrylics for drywall. Use compatible systems and follow manufacturer curing times.
| Substrate | Primer/Paint |
|---|---|
| Metal | Bonding primer + enamel |
| Wood | Stain-blocking primer + acrylic |
Recommended sealants, moisture barriers, and corrosion inhibitors
When you’re protecting painted surfaces, choose sealants, moisture barriers, and corrosion inhibitors that match the substrate and the exposure conditions—silicone or polyurethane sealants for flexible joints, self-adhering bituminous or peel-and-stick membranes for below-grade moisture control, and thin-film or sacrificial corrosion inhibitors for metal.
Match compatibility with paint, follow manufacturer cure times, prep surfaces thoroughly, and recoat only after full barrier and inhibitor activation to prevent bubbling and peeling.
Tools and consumables that improve adhesion (brushes, rollers, sprayers)
One clear way to improve paint adhesion is to pick the right tools and consumables for the job: quality synthetic brushes for waterborne paints, natural-bristle for oil-based, the correct nap roller for surface texture, and a properly calibrated sprayer with matched tip sizes and filters.
Use clean, lint-free rollers and covers, fresh brushes, compatible tapes, and high-quality primers and additives to guarantee uniform spread and bonding.
Prevention and Best Practices
Plan your paint work around ideal temperature and humidity, and follow a strict surface-prep checklist—clean, sand, prime, and repair—before you start.
Keep a simple maintenance routine to spot and fix bubbles early, and choose different products and schedules for exterior versus interior surfaces.
With seasonal planning and routine care you’ll greatly reduce the chance of peeling and extend the life of your paint.
Seasonal and environmental planning (ideal temp/humidity)
Because paint reacts to temperature and moisture, you should schedule priming and painting for times when conditions stay steady—ideally 50–85°F (10–29°C) and 40–70% relative humidity—so coatings cure properly and bond to the surface.
Avoid painting in direct midday sun, freezing nights, or during heavy fog. Monitor forecasts, use dehumidifiers or heaters as needed, and pause if conditions fluctuate.
Surface prep checklist before any paint job
Before you touch a brush, make the surface structurally sound and clean so paint can bond and last: remove loose or peeling paint, repair cracks and holes with appropriate filler, sand glossy areas to dull the sheen, clean dirt and grease with a suitable detergent or TSP substitute, rinse and let dry, scrape and wire-brush rusted metal, and prime bare wood, bare metal, and patched spots.
- Clean and degloss
- Repair and fill
- Prime problem areas
Maintenance routine to prevent recurrence
Once you’ve prepped and primed properly, keep a simple maintenance routine to stop bubbling and peeling from coming back.
Inspect surfaces seasonally, wipe dirt and mildew, and touch up chips promptly.
Control moisture sources—fix leaks, improve ventilation, and redirect runoff.
Repaint high-wear areas before failure appears.
Use compatible paints and primers for repairs to maintain adhesion and extend finish life.
Long-term considerations for exterior vs. interior surfaces
Many factors differ between exterior and interior painting, so you’ll need tailored long-term strategies.
For exteriors, prioritize weatherproof primers, flexible topcoats, regular inspections, and timely caulking to prevent moisture and UV damage.
For interiors, control humidity, use breathable primers where needed, avoid oil-over-latex mistakes, and touch up high-traffic areas.
Track maintenance schedules and address small issues before they worsen.
Common Mistakes That Cause Repeat Failures
You’ll often see paint failures repeat because of avoidable mistakes like skipping primer or using the wrong type.
Painting over damp, dirty, or contaminated surfaces or applying paint too thick—or doing the job in the wrong temperature or humidity—sets you up for bubbling and peeling.
And if you ignore underlying structural moisture, no surface fix will last.
Skipping primer or using wrong primer
If you skip primer or pick the wrong one, the paint won’t bond properly and failures will come back sooner than you expect.
You’ll get bubbling, flaking, or patchy adhesion.
Use a primer matched to the surface and paint type—stain-blocking for tannin bleed, bonding primer for slick substrates, oil or latex compatibly—so coatings adhere and resist moisture and wear.
Painting over damp or contaminated surfaces
Skipping the right primer won’t save you from painting mistakes if the surface is damp or dirty; poor adhesion and bubbling will still show up.
You need to dry surfaces fully, remove dust, grease, mildew, and salt with proper cleaners, and sand glossy areas.
If you paint over contamination, coatings won’t bond and will peel; prep prevents repeat failures.
Applying paint too thick or in wrong conditions
When you lay paint on too thick or work in conditions that are too cold, hot, humid, or windy, the coating won’t dry evenly and is far more likely to sag, bubble, or peel.
You should apply thin, even coats, follow manufacturer recoat times, and paint within recommended temperature and humidity ranges.
Use proper ventilation and wait between coats to guarantee complete curing.
Ignoring structural moisture sources
Because water always finds a way into weak spots, ignoring structural moisture sources dooms even the best paint job to repeat failures.
You need to locate leaks, rising damp, poor flashing, and clogged gutters before repainting. Fix roofing, siding, and foundation issues, improve ventilation, and install proper vapor barriers.
Otherwise paint will re-bubble and peel, wasting time and money.
Cost and Time Estimates for Typical Repairs
You’ll find big differences between a quick touch-up and full surface remediation in both cost and time.
Decide whether you’ll tackle a DIY patch or hire a pro, since labor, tools, and warranty needs change the equation.
Be prepared for hidden issues—moisture damage or substrate replacement can quickly raise costs and extend timelines.
Small touch-ups vs. full surface remediation
If the bubbling and peeling are limited to a few isolated spots, small touch-ups can save you time and money compared with full surface remediation.
You’ll spend less on materials and a few hours sanding, priming, and repainting each spot.
Full remediation costs more and takes days for prep, repairs, and multiple coats, but it restores uniformity and prevents recurring issues across large areas.
DIY vs. professional repair considerations
When deciding between spot repairs and full remediation, weigh whether you want to tackle the work yourself or hire a pro—each choice affects cost, time, and long-term results.
DIY saves labor costs but takes longer, demands tools, and risks imperfect sealing. Pros charge more upfront, finish faster, and guarantee workmanship.
Estimate small patches at a few hours; full resurfacing can take days and higher fees.
Factors that drive up cost (hidden moisture, substrate replacement)
Because hidden problems rarely stay hidden, small-looking paint damage can balloon costs quickly: trapped moisture, rot, or failing substrate often mean you’re not just repainting but repairing or replacing materials.
You’ll pay more for moisture removal, mold remediation, replacing drywall or sheathing, structural repairs, and longer labor. Expect inspections, drying time, and contingency charges—budget accordingly to avoid surprises.
FAQ Frequently Asked Questions
You’ll likely want quick answers to whether bubbling or peeling will spread if you ignore it, or if you can just paint over the damaged area.
You’ll also ask how long to wait after fixing moisture, whether any quick fixes hold up, and how to tell if the peeling paint contains lead.
Read on for clear, practical guidance so you can decide the next steps.
Will bubbling or peeling spread if I leave it alone?
Will it keep spreading if you ignore bubbling or peeling? Yes.
Left untreated, moisture, heat, or continued exposure will enlarge affected areas and cause surrounding paint to delaminate. Small bubbles often become larger blisters; peeling edges lift more paint.
That accelerates substrate damage like rot or rust. Address causes promptly to stop progression and prevent costlier repairs.
Can I paint over bubbled or peeling paint?
If bubbling or peeling is already underway, painting directly over it won’t fix the problem and usually makes it worse.
You should remove loose paint, address the underlying cause (moisture, adhesion, surface contamination), sand and prime exposed areas, then repaint.
Skipping prep traps defects, shortens the new coat’s life, and wastes time and money.
Proper surface prep guarantees a durable finish.
How long should I wait after fixing moisture before repainting?
After you’ve fixed the source of moisture, wait until the affected materials are completely dry—typically 24 to 72 hours for surface paint and up to several days for thicker substrates—before priming and repainting.
Check moisture with a meter or touch tests; verify humidity is low and ventilation is adequate.
Don’t rush: painting over damp surfaces invites recurring bubbling and poor adhesion.
Are there quick fixes that actually work long-term?
Quick fixes like scraping and repainting or slapping on a sealant can seem tempting, but they rarely solve bubbling and peeling for the long term unless you address the underlying cause—moisture, poor adhesion, or incompatible coatings.
You can slow damage temporarily with proper prep and high-quality primers, but lasting repair means diagnosing and fixing the root issue first, then using compatible materials and correct application.
How can I tell if peeling paint contains lead?
How can you tell whether peeling paint contains lead? You can’t confirm visually.
Test with a certified lead-test kit or hire a certified inspector for XRF analysis or lab sampling.
For homes built before 1978, assume risk and avoid sanding or scraping without precautions.
Use HEPA vacuums, wet methods, and professional abatement if tests show lead to protect occupants and children.