How to Use Peel Away Paint Remover for Clean, Damage-Free Stripping
You can get clean, low‑damage stripping with Peel Away by choosing the right formula, testing a small hidden spot, and using proper prep and PPE. Mix to a peanut‑butter consistency, spread evenly, cover to retain moisture, then peel or gently scrape off softened layers with plastic tools. Rinse, neutralize, and inspect for repairs before finishing. Avoid delicate veneers and long dwell times; follow disposal rules for hazardous residues. Keep going for detailed steps, tips, and safety reminders.
Quick Answer Can You Use Peel Away Paint Remover for Clean, Damage-Free Stripping?
You can get very clean results with Peel Away when you use it on compatible, nonporous surfaces and follow the product’s timing and removal steps.
Take basic safety precautions—gloves, eye protection, good ventilation—and test a small hidden area first to check for finish or substrate reactions.
Avoid using it on delicate woods, plastics, or materials the manufacturer lists as incompatible to prevent damage.
Short summary of effectiveness and ideal use cases
Peel Away works well for clean, largely damage-free stripping on rigid surfaces like brick, stone, masonry, and well-adhered exterior paint, because its gel sheet lifts multiple layers without aggressive scraping.
You’ll find it efficient for removing layers, reducing sanding, and saving time.
Learn how to use peel away paint remover for targeted, layered removal on sturdy substrates and larger restoration projects.
Safety and surface compatibility quick notes
Although it works well on rigid, well-cured substrates, you should confirm both safety and compatibility before using Peel Away for clean, damage-free stripping.
Check manufacturer guidelines, test a small, inconspicuous area, and verify substrate heat sensitivity and coatings underneath.
Wear gloves, eye protection, and a respirator if needed.
Avoid plastics, thin veneers, and delicate finishes; consult pros for antiques or painted plaster.
Understanding Peel Away Paint Remover What It Is and How It Works
You’ll find Peel Away products come as thick pastes, gels, or solvent-impregnated sheets designed for different jobs and surfaces.
The remover softens and chemically breaks the paint’s bond, then you lift the softened layers away with the fabric or peel-back system.
Kits usually include a paste or sheet, a protective fabric cover, and tools or neutralizer to finish the job.
What Peel Away is (product types, formulations)
A specialty paint remover, Peel Away comes in several formulations designed for different jobs—you’ll find gel sacks for architectural restoration, paste tubs for smaller DIY tasks, and heavy-duty versions for industrial coatings.
You’ll also see water-based, solvent-based, and low-odor formulas, plus citrus or caustic options. Choose based on surface, paint type, application method, and safety considerations like ventilation and protective gear.
How the product removes paint (chemical action and peel-off mechanism)
Think of Peel Away as doing two jobs at once: its chemicals soften and separate the paint from the substrate, and its removable layer lifts that softened coating away in one piece.
You apply the gel, it penetrates and breaks polymer bonds, swelling and loosening layers. After dwell time, you peel the sacrificial layer, removing weakened paint without aggressive scraping or substrate damage.
Common variants and kit components (fabric, paste, solvent sheets)
After the peel-away layer lifts softened paint, you’ll need the right variant and kit parts for the job.
Choose fabric-backed sheets for delicate profiles, thick paste for vertical or sculpted surfaces, and solvent-soaked sheets for stubborn, multiple layers.
Kits usually include applicator knives, scrapers, gloves, and neutralizing agents.
Match variant to substrate and paint age for safe, efficient stripping results.
Is Peel Away Right for Your Project? Surface Compatibility and Limitations
You’ll find Peel Away works well on sturdy surfaces like wood, masonry, and many metals, but you should skip it on delicate finishes, some plastics, and wallpaper.
Check what kind of paint you’re removing, how many layers there are, and how old the finish is, since these factors affect adhesion and dwell time.
Test a small inconspicuous area first to confirm it won’t damage the substrate or leave residue.
Surfaces well-suited for Peel Away (wood, masonry, metal, etc.)
When choosing Peel Away, consider the material, the paint layers, and any delicate details—this remover works well on many woods, masonry, and some metals, but it isn’t universal. You can safely strip thick latex or oil on exterior brick, painted hardwood, and steel with precautions. Test a small area first.
| Surface | Typical result |
|---|---|
| Brick | Effective |
| Hardwood | Gentle |
Surfaces to avoid (delicate finishes, certain plastics, wallpaper)
Even though Peel Away works well on many bricks, hardwoods, and some metals, it isn’t safe for every surface.
You should avoid using it on delicate finishes, antique patinas, or softwoods with thin veneers.
Don’t apply it to vinyl, certain plastics, or wallpapered walls—chemicals can melt, warp, or delaminate those materials.
Test in an inconspicuous spot if unsure.
Factors that affect performance (paint type, number of layers, age of finish)
Several key factors determine whether Peel Away will work well for your project: the type of paint (latex, oil, shellac, or lead-based), how many layers you’re removing, and how old or cured the finish is.
You’ll find oil and shellac need longer dwell time; multiple layers or heavily cured finishes may require repeats or mechanical help.
Always test a small area first.
Step-by-Step Guide: Using Peel Away for Clean, Damage-Free Stripping
Before you start, gather your prep tools, set up a ventilated workspace, and put on safety gear so you’re ready for each step.
Do a small test patch to assess the surface, then mix and apply Peel Away according to the label, cover it, and respect the recommended wait times and environmental guidelines.
Finally, use proper peeling and removal techniques to lift the coating without harming the substrate.
Preparation tools, workspace, and safety gear checklist
Start with a compact checklist so you don’t scramble mid-job: gather the peel-away kit, disposable plastic sheeting, painter’s tape, a stiff plastic scraper, nylon scrub pads, nitrile gloves, safety goggles, a respirator rated for organic vapors, and a sturdy work table or saw horses to support the piece.
Keep ventilation, containment, and clear access in mind.
- Ventilate well
- Protect surrounding surfaces
- Arrange tools within reach
Step 1: Test patch and surface assessment
With your workspace set and protective gear on, perform a small test patch to confirm the Peel Away formula and timing suit the substrate.
Choose an inconspicuous area, note paint layers, adhesion, and any staining or finish damage.
Time the dwell period, then remove gently to assess effectiveness.
If issues appear, stop and reassess substrate compatibility before proceeding.
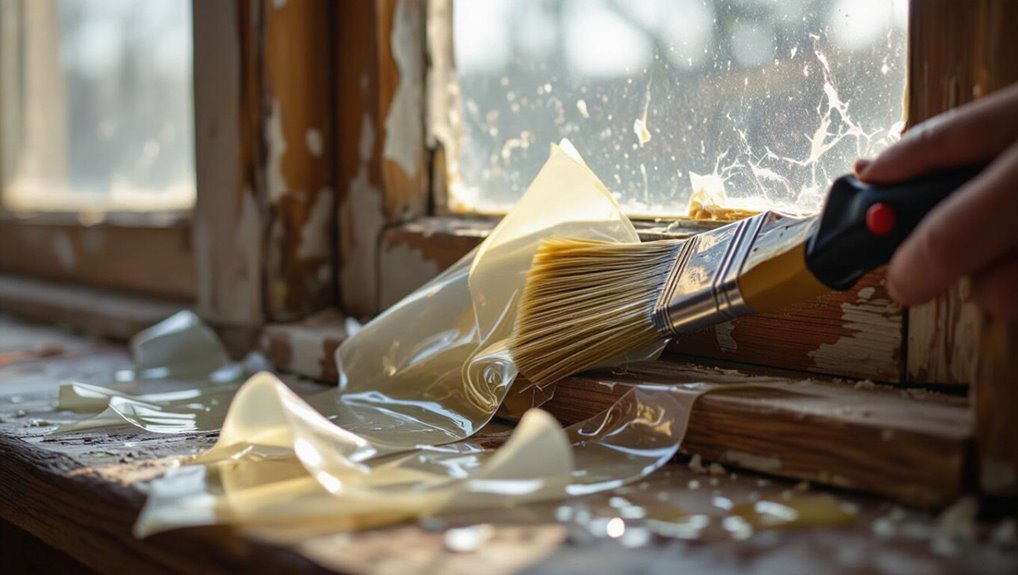
Step 2: Preparing the mixture and applying the product
Mix the Peel Away paste to a peanut-butter consistency, then spread a uniform layer over the painted surface—about 1/8 to 1/4 inch thick—so it can penetrate paint layers without sagging.
Work in manageable sections, using a palette knife for even coverage and flexible brushes for contours.
Smooth edges to prevent undercutting and clean tools immediately to avoid paste hardening.
Step 3: Covering, wait times, and environmental considerations
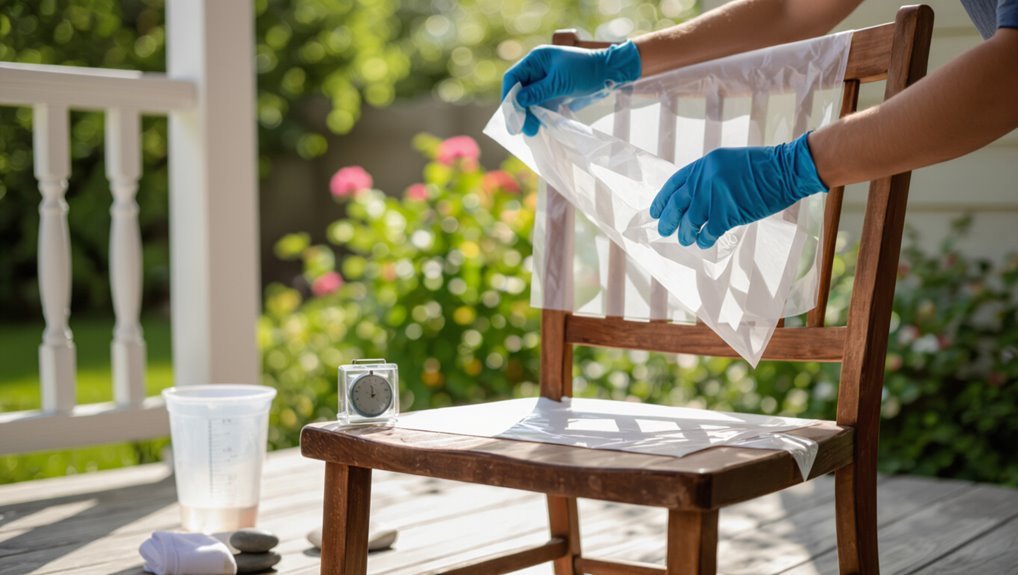
Once you’ve sealed the paste, cover it promptly to keep it moist and working—use the manufacturer’s recommended paper or plastic sheets and tape the edges to form a tight barrier.
Monitor recommended wait times; thicker coatings need longer dwell. Check periodically without exposing edges.
Keep area ventilated, control runoff, and dispose of waste per local hazardous-waste rules.
Wear PPE and avoid open flames.
Step 4: Peeling and removal techniques to avoid damage
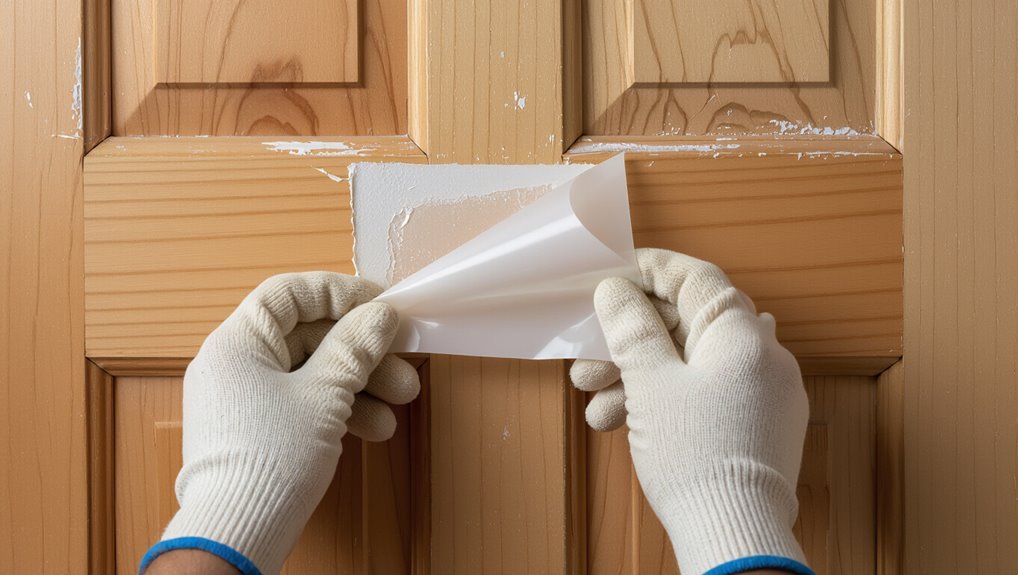
Start by testing a small, inconspicuous patch to see how the peel-away film lifts and how the substrate responds; this tells you how aggressively you can peel without risking damage.
Peel slowly at a low angle, supporting fragile areas with your free hand. Use a plastic scraper for stubborn spots, avoid metal tools, and stop if substrate fibers lift—reapply film and repeat gently.
Step 5: Cleanup and neutralizing residue
After you’ve lifted the paint and handled delicate sections, focus on removing residue and neutralizing the stripper so the surface’s pH and texture are restoring safely.
Scrape remaining gel gently, then rinse with warm water and a soft brush.
Apply the manufacturer’s neutralizer or a baking soda solution, rinse thoroughly, and dry.
Dispose of waste per local regulations and ventilate the area.
Step 6: Surface repair and preparation for refinishing
Inspect the stripped surface carefully for gouges, old filler, loose wood fibers, or residual finish, and mark any areas that need attention before refinishing.
Sand lightly with appropriate grit, remove dust, and replace or blend damaged sections with compatible filler or epoxy.
Check joints and hardware, let repairs cure, then finish-sand and vacuum again so the substrate’s ready for primer or stain.
Best Practices and Pro Tips for Optimal, Damage-Free Results
Work when temperatures and humidity are moderate so the remover performs predictably and you’re comfortable wearing PPE.
Choose soft plastic scrapers, natural-bristle brushes, and adjustable heat only when needed to protect the substrate and handle stubborn multiple layers or possible lead paint safely.
Bag waste, use proper filters or HEPA vacuums for cleanup, and follow local disposal rules to minimize environmental impact.
Timing and environmental tips (temperature, humidity)
Because Peel Away’s performance depends on ambient conditions, you’ll want to plan your stripping when temperatures are moderate (typically 50–85°F / 10–29°C) and humidity is low to moderate.
Extreme heat can make the gel runny and dry it too fast, while cold slows chemical action and prolongs dwell time.
Work in shaded, well-ventilated areas, avoid rain, and check forecasted swings that could alter drying or reactivation.
Tool choices that minimize surface harm
While you’ll rely on Peel Away’s chemistry, choosing the right hand tools and pads lets you control pressure and avoid gouges, scratches, or abrasion marks; soft plastic scrapers, medium-stiff nylon brushes, and low-tack sanding pads are usually safer than metal scrapers or wire brushes, which you should reserve only for heavy, non-delicate substrates.
Use felt or rubber pads on contours, test small areas, and work slowly.
Techniques for stubborn multiple layers or lead paint concerns
After you’ve chosen softer tools and tested small areas, tackle stubborn multiple layers and any suspected lead paint with a layered, safety-first approach.
Work in thin passes, reapply Peel Away as directed, and lift each softened layer gently.
Use HEPA-filtered containment, wear respirator and gloves, and wet-clean between passes to reduce dust.
Stop and consult pros if paint resists or flakes unpredictably.
Eco-friendly disposal and cleanup recommendations
When you finish stripping paint, dispose of Peel Away residue and paint chips responsibly to protect the environment and avoid fines:
Bag contaminated waste in heavy-duty, labeled plastic, seal it, and follow local hazardous-waste guidelines for drop-off or pickup.
Then ventilate, wipe surfaces with recommended cleaner, avoid washing residue down drains, launder contaminated clothing separately, and document disposal per local regulations.
Common Mistakes and How to Avoid Them
Don’t over-apply the gel or let it sit longer than recommended, or you’ll damage the substrate and create extra work.
Use the right scrapers and techniques—peeling with metal or prying at the wrong angle can gouge wood or plaster.
Always test a small area first and treat suspect old paint as hazardous (lead/asbestos) so you protect yourself and the finish.
Over-application and long dwell times problems
One common misstep is slathering on too much Peel Away and letting it sit far longer than recommended, which can damage delicate surfaces and make cleanup harder.
You should apply a thin, even layer, follow label dwell-time limits, and check progress regularly.
Remove softened paint promptly to prevent substrate discoloration, avoid prolonged chemical exposure, and rinse surfaces thoroughly after stripping to neutralize residues.
Peeling wrong or using improper tools
Peel carefully and use the right tools: scraping with the wrong blade or pulling softened paint off too aggressively can gouge wood, chip plaster, or leave adhesive residue behind.
Work in small sections, employ a plastic scraper or putty knife at a shallow angle, and switch to finer tools for detail.
Clean tools and surfaces frequently to prevent re-depositing softened paint.
Failing to test led to ruined finishes
If you skip testing the remover on a small, hidden area, you risk irreversible damage to the finish, stain, or substrate beneath the paint.
Always try a spot first, wait full dwell time, then inspect for discoloration, raised grain, or softened veneer.
Adjust product strength, exposure time, or choose a gentler method if you see harm—don’t proceed until you’re confident.
Ignoring safety for hazardous paints (lead, asbestos)
Testing a small area first also helps you notice signs that the paint might be hazardous, and ignoring those signs can put you and others at serious risk.
If you suspect lead or asbestos, stop, don’t sand or scrape, and follow testing and abatement rules. Protect yourself and occupants by hiring pros or using certified test kits.
- Wear PPE
- Don’t disturb dust
- Get certified help
Comparison Peel Away vs. Other Paint Removal Methods
When you compare Peel Away to traditional chemical strippers, you’ll notice differences in effectiveness, safety, and cleanup requirements that affect your workflow.
Heat guns and scraping can be faster but raise the risk of scorching or gouging delicate surfaces, which Peel Away avoids.
For very hard or heavily pitted substrates, sanding or media blasting might be more appropriate than Peel Away, so weigh surface suitability before you choose.
Chemical strippers vs. Peel Away (efficacy, safety, cleanup)
Although both Peel Away and traditional chemical strippers dissolve old paint, they work differently enough that you’ll notice big differences in potency, safety, and cleanup. You’ll find Peel Away gentler, less fume-heavy, and easier to remove in layers; harsh strippers act faster but need ventilation and careful neutralizing.
| Feature | Peel Away | Chemical Strippers |
|---|---|---|
| Efficacy | Moderate | High |
| Safety | Higher | Lower |
| Cleanup | Easier | Messier |
Heat guns and scraping vs. Peel Away (risk of damage)
Because heat guns and heavy scraping apply direct force and high heat to wood and trim, you’re more likely to scorch, warp, or gouge the substrate than you’re with Peel Away’s controlled, layered lifting.
You can remove paint gently with Peel Away, reducing risk of permanent damage, preserving profile details, and minimizing follow-up repairs compared with aggressive thermal or blunt scraping methods.
Sanding and media blasting vs. Peel Away (surface suitability)
If you’re working on delicate moldings, thin trim, or historic wood, sanding and media blasting often take off more substrate than paint, risking loss of profile and original material; you should choose Peel Away instead.
It softens coatings so you lift layers without abrasion, preserves detail, and minimizes dust.
Use Peel Away on carved, fragile, or archival surfaces for controlled, gentle stripping.
When to Call a Professional
If you’re tackling a very large job or suspect hazardous materials like lead or asbestos, call a professional instead of going it alone.
A trained crew will test for hazards, contain and remove contaminants safely, and dispose of waste to code.
Expect clear timelines, written estimates, and certifications that protect you and your property.
Signs your project needs pro help (large scale, hazardous materials)
When a project stretches beyond a few rooms or involves unknown or suspected lead, asbestos, or other hazardous materials, call a professional—those jobs carry health, safety, and regulatory risks that DIY methods and peel-away products aren’t built to handle.
If surfaces cover large areas, coatings are stubborn or layered, or you lack containment, PPE, or disposal options, hire licensed experts to avoid contamination, fines, and injury.
What to expect from a professional paint removal service
Hiring a pro gives you containment, testing, and disposal you likely can’t handle on your own—licensed crews will assess hazards, test for lead or asbestos if needed, set up proper barriers and negative pressure, and follow local rules for removing and hauling contaminated waste.
Expect written estimates, timelines, permits if required, trained technicians using PPE and approved methods, and documented waste disposal so you’re protected legally and physically.
FAQ Common Questions About Using Peel Away
You probably have questions about timing, safety, and cleanup when using Peel Away, like how long it should sit or whether it can safely strip lead-based paint.
You’ll also want to know if it harms softwoods or antique finishes, how to dispose of peeled paint and materials, and whether it’s safe to use indoors or in poor ventilation.
I’ll answer each of these so you can use Peel Away effectively and responsibly.
How long should I leave Peel Away on paint?
Wondering how long to leave Peel Away on paint? You’ll typically leave it 30 minutes to several hours depending on paint thickness and layers.
Check progress periodically—softened paint should wrinkle or bubble. Reapply or extend time for stubborn areas, but don’t let the paste fully dry.
Follow product instructions and test a small area first to avoid substrate damage.
Can Peel Away remove lead-based paint safely?
Can Peel Away remove lead-based paint safely? Yes—Peel Away’s formula strips multiple layers effectively, including lead-based coatings, but you must treat removal as hazardous.
Wear proper PPE, use containment and HEPA vacuuming, wet methods to control dust, and follow local regulations for testing and disposal.
If unsure, hire certified abatement professionals to guarantee legal and safe handling.
Will Peel Away damage softwoods or antique finishes?
How will Peel Away affect softwoods or delicate antique finishes? You shouldn’t get surface damage if you follow directions: test a small area first, use the gentlest formulation, limit dwell time, and work with a soft scraper.
For very fragile antiques, consider professional conservation. Always neutralize and rinse as instructed to prevent residue that could harm fibers or finish over time.
How do I dispose of peeled-off paint and used materials?
1 clear step: treat removed paint and used peel-away materials as potentially hazardous waste.
Wear gloves, scoop solids into sturdy, labeled containers, and seal them.
Don’t wash residues down drains.
Check local hazardous-waste guidelines and take containers to an approved disposal site or collection event.
For small amounts, wrap in heavy plastic and follow municipal instructions to avoid fines and environmental harm.
Can I use Peel Away indoors or in poorly ventilated areas?
Wondering if Peel Away is safe to use inside? You can use it indoors only with strong precautions: guarantee maximum ventilation, open windows and doors, run fans to exhaust fumes, and wear a respirator, gloves, and eye protection.
For poorly ventilated areas, don’t use Peel Away—move the project outdoors or improve ventilation to meet safety recommendations before starting.