
How to Paint a Concrete Ceiling: What Works and What Doesn’t
You can get a durable, attractive concrete ceiling if you prep, prime and pick the right paint—don’t skip moisture checks or use a non-breathable coating. Start by inspecting for cracks, efflorescence and leaks, clean and neutralize salts or mold, repair joints, then apply a masonry bonding primer and a quality acrylic or epoxy masonry paint. Use rollers or a sprayer for even coverage and allow full curing; keep going for tips on products, techniques and maintenance.
Why Paint a Concrete Ceiling: Durability and Style

Because concrete is porous and exposed to wear, painting your ceiling both protects it and updates the room’s look.
You’ll gain durability benefits like moisture resistance and easier cleaning, and you’ll get aesthetic enhancements through color, texture, and light reflection.
You can mask imperfections, unify exposed structures, and extend surface life while giving the space a refreshed, intentional appearance.
Who Should Repaint a Concrete Ceiling: and When to Hire a Pro?
Who should tackle repainting a concrete ceiling yourself, and when should you call in a pro?
If you’re comfortable with ladders, surface prep and basic tools, DIY saves money and fits short project timelines.
Comfortable with ladders, prep, and basic tools? DIY repainting saves money and suits quick projects.
Hire a pro when damages exceed your skills, or when you need verified contractor qualifications, warranties, or faster completion.
Pros handle complex repairs and tight schedules reliably.
Quick Inspection Checklist: What to Look For (Cracks, Moisture, Salts)
Before you paint, check the ceiling for visible cracks and note their size and pattern.
Look for signs of moisture—stains, damp spots, or peeling—and test any suspicious areas for salt deposits (white, powdery residue).
If you find active leaks, extensive salts, or wide cracks, don’t paint until those issues are fixed.
Check For Visible Cracks
When you inspect the ceiling, scan for visible cracks—note their length, width, and whether they’re hairline, structural, or branching into a network—because that tells you how urgently they need repair and what type of fix to use.
You’ll perform a focused crack assessment to judge structural integrity, mark locations, and decide whether DIY patching suffices or if you should consult a pro for reinforcement.
Identify Moisture And Salts
After noting cracks, turn your attention to moisture and salts—these can undermine repairs and paint adhesion.
Use moisture detection and salt identification steps to decide action.
- Look for damp patches and dark staining.
- Perform a moisture detection test (meter or plastic sheet).
- Check for powdery white efflorescence.
- If salts appear, halt painting and address water ingress first.
What Causes Peeling, Cracking, and Efflorescence on Concrete
When you see peeling, cracking, or white salt deposits, it usually traces back to a few core causes.
Moisture moving through the slab pushes salts to the surface and weakens paint adhesion, while dirt, oil, or old coatings keep new paint from sticking.
Temperature swings and structural movement then open hairline cracks that let more water and contaminants in.
Moisture Migration
Although concrete looks solid, it’s porous and draws water through capillaries and cracks. That migrating moisture is the main reason paint peels, concrete cracks, and efflorescence appears.
You must manage moisture with barriers and humidity control.
Key steps:
- Install moisture barriers.
- Improve ventilation.
- Fix leaks promptly.
- Use breathable coatings to let vapor escape.
Surface Contaminants
Surface contaminants like oil, grease, dust, salts, and old paint films undermine adhesion and accelerate problems such as peeling, cracking, and efflorescence on concrete ceilings.
You must identify contamination sources, then use appropriate cleaning methods—degreasers, soda blasting, wire brushing, or muriatic rinses.
Proper surface preparation techniques, including testing and profiling, guarantee primers and paints bond, preventing premature failure and costly rework.
Thermal Movement
Cleaning off contaminants won’t fix all paint failures; thermal movement in the concrete itself often drives peeling, cracking, and efflorescence.
You must address thermal expansion and movement considerations before painting.
Steps to follow:
- Inspect for hairline cracks.
- Allow moisture to dry fully.
- Use flexible primers and elastomeric coatings.
- Incorporate control joints or sealants for ongoing movement.
How Moisture and Humidity Affect Painted Concrete Ceilings
Because concrete breathes, moisture and humidity are the biggest threats to a durable paint job on your ceiling: trapped damp will cause blistering, peeling, efflorescence, and mold growth, while fluctuating humidity can make paint expand and contract, breaking the bond to the substrate. You must monitor humidity levels and prioritize moisture control to prevent failures.
| Issue | Cause | Fix |
|---|---|---|
| Blistering | Trapped moisture | Drying, sealers |
| Peeling | High humidity | Dehumidify, priming |
| Mold | Persistent damp | Clean, treat |
Essential Tools and PPE Before You Start
Before you start painting a concrete ceiling, gather the right tools and PPE so the job stays safe and efficient: a sturdy ladder or scaffolding, extension roller with a genuine nap for masonry, quality brushes for corners, a breathable masonry primer and paint, mixing paddle, and a bucket or tray; for PPE, wear a respirator rated for paint vapors and dust, safety goggles, gloves, and a hard hat if you’ll be on scaffold.
Before painting a concrete ceiling, gather sturdy ladder/scaffold, masonry roller and brushes, breathable primer/paint, and proper respirator, goggles, gloves.
- Ladder/scaffold
- Roller/brushes
- Primer/paint
- Respirator/goggles
Follow safety precautions and confirm essential supplies are in good condition before beginning.
Decide: DIY vs. Pro-Grade Approach and When to Upgrade
When weighing whether to tackle your concrete ceiling yourself or step up to a pro-grade approach, consider the ceiling’s condition, your experience, and the scale of the job.
For DIY Considerations, factor time, tool access, patching skill, and tolerance for imperfect finish.
For Professional Benefits, weigh faster prep, guaranteed adhesion, specialized coatings, and reduced risk—upgrade when scope or structural issues exceed your skills.
Test Adhesion: Tape and Pull Tests-And Next Steps If It Fails
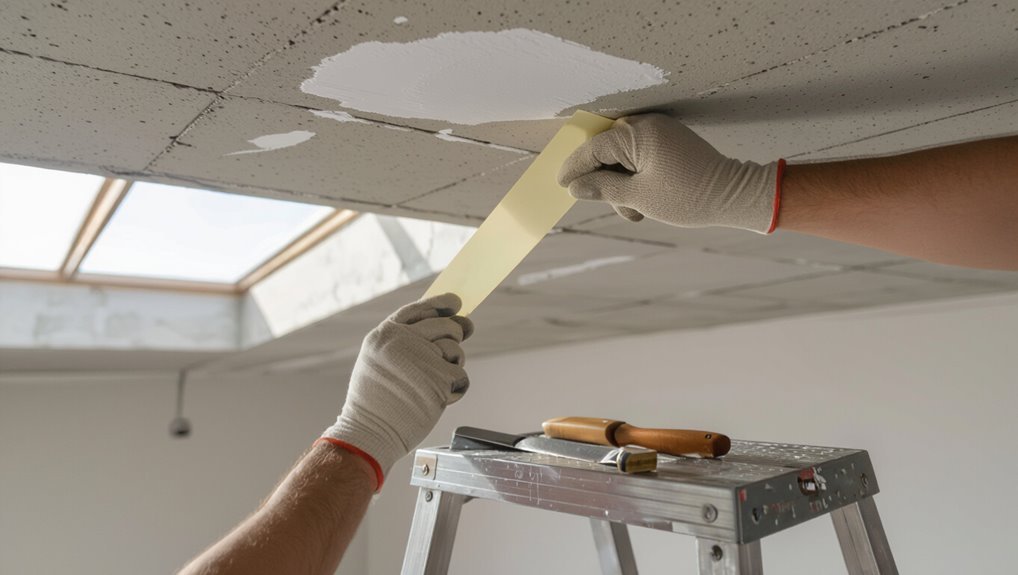
Before you paint, you’ll want to run a simple tape-and-pull adhesion test on a small area of the concrete to see if the coating will stick.
If the tape pulls away paint or powder, you’ll need to clean, etch, or sand the surface and use a suitable primer before repainting.
Repeat the test after remediation to confirm proper adhesion.
Tape Pull Method
Start by applying several strips of high-quality adhesive tape across different areas of the ceiling and press firmly. Then pull each strip off quickly at a 180-degree angle to check for any paint or loose concrete coming away.
Use tape adhesion techniques and tape application tips to evaluate adhesion.
Follow this quick checklist:
- Test multiple spots
- Vary pressure
- Note residue
- Photograph results
Remediation Steps If Fails
If the tape-and-pull tests show paint or loose concrete coming away, you’ll need to address adhesion issues before painting: remove all loose material, clean with a degreaser, and etch or sand glossy areas.
Apply a compatible primer or bonding agent, let it cure, then re-test.
Use proven remediation techniques to prevent recurring paint failures and guarantee a durable finish.
Preparing the Room: Protect Floors, Fixtures, and Furniture
1. Prepare the room before painting: prioritize floor protection, fixture covering, furniture relocation, and surface cleaning to avoid damage.
- Lay drop cloths or rosin paper.
- Tape and wrap light fixtures and vents.
- Move or tightly cover furniture with plastic.
- Sweep and vacuum floors; spot-clean nearby surfaces.
Cleaning Ceilings: Dust Removal and Degreasing Steps
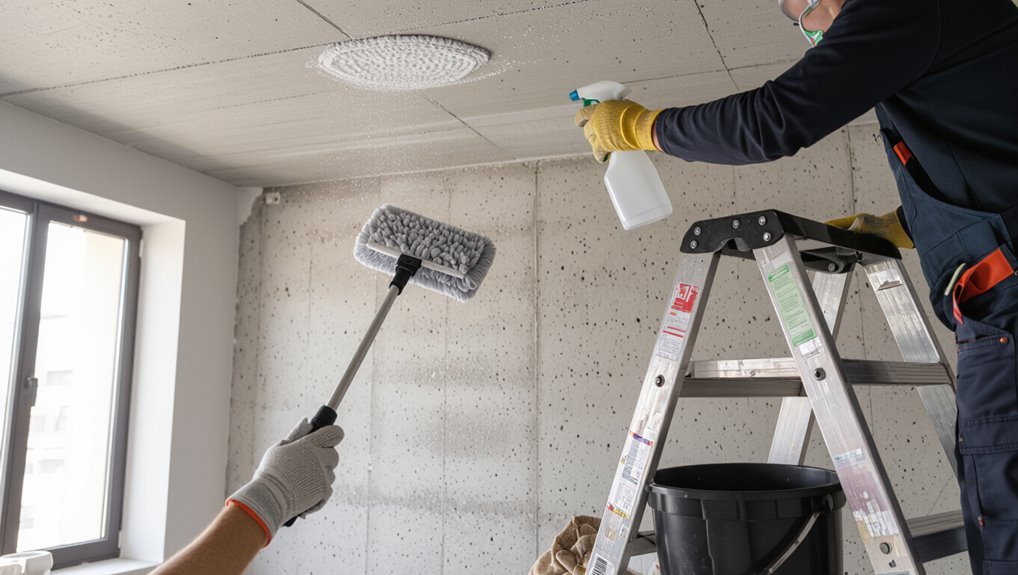
Before you paint, remove dust and grease so your primer and paint will adhere evenly; use a stiff broom or vacuum with brush attachment for dust removal, working from center outward.
For grease, apply a mild degreaser or trisodium phosphate solution, scrub with a nylon brush, then rinse thoroughly and let dry.
Wear gloves and ventilate the area during degreasing techniques.
Remove Efflorescence and Salts Safely
Scrape or brush away loose white powdery deposits (efflorescence) using a stiff nylon brush or wire brush, then neutralize remaining salts with a diluted vinegar or masonry cleaner and rinse thoroughly.
Scrape away loose white deposits, then neutralize remaining salts with diluted vinegar or masonry cleaner and rinse thoroughly
You’ll perform efflorescence removal and safe cleaning by following steps:
- Protect skin and eyes.
- Test cleaner on small area.
- Apply cleaner, scrub gently.
- Rinse and dry fully before painting.
Treat Mold and Mildew on Concrete Ceilings
Before you paint, you’ll want to find what’s causing mold so it doesn’t come back.
Clean the affected areas thoroughly with an appropriate mildew remover and a stiff brush, rinsing and letting the ceiling dry completely.
Finally, apply a mold-resistant primer or treatment to inhibit regrowth before painting.
Identify Mold Sources
When you spot mold or mildew on a concrete ceiling, your first step is to find what’s feeding it: moisture.
You’ll trace sources, assess ventilation, and plan mold prevention and moisture control measures before cleaning.
- Inspect roof and flashings
- Check plumbing and condensate lines
- Evaluate ventilation and exhaust
- Look for condensation on HVAC ducts
Proper Surface Cleaning
Although mold can look stubborn, you can remove it effectively with the right cleaners and technique; start by ventilating the area and protecting yourself with gloves and a mask.
Use tested cleaning solutions—bleach or oxygen bleach mixes—scrub with a stiff brush, rinse thoroughly, and let dry.
These surface preparation techniques guarantee paint adheres and prevent regrowth before you prime and paint.
Use Mold-Resistant Treatments
If mold or mildew has been on your concrete ceiling, treat the area with a mold-resistant product to stop regrowth and protect your new paint.
You should:
- Wear protection and clean with a biocide.
- Apply a mold prevention techniques product per instructions.
- Seal cracks and add moisture barriers where needed.
- Prime with a mold-resistant primer before painting to guarantee durability.
Repair Hairline Cracks and Shrinkage Joints
Start by locating every hairline crack and shrinkage joint on the ceiling so you can assess whether they need simple filling or more extensive repair.
Clean cracks, remove loose debris, and widen tiny gaps slightly so filler bonds.
Use a flexible, paintable sealant for shrinkage joints and a fine cementitious crack repair for hairline cracks.
Sand smooth before priming and painting.
Patch Holes and Spalled Concrete the Right Way
Tackle holes and spalled concrete by removing loose material, cleaning the area, and selecting the proper repair mortar so the patch bonds and lasts.
You’ll choose patch materials and apply spalling techniques that match depth and exposure.
Follow these steps:
Follow these steps to properly repair spalled concrete and ensure a durable, long-lasting patch.
- Chip to sound concrete.
- Clean and dampen.
- Apply repair mortar in layers.
- Cure per manufacturer instructions.
Why and When to Use a Concrete Bonding Primer
When you want your patch or coating to stick and last, use a concrete bonding primer because it creates a mechanical and chemical bridge between old concrete and new material.
You’ll see bonding primer benefits immediately: improved adhesion, reduced delamination, and uniform finish.
Apply after cleaning and etching; follow recommended application techniques—roller for coverage, brush for edges, thin even coats, proper dry times before topping.
Choose the Right Primer for Concrete Ceilings
Before you pick a primer, make sure the ceiling is clean, dry, and free of dust, efflorescence, or loose concrete so the product bonds properly.
Choose a primer formulated for concrete — typically a high-adhesion bonding primer or an acrylic masonry primer — based on the substrate condition and whether you need moisture or stain blocking.
I’ll walk you through the key surface prep steps and how to match primer type to your ceiling’s needs.
Surface Preparation Steps
Since concrete is porous and often alkaline, choosing the right primer is essential to getting paint to adhere and last on a ceiling.
You’ll focus on surface cleaning and careful primer selection before painting. Follow these steps:
- Remove dust, efflorescence, and loose mortar.
- Degrease stains with appropriate cleaner.
- Repair cracks and chip areas.
- Rinse, dry, and test adhesion.
Primer Type Selection
Which primer will give your concrete ceiling the best bond and longevity? You should pick a high-adhesion, masonry-specific primer and match it to your paint—consider primer compatibility considerations and proper primer application techniques to avoid peeling. Test a small area first.
| Primer Type | Best For | Notes |
|---|---|---|
| Acrylic | Interior | Fast-dry, good adhesion |
| Epoxy | High-moisture | Durable, costly |
| Oil-based | Stains | Strong sealer, slower drying |
Moisture-Mitigating Primers: Basements and Garages
When you’re painting a concrete ceiling in a basement or garage, moisture-mitigating primers are the first line of defense against efflorescence, peeling, and mold.
You should choose primers that create moisture barriers and employ proven sealing techniques.
Steps:
- Test for dampness.
- Clean efflorescence.
- Apply a penetrating primer.
- Recheck and spot-seal before topcoat.
Acrylic vs. Epoxy vs. Masonry Paints: Pros and Cons
When choosing between acrylic, epoxy, and masonry paints for a concrete ceiling, you’ll weigh durability and wear against ease of maintenance.
You’ll also consider adhesion and surface prep needs, since some coatings grab better and demand more prep.
Finally, think about finish and breathability so you balance appearance with moisture vapor movement.
Durability And Wear
Because your ceiling takes constant exposure to moisture, abrasion, and occasional cleaning, choosing the right paint affects how long the finish lasts and how it wears.
You’ll consider durability testing and wear resistance when comparing types.
- Acrylic: flexible, moderate wear resistance.
- Epoxy: superior durability testing results, tough.
- Masonry: breathable, good longevity.
- Maintenance: easy cleaning extends life.
Adhesion And Preparation
Durability matters, but how well paint sticks to concrete and what prep it needs will determine whether that durability actually lasts.
You’ll choose acrylic for ease, epoxy for toughness, or masonry paint for mineral surfaces.
Test surface texture, clean, etch, and use primer to guarantee paint compatibility.
Match product specs to concrete conditions to avoid peeling and failures.
Finish And Breathability
Although paint choice won’t change the ceiling’s structure, it will control how the surface looks, feels, and handles moisture and vapor over time.
You’ll weigh finish types and breathability concerns when choosing acrylic, epoxy, or masonry paint.
Consider:
- Acrylic: breathable, flexible.
- Epoxy: durable, less breathable.
- Masonry: balanced vapor transmission.
- Sealers: modulate breathability.
Picking Sheen and Color for Concrete Ceilings
Choosing the right sheen and color for a concrete ceiling will shape both its look and how it performs—matte sheens hide surface imperfections and reduce glare, while low-luster or satin finishes reflect more light and clean up easier.
Pick darker tones to mask stains and lighter tones to brighten a room, and consider matching finish sheen with the room’s light level and planned maintenance.
You’ll weigh sheen options and color psychology to set mood, balance light, and simplify upkeep.
Why Flat or Low-Sheen Finishes Work Best Overhead
When you’re working overhead, flat or low-sheen finishes hide imperfections and cut glare better than glossier paints.
This helps keep the ceiling from looking patchy and prevents harsh reflections that can tire your eyes.
- Choose flat finishes for maximum concealment.
- Use low sheen benefits to reduce light bounce.
- Expect easier touch-ups.
- Minimize visual texture contrast.
Calculate Paint and Primer Quantities for Ceilings
Now that you’ve picked a flat or low-sheen finish to mask imperfections and cut glare, you’ll want to figure out exactly how much primer and paint you’ll need so you don’t run out mid-job or end up with extra cans. Use paint quantity calculation: measure ceiling area, factor coat count, and follow primer selection tips for porosity and adhesion.
| Area (sq ft) | Coats | Cans needed |
|---|---|---|
| 100 | 2 | 1–2 |
| 200 | 2 | 2–4 |
Mix and Thin Paint for Spraying or Rolling Concrete Ceilings
Start by stirring your primer and paint thoroughly to reincorporate settled pigments and binders.
Then test viscosity so you can thin only as needed for your application method. You’ll control mix consistency and use proper spray techniques or rolling viscosity.
- Measure solvent per label.
- Mix slowly to avoid bubbles.
- Strain before loading.
- Recheck viscosity after sitting.
When Should You Use a Sprayer Versus a Roller or Brush?
Although both sprayers and rollers (with brushes for trim) can give good results, you’ll choose the tool based on ceiling texture, room size, speed needs, and cleanup tolerance.
Use a sprayer when you want fast, even coverage over rough or high ceilings — sprayer benefits include speed and reach.
Choose roller for control, less overspray, and easier cleanup — roller advantages for small rooms.
Set Up an Airless Sprayer for Ceilings
Start by choosing the right tip and nozzle for your paint and the texture of the concrete so you get even coverage.
Set the sprayer pressure low and increase it gradually until the spray pattern is smooth without excessive overspray.
Finally, secure the hose and gun so they won’t pull or swing while you work, keeping your hands free to control the spray.
Choose Tip And Nozzle
Before you pull the trigger, match the tip size and nozzle type to your paint and ceiling surface so you get even coverage without overspray.
Pick compatible sprayer types and check nozzle sizes for viscosity and texture.
Then:
- Test on scrap.
- Use larger tip for textured concrete.
- Use fine tip for smooth finishes.
- Replace clogged nozzles promptly.
Adjust Pressure Settings
Now that you’ve matched the tip and nozzle to the ceiling, set the sprayer’s pressure so paint atomizes evenly without spattering.
Start low, test a small area, and gradually adjust pressure until you get a smooth, consistent fan without runs.
Note ideal settings for your paint and tip, then fine-tune for distance and ceiling texture before spraying the full surface.
Secure Hose And Gun
Clamp the hose and gun into position so they won’t kink or pull while you work overhead. You should:
- Anchor hose supports to joists to prevent strain.
- Secure the gun holster near your scaffold.
- Practice spray technique at eye level before spraying.
- Keep hose cleaning supplies handy and flush the system after use.
These steps keep you safe, steady, and efficient when spraying ceilings.
Rolling Textured Concrete Ceilings Without Splatter
Grab a thick-nap roller and work in manageable sections so you can keep a wet edge without drips. Textured concrete hides uneven strokes but still throws paint, so load the roller evenly, roll off excess, and use a slow, steady technique to minimize splatter while maintaining full coverage.
You’ll use specific rolling techniques, angle the nap into crevices, and tap edges gently for splatter prevention and clean results.
Avoid Lap Marks and Get Even Coverage
Keep a wet edge as you work so new paint blends seamlessly with the last section.
Use short, overlapping strokes to feather each pass and avoid hard lines.
If you keep moving steadily and don’t let areas dry before you blend, you’ll get even coverage without lap marks.
Maintain Wet Edge
When you paint a concrete ceiling, work in manageable sections so the previous pass stays wet while you overlap it—this prevents lap marks and guarantees an even finish.
Use wet edge techniques and consistent paint application to keep edges blendable.
Steps:
- Load roller evenly.
- Start at one corner.
- Maintain steady speed.
- Feather overlaps before drying.
Overlap Short Strokes
Work in short, controlled strokes that overlap each pass by about half the roller’s width so each section blends seamlessly into the next; this prevents lap marks and gives you consistent coverage across the ceiling.
Use overlap techniques and deliberate stroke patterns, keeping pressure even and speed steady.
Restart at wet edges, feather changes, and inspect lighting angles to catch missed spots quickly.
How Many Coats You Really Need and Why
Although one coat might seem sufficient at first glance, you’ll usually need two — sometimes three — to get durable, even coverage on a concrete ceiling.
One coat may look fine, but two—sometimes three—are usually needed for durable, even concrete ceiling coverage.
You choose coats based on coating types, surface porosity, and application techniques.
Follow steps:
- Prime porous areas.
- Apply first paint coat evenly.
- Inspect for thin spots.
- Add a final coat for uniformity and longevity.
Dry Times: Waiting Between Primer and Paint Coats
You should let primer dry fully—usually 24 hours for water-based primers and up to 48 hours for oil-based—before applying paint.
Keep in mind temperature and humidity can add or subtract drying time, so adjust accordingly.
Before painting, do a quick adhesion test (light scuff or tape test) to make sure the primer’s cured and ready for the topcoat.
Recommended Drying Times
1–2 hours is a good rule of thumb for most primers to become touch-dry, but you should wait the full recoat time listed on the product label—often 4–24 hours—before applying paint so the primer has properly cured and the finish bonds.
Consider:
- Check label for recoat time.
- Note drying conditions.
- Adjust for paint thickness.
- Test adhesion before full coat.
Environmental Factors Impact
When humidity is high or temperatures are low, drying and curing slow dramatically, so you’ll need to extend the wait between primer and paint beyond the label’s minimum. Monitor humidity levels, temperature fluctuations, air circulation, ventilation strategies, and sunlight exposure; consider seasonal changes, weather impacts, climate considerations, moisture barriers, and environmental pollutants.
| Factor | Action |
|---|---|
| Humidity | Dehumidify |
| Temperature | Heat |
| Airflow | Fans |
| Sunlight | Use |
| Pollutants | Filter |
Testing Adhesion Before Coating
Before you apply the next coat, test adhesion to make sure the primer has cured enough and will bond to the paint; doing a quick adhesion check prevents peeling and wasted work.
You’ll perform simple adhesion tests using tape methods and observation:
- Clean a small area.
- Apply primer test patch.
- Press tape, pull sharply.
- Inspect for residue or lifting.
Temperature, Humidity, and Curing Times
Although concrete can feel solid, its strength and paint adhesion depend on temperature, humidity, and curing time.
So you’ll want to plan your ceiling paint job around the right environmental window. Monitor temperature effects and humidity levels during curing; paint adheres best when temperatures are moderate and moisture is low.
Allow manufacturer-recommended curing—often 28 days—before priming or painting to avoid failures.
Painting Around Fixtures, Pipes, and Beams Safely
After you’ve waited the proper curing time and confirmed stable temperature and humidity, you’ll need to paint carefully around fixtures, pipes, and beams to protect both the structure and the hardware.
Once cured and conditions are stable, carefully paint around fixtures, pipes, and beams to protect structure and hardware.
Follow these safety precautions and consider fixture placement:
- Turn off power and cover electrical fixtures.
- Mask pipes and beam edges tightly.
- Use angled brushes for control.
- Apply thin, even coats.
Dealing With Exposed Rebar and Rust Stains
If you find exposed rebar or rust stains on your concrete ceiling, address them promptly to prevent further corrosion and staining, and to secure a sound surface for paint adhesion.
Clean loose rust, remove flaking concrete, then apply a rust treatment to metal and a concrete-specific primer over repair patches.
Smooth, dry surfaces guarantee paint bonds and corrosion won’t recur.
Create an Intentional Industrial/Raw-Concrete Look
When you want an intentional industrial look, embrace the ceiling’s raw texture and keep finishes minimal to highlight concrete’s character.
You’ll accentuate industrial aesthetics and use raw finishes without masking imperfections.
Consider these steps:
- Clean surface and remove loose debris.
- Apply clear matte sealer for protection.
- Highlight beams with dark wash.
- Keep lighting utilitarian and exposed.
Smooth Ceiling Finishes Over Rough Concrete
Transform rough concrete into a smooth ceiling by choosing the right prep and skim-coating method for your space; you’ll need to clean the surface, repair major defects, and decide between plaster, joint compound, or a thinset-backed drywall approach based on desired finish, budget, and ceiling access. Use proper smoothing techniques and select texture options wisely.
| Method | Cost | Finish |
|---|---|---|
| Plaster | Medium | Smooth |
| Joint compound | Low | Ultra-smooth |
| Drywall | High | Factory-smooth |
Add Insulation or Soundproofing Before Painting?
Should you add insulation or soundproofing before painting your concrete ceiling? Yes—if you need thermal or acoustic improvement.
Choose appropriate insulation types and soundproofing materials, then install before finishing. Consider:
- Rigid foam for thermal gain
- Mineral wool for sound absorption
- Resilient channels for isolation
- Mass-loaded vinyl for blocking noise
Seal gaps, then prime and paint.
Maintaining Painted Concrete Ceilings Long-Term
Once your concrete ceiling is painted, you’ll want to keep routine dust and debris off it with a soft broom or vacuum attachment to preserve the finish.
Check periodically for moisture or stains so you can address leaks or mold early.
Plan on spot touch-ups and occasional recoats to maintain coverage and protect the surface over time.
Routine Dust And Debris
Dust and settled debris will dull your ceiling’s finish over time, so you’ll want to remove loose particles regularly to keep paint looking fresh and prevent buildup that can trap moisture or grime.
Use simple dust control and debris management methods and:
- Vacuum with soft-brush attachment.
- Microfiber mop or extendable duster.
- Spot-clean stains with mild detergent.
- Schedule quarterly quick cleanings to maintain finish.
Inspect For Moisture
Because moisture is the main enemy of painted concrete, you should inspect ceilings regularly for damp spots, efflorescence, peeling paint, or musty odors that signal leaks or high humidity.
Check potential moisture sources—roof penetrations, plumbing, condensation-prone ducts—and measure humidity levels with a hygrometer.
Document findings, mark problem areas, and address causes promptly to prevent mold and structural damage before repainting becomes necessary.
Recoat And Touch-Ups
Every few years you’ll want to recoat high‑traffic or exposed concrete ceilings and perform spot touch-ups to keep the finish protective and attractive.
Plan maintenance:
- Inspect for wear and moisture.
- Match color selection and texture.
- Clean and sand damaged spots.
- Use proper application techniques—thin coats, compatible primer, and feather edges—so repairs blend and protection lasts.
Fixing Peeling, Bubbling, and Discoloration
Start by evaluating the ceiling to identify peeling, bubbling, and discoloration so you know what repairs are needed and why they happened.
Address loose flakes with targeted peeling solutions: scrape, sand, and prime affected spots.
For bubbling remedies, puncture bubbles, release trapped moisture, then dry and seal.
Treat stains with appropriate cleaners, spot-prime, and repaint with breathable masonry paint.
Removing Old Paint From Concrete Ceilings When Necessary
If the peeling, bubbling, or stains are widespread or the old paint’s adhesion is poor, you’ll need to remove loose or failed coatings before repainting.
Choose paint removal techniques carefully and follow safety precautions.
Select removal methods wisely and prioritize safety—use suitable techniques and precautions before repainting.
- Scrape loose areas.
- Use a wire brush or sander.
- Apply chemical strippers sparingly.
- Rinse, dry, and inspect before priming.
Estimate Total Project Time and Staging
You’ll want a clear estimate of total project time that accounts for each step, not just painting.
Factor in prep and drying times for primers, patching compounds, and finishes so you don’t rush a coat.
Plan a logical work staging sequence—prep, prime, paint, cure—to keep tasks organized and avoid rework.
Project Duration Estimate
A realistic estimate for painting a concrete ceiling depends on surface condition, room size, and drying times, so plan in phases: prep (cleaning, patching, priming), painting (cutting in and rolling), and curing.
Use a clear project timeline and task breakdown to schedule work. Estimate:
- Inspection
- Prep
- Paint
- Curing/cleanup
Adjust for ventilation and access.
Prep And Drying Times
Now that you’ve mapped out inspection, prep, painting, and curing, let’s map the prep and drying timeline so you can stage work and set realistic completion dates. You’ll use targeted prep techniques and controlled drying methods: plan 1–2 days cleaning/repair, primer day, paint day, and 24–72 hours cure per coat.
| Step | Time | Feeling |
|---|---|---|
| Clean/Repair | 1–2d | Relieved |
| Prime | 1d | Confident |
| Paint | 1d | Proud |
| Cure | 1–3d | Patient |
| Inspect | 0.5d | Satisfied |
Work Staging Sequence
Start by breaking the ceiling job into clear stages—inspection, prep/repairs, priming, painting, curing, and final inspection—and assign realistic windows for each so you can coordinate labor, materials, and ventilation.
Use staging techniques to streamline work and create a reliable project timeline. Estimate total time, allow buffers, and follow this checklist:
- Inspect
- Prep/repair
- Prime/paint
- Cure/inspect
Budgeting for Materials, Tools, and Labor
Before you set a brush to ceiling, calculate your budget by listing required materials, tools, and any labor you’ll hire so you know exactly where money will go.
Use budgeting tips: compare material cost per square foot, factor primer, paint, rollers, ladders, drop cloths, and patching compounds.
Get quotes for labor, include contingency, and prioritize essentials to avoid surprises.
Choose Eco-Friendly and Low-VOC Options
If you want a healthier home and a smaller environmental footprint, choose low‑VOC or zero‑VOC paints and primers for your concrete ceiling. You’ll reduce fumes and protect indoor air.
Consider these steps:
- Pick eco friendly paints with clear labels.
- Seek low VOC options for primers and topcoats.
- Favor sustainable materials in tools and supplies.
- Verify green certifications before you buy.
Pro-Recommended Products and Brands for Concrete Ceilings
When you’re ready to buy, choose products pros trust for durability, adhesion, and low odor—specifically a masonry primer designed for concrete, a high-build ceiling paint or elastomeric topcoat, and corrosion-resistant fasteners or anchors for any fixtures.
Look for pro grade paints from reputable brands, acrylic or elastomeric formulas, and eco friendly options like low-VOC lines; buy quality rollers, breathable caulk, and stainless anchors.
Shortcuts That Cost Time and Money: What Not to Skip
Picking the right primer and paint is smart, but skipping steps to save time will usually cost you more in repairs and rework.
Choosing the right primer and paint helps — but cutting prep time often leads to costly repairs later.
You should avoid shortcut pitfalls by doing proper surface prep, moisture checks, and using recommended sealers. Consider a clear budget breakdown before cutting corners.
- Clean thoroughly
- Patch cracks
- Check moisture
- Use primer
Document the Job: Warranties, Records, and Resale Value
Documenting the job protects your investment and makes future transfers easier: photograph the ceiling before, during, and after work; keep receipts for materials, primers, and sealers; note moisture readings and patch locations; and save any manufacturer warranties and contractor agreements in a single folder.
You’ll record warranty coverage, dates, and installer contacts, which supports claims and highlights resale benefits for buyers seeking documented maintenance.
Plan Follow-Up Inspections and Touch-Ups Over Time
Schedule periodic inspections and brief touch-ups so your painted concrete ceiling stays in top condition.
You’ll set inspection intervals, note areas needing repair, and apply suitable touch up techniques. Follow a simple routine:
- Quarterly visual check
- Annual detailed inspection
- Spot-clean stains immediately
- Small-area repaint within months
Record findings so you’ll address issues before they worsen.
Frequently Asked Questions
Can Painting Concrete Ceilings Improve Room Acoustics?
Painting concrete ceilings alone won’t improve acoustics much; you’ll need acoustic panels or treatments for real sound absorption. You should combine paint with specialized coatings and panels to reduce reverberation and improve room clarity effectively.
Will Painted Concrete Ceilings Affect Home Insurance or Code Compliance?
Yes, painting concrete ceilings rarely changes insurance implications or compliance standards, but you should check for fire-rating, vapor barriers, or structural alterations; notify your insurer if you alter finishes considerably to avoid coverage disputes.
Can I Use Ceiling Paint Leftovers for Surrounding Walls or Floors?
Yes — you can, though it’s a bit of a happy compromise: you’ll want to check color compatibility and accept some texture variation; thin or tint ceiling paint before using on walls or floors for better coverage and durability.
How Do Seasonal Temperature Swings Impact Painted Ceiling Longevity?
Seasonal temperature swings stress paint adhesion: when temperatures fluctuate, you’ll get expansion and contraction that can cause cracking, peeling, or reduced lifespan. You’ll avoid problems by using flexible, proper primers and controlling application conditions.
Are There Special Disposal Rules for Contaminated Concrete Paint Waste?
Yes — you’ll follow strict paint waste management rules: contaminated concrete paint is treated as hazardous in many areas, so you’ll comply with environmental regulations, use approved disposal services, document manifests, and never dump it in regular trash.
