Can You Paint Over Stain Without Sanding? Full Diy Guide
Yes — you can often paint over stained wood without sanding if you clean, degloss, and use a proper stain‑blocking primer. Start by removing dirt, grease, and loose finish, then use a chemical deglosser or scuff pad to dull glossy surfaces. Pick a shellac or oil‑based stain blocker for tannins, or a bonding latex primer for easier cleanup. Test adhesion with tape first; if it lifts you’ll need more prep. Keep going and you’ll find step‑by‑step tips and troubleshooting.
Quick Answer: Can You Paint Over Stain Without Sanding?
Can you paint over stain without sanding? You can, but it depends on surface preparation and chosen painting techniques.
Clean thoroughly, degloss with liquid sandpaper, and use a stain-blocking primer to prevent bleed-through.
For best results on heavily stained or worn wood, light sanding still improves adhesion.
Decide based on condition, desired longevity, and time you want to spend.
How to Use This Guide (What to Read First)
You can paint over stain without sanding in many cases, but deciding how to proceed depends on the condition of your piece and the finish you want.
Start with the quick answer, then read sections on tools, DIY preparation, and products. Use guide navigation to jump to troubleshooting or step-by-step painting.
Follow recommended checks before beginning to guarantee a smooth, predictable result.
When Skipping Sanding Is Safe
If the surface is smooth and already sealed, you can often skip sanding and still get good adhesion.
You’ll have better results on low-traffic pieces that won’t face much wear.
Also check that the new paint has a finish compatible with the existing coating so it bonds properly.
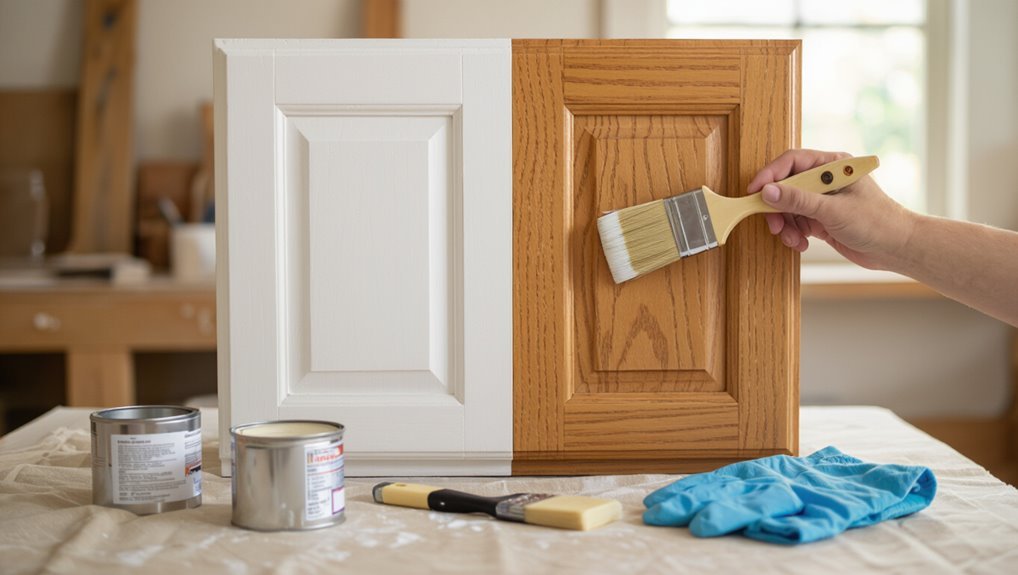
Smooth, Sealed Surfaces
When a surface is already smooth, glossy, and sealed—like factory-finished cabinets or laminate countertops—you can often skip sanding and go straight to cleaning and priming, saving time without sacrificing adhesion.
You’ll guarantee a smooth application by degreasing, scuffing lightly with a mesh pad, and using a bonding primer formulated for a sealed finish.
Test a small area first.
Low-Traffic Pieces
Choose low-traffic items—like decorative chairs, bedside tables, or picture frames—if you want to skip aggressive sanding and still get a durable, attractive finish.
You’ll assess furniture styles and match paint types for best adhesion. Consider:
- Accent chairs (occasional use)
- Wall-mounted shelves (light access)
- Decorative frames (no handling)
Prep with deglosser and light cleaning for success.
Comparable Finish Compatibility
Although you’re skipping sanding, you’ll want to confirm the existing finish is compatible with your paint—smooth, cured finishes like factory-cured lacquer, polyurethane, or enamel typically accept water- or oil-based paints with minimal prep.
You should check finish types and test paint compatibility on an inconspicuous spot. If the topcoat’s glossy or poorly adhered, scuffing or primer may still be necessary for durable adhesion.
When You Must Sand: Red Flags
If the stained surface shows any of the following red flags, you’ll need to sand before painting:
- Flaking or peeling finish that resists good sanding techniques.
- Glossy or slick stain where surface preparation won’t promote adhesion.
- Deep stains or tannin bleed-through that require abrasion and sealing.
You’ll prep edges, remove contaminants, and sand to a consistent profile before priming.
How Stain Type Affects Paint Adhesion
Whether the stain is oil- or water-based changes how well paint will stick, so you’ll need different prep for each.
Penetrating stains soak into the wood and may allow adhesion with light scuffing and a primer, while film-forming stains sit on the surface and often need sanding or a stronger primer.
I’ll walk you through the signs and the right prep for each type.
Oil-Based Vs Water-Based
Because the type of stain under your paint changes how well the new finish will stick, you should identify whether the stain is oil- or water-based before you start.
Oil-based advantages include better adhesion under oil paints; water based drawbacks include raised grain and poor bonding with some enamels.
Consider:
- Test adhesion with tape.
- Use primer matched to stain type.
- Clean thoroughly.
Penetrating Vs Film-Forming
When you’re choosing paint, know that stains fall into two functional categories—penetrating stains soak into the wood fibers, while film-forming finishes sit on the surface—and each demands a different prep and primer approach to secure good adhesion. You’ll assess stain absorption, then pick bonding primer for film-forming or deglosser/etch for high absorption to guarantee paint adhesion.
| Stain Type | Prep Needed |
|---|---|
| Penetrating | Degloss/clean |
| Film-forming | Sand/prime |
| High absorption | Sealing primer |
| Low absorption | Bonding primer |
How Finish Sheen Changes Your Prep
If you’re switching from a glossy or semi-gloss stain to a satin or matte paint, you’ll need to sand and degloss the surface more aggressively so the new finish can bite; higher-sheen stains resist paint adhesion and show flaws more readily, so prep becomes both about adhesion and smoothing visible defects.
Glossy or semi-gloss stains require more aggressive sanding and deglossing to ensure paint adhesion and hide flaws.
- Assess finish types and damage.
- Sand high-sheen areas more.
- Use deglosser for sheen effects.
Cleaning Stained Wood Before Painting
Before you paint, wipe away surface dirt and dust so the primer can stick properly.
Use a degreasing cleaner on any oily spots, then rinse thoroughly to remove residue.
Let the wood dry completely before you start sanding or priming.
Remove Surface Dirt
Since dust, oils, and grime block paint adhesion, you’ll want to remove all surface dirt from stained wood before you prime or paint.
Good surface preparation uses simple cleaning techniques to guarantee adhesion. Use a soft brush, tack cloth, or damp microfiber to clear debris.
- Brush loose dust
- Wipe with damp cloth
- Finish with tack cloth for a clean, dry surface
Degrease With Cleaner
Scrub stubborn grease and oils with a dedicated degreaser so your primer and paint will stick properly; grease repels water-based products and causes peeling if left behind.
Use appropriate cleaning solutions—citrus-based or trisodium phosphate substitutes—applying with a scrub pad to break down residues.
Focus on surface preparation: remove all oily film and visible contaminants so coatings bond reliably and avoid future adhesion failures.
Rinse And Dry
Now that you’ve removed the grease, rinse the surface thoroughly to wash away cleaning residues and loosened grime so primer can bond properly.
Use proper rinse techniques and follow effective drying methods to prevent moisture traps.
Visualize steps:
- Hose or bucket-rinse, low pressure.
- Wipe excess water with clean rags.
- Air-dry or use a fan until fully dry before priming.
How to Degloss Stained Surfaces Without Sanding
If you want paint to stick to a glossy stained surface without sanding, deglossing is a quick, effective alternative that chemically dulls the finish so primer and paint bond better.
You’ll clean the surface, apply deglossing techniques per product directions, wipe residue, and let it dry. This surface preparation guarantees adhesion without abrasive sanding for most sealed wood and laminate projects.
Best Chemical Deglossers and Safety Tips
Once you’ve cleaned and chemically dulled the finish, pick a deglosser that matches your project and follow safety guidelines.
Choose chemical options for compatibility: solvent-based for old varnish, citrus for mild finishes, or ammonia blends for heavy buildup.
Observe safety precautions: ventilate, wear gloves and goggles, and dispose per label.
- Ventilation
- PPE
- Proper disposal
How to Test Paint Adhesion on Stained Wood
Start by staging a small, inconspicuous test area to confirm paint will stick to your stained wood—this quick check saves time and prevents costly mistakes.
Clean the spot, let it dry, then apply your chosen paint.
After curing, perform a simple adhesion test: press tape firmly, pull sharply. If paint lifts, reassess wood preparation before proceeding.
Primers That Bond to Stained Wood
Because stained wood can bleed tannins and show through thin paint, choose a primer formulated to block stains and adhere to slick finishes.
You’ll assess primer types and adhesion factors to pick a strong base that prevents bleed-through and peels.
Consider options:
- Shellac-based for tough stain blocking.
- Oil-based for durable bonding.
- Bonding latex for easier cleanup and decent adhesion.
Choosing Primer for Water- vs Oil-Based Paint
When you’re choosing a primer, make sure it’s compatible with the finish you plan to use—water-based primers work best under water-based paints, and oil-based primers pair with oil finishes.
Pick a stain-blocking primer rated to stop bleed-through if tannins or grease are a concern. That match will save you time and prevent stains from ruining the topcoat.
Primer Compatibility With Paint
Although primers and paints may look interchangeable, you’ll get the best adhesion and finish by matching their bases—use a water-based (latex) primer under water-based paint and an oil-based or solvent-based primer under oil-based (alkyd) paint.
Choose primer types for paint compatibility to prevent peeling. Consider:
- Latex primer + latex paint
- Oil/alkyd primer + oil paint
- Shellac primer for tough stains
Tackling Stain Bleed-Through
If you’ve ever painted over nicotine, water stains, or tannin-rich wood only to watch the marks reappear, you need a primer that blocks bleed-through; choose primer options based on stain types and final paint (water- vs oil-based). Use sealing techniques that improve paint adhesion.
| Fear | Hope | Choice |
|---|---|---|
| Yellowing | Fresh start | Shellac |
| Ring stains | Clean walls | Oil primer |
| Tannin | Confidence | Waterborne |
How to Prime Stained Wood for Full Coverage
Because stained wood can bleed tannins and show through thin primers, you’ll want to seal it properly before painting for true full coverage.
Use oil-based or shellac primers, focus on priming techniques and adhesion factors, and follow this checklist:
- Clean and degrease surface.
- Apply stain-blocking primer thinly, two coats.
- Sand lightly between coats for uniform adhesion.
Best Paints to Use Over Stained Wood
When you’re choosing paint for stained wood, pick products designed for adhesion and stain-blocking so your finish stays smooth and opaque. You’ll want primers and topcoats offering paint durability and thoughtful color selection to hide tannins and wear.
| Type | Benefit | Best Use |
|---|---|---|
| Bonding primer | Blocks stains | Glossy wood |
| Acrylic latex | Flexible | Interior |
| Oil-based | Tough finish | High-traffic |
| Chalk paint | Easy cover | Decorative |
Painting Tips When You Skip Sanding
Although skipping sanding can save time, you’ll need to rely on proper cleaning, the right primer, and light abrasion alternatives to guarantee paint sticks and hides the stain.
You’ll focus on surface preparation and proven adhesion techniques. Follow this concise checklist:
- Degrease and scuff with a nonwoven pad.
- Use a stain-blocking primer.
- Test adhesion in an inconspicuous spot.
Drying, Recoat Timing, and Avoiding Failures
If you let coats dry fully and follow proper recoat windows, your finish will cure evenly and resist problems like blistering, lifting, or visible seams.
Check product labels for drying times and stick to recommended recoat intervals. Work in proper temperature and humidity, apply thin even coats, and wait longer in cool or damp conditions.
Test a small area before full recoating.
Common Problems When Painting Over Stain
You’ll run into two big trouble areas when painting over stain: surface contamination and poor adhesion.
If dirt, oil, or old finish aren’t fully removed, the paint won’t stick properly.
Addressing contamination and ensuring good adhesion up front prevents peeling and costly touch-ups.
Surface Contamination Issues
When old finishes, grease, or dirt stay on the wood, they’ll keep new paint from sticking properly; you’ll see peeling, bubbling, or blotchy coverage soon after you finish.
You must focus on surface preparation and identify contamination sources before painting. Common culprits include:
- Oils and grease from hands or kitchens
- Dust, wax, or polish residues
- Mold or mildew left from moisture
Adhesion And Peeling
Although a stained surface might look sound, poor adhesion is the most common reason paint peels off soon after you finish.
It usually comes down to incompatible finishes, lingering contaminants, or improper surface prep. You’ll prevent adhesion issues by cleaning, deglossing, or using a bonding primer.
Test a small area first, follow manufacturer instructions, and don’t skip peeling prevention steps.
Preventing Stain Bleed and Tannin Bleed
Because tannins and certain stains can bleed through paint and ruin a finish, you need to stop them at the source before priming.
You’ll use stain prevention techniques and tannin protection primers. Follow these steps:
- Clean surface; remove oils and residue.
- Apply a shellac- or oil-based stain-blocking primer.
- Let cure fully, then topcoat for durable coverage.
Fixing Peeled or Flaked Paint Spots
If you spot peeled or flaked paint, start by identifying and removing any loose areas so the repair will hold.
Sand the edges smooth, clean the surface, and apply a suitable primer to seal exposed substrate.
Once the primer’s dry, you can repaint for a seamless finish.
Identify Loose Paint
Start by inspecting the surface for paint that lifts, cracks, or flakes away when you press your fingernail against it.
Note paint condition and any adhesion issues. Remove loose bits and document affected areas.
Check surrounding zones for spreading failure.
- Small chips
- Large flakes
- Underlying substrate damage
Prep And Prime
Prepare the surface by removing all loose paint, sanding the edges smooth, and cleaning away dust and grease so new primer and paint will adhere properly.
Next, spot-fill gouges, feather sand blends, and wipe clean using recommended prep techniques.
Choose appropriate primer types—stain-blocking for tannin bleed, bonding primer for glossy areas—and apply thin, even coats before repainting for durable, uniform coverage.
When to Use a Stain-Blocking Sealer or Shellac
Sometimes you’ll run into stains that bleed through regular primer or paint—those are the ones that call for a stain-blocking sealer or shellac.
You’ll choose sealers when stain blocking techniques are needed; use shellac applications for tough tannin or water stains.
Consider:
- Tannin/wood bleed-through
- Smoke or marker stains
- High-moisture areas needing fast sealing
Tools and Materials Checklist (No-Sand Projects)
Gather the essential tools and materials you’ll need for a no-sand paint-over-stain job so you don’t get halfway through and realize something’s missing.
For a concise tools overview, include tack cloths, high-quality brushes, foam rollers, painter’s tape, respirator, and drop cloths.
Materials essentials: stain-blocking primer, adhesion-promoting bonding primer, latex or oil paint, fast-dry solvent, and appropriate cleaners.
Project Tips: Cabinets, Furniture, Trim, Floors
Start by prioritizing surfaces: cabinets, furniture, trim, and floors each demand different prep and product choices, so tackle them with targeted techniques.
Start by prioritizing surfaces—cabinets, furniture, trim, and floors—each needing distinct prep and products.
You’ll focus on cabinet restoration, furniture refinishing, trim upgrades, and floor maintenance.
Plan workflow, ventilation, and drying.
Key steps:
- Clean/degloss.
- Use adhesion primer.
- Choose durable topcoat for each surface.
Sanding vs No Sanding: Cost, Time, Durability
When you’re deciding whether to sand or skip sanding before painting over stain, weigh the trade-offs between cost, time, and long-term durability.
You’ll see sanding benefits like better adhesion and fewer touch-ups, but it adds labor and materials.
A clear cost comparison shows sanding raises upfront expense yet often reduces future maintenance, while skipping saves time now but may mean more repairs later.
Should You Skip Sanding? Quick Decision Checklist
Wondering whether you can skip sanding? You can, sometimes, but consider surface preparation and sanding alternatives before deciding.
Quick checklist to guide you:
- Inspect finish: glossy or peeling? If glossy, sand or use a deglosser.
- Test adhesion: tape test shows good hold → primer may suffice.
- Durability need: high-traffic → don’t skip sanding; low-use → alternatives may work.
Frequently Asked Questions
Can You Paint Over Stained Outdoor Furniture Without Special Outdoor Primer?
Yes — you can, but you’ll risk reduced outdoor durability and poor stain compatibility. You’ll need thorough cleaning, a bonding primer or deglosser, and weatherproof topcoat to guarantee adhesion and long-lasting protection.
Will Painting Over Stain Hide Wood Grain Completely?
Soft, subtle swirls show through. You won’t completely hide wood grain visibility if stain absorption soaked deeply; painting can diminish and disguise texture, but persistent patterns may peek through unless you block with primer or heavy, opaque coats.
Do Latex Paints Prevent Future Re-Staining From Sunlight?
No, latex paints won’t fully prevent future re-staining from sunlight; they’ll provide some UV protection and improve paint longevity but won’t stop color fading entirely. You’ll need good surface adhesion and periodic refinishing to maintain protection and appearance.
Can I Use Spray Paint Directly Over Stained Wood?
Yes — but only sometimes. If you choose the right spray paint types and do proper wood preparation (cleaning, deglossing, primer), you’ll get adhesion; skip prep and the coating’ll peel or look uneven.
How Long Before Moving Painted Furniture Back Into Use?
You should wait 7–30 days before regular use: furniture curing time exceeds initial touch-dry hours. Though the paint drying process feels quick, full hardness and VOC off-gassing finish over weeks, so be patient with placement.
Conclusion
You can sometimes skip sanding when painting over stain, but don’t assume it’ll always work. Tests show that a high-adhesion primer or deglosser can let paint stick to sealed or lightly stained surfaces, yet oils, heavy polyurethanes, or glossy finishes often need sanding for durability. So before you start, try the adhesion test: tape and peel. If it fails, sand. Follow the simple prep steps here to avoid peeling, blotchy color, or extra fixes later.