How to Paint Animal Print on Walls: Creative Diy Guide
You can transform a room with bold animal-print walls by choosing an accent or full feature, selecting leopard, zebra, or snakeskin, and prepping the surface—clean, patch, sand, and prime—before marking layout and scale. Use washable latex paints, good brushes, and stencils or freehand techniques; layer colors for depth, fix smudges quickly, and seal with a non-yellowing water-based sealer. Follow simple maintenance and scaling tips, and keep going to pick up pro tricks and troubleshooting.
What This Tutorial Covers : Final Look & Quick Plan
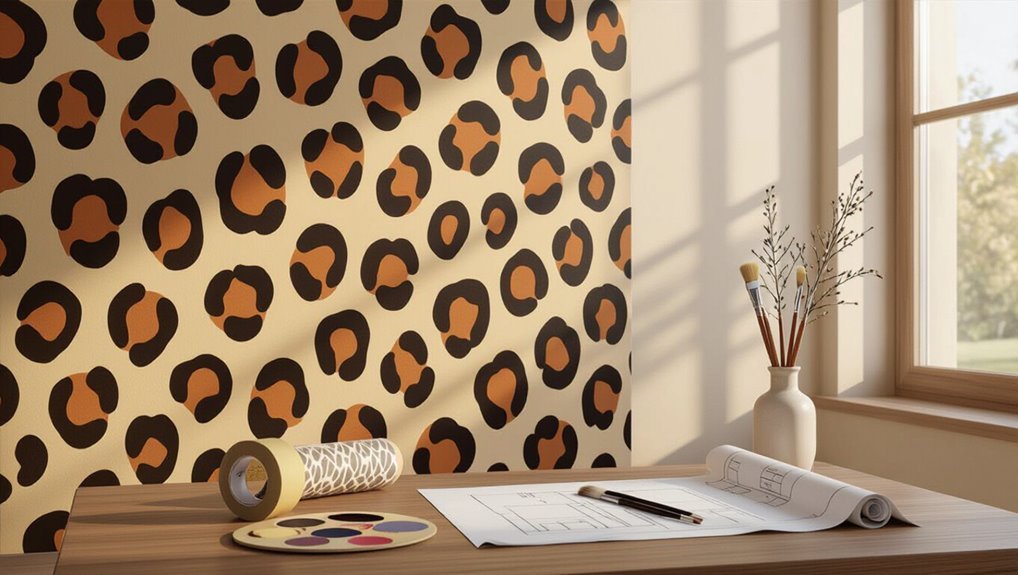
You’ll get a clear picture of the final look and a quick plan to reach it: a bold, professional-looking animal print wall that fits your room’s scale and style.
You’ll learn prep steps, paint and tool choices, stencil or freehand options, timing, and cleanup.
Follow concise instructions so you can confidently execute pattern scale, contrast, and placement for a striking, lasting finish.
Pick the Best Wall: Accent vs Full Feature
You’ll want to decide whether an accent wall or a full-feature wall suits your space and style.
An accent wall gives a bold focal point with less commitment and easier future changes.
Painting the entire room creates drama and continuity but takes more time, paint, and a good sense of balance.
Accent Wall Advantages
When you want bold impact without overwhelming the room, an accent wall gives you that focal point while keeping the rest calm and flexible.
You can add animal print for decorative impact without committing the whole room. It’s easier to update as design trends change, highlights furniture or art, and minimizes painting time.
You’ll get drama with controlled cost and effort.
Full Wall Considerations
If you’re weighing an accent wall against covering an entire room, think about how much visual weight you want the pattern to carry: a single feature keeps the space grounded and flexible, while a full wall (or all four) makes a bold, immersive statement that defines the room’s mood.
Choose based on color psychology, room size, and lighting.
Maintain pattern balance so the design energizes without overwhelming.
Choose an Animal Print Style: Leopard, Zebra, Snakeskin
Picking between leopard, zebra, or snakeskin starts with what mood you want the room to send: leopard feels warm and playful, zebra brings bold high-contrast energy, and snakeskin reads sleek and sophisticated. You’ll use animal print history and design inspiration to pick scale, contrast, and color so the pattern suits scale and lighting.
| Style | Vibe |
|---|---|
| Leopard | Cozy, playful |
| Zebra | Dramatic, modern |
| Snakeskin | Sleek, refined |
Tools & Budget Paints for Animal-Print Walls
You’ll need a handful of essentials—roller and tray, assorted brushes or sponges, painter’s tape, and a few small detail brushes—to get crisp animal patterns.
Pick budget-friendly, washable latex paints and a good primer so colors pop without breaking the bank.
Don’t forget prep and safety: drop cloths, sandpaper, a respirator or mask, and gloves to protect surfaces and yourself.
Essential Tools Needed
Five basic tools will get you started and keep your animal-print wall project smooth: quality brushes (angled and round), a small foam roller for base coats, painter’s tape, a good palette or tray, and drop cloths to protect floors.
You’ll practice brush techniques for crisp spots and strokes, use tape for clean edges, and plan color coordination so your pattern reads bold and balanced.
Budget-Friendly Paints
Choose paints that give good coverage without costing a lot—mid-grade latex or acrylic wall paints usually hit the sweet spot for animal-print walls.
Pick a limited palette to use color psychology for mood control, then layer accent tones for spots or stripes.
Test small samples to match desired paint finishes—matte hides imperfections, satin adds subtle sheen—so you stay stylish on a budget.
Prep And Safety Supplies
Before you start painting, gather the right prep and safety supplies so the job goes smoothly and without accidents. You’ll need safety gear (gloves, mask), basic tools, and cleaning supplies. Lay drop cloths, tape edges, and keep rags and solvent ready.
| Calm | Ready | Safe |
|---|---|---|
| Gloves | Mask | Tape |
| Rags | Solvent | Dropcloths |
Prep Like a Pro : Clean, Prime, and Mark Your Layout
Good prep makes the paint job look intentional and last longer, so start by thoroughly cleaning the wall, filling holes, and sanding any rough spots.
Thorough prep—clean, patch, and sand—makes your paint job look purposeful and last much longer.
Tape trims, apply primer for adhesion, and let it dry fully.
Use a level, chalk line, or light grid for accurate pattern marking.
Protect floors and furniture, and keep tools handy so you can work efficiently and confidently.
Scale Patterns: Size Spots and Stripes for Any Wall
Now that your wall’s prepped and marked, it’s time to scale the pattern to the room so spots and stripes feel balanced, not overwhelming. You’ll choose pattern variations based on room size and color psychology to create rhythm and focal points. Match spot/stripe size to furniture scale and sightlines; test samples before committing.
| Size | Effect |
|---|---|
| Small | Intimate |
| Large | Bold |
| Mixed | Dynamic |
Paint Leopard Spots: A Step-by-Step Natural Look
If you want a natural-looking leopard pattern, start by sketching irregular rosettes with a light pencil or chalk so you can adjust spacing and size without committing.
Block in warm base tones, then use a darker brown to paint open-centered spots.
Vary size and density, soften edges with a dry brush, and finish with subtle highlights.
These animal patterns rely on careful paint techniques.
Paint Zebra Stripes: Tips for Clean, Bold Lines
Start by planning your stripe layout on paper and the wall so you’ll get bold, even bands that flow with the room’s lines; measure and mark a centerline, then use a level and painter’s tape to define each stripe before you paint.
Choose high-contrast zebra color, cut crisp tape edges, paint two thin coats, remove tape carefully, and touch up crisp pattern techniques for a sharp, graphic finish.
Paint Snakeskin: Texture and Subtle Repeat Patterns
Choose a subtle base color and work in small, layered scales so the snakeskin reads as texture rather than a flat repeat; start with irregular scale shapes, vary scale size subtly, and use a dry brush or stipple to suggest raised edges.
You’ll practice snakeskin techniques focusing on alignment and rhythm, then seal with a satin varnish to enhance textured finishes without overwhelming the wall.
Color Mixing for Depth: Palettes, Contrast, and Layers
Start by choosing a base palette that sets the overall mood—warm tans for a classic look or cool grays for a modern edge.
Then layer midtones and darker accents to build contrast and define the pattern.
You’ll control depth by varying opacity and brushwork so each layer reads clearly against the one beneath it.
Base Palette Selection
A solid base palette gives your animal-print wall depth and realism, so mix a few key tones—mid, shadow, and highlight—before you begin.
Consider color psychology and animal symbolism to choose hues that evoke mood and meaning. Test swatches on the wall at different light times.
- Mid-tone anchor
- Cool/warm shadow
- Bright highlight
Layering For Contrast
When you layer colors for contrast, think in planes—mid tones lay the groundwork, shadows push back, and highlights pull elements forward—so mix each layer with intent to preserve clarity between them.
| Layer | Purpose |
|---|---|
| Mid tones | Base definition |
| Shadows/highlights | Depth and lift |
Use layering techniques and contrasting colors deliberately; work thin layers, let edges read clearly, and adjust saturation for depth.
Quick Fixes: Smudges, Uneven Repeats, and Coverage
Mistakes happen—smudges, uneven repeats, and thin coverage are all fixable without redoing the whole wall.
Mistakes happen—smudges, misalignments, and thin spots are fixable without redoing the whole wall.
You can tidy smudge removal with a damp brush, blend thin spots with stippling, and correct repeats by re-aligning your stencil edges. Keep steps simple to maintain pattern consistency.
- Touch-up smudges quickly.
- Re-stipple thin areas.
- Reposition for matched repeats.
Seal & Maintain Your Animal-Print Wall for Longevity
1 essential step after finishing your animal-print wall is sealing it so the colors stay true and the pattern resists wear; choose a clear, non-yellowing polyurethane or water-based acrylic sealer and apply it evenly with a high-density foam roller or wide brush.
Let each coat cure, sand lightly between coats, and follow manufacturer dry times.
Maintenance tips include gentle cleaning and inspecting sealant options annually.
Scale It Down: Framed Panels, Furniture Accents, and Removable Options
If you love the look of animal print but don’t want a full accent wall, scale it down with framed panels, furniture accents, or removable options that give you the same impact without commitment.
You can test patterns, switch styles, and protect walls.
Try these focused approaches:
Try these focused approaches to add animal-print flair without the commitment—small, switchable, and stylish.
- Framed panels for temporary bold art.
- Painted furniture accents for subtle flair.
- Peel-and-stick removable options for easy change.
Frequently Asked Questions
Can I Use Stencils Instead of Freehand for Complex Patterns?
Yes — you can use stencils instead of freehand for complex patterns. You’ll speed up work, guarantee consistent stencil techniques, and control pattern placement precisely; just plan repeats, secure edges, and vary paint pressure for natural variation.
How Do I Protect Floors and Furniture During Painting?
You’ll protect floors and furniture by using drop cloths placement strategically and doing furniture removal where possible; tape edges, cover remaining items with plastic, secure cloths with weights, and keep a clear work path to avoid spills and scuffs.
Are These Paints Safe in Nurseries or Around Pets?
Think of a nursery like Eden — yes, they’re safe if you choose non toxic options and eco friendly paints; you should ventilate, cure fully, and keep pets away during drying, and always check low-VOC label details first.
Can I Remove Animal-Print Paint Later Without Damaging Drywall?
Yes — you can, but it depends on paint types and removal techniques you choose. You’ll want to test, use gentle stripping solutions or sanding, prime after repairs, and expect some touch-ups to avoid drywall damage.
What Matte Vs Satin Finish Works Best for High-Traffic Areas?
Use satin sheen for high-traffic areas because you’ll get better cleaning and resistance; matte durability looks softer but shows scuffs. You’ll prefer satin for upkeep, though durable matte can work in lower-traffic zones.
Conclusion
You’ve got this — take it step by step and don’t rush the layers; slow and steady wins the race. Whether you go bold with a full feature wall or keep it subtle with framed panels, prepping well and building depth with contrast pays off. Fix small smudges right away, seal the surface for easy cleaning, and remember removable options let you experiment without commitment. Enjoy the process and make the space truly yours.