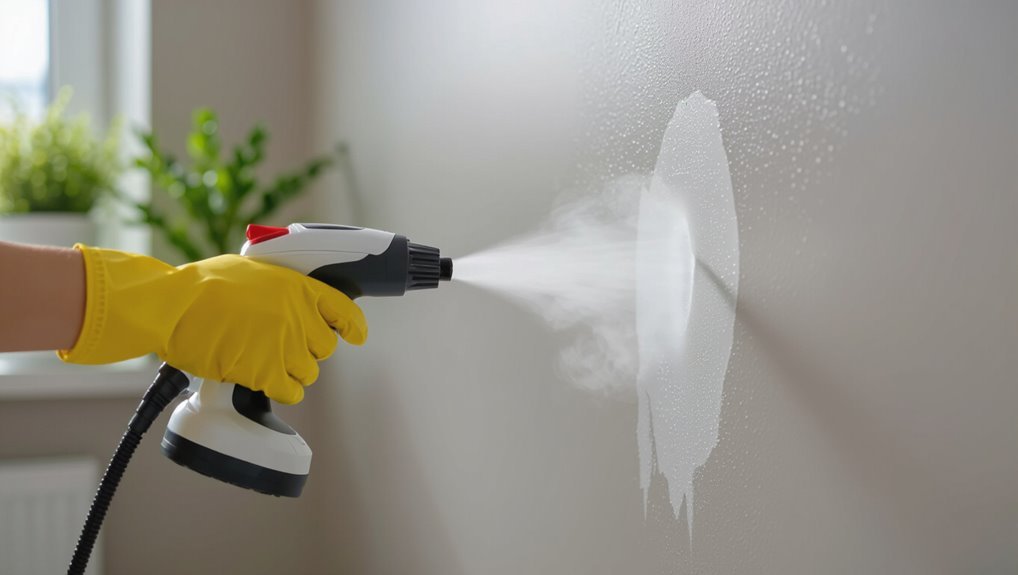
Can You Use a Steam Cleaner on Painted Walls? Risks Explained
You can use a steam cleaner on painted walls, but you’ve got to be careful: brief, low-pressure bursts held several inches away usually lift grime safely, while prolonged or hot steam can soften, bubble, or peel paint—especially older, flat, or poorly cured finishes. Test a hidden spot first, use low settings, keep the nozzle moving, and wait between passes. Follow simple checks and techniques and you’ll see when steam is safe and when it’s not if you keep going.
Can You Safely Steam-Clean Painted Walls? Quick Answer & Checklist
Wondering if you can steam-clean painted walls? You can, sometimes: steam cleaner benefits include sanitizing and lifting grime without chemicals.
For painted wall maintenance, test a hidden spot, use low steam, keep the nozzle moving, and avoid prolonged heat on trim. If paint peels or feels soft, stop immediately and switch to gentle detergent and soft cloths.
When Steam Will Almost Certainly Ruin Paint
If your paint’s already peeling, bubbling, chalky, or feels soft to the touch, steaming will almost certainly make the damage worse—because the heat and moisture break down the cured surface and lift edges, causing larger flakes and exposed substrate.
Don’t steam compromised areas: you’ll accelerate paint damage. High steam temperature and prolonged exposure delaminate coatings, force moisture behind film, and reveal raw drywall or wood.
Which Paint Types Tolerate Steam: Latex, Oil, Enamel?
You’ll find that latex paint generally tolerates brief, low-temperature steam because its water-based film softens less than you might expect.
Oil-based and enamel finishes resist moisture differently—oil can darken or swell under prolonged steam, while hard enamel may handle mild steam but can craze if it’s old or brittle.
Test a hidden spot first so you know how your specific finish reacts before treating a whole wall.
Latex Paint Heat Resistance
Because steam combines heat and moisture, not all paints stand up to it the same way.
You’ll find latex paint durability varies by quality and cure time; lower-gloss or poorly cured latex can soften or peel under steam.
Use gentle steam cleaning techniques, low heat, and minimal dwell time.
Test a hidden patch first and back off if paint darkens, bubbles, or wrinkles.
Oil And Enamel Response
When steam meets oil-based and enamel paints, their higher film hardness and solvent resistance usually let them tolerate short, low-temperature passes better than softer latex.
Though prolonged exposure can still soften finishes or cause gloss loss. You’ll find oil paint durability helps resist brief cleaning, and enamel paint resilience keeps gloss intact.
But test a hidden spot and avoid high heat or extended dwell time.
How Paint Finish (Flat to High Gloss) Changes Steam Risk
With flat paint, you’ll find the porous surface soaks up moisture and can stain or bubble more easily when exposed to steam.
Higher-gloss finishes are smoother and resist moisture, so they tolerate brief, gentle steaming better.
You’ll want to adjust your steam pressure and contact time depending on the finish to avoid damage.
Flat Paint Vulnerability
Although surface sheen might seem like a small detail, it directly affects how steam interacts with painted walls: flat paints absorb moisture and soften more easily, while satin, semi-gloss, and high-gloss finishes resist water and heat and tolerate steam cleaning better.
You should avoid steam on flat surfaces because flat paint sensitivity raises the risk of steam damage, bubbling, and peeling.
Glossy Paint Resilience
If your walls have satin, semi-gloss, or high-gloss paint, they’ll stand up to a steam cleaner far better than flat finishes because the harder, less porous surface resists moisture and heat.
You can usually apply steam cautiously on these finishes without risking the rapid softening, bubbling, or peeling that flat paint often shows.
You should still test a small area to preserve glossy durability and paint longevity.
How Primer Type Affects Steam Tolerance
Because primers form the paint’s first defense, the type you chose determines how well your walls handle steam cleaning. You should pick primers for primer durability and steam resistance; oil-based and shellac primers resist moisture best, while latex is less tolerant. Check manufacturer specs and test a small area before steaming.
| Primer Type | Steam Tolerance |
|---|---|
| Oil-based | High |
| Shellac | High |
| Latex | Moderate |
| Bonding | Variable |
How Paint Age and Curing Time Change Steam Risk
Primers influence how paint handles moisture, but the paint’s age and how long it cured play a big role in steam risk too.
If paint fully cured and aged, its paint durability improves and it’s less susceptible to steam effects.
Fresh or undercured paint remains soft, can blister, lift, or discolor when exposed to steam, so wait the recommended cure time before cleaning.
Signs a Painted Wall Is Safe for Steam Cleaning
Before you fire up the steam cleaner, check that your paint is compatible—latex and high-quality acrylics usually handle steam better than flat or specialty finishes.
Run your hand over the wall to feel for flaking, bubbling, or soft spots that indicate poor adhesion or moisture damage.
If the surface is intact and the paint type is steam-tolerant, you can proceed with cautious, spot-tested cleaning.
Paint Type Compatibility
If your painted wall shows a smooth, even finish without peeling, bubbling, or soft spots, it’s likely safe for steam cleaning; these visible signs indicate a well-adhered paint film that can withstand heat and moisture. Check paint type and recommended steam settings: latex and enamel usually tolerate low heat; avoid high-gloss oils.
| Paint Type | Compatibility |
|---|---|
| Latex | Good (low heat) |
| Enamel | Good (low heat) |
| Oil-based | Caution |
| Milk/Casein | Avoid |
Surface Condition Check
When your wall looks and feels solid, you can proceed with a steam cleaner; check for peeling, bubbling, soft spots, blistering, or flaking paint—any of these mean the finish won’t hold up to heat and moisture.
You should perform a careful paint assessment and basic surface preparation: test a small inconspicuous area, press for softness, and confirm adhesion before full steaming to avoid damage.
How Moisture and Heat Cause Paint Bubbling and Peeling
Because steam adds both heat and moisture, it can soften paint binders and force trapped water out of the substrate, causing bubbles to form and lose adhesion to the wall.
You’ll see moisture effects where paint blisters, then cracks. Continued exposure causes heat damage that accelerates breakdown, letting sections peel away.
Avoid prolonged steaming and test a small, inconspicuous area first.
How Steam Affects Underlying Drywall and Plaster
Beyond paint itself, steam doesn’t stop at the surface — it penetrates into drywall and plaster, where moisture and heat can weaken fibers and bonding compounds.
You’ll see softening, delamination, and crumbling at seams as steam penetration undermines adhesives and joint compound.
Check for sagging or powdery texture; addressing reduced wall integrity quickly prevents costly repairs and hidden structural damage.
How Mold and Mildew React on Painted Walls With Steam
Steam can seem like a quick mold fixer, but it often just loosens surface growth and drives spores deeper into porous paint and wall materials; you’ll remove some visible mildew, yet heat and moisture can reactivate dormant spores and encourage regrowth if you don’t follow up with proper drying and antimicrobial treatment.
| Effect | Short-term | Long-term |
|---|---|---|
| Visible removal | Yes | No guarantee |
| Spore movement | Surface | Deeper |
| Prevention tip | Dry promptly | Use mold prevention and targeted mildew removal products |
How to Test a Small Area Before Steaming Painted Walls
Before you run a full session, pick a small, inconspicuous patch—about 6×6 inches—near a corner or behind furniture and test there first.
Use low steam cleaner settings and a gentle pass, then wait for full drying to inspect paint. This painted wall testing confirms adhesion, finish change, or swelling before proceeding.
- faded spot
- softening edge
- tiny blister
Recommended Steam-Cleaner Settings for Painted Surfaces
When you steam painted walls, keep the surface temperature low to avoid softening the paint.
Use moderate steam pressure rather than the highest setting to prevent blistering, and limit each pass to short bursts so you don’t over-saturate the finish.
I’ll outline specific temperature ranges, pressure recommendations, and safe time limits next.
Surface Temperature Control
Although painted walls can tolerate some heat, you should keep the steam temperature and exposure time low to avoid softening paint or causing blistering.
When steam cleaning, monitor surface temperature with a noncontact thermometer and move quickly to prevent dwell.
Visualize risks and safe practice:
- Brief passes across paint, like a gentle breeze
- Cooler nozzle settings, avoiding trapped heat
- Immediate drying with a cloth
Steam Pressure Levels
Keeping surface temperature low goes hand in hand with controlling steam pressure, since higher pressure raises heat transfer and the risk of paint damage. You should use low to medium steam pressure to protect wall durability and avoid blistering. Recommended quick reference:
| Pressure Setting | Use Case | Effect |
|---|---|---|
| Low | Light grime | Minimal risk |
| Medium | Moderate stains | Balanced cleaning |
Cleaning Duration Limits
If you run the steam cleaner over the same painted area for more than a few seconds at a time, you risk softening the paint and lifting it from the wall; limit contact to short passes—typically 3–5 seconds per spot—and wait at least 30–60 seconds before re-treating the same area.
You should monitor cleaning duration to aid paint preservation and avoid saturation.
- Damp patch blooming
- Paint edge curling
- Faint gloss changes
Nozzles and Attachments That Reduce Paint Risk
When you pick the right nozzle and attachment, you can control steam intensity and distance to protect paint while still getting walls clean. Choose between focused jet, fan, and brush heads—know steam nozzle types and cleaning attachment benefits to limit heat and abrasion. Test first on an inconspicuous spot and use soft pads for painted finishes.
| Nozzle | Use |
|---|---|
| Jet | Spot cleaning |
| Fan | Broad coverage |
| Brush | Gentle scrubbing |
| Pad | Finish protection |
How Far to Hold the Steam Nozzle From Painted Walls
Aim to hold the steam nozzle about 6–12 inches from painted walls, adjusting distance based on paint type and steam setting to avoid softening or lifting the finish.
You’ll monitor steam nozzle distance and steam pressure effects, keeping higher settings farther away and testing discreet spots first.
- gentle misting like a distant shower
- narrow jet aimed too close
- soft plume skimming the surface
How Long to Hold Steam on a Painted Surface
Because paint softens with heat, you should keep the steam moving and limit contact to brief bursts—generally 5–10 seconds per spot—then pause and let the surface cool before rechecking.
Longer exposure increases the risk of blistering or lifting, especially on latex and older oil-based finishes.
Monitor steam duration closely, test an inconspicuous area first, and adjust for surface sensitivity to avoid damage.
How to Move the Nozzle to Avoid Concentrated Heat
Don’t keep the nozzle in one spot; you should keep it moving to prevent concentrated heat.
Use broad, sweeping strokes that overlap slightly so no area gets hit too long. Move at a steady pace and watch the paint for any signs of softening.
Keep Nozzle Moving
Move the nozzle continuously in slow, overlapping strokes so heat never lingers on one spot long enough to soften paint.
You keep the steam nozzle moving with steady steam movement, scanning small areas, never pausing. Aim for even coverage and consistent distance to protect finish.
- Gliding along trim like a paintbrush
- Sweeping over scuffs without stopping
- Circling stains with gentle motion
Use Broad, Sweeping Strokes
Keeping the nozzle in motion sets you up to use broad, sweeping strokes that spread heat over a larger area and prevent any single spot from getting too hot.
Move steadily, overlap passes slightly, and keep the nozzle several inches from the surface.
These steam cleaning techniques protect finish and help you assess wall paint compatibility, reducing blistering, softening, or uneven sheen.
Safer Steam Techniques for Stubborn Stains on Paint
When tackling stubborn stains on painted walls, start by testing steam at the lowest setting on an inconspicuous spot so you can gauge how the paint reacts; increase heat or pressure only if the test shows no damage.
You should move slowly, use a microfiber pad, and favor stain prevention habits or steam alternatives when risks appear.
- damp microfiber gliding
- gentle circular motion
- blotting with mild detergent
Cleaning Grease and Kitchen Splatters Without Damaging Paint
When you’re tackling grease and kitchen splatters, start with gentle steam at a safe distance and short pulses to avoid softening the paint.
If steam alone won’t lift the grime, switch to paint-friendly alternatives like diluted dish soap or a vinegar solution applied with a soft cloth.
Test any method in an inconspicuous spot first so you don’t risk visible damage.
Safe Steam Cleaning Steps
Start by testing a small, inconspicuous area of the painted wall with your steam cleaner on the lowest setting and a soft cloth attachment to make sure the finish won’t soften, blister, or discolor.
If the paint holds up, work in short bursts, keeping the nozzle a few inches away and moving steadily to lift grease and splatters without saturating the surface.
Follow steam cleaning precautions and check wall paint compatibility.
- Warm steam loosens sticky splatter.
- Soft cloth catches residue.
- Steady motion prevents streaks.
Paint-Friendly Cleaning Alternatives
If steam didn’t suit your paint or you’d rather avoid heat, there are safer ways to remove kitchen grease and splatters without harming the finish.
Use mild dish soap with warm water and a soft microfiber cloth for quick spots.
Try eco-friendly solutions like vinegar diluted with water for tougher grime.
These alternative methods lift grease gently without stripping paint or leaving residue.
Household Cleaners Safe to Use With Steam on Painted Walls
Although steam does much of the cleaning, pairing it with the right mild cleaners can improve results without harming paint.
So you should choose products formulated for painted surfaces and avoid harsh chemicals like bleach, oven cleaners, or strong degreasers.
With household steamers, pick safe solutions: gentle dish soap mix, diluted vinegar spot cleaner, or pH-neutral cleaner labeled for paint.
How to Remove Crayon, Marker, and Scuffs With Minimal Risk
1. You can tackle crayon removal, marker cleaning, and scuff treatment safely by testing a hidden spot, using a soft cloth, gentle cleaner, or mild eraser sponge, and avoiding excessive steam or scrubbing.
Work from edges inward, blot rather than rub, and dry promptly to aid stain prevention.
Repeat cautiously until marks lift without damaging paint.
Which Painted Surfaces Tolerate Steam: Trim, Doors, Cabinets?
When you use a steam cleaner on painted surfaces, you’ll want to contemplate trim and molding, interior doors, and painted cabinets separately.
Hard, glossy trims and doors usually tolerate low-moisture steam better than flat or matte finishes.
Painted cabinets can be sensitive at edges and seams, so test a hidden spot first and keep steam light.
Trim And Molding
If you plan to use a steam cleaner on trim, doors, or cabinets, check the paint type and condition first because some finishes handle heat and moisture far better than others.
For trim maintenance and molding care, work gently, test a hidden spot, and dry quickly to avoid swelling or paint lift.
- Painted baseboard with glossy finish
- Decorative crown molding seams
- Thin primer-only trim edges
Interior Doors
Although interior doors often look sturdy, they react differently to steam depending on their paint and construction—solid-core doors with high-gloss enamel tolerate short, low-moisture passes better than hollow-core doors or those with thin primer-only coats.
You should test a discreet spot, adjust steam output, and follow door maintenance routines.
Consider finish type and interior door styles before cleaning to avoid warping or finish damage.
Painted Cabinets
Doors gave you a sense of how different substrates and finishes handle moisture; cabinets will show similar but often more sensitive behavior.
You should test discreet spots first, since paint colors and cabinet finishes react differently. Use low-steam, keep sessions short, and dry immediately to prevent swelling or discoloration.
- Glossy white door edge with beaded water
- Matte oak grain darkening
- Painted shaker corner lifting
Why Freshly Painted Walls Are More Vulnerable to Steam
Because the paint hasn’t fully cured, freshly painted walls absorb heat and moisture from steam more readily, which can soften the finish and leave marks.
You’ll notice fresh paint vulnerability increases with solvent evaporation and low cure time.
Consider steam impact factors like temperature, exposure duration, and nozzle distance; they determine how much the film weakens, so avoid steaming until paint fully cures.
Common Paint Failures After Steam Cleaning and How to Spot Them
When steam hits painted walls, you’ll see a few predictable failures: bubbling or blistering where moisture lifts the paint, soft or tacky areas that collect fingerprints, and flaking or peeling where the film loses adhesion.
When steam strikes painted walls, expect bubbling, tacky spots, and peeling as moisture undermines adhesion and durability.
You should assess steam impact against paint adhesion and paint durability, noting poor surface preparation as a risk factor.
- Bubble patterns along seams
- Sticky, dull patches
- Paint sheets curling away
How to Dry Painted Walls Fast After Steam Cleaning
After you’ve spotted any bubbling, tacky spots, or peeling, you’ll want to dry the painted surface quickly to prevent further damage and to assess what repairs are needed.
Use targeted drying techniques: blot excess moisture with lint-free towels, open windows for airflow, and position a wall fan several feet away on low to circulate air without blasting the paint.
Check frequently until fully dry.
Protective Measures for Baseboards, Trim, and Flooring
1 simple step protects your trim and floors: create barriers before you bring the steam cleaner to the walls.
You’ll want baseboard protection and trim safeguarding to prevent warping or finish damage. Use waterproof shields and absorbent barriers along the floor edge, and keep a towel handy to blot moisture.
- Plastic sheeting tucked under trim
- Thick towels against baseboards
- Painter’s tape securing edges
When to Avoid Steam Near Electrical Outlets and Fixtures
Keep steam well away from electrical outlets and fixtures to prevent moisture from seeping into wiring.
Before you clean near any switches or sockets, turn off the power at the breaker and confirm circuits are dead.
For areas right around fixtures, use dry cleaning methods instead of steam.
Keep Steam Away From Outlets
If you’re using a steam cleaner, don’t aim steam directly at electrical outlets, switches, or light fixtures—moisture can short circuits, damage wiring, and create a shock or fire hazard.
You need steam outlet safety and electrical hazard awareness to prevent accidents; keep distance and use barriers.
- Steam curling toward a socket
- Damp switch plate edges
- Moisture seeping behind a fixture
Turn Off Power First
Before you bring steam anywhere near outlets or fixtures, shut off the circuit at the breaker—doing so removes the risk of shocks, shorts, or hidden damage if moisture sneaks in.
You should confirm power sources are dead with a tester, post a warning so others don’t switch them back on, and follow basic safety precautions to prevent electrical incidents while you clean nearby painted walls.
Use Dry Methods Near Fixtures
Because steam can force moisture into gaps and behind faceplates, you should avoid using it near outlets, switches, and light fixtures and stick to dry methods in those areas.
Use dry cleaning like microfiber cloths and vacuums to maintain fixture safety.
Visualize risks:
- Steam seeping behind a faceplate
- Condensation around a switch
- Damp near a ceiling fixture
How to Repair Paint Damage Caused by Steam
Start by evaluating the damage: check for blistering, peeling, bubbling, or discoloration so you know whether the problem is surface-level or deeper.
If minor, sand loose paint, clean, prime, and touch up with matching paint.
For larger issues, remove all compromised material, apply appropriate primer, and repaint.
Use proper paint repair techniques and follow damage prevention steps to avoid recurrence.
When Repainting Is a Better Option Than Steam Cleaning
If paint is peeling or flaking, steam cleaning won’t fix the underlying adhesion problems and you’ll need to strip and repaint.
Likewise, deep stains, water damage, or gouges that go through the finish are usually best repaired by sanding, priming, and repainting.
We’ll cover how to assess the damage and the basic steps for a proper repaint job.
Peeling Or Flaking Paint
When paint is visibly peeling or flaking, don’t try to mask the problem with steam—steam cleaning can loosen more paint and make the surface worse.
You’ll want to address paint deterioration directly; steam effects accelerate lifting and create uneven patches. Repaint after proper scraping and priming instead of steaming.
- Curling edges revealing substrate
- Powdery, crumbly flakes under touch
- Irregular glossy and dull patches
Deep Stains Or Damage
Although steam can lift surface dirt, it won’t reliably remove deep stains, set-in discoloration, or structural damage, so you’ll often be better off repainting instead of steaming.
If stains penetrate primer or drywall, steam won’t achieve effective stain removal and may worsen paint deterioration.
Repainting after proper prep seals damage, hides discoloration, and prevents recurring problems better than repeated steaming attempts.
Safer Non-Steam Alternatives for Painted Walls
Because steam can soften paint and raise the risk of damage, you’ll often want gentler, non-steam options for cleaning painted walls.
You can use mild soap with soft cloths, wall-safe cleaners, or spot-treaters for stubborn marks. These alternative cleaning choices protect finishes and avoid moisture problems.
- Soft microfiber and diluted dish soap
- Gentle wall cleaner and sponge
- Magic eraser for scuffs
How to Choose a Steam Cleaner for Multi-Surface Homes
When choosing a steam cleaner for a home with mixed surfaces, consider power and steam output so you can adjust heat and pressure without damaging painted walls.
Look for multiple brushes and nozzles to match delicate trim, grout, and hard floors.
Also check portability and tank size for easy maneuvering and long cleaning sessions without constant refills.
Power And Steam Output
Choosing the right steam cleaner for a home with painted walls means matching power and steam output to both surface type and paint durability; too much heat or continuous high-pressure steam can strip or discolor delicate finishes, while too little won’t remove grime effectively.
You’ll balance steam pressure and temperature settings to protect paint while cleaning efficiently.
- Gentle mist on matte paint
- Short bursts on semi-gloss
- Cool-down intervals between passes
Brush And Nozzle Options
Pick brushes and nozzles that match the surfaces you’ll clean, since the wrong attachment can scratch trim, miss grout, or leave streaks on painted walls.
You’ll want varied brush types—soft nylon for paint, stiff for grout—and multiple nozzle sizes to control steam concentration.
Match attachments to tasks, test on hidden spots, and swap heads as surface and dirt level change for safe, effective cleaning.
Portability And Tank Size
For multi-surface homes, aim for a steam cleaner that balances weight and runtime so you can move from baseboards to tile without fatigue or constant refilling.
You’ll consider portability factors like handle comfort, caster wheels, and cord length alongside tank capacity to match room sizes. Choose a midweight unit with a larger tank for longer sessions without sacrificing maneuverability.
- Shoulder strap and compact body
- Quick-fill wide-mouth tank
- Smooth swivel wheels
Which Pros Safely Use Steam on Painted Surfaces?
When pros use steam on painted walls, they match the method to the paint type and condition to avoid damage.
You’ll hire painters, restoration techs, or professional cleaners who know steam cleaning benefits and painted wall care limits. They test small areas, adjust temperature and distance, use appropriate nozzles, and follow drying protocols so you get grime removal without blistering, peeling, or finish loss.
Cost-Benefit: Steam-Clean Painted Walls vs Alternatives
Although steam cleaning can cut through grease and sanitize without chemicals, you should weigh its costs and risks against alternatives like gentle hand-washing, solvent-based cleaners, or hiring specialists.
Steam cleans well, but weigh equipment cost, paint risk, and results versus hand-washing or pros.
Do a cost analysis that balances equipment expense, potential paint damage, and cleaning efficacy. Visualize trade-offs:
- You with a handheld steamer spotting paint loss
- A bucket, sponge, elbow grease
- A pro team and guaranteed finish
Common Myths About Steam-Cleaning Painted Walls
Curious whether steam cleaning will ruin your paint or magically make every stain vanish? You’ll hear common misconceptions: that steam always strips finish, kills paint adhesion, or sanitizes perfectly.
In reality, results vary by paint type, temperature, and technique. You shouldn’t assume steam cleaning is risk-free or universally effective; test a hidden area and follow manufacturer guidelines before treating whole walls.
How Climate and Home Humidity Change Steam Risks
You’ve seen that paint type and technique matter, but local climate and indoor humidity also change how steam interacts with painted walls.
You’ll notice climate effects: cooler, damp regions trap moisture; hot, dry zones speed evaporation, altering risks. Monitor humidity levels to prevent peeling or mold.
Climate matters: cool, damp areas hold moisture while hot, dry ones evaporate it—monitor humidity to avoid peeling and mold.
- Fogged windows and musty corners
- Dripping sills after steaming
- Paint softening near exterior walls
How to Protect Painted Walls During Whole-House Steaming
When you plan a whole-house steam cleaning, protect painted walls by lowering indoor humidity beforehand, masking vulnerable surfaces, and controlling steam exposure so paint doesn’t soften or trap moisture.
You should keep steam pressure low, test a hidden spot, use short bursts at a distance, shield trim and outlets, ventilate rooms, and monitor drying.
These steps guarantee paint protection and steam safety.
Pre-Steam Checklist for Painted Surfaces
Before you fire up the steamer, run through a quick pre-steam checklist to make sure painted surfaces stay intact and dry.
Check paint durability and steam compatibility first, then prep the room and test a hidden patch.
- Inspect finish for peeling, gloss, or soft spots
- Test steam on an inconspicuous area for 10–15 seconds
- Protect trim, outlets, and flooring
How to Document Damage and Warranty Considerations After Steaming
If paint or substrate problems appear after steaming, document them immediately with time-stamped photos, clear notes on location and conditions, and samples if possible; this creates a factual record you can use with contractors or your paint warranty provider.
Keep organized damage documentation, log cleaning settings and operator actions, and contact your paint manufacturer or installer promptly to clarify warranty implications before repairs, preserving claim eligibility.
How to Maintain Painted Walls After Steam Cleaning
Although steam cleaning removes grime quickly, you’ll need a simple maintenance routine to keep painted walls looking their best and to prevent moisture-related issues.
Steam-cleaning brightens walls fast, but follow up with drying, touch-ups, and humidity control to prevent damage.
After drying, inspect for soft spots, touch up scuffs, and keep humidity low to avoid peeling. Regular paint care and wall maintenance stops long-term damage.
- Wipe with a microfiber cloth
- Spot-prime and repaint small areas
- Run a dehumidifier when needed
Real Examples: Steam Cleaning Wins and Failures on Paint
When you’re deciding whether to steam-clean painted walls, seeing real examples helps you pick the right approach: some homeowners restored dingy, washable paint with no issues, while others watched water soften latex finishes or lift old, poorly adhered layers.
You’ll read steam cleaning experiences that praise gentle steam on semi-gloss and paint damage stories warning against high heat, abrasive pads, or saturated passes.
Final Decision Checklist: Should You Steam-Clean This Painted Wall?
Ready to decide whether to steam-clean that painted wall? Use this quick checklist to judge risk: surface type, paint age, and ventilation.
Test a hidden patch first, apply gentle steam cleaning techniques, and evaluate finish. Prioritize paint protection: if paint softens, stop. If passes, proceed slowly with low pressure and keep a microfiber cloth handy.
- dull, oil-based trim
- chalky exterior siding
- glossy interior paneling
Frequently Asked Questions
Can Steam Cleaners Remove Lead-Based Paint Safely?
No — you shouldn’t use a steam cleaner on lead paint; you’ll risk releasing toxic dust and fumes. Use strict safety precautions: hire certified abatement professionals, seal the area, use HEPA containment, and avoid disturbing the paint yourself.
Will Steam Affect Paint-Covered Wallpaper or Vinyl Wallcoverings?
About 65% of wallpapers loosen with heat, so you shouldn’t steam painted wallpaper or vinyl wallcoverings; you’ll damage adhesive, compromise wall protection and reduce paint durability, so test a hidden spot and use low heat cautiously.
Can Steam Cleaning Cause Discoloration or Gloss Changes Over Time?
Yes — prolonged steam exposure can dull or discolor finishes: you’ll affect paint durability when high steam temperature softens binders, causing gloss loss or color shifts over time; test, use low temperature, brief passes, and ventilate.
Is It Safe to Steam Clean Painted Exterior Walls or Siding?
Like a pressure washer that stripped my neighbor’s deck stain, you shouldn’t casually steam exterior paint or delicate siding materials. You’ll risk softening paint, lifting finishes, or warping siding, so test a small area first.
How Does Steam Interact With Paint Sealers or Clear Coats?
Steam can soften and lift sealers or clear coats if you apply high heat or prolonged exposure; you’ll reduce paint durability as steam penetration breaks bonds, so use low heat, short passes, and test a discreet spot first.
Conclusion
You can sometimes steam-clean painted walls, but proceed cautiously. Studies show steam cleaning can lift paint: one industry test found up to 30% failure on low-quality latex after steaming. If your paint’s high-quality, fully cured, and glossy, you’ll likely be fine; if it’s flat, old, or improperly primed, don’t risk it. Always test a hidden spot, use low heat and distance, and document any damage for warranty or repair claims before proceeding.