Can You Use Acrylic Paint in Resin Molds? Tips for a Flawless Finish
Yes — you can use acrylic paint in resin molds for color accents, marbling, and small pours, but use it sparingly to avoid thinning, cloudiness, or cure issues. Measure resin and hardener accurately, keep paint under about 1–3% by weight for reliable cures, stir gently to limit bubbles, and test small samples first. Use fluid, high-pigment acrylics and seal delicate layers; follow safety gear and workspace practices, and keep going to learn specific techniques and fixes.
Can You Use Acrylic Paint in Resin Molds? Quick Answer
Yes — you can use acrylic paint in resin molds for simple color accents and small projects, but it’s not always the best choice for full pours or ultra-clear finishes.
Use it when you want quick tinting, marbling, or surface details, and make sure the paint is well-mixed and used sparingly.
Avoid it if you need perfect clarity, long-term adhesion, or when the paint isn’t fully compatible with your resin.
Short direct answer for hobbyists and crafters
If you mix a small amount of acrylic paint into fully cured resin or add it sparingly to the resin before pouring, you can use it for color and effects—but don’t add too much or it can thin the resin, cause curing problems, or create cloudy, sticky spots.
For hobbyists: test ratios, use fluid acrylics or inks, stir gently, and cure a small sample first.
When it’s a good idea and when to avoid it
Those quick tests you ran will tell you a lot about whether acrylics will work for a specific project.
You’ll choose acrylics when color swirls, sealed surfaces, or quick cures are fine; avoid them for deep pours or glossy clarity needs.
- Small embeds
- Surface details
- Tinted top coats
- Thick layers
- Optical clarity pieces
Basic Understanding What Are Acrylic Paint and Resin?
You’ll learn that acrylic paint is a water-based pigment suspended in a polymer emulsion, prized for fast drying and flexibility.
Resin—whether epoxy or polyurethane—is a reactive, solvent-free polymer system that cures from liquid to solid and varies in hardness, pot life, and yellowing resistance.
Understanding each material’s chemistry and how acrylic’s waterborne binders and pigments interact physically (wetting, adhesion) and chemically (compatibility, inhibition) with resin will help you avoid issues like lifting, cloudiness, or soft spots.
What is acrylic paint? composition and properties
Acrylic paint is a fast-drying, water-based medium made of pigment suspended in an acrylic polymer emulsion, and it behaves differently from traditional oils and watercolors.
You’ll find it offers strong adhesion, flexibility when dry, lightfast pigments, and variable viscosity. You can thin it with water or mediums, tint easily, and expect durable, non-yellowing color that bonds well to many surfaces when applied correctly.
What is epoxy/polyurethane resin? types and curing basics
When you mix two-part epoxy or pour single-component polyurethane, you’re working with thermosetting resins that harden through chemical reactions rather than evaporation.
You’ll find epoxy offers strong adhesion, clarity, and longer working time; polyurethane cures faster, resists abrasion, and can be softer or more rigid depending on formulation.
Both require correct ratios, thorough mixing, and proper temperature for reliable curing.
How acrylic paint and resin interact chemically and physically
Having covered resin types and curing basics, let’s look at how acrylic paint and resin behave together at both chemical and physical levels.
You’ll find acrylics are water-based polymers that largely sit within or on cured resin rather than chemically bonding.
Solvents and additives can interfere with curing; pigments disperse physically, affecting translucency and UV stability.
Test blends to guarantee adhesion and finish.
Pros and Cons of Using Acrylic Paint in Resin
You’ll find acrylic paint gives you huge color variety and it’s easy to use for quick tinting. However, you need to watch for compatibility issues and possible curing interference that can ruin a pour. Below is a quick comparison to help you see when acrylics outperform other colorants and when they don’t:
| Situation | Benefit | Caution |
|---|---|---|
| Color variety | Wide palette and mixes easily | Pigment load can affect cure |
| Ease of use | Readily available and user-friendly | Thick paint may need thinning |
| When best | Small projects, surface pours | Deep casts or delicate cures need testing |
| When avoid | Fast prototypes, opaque accents | Large-volume pours or sensitive resins |
Advantages (color variety, ease of use)
Color is one of the biggest advantages acrylic paint brings to resin projects: it gives you a huge palette of hues and finishes, from matte to metallic, that you can mix and layer easily.
You’ll find acrylics user-friendly, fast-drying, and water-soluble for simple cleanup. They let you tint resin precisely, create effects with washes or opaque layers, and control color without complex prep.
Disadvantages (compatibility issues, curing interference)
Although acrylics seem convenient, they can cause compatibility problems with some resin systems that lead to uneven curing or surface defects.
You might see tacky spots, bubbling, or whitening when pigments react with hardeners. Acrylics can also alter cure time and strength if overused.
Test small batches, use thin layers, and choose resin-compatible acrylics to avoid failed pours and weak pieces.
When acrylic paint outperforms other colorants
When you need precise control over tint and opacity, acrylic paint often outperforms powdered pigments or alcohol inks because it lets you dial in subtle shades and block out layers without adding much volume to the resin.
You can layer, mask, and correct easily, achieve matte or satin effects, and use inexpensive student or artist paints for small runs, though testing for curing compatibility remains essential.
How to Use Acrylic Paint in Resin Step-by-Step Guide
Now you’ll learn the practical steps for mixing and using acrylic paint with resin so your pieces come out the way you want.
Follow these essentials before you start:
- Materials and tools checklist
- Workspace prep and safety precautions
- Resin preparation and correct mixing ratios
- How much acrylic to add, thinning tips, and mixing technique
- Pouring methods for transparent casts, opaque fills, and marbling
Keep each step organized and work steadily to avoid mistakes.
Materials and tools checklist
You’ll need a compact set of reliable materials and tools to get consistent results:
- Resin kit (epoxy or UV) and accurate measuring cups
- Acrylic paints (high-pigment, fluid or thinned)
- Silicone molds and mixing sticks
- Disposable gloves, stirrer sticks, and toothpicks
- Small heat gun or torch for bubbles and a digital scale for precision
Preparing the workspace and safety precautions
Before pouring a single drop of resin, set up a clean, well-ventilated work area with a stable, level surface and everything you need within arm’s reach. Wear gloves, goggles, and a respirator; keep pets and kids away. Organize tools, tape off edges, and have cleanup supplies ready.
- Nitrile gloves
- Eye protection
- Respirator mask
- Disposable mixing cups
- Paper towels
Preparing resin and mixing ratios
1. Measure resin and hardener precisely per manufacturer instructions; small errors ruin curing.
Work at recommended temperature to avoid viscosity issues. Stir slowly for the full time, scraping sides and bottom, to prevent unmixed pockets.
Pour test batches if you’re unsure. Use graduated cups and a timer, and note ratios on your workspace so you repeat successful results consistently.
Mixing acrylic paint into resin amounts, thinning, and technique
Start by deciding how much color you need: mix acrylic paint into resin at about 1–3% by weight (roughly a pea- to dime-sized amount per ounce/ml of resin) to keep the cure reliable and the finish clear; heavier loads can thicken the mix, extend cure times, and risk cloudiness or tackiness.
- Measure by weight for consistency
- Thin with water sparingly
- Use fluid acrylics when possible
- Stir gently to avoid bubbles
- Test small batches first
Pouring methods for different effects (transparent casts, opaque fills, marbling)
Now that you’ve got a reliable pigment ratio and mixing routine, you can focus on how you pour to achieve different looks.
Choose thin, translucent pours for depth or thick opaque fills for solid color. Try controlled splashes for marbling, and use separate cups for swirls.
Tips:
- Slow pour for clear layers
- Thick pour for opacity
- Ring pour for marbling
- Spoon drops for veins
- Tilt to blend edges
Layering and embedding painted elements
When you want to build depth or capture fine details, plan each resin pour and painted layer so they cure in the right order and won’t lift or bleed. Measure, mix, and pour with intention so embedded paint sits exactly where you want it.
Use thin acrylic washes or cured acrylic pieces, seal delicate paint with a clear medium, and allow partial cures between layers to prevent movement.
Demolding and post-cure finishing
After your final pour has fully cured, carefully release the piece from the mold—use gentle flexing, a soft silicone-tipped tool, or compressed air along seam lines to avoid gouging the resin or painted surfaces.
Inspect for flash, trim with a razor or fine sandpaper, wet-sand progressively, and polish or buff.
If needed, apply a thin clear resin coat to seal and revive painted details.
Alternatives and Comparisons to Acrylic Paint
You’ll want to weigh other colorants against acrylics to pick the best look and performance for your resin project. Below is a quick comparison to help you contrast resin pigments, alcohol inks, oil-based paints, and mica powders. Use these points to decide which material fits your cure time, opacity, and finish needs.
| Option | Quick Notes |
|---|---|
| Resin pigments (powder/liquid) | High color strength, formulated for resin, minimal reaction issues |
| Alcohol inks | Vibrant, translucent, can spread unpredictably in resin |
| Oil-based paints | Slow drying, may inhibit cure if not fully compatible |
| Mica powders | Shimmery, inert, great for pearlescent effects |
Resin pigments (powders, liquid dyes) vs acrylic paints
Although acrylic paints can tint resin in a pinch, resin-specific pigments—powdered mica, interference powders, and concentrated liquid dyes—give you much more predictable color saturation, transparency, and chemical compatibility;
you’ll find powders and dyes cure clear without clouding or inhibiting hardening, while many acrylics can introduce bubbles, cure delays, or tackiness if not used sparingly or sealed first.
Use pigments for consistency and depth.
Alcohol inks vs acrylics
When you need vivid, fast-moving color with translucent layers, alcohol inks and acrylics behave very differently: alcohol inks soak, flow, and create bright transparent effects ideal for marbling or stained looks.
On the other hand, acrylics give opaque, controllable coverage and texture.
You’ll choose inks for luminous depth and blending, while acrylics are preferred for solid color, masking, or mixing with pigments to maintain consistency in resin pours.
Oil-based paints and mica powders comparison
If you want deep, buttery blends and long working time, oil-based paints and mica powders offer two distinct alternatives to acrylics for resin work: oils give rich, slow-drying color that stays workable for blending and glazing, while mica powders provide instant, light-catching shimmer with no added medium.
You’ll favor oils for depth and blending, mica for sparkle, opacity control, and minimal prep.
Common Problems and How to Fix Them
You’ll run into a few common problems—tacky or undercured resin, cloudiness or bubbles, and paint separation, bleeding, or fading—but most have straightforward fixes.
We’ll cover causes and remedies for each issue and give you a quick troubleshooting checklist to follow before you decide to scrap a piece.
Issue: Incomplete curing or tacky surface causes and fixes
Because resin needs the right mix of temperature, ratios, and additives to fully polymerize, an incomplete cure or tacky surface usually points to a few specific causes you can troubleshoot.
- Wrong resin/hardener ratio — remeasure and remix.
- Low temperature — warm your workspace.
- Insufficient cure time — wait longer before demolding.
- Contaminants (oil, dust) — clean molds and tools.
- Additive overload (too much paint) — reduce pigments or use compatible dyes.
Issue: Cloudiness or bubbles prevention and remediation
Once you’ve ruled out curing issues, the next common setbacks are cloudiness and trapped bubbles, which both spoil clarity and detail.
You can prevent and fix them by:
- Degassing resin or using low-viscosity mixes
- Warming materials to reduce bubbles
- Pouring slowly in thin layers
- Using a heat gun or torch briefly
- Skimming or vacuum-treating problem spots
Issue: Paint separation, bleeding, or color fading solutions
While acrylics often behave well in resin, they can still separate, bleed, or fade if you don’t control how they’re mixed and applied; preventing this starts with choosing compatible paints and stabilizing techniques.
Seal pigments with a clear acrylic medium or alcohol ink reducer, mix thoroughly but avoid over-thinning, cure in thin layers, and test colorfastness under UV to prevent fading.
Troubleshooting checklist before discarding a piece
If your piece looks off and you’re ready to toss it, pause and run through a quick troubleshooting checklist—most issues have fixable causes.
- Check cure: tacky? undercured resin needs more time or warmth.
- Inspect bubbles: pop with heat or toothpick, then rebuff.
- Look for fog: sanding and polishing can restore clarity.
- Test adhesion: primer or thinner paint layer may help.
- Color shift: UV coat or pigment correction.
Best Practices and Pro Tips for a Flawless Finish
To get a flawless finish, you’ll want to use acrylics that are known to play well with resin and thin them correctly with compatible additives for smooth mixing.
Watch your workspace temperature and humidity, and adjust cure times accordingly so colors stay clear and vibrant.
When cured, sand and polish carefully and seal with a suitable clear coat to preserve transparency and shine.
Recommended paint brands and types for resin compatibility
1 key decision when pairing acrylic paint with resin is choosing brands and formulations known for low additives and proven compatibility; you’ll want artist-grade or high-quality craft acrylics labeled as “acrylic polymer” or “acrylic emulsion” that dry hard, remain flexible enough to resist crazing, and don’t contain heavy fillers or silicone-based additives.
- Golden Heavy Body Acrylics
- Liquitex Professional
- Winsor & Newton Galeria
- Arteza Artist Acrylics
- DecoArt Americana
Proper dilution and additives to improve mixing
Because acrylics can thicken or clump when added to resin, you’ll want to thin them to a creamy, pourable consistency and choose compatible additives that won’t inhibit curing.
Use small amounts of water or acrylic medium—avoid alcohols or oils.
Mix thoroughly, strain if needed, and test a tiny batch for clarity and cure.
Add pigments slowly to prevent streaks and bubbles.
Temperature, humidity, and cure-time adjustments
After thinning and testing your acrylic mixes, pay close attention to temperature, humidity, and cure times—these environmental factors directly affect resin viscosity, cure speed, and final clarity.
Work in a stable, warm (70–75°F/21–24°C), low-humidity space. Adjust pot time by slightly warming resin or slowing hardener in cool conditions.
Monitor tack and demold only when fully cured to avoid blush or sink.
Finishing techniques: sanding, polishing, clear coats
Start by evaluating the cured piece under good light to identify scratches, uneven areas, or surface defects that need attention; you’ll save time by planning your sanding and polishing steps before you begin.
- Sand from coarse to fine grits, keep edges consistent.
- Wet-sand to reduce dust and heat.
- Use polishing compound with a soft wheel.
- Remove residue between steps with isopropyl alcohol.
- Apply thin, even clear coats; cure fully before handling.
Tips for preserving transparency and vibrancy
You’ve smoothed, polished, and sealed the piece, so now focus on keeping the clarity and color you worked for—small habits during mixing, pouring, and curing make a big difference.
Use translucent paints sparingly, pre-mix pigments into a thin resin base, avoid bubbles with slow stirring and vacuum/pressure, pour in layers, cure in stable temperature, and store away from UV to prevent yellowing.
Safety Considerations
When you work with resin and acrylic paint, wear a respirator rated for organic vapors and nitrile gloves to protect your lungs and skin.
Make sure you’ve got good ventilation, and handle waste and leftover resin according to local hazardous-disposal rules.
Store chemicals in labeled, sealed containers away from heat and children or pets.
Respiratory and skin protection when working with resin and paints
Although acrylics and epoxy resins are common in craft work, they can both release irritants and vapors that affect your lungs and skin.
So you should use proper respiratory and dermal protection every time you mix, pour, or sand.
Use PPE suited to resins and paints and follow label guidance.
Recommended protective items:
- NIOSH-rated respirator (organic vapor/particulate)
- Chemical-resistant nitrile gloves
- Long sleeves and apron
- Safety goggles or face shield
- Disposable sleeve covers
Ventilation, disposal, and safe storage recommendations
Because fumes and waste from resin and acrylic paints can build up quickly in small workspaces, make ventilation, disposal, and storage part of your routine before you mix anything.
Work near open windows or use a vented fan and respirator. Seal cured waste in labeled containers, follow local hazardous-disposal rules, store unopened resin and pigments in cool, locked areas away from children and pets, and keep SDS accessible.
Examples and Use Cases
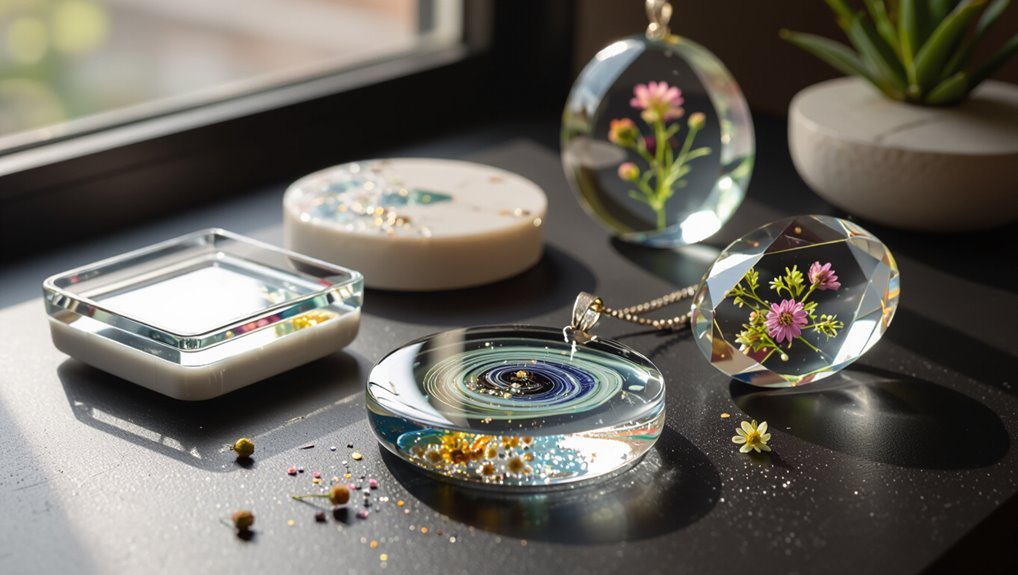
You can use acrylic-painted resin to make small jewelry like earrings and pendants with crisp color details.
It also works well for coasters, trays, and tabletop art where layered pigments create depth.
Try embedding objects or combining other media to add texture and visual interest.
Small jewelry pieces (earrings, pendants)
Small jewelry pieces like earrings and pendants shine when you combine acrylic paint and resin, letting you trap vivid colors, delicate brushwork, or tiny inclusions under a glossy, durable finish.
You can layer translucent washes, seal painted surfaces with a thin resin coat, and add metallic flakes or microbeads.
Work small, cure fully, and sand edges for professional, wearable results.
Coasters, trays, and tabletop art
Transform tabletops with acrylic-painted resin coasters, trays, and larger art pieces that combine durability with decorative detail.
You can layer colors, create gradients, or paint focal designs before sealing with clear resin for protection.
Use non-porous molds, thin paint layers, and proper curing times to prevent lifting or clouding.
Sand and polish edges for a professional finish that withstands everyday use.
Embedded objects and mixed-media applications
Beyond coasters and trays, adding embedded objects and mixed-media elements opens up fresh creative directions for acrylic-painted resin pieces.
You can embed dried flowers, metal charms, fabric scraps, or tiny photos, sealing them with clear resin layers.
Use acrylic washes for backgrounds, isolate delicate items with barrier coats, and layer slowly to prevent bubbles.
Plan composition and curing times for durable, museum-quality results.
Frequently Asked Questions (FAQ)
You probably have a few quick questions about mixing acrylic paint with resin, so here are the things people ask most.
Below are the key FAQs you’ll want answers to before you start a project:
- Can I use acrylic paint straight from the tube in resin?
- Will acrylic paint affect resin cure time?
- How much acrylic paint is safe to add to resin?
- Can I sand and polish resin pieces colored with acrylic paint?
- Is acrylic paint permanent in resin or will it fade/yellow?
Can I use acrylic paint straight from the tube in resin?
Curious whether you can squeeze acrylic paint straight from the tube into resin? You can for small accents, but use sparingly.
Thick paint can trap air, create texture, or resist blending. Mix thoroughly to avoid clumps and work quickly before resin skins.
For consistent color and smoother finish, dilute or pre-mix paint with a little resin or use fluid acrylics instead of full-strength tube paint.
Will acrylic paint affect resin cure time?
How will adding acrylic paint affect your resin’s cure time?
It usually won’t change cure time if you use small amounts and fully mixed, water-free paint.
Heavy pigment loads or water-based paints can slow or inhibit curing.
Always test a sample before committing, follow resin maker guidelines, and allow extra cure time if you notice tackiness or incomplete hardening.
How much acrylic paint is safe to add to resin?
A good rule of thumb is to keep acrylic paint under about 5–10% of the total resin volume to avoid affecting cure, clarity, or strength—use less for deep pours or translucent effects.
Start lower if you need vibrant color, test small batches, and thin heavy paints to prevent clumping.
If you exceed this range, you risk longer cure times, clouding, or weakened finished pieces.
Can I sand and polish resin pieces colored with acrylic paint?
Yes—you can sand and polish resin pieces that contain acrylic paint, but you’ll need to take into account how the paint was mixed and where it sits in the piece.
Sand gently with progressively finer grits to avoid cutting through paint layers.
If paint is surface-applied, protect edges or seal first.
Finish with a polish or resin topcoat for restored clarity and shine.
Is acrylic paint permanent in resin or will it fade/yellow?
Wondering whether acrylic paint will stay true inside resin over time? It’s not inherently permanent—acrylics sealed within cured resin are more stable, but pigments can fade with prolonged UV exposure.
Use lightfast, artist-grade paints and add UV inhibitors or a UV-resistant topcoat to slow yellowing.
Proper mixing and full cure reduce chemical interactions that might alter color over years.
Conclusion and Final Recommendations
Keep things simple: follow the best practices—mix sparingly, test cure, and watch for bubbles and color shift.
Choose acrylics for easy tinting and opaque effects, but pick alcohol inks or pigment powders when you need translucence, intense color, or UV stability.
Try a small beginner project, post your results, and note what worked so you can refine your approach.
Quick best-practice summary
If you want reliable results, follow a few core rules:
- Test paint/resin compatibility first.
- Thin acrylics for even mixing.
- Measure resin precisely and cure fully.
- Avoid overloading color to prevent curing issues.
- Seal painted surfaces when needed.
Stick to clean tools and patience; small tests save ruined pieces and time.
When to choose acrylic paint vs other colorants
You’ve covered the basics for getting reliable results; now decide when acrylics are the right choice versus alternatives like alcohol inks, mica powders, or resin pigments.
Use acrylics for opaque, budget-friendly color, texture, and easy touch-ups.
Choose alcohol inks for vibrant, translucent effects; mica powders for shimmer and depth; resin pigments for strong, uniform coloration.
Match colorant to finish, durability, and project scale.
Call to action try a simple beginner project and share results
Try a simple project today: make a small resin coaster using acrylic paint for color so you can learn how opacity, mixing, and layering affect the final piece.
Gather resin, a silicone mold, a few paint shades, and safety gear.
Mix small batches, document ratios and cures, and adjust technique.
Share photos and notes online or with friends to get feedback and improve.