How Do I Paint a Textured Ceiling: Tools and Techniques Explained
You’ll want to prep, protect, and pick the right tools so your textured ceiling looks uniform and lasts. Move furniture, cover fixtures, clean stains, and repair damage first. Use thick-nap rollers (3/4″–1″) for popcorn, medium nap for orange peel or knockdown, cut in with angled sash brushes, or use a hopper/turbine sprayer for large or deep textures. Prime stained areas, apply two coats, and ventilate well—keep going and you’ll learn pro tips for faster, cleaner results.
Why Paint a Textured Ceiling: Benefits and Fixes
Although a textured ceiling often hides imperfections, painting it refreshes the room and fixes common issues like staining, discoloration, and faded texture.
You’ll improve light reflection, unify color, and extend surface life.
Use ceiling maintenance tips—clean, patch, and prime first—to protect the textured finish benefits.
Painting also masks minor flaws, prevents mildew, and makes future touch-ups easier for you.
When Should You Repaint a Textured Ceiling?
You should repaint a textured ceiling when you start seeing clear signs like widespread discoloration, peeling or flaking texture, water stains, or persistent mildew that won’t come clean with washing.
Repaint for safety and aesthetics: reasons to repaint include covering stains, sealing damaged texture, and preventing mold spread.
Regular texture maintenance—inspections, gentle cleaning, and timely touch-ups—keeps ceilings durable and attractive.
Textured Ceiling Types This Guide Covers
Next, you’ll look at the common textured ceilings you’ll likely encounter: popcorn, knockdown, and orange peel.
I’ll explain how each texture affects prep, painting technique, and the finish you’ll get.
That way you can pick the right approach for your ceiling.
Popcorn Ceiling Types
Some textured ceilings are called “popcorn” because their bumpy, spray-on finish resembles cottage cheese or popcorn kernels. You’ll learn popcorn ceiling history and textured ceiling maintenance basics so you can decide repair, encapsulation, or repainting. Consult testing for asbestos before work.
| Type | Consideration |
|---|---|
| Heavy | Repairs visible |
| Fine | Easier paint |
Knockdown And Orange Peel
Although less dramatic than popcorn, knockdown and orange peel textures give ceilings subtle depth and disguise minor imperfections, so you’ll want to approach them with the right tools and technique.
You’ll work carefully to preserve texture while painting:
- Use a thick-nap roller for orange peel.
- Lightly brush or spray for knockdown texture.
- Apply two thin, even coats for consistent coverage.
Paint vs Remove Texture: How to Decide
Wondering whether you should paint over that textured ceiling or strip it down first? You’ll weigh effort, budget, and finish.
For quick refreshes, ceiling painting saves time and hides minor flaws.
A fresh coat quickly refreshes a textured ceiling, concealing small imperfections with minimal time and effort.
If texture removal will improve resale, modernize style, or fix heavy damage, plan for labor and repair.
Choose based on desired look, cost, and how much prep you’ll tolerate.
Lead and Asbestos: How to Test Your Ceiling
Before you start painting, you should test for lead if your home was built before 1978 and check for asbestos in older textured ceilings.
You can buy DIY lead test kits and hire a certified lab for more reliable results.
If either hazard is present, stop work and contact a licensed abatement professional.
Test For Lead
You should always test textured ceilings for lead before scraping, sanding, or painting, because older coatings often contain lead that can pose serious health risks when disturbed.
Use certified kits or labs for reliable lead testing and follow lead safety precautions.
- Wear PPE and contain dust.
- Use a lab for confirmation.
- Hire pros if positive.
Check For Asbestos
After testing for lead, also check textured ceilings for asbestos, since many older compounds and popcorn coatings contain it and can release dangerous fibers when disturbed.
You should use asbestos awareness: hire a certified inspector or use an accredited lab kit. Don’t sand or scrape.
Follow strict safety precautions—respirator, containment, wet methods—and evacuate occupants until a professional clears the area.
What Protective Gear to Wear for Ceiling Painting
Three key pieces of protective gear will keep you safe and comfortable while painting a textured ceiling.
Use protective masks with appropriate respirator filters, safety goggles, and painter’s gloves.
Follow ladder safety and secure footing. Protect floors with drop cloths.
- Mask + filters
- Goggles
- Gloves and ladder safety
How to Prep Furniture and Floors to Prevent Mess
Start by moving as much furniture as you can to the center of the room and cover remaining pieces with fitted plastic or canvas drop cloths; tape the cloths at the baseboards so they don’t shift.
Use weighted furniture coverings, secure floor protection like rosin paper or layered drop cloths, and keep a trash bin and damp rags handy for cleanup strategies and swift mess prevention.
How to Mask Lights, Vents, and Fixtures
Before you start rolling, cover light fixtures with plastic bags or painter’s paper and secure them with painter’s tape so bulbs and shades stay paint-free.
Seal HVAC vents and ceiling diffusers with removable tape or plastic to prevent paint from clogging the grilles.
Work methodically so you can remove the masks without tearing the texture or leaving residue.
Protecting Light Fixtures
When you’re getting ready to paint a textured ceiling, protecting lights, vents, and fixtures is essential to prevent splatter, clogging, or damage. Cover each fixture with plastic, painter’s tape, and paper or use disposable bags for recessed cans so you can work quickly without worrying about cleanup.
Use these light fixture safety and fixture protection techniques:
- Tape edges tightly.
- Bag recessed cans.
- Clip paper shields.
Sealing Vents And Diffusers
After you’ve taped and bagged your light fixtures, move on to sealing vents and diffusers so paint doesn’t clog louvers or spread through your HVAC.
Use painter’s tape and plastic or paper to cover vents, applying a light adhesive for secure vent sealing.
For diffuser protection, remove removable grilles when possible or wrap fixed diffusers tightly to prevent overspray and dust intrusion during painting.
How to Clean a Textured Ceiling Before Painting
Start by removing dust and cobwebs with a soft-bristle broom or a long-handled duster so dirt won’t interfere with paint adhesion.
Use gentle ceiling cleaning methods and regular textured ceiling maintenance to avoid damage.
Then:
- Vacuum with brush attachment.
- Wipe stains with mild detergent and sponge.
- Rinse lightly and let fully dry before priming.
How to Repair Cracks, Holes, and Damaged Texture
Before you start painting, you’ll want to assess the damage area to identify cracks, holes, and any missing texture.
Patch small holes with spackle and larger damage with joint compound, then sand smooth once dry.
Recreate the texture to match the surrounding ceiling before priming and painting.
Assess Damage Area
When you inspect the ceiling, focus on locating every crack, hole, and area where the texture’s worn or missing so you know exactly what needs repairing.
Use a careful damage assessment and thorough ceiling inspection to plan fixes.
- Mark small cracks and hairlines.
- Note larger holes and sagging areas.
- Photograph and measure each spot for supplies.
Patch And Retexture
Gather the right tools and work systematically: cut away loose material, fill cracks and holes with joint compound or spackle, sand smooth once it’s dry, and then recreate the texture to match the surrounding ceiling.
For ceiling repair, feather edges, use small test patches, and adjust spray or trowel texture application until it blends. Prime patched areas before painting for a uniform finish.
When to Retexture a Patch Before Painting
How can you tell whether a patched area needs retexturing before you paint? Inspect texture match, feel, and visibility. Use patching techniques that blend edges; if seams show, retexture. Choose retexturing methods that mirror the original pattern.
- Match texture depth.
- Check from normal viewing distance.
- Sand and feather before final retexture.
How to Choose the Right Primer for Textured Ceilings
Anyone painting a textured ceiling needs to pick a primer that bonds well, hides previous repairs, and works with your chosen topcoat.
You’ll choose between stain-blocking, high-adhesion, and bonding primer types based on surface condition. Consider odor, dry time, and compatibility.
Use roller nap and brush application techniques for even coverage, feathering edges and avoiding overworking the texture to preserve detail.
How to Pick the Best Ceiling Paint Finish
Once your primer’s bonded and dry, choosing the right ceiling paint finish will determine how texture reads, how much light it reflects, and how easy touch-ups will be later.
Pick among ceiling paint types and sheen options based on room use and light.
- Flat—hides imperfections.
- Eggshell—subtle sheen, washable.
- Satin—durable, brighter appearance.
When to Use Stain-Blocking Paint on Textured Ceilings
Before you grab paint, identify the stain type—water, smoke, or tannin—since each needs different treatment.
Check the ceiling’s porosity by tapping and inspecting spots to see if stains have soaked in.
If stains are set or the surface is porous, use a stain-blocking primer made for ceilings before repainting.
Identify Stain Types
Stains come from different sources—water, nicotine, smoke, rust, or mold—and each needs a specific approach, so you should identify the type before you pick a stain-blocking paint.
Use stain identification, then plan stain removal steps:
- Water: check for leaks, dry, treat mildew.
- Nicotine/smoke: clean with degreaser, then primer.
- Rust: remove, neutralize, then prime.
Assess Ceiling Porosity
Porosity tells you how much liquid a textured ceiling will absorb, and that directly determines whether you need a stain-blocking primer before painting.
You’ll perform a quick texture assessment: dab water on spots of different ceiling material and watch absorption.
If water soaks in fast or stains bleed through, plan to use stain-blocking paint; low absorption often lets you skip it.
Choose Appropriate Primer
If your water test showed quick absorption or visible bleed-through, you’ll want a stain-blocking primer to stop discoloration and create an even base for topcoat paint.
Choose primer types suited for texture and stains, then follow proper primer application for coverage.
- Pick oil-based or shellac for severe stains.
- Use latex bonding for porous surfaces.
- Roll carefully into peaks.
How Much Paint and Primer to Buy for Textured Ceilings
Calculating paint and primer for a textured ceiling comes down to measuring surface area, estimating texture absorption, and accounting for coverage per gallon; do a quick ceiling area measurement (length × width) and add 10–15% for waste and texture depth. After ceiling preparation, use paint coverage data to estimate gallons; primer often needs one coat.
| Item | Coverage/gal | Notes |
|---|---|---|
| Primer | 300–400 sq ft | Seals texture |
| Paint | 250–350 sq ft | Depends on texture |
| Extra | 10–15% | Waste allowance |
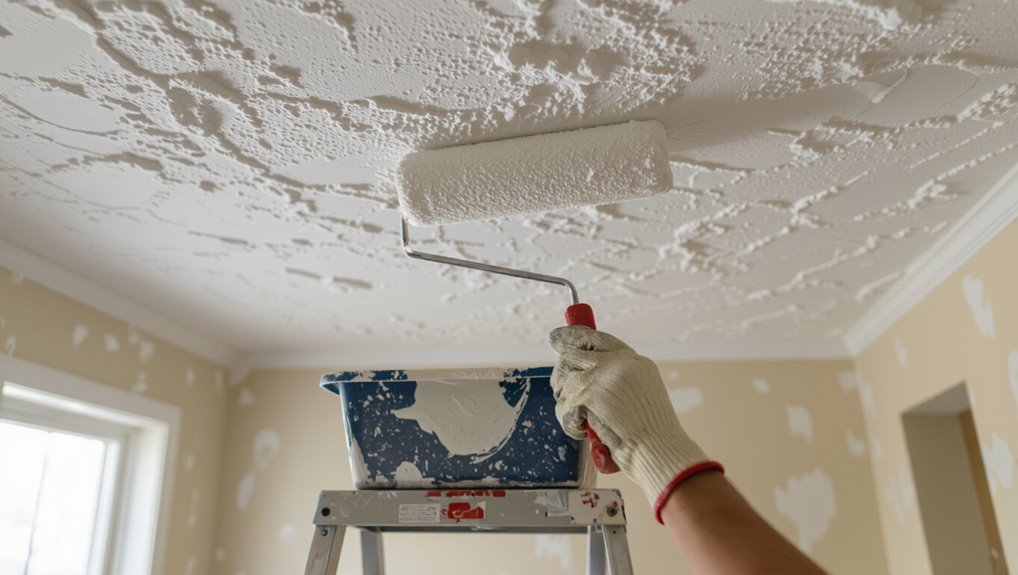
Pick the Right Tools for Textured Ceilings
Grab a few key tools before you start—good rollers, extension poles, angled brushes, and a quality sprayer if you plan to spray—because the right equipment makes textured ceilings faster and neater to finish.
You’ll want textured ceiling tools and essential painting supplies like:
- Roller frame and pole
- Angled brush for edges
- Drop cloths and protective gear
Which Roller Naps Work Best for Popcorn Ceilings
Wondering which roller nap will get the best coverage on popcorn ceilings? You’ll want a thick nap—typically 3/4″ to 1″—to reach deep peaks.
Choose roller types designed for heavy texture and high-solids paint; microfiber or lambswool often work.
Check texture compatibility on product labels, test a patch, and avoid short naps that miss crevices or overload paint, causing drips.
Which Rollers Suit Orange Peel and Knockdown Textures
For orange peel and knockdown ceilings, pick a roller that balances reach and control so you fill shallow dimples without over-smoothing the texture.
- Choose medium–nap rollers for general texture compatibility and smooth application.
- Use woven or knit covers to resist matting and hold paint evenly.
- Try a longer handle extension for reach while keeping light pressure to preserve peaks and valleys.
Keywords: roller types, texture compatibility
How to Pick Brushes for Cutting In Around Texture
When cutting in around textured ceilings, pick angled sash brushes because their shape gives you control along edges.
Use stiff natural bristles to carry paint into the nooks without splaying.
Choose narrower widths so you can follow contours precisely without touching the texture.
Choose Angled Sash Brushes
Because textured ceilings create uneven edges, choose angled sash brushes to get clean lines when you cut in.
You’ll control paint with angled brush techniques and use paint application tips to avoid globs.
Follow these steps:
- Load sparingly, tap off excess.
- Angle bristles into crevices, steady wrist.
- Feather strokes outward for seamless blending.
Select Stiff Natural Bristles
Choose stiff natural-bristle brushes to cut in around textured ceilings; they hold paint well and flex into crevices without splaying. You’ll appreciate stiff brush benefits when controlling edges and loading paint evenly.
Learn a natural bristles comparison to synthetics: naturals resist wear on rough texture and maintain tip shape, so you’ll get cleaner lines and fewer touch-ups while working around popcorn or knockdown finishes.
Opt For Narrow Widths
If you’re working around textured ceilings, pick narrower brush widths to give yourself tighter control and cleaner edges; they let you navigate bumps and valleys without smearing paint onto the ceiling.
- Use 1–2″ angled sash brushes for precise cutting in.
- Match brushes to narrow roller application for consistent finish.
- Pair with texture paint techniques and steady strokes to avoid drag and clumps.
When a Paint Sprayer Is the Smarter Choice
When your ceiling’s texture is deep or covers a large area, a paint sprayer saves time and delivers a more even finish than brushing or rolling.
You’ll appreciate sprayer advantages: faster coverage, better penetration into crevices, and reduced lap marks.
For an efficiency comparison, weigh prep and masking time against speed; sprayers excel on big rooms, while small patches may not justify setup.
How to Thin and Prepare Paint for Sprayers
Start by checking the paint’s viscosity against your sprayer’s recommendations—too thick and you’ll clog the nozzle, too thin and you’ll get runs and poor coverage.
Then follow simple steps to thin and prep for consistent flow and sprayer maintenance:
- Strain paint, add manufacturer-recommended thinner.
- Test spray on cardboard, adjust viscosity.
- Clean filters and nozzle before use.
How to Spray a Popcorn Ceiling Without Overspray
After you’ve thinned and tested the paint for smooth flow, set up to spray the popcorn ceiling with controls that minimize overspray and protect surrounding surfaces.
Maintain a consistent 12–18 inch distance, use a low-pressure spray technique, and overlap passes by 30%.
Mask walls, lights, and floors, and employ drop cloths and plastic sheeting for overspray control.
Move steadily to avoid drips.
How to Spray Knockdown and Orange Peel Safely
Before you spray knockdown or orange peel, clear the room and cover floors and furniture so dust and overspray don’t become a bigger job.
Choose the right hopper or turbine sprayer, tip size, and air settings for a consistent texture.
Wear a respirator, goggles, and disposable clothing, and keep ventilation and a helper nearby for safer, smoother work.
Prepare Work Area
1 essential step in spraying knockdown or orange peel is setting up a secure, well-ventilated work area; you’ll want to control overspray, protect surfaces, and keep dust out of the fresh texture.
Follow these ceiling preparation tips and maintain workspace organization:
- Seal floors and furniture.
- Create cross-ventilation.
- Mask vents and lighting fixtures.
Choose Proper Equipment
When you’re ready to spray knockdown or orange peel, pick tools that match the job and your skill level so you get consistent coverage without wasting material.
Choose sprayer selection based on nozzle size, pressure, and portability. Match paint thickness to the sprayer — thin for higher-pressure units, thicker for HVLP.
Test patterns, adjust flow, and replace tips for even texture.
Follow Safety Protocols
After you’ve picked the right sprayer and nozzle, focus on safety so you can work confidently and avoid injuries or damage.
Wear full safety gear, test spray patterns, and maintain proper ventilation. Follow these steps:
- Don respirator, goggles, gloves.
- Open windows, run fans for proper ventilation.
- Keep ladder stable, clean spills, unplug equipment.
How to Overlap Sprayer Passes for Even Coverage
Because the texture needs uniform coverage, overlap each sprayer pass by about 30–50% so you don’t get heavy ridges or missed spots.
Keep a steady distance and consistent speed, using a cross-hatch pattern for even buildup. This sprayer technique reduces streaks; pause at edges to feather.
Follow these coverage tips: maintain nozzle pressure, test on scrap, and work methodically across the ceiling.
How to Roll a Textured Ceiling to Minimize Drips
If you’ve been spraying, switch to a roller for touch-ups and areas a sprayer can’t reach so you don’t overwork the texture.
Use gentle roller techniques to avoid overload and focus on drip prevention.
Use gentle rolling — light loads, slow strokes, and back-rolling to prevent drips and overload.
- Load lightly, roll slowly.
- Use a thick-nap cover for texture.
- Back-roll excess paint off to smooth drips.
How to Cut In Along Textured Edges Without Smudging
Start by fitting an angled trim brush to your dominant hand so you can cut a clean line where the textured ceiling meets the wall.
Work slowly with the brush tip, feathering paint into the texture to avoid buildup that causes smudges.
Protect adjacent surfaces with painter’s tape and drop cloths so any stray bristles or drips won’t mar trim or walls.
Use Angled Trim Brush
A 2½-inch angled trim brush gives you the control you need to cut in neatly along textured ceiling edges without smudging nearby walls or fixtures.
Use angled brush techniques for precise lines and textured ceiling maintenance.
- Load brush lightly for smooth paint flow.
- Hold at a shallow angle, steady wrist.
- Feather strokes toward ceiling peaks for even coverage.
Protect Adjacent Surfaces
When you’re cutting in along textured edges, protect nearby walls, fixtures, and floors with tape and drop cloths so a stray stroke won’t ruin your work.
Choose tape types—painter’s, delicate, or high-adhesion—based on finish; press edges firmly.
Do surface preparation: clean and dry trim, remove loose texture, and use a steady angled brush.
Work slowly to avoid smudges and peeling.
How to Avoid Lap Marks and Splotchy Spots
Keep a wet edge and work in consistent, overlapping passes so you don’t leave lap marks or splotchy spots on textured ceilings.
For lap mark prevention and splotchy spot solutions, follow these steps:
- Maintain even roller pressure and load.
- Blend sections quickly, back-rolling edges.
- Match drying conditions; avoid bright sun or drafts.
Move steadily and check lighting to catch flaws.
How Many Coats Are Necessary on Textured Ceilings?
Wondering how many coats your textured ceiling really needs? You’ll usually apply two: a primer sealer, then a topcoat.
Heavier textures or patched areas might need a third. Choose coating methods—roller, sprayer, or brush—based on texture.
Monitor drying times between coats to avoid lifting or uneven coverage. Stop once texture’s uniform and no substrate shows through.
How to Manage Drying Times in Different Climates
After you’ve applied the primer and topcoat, adapt drying expectations to your local climate since temperature, humidity, and airflow strongly affect cure times.
You’ll use humidity control, understand temperature effects, and prioritize ventilation importance.
Follow simple drying techniques to manage paint absorption and curing:
- Warm, low-humidity speeds drying.
- Cooler, humid slows cure.
- Use fans and dehumidifiers for consistent results.
How to Troubleshoot Visible Seams After Painting
If seams are still showing once the paint’s dry, don’t panic—you can usually fix them without redoing the whole ceiling.
Lightly sand edges, apply thin joint compound, and feather with a putty knife to hide the join.
Use seam visibility solutions like color-matched touch-up and texture blending techniques with stipple brush or spray.
Prime and repaint the patched area for uniform finish.
How to Fix Drip Marks and Runs on Textured Ceilings
Catch drip marks and runs early to make repairs quick and nearly invisible. You’ll need gentle scraping, texture touch-up, and matching paint.
Steps:
- Scrape raised drips, sand edges, remove excess for drip removal.
- Rebuild texture with same compound, feather edges.
- Match paint consistency, spot-prime, and blend.
Check lighting and dry before declaring it fixed.
How to Repaint Stained or Smoke-Damaged Ceilings
If your textured ceiling has stains or smoke damage, start by cleaning the surface thoroughly with a degreasing cleaner and letting it dry completely.
You’ll want to remove soot and residue with gentle scrubbing or a trisodium phosphate solution before painting.
Finish by applying a quality stain-blocking primer to seal stains and prevent bleed-through before you topcoat.
Prep And Clean Thoroughly
Start by clearing the room and protecting everything you want to keep clean—move furniture out or to the center, cover floors and remaining items with drop cloths, and tape plastic over fixtures.
Use targeted cleaning techniques for smoke and stains, ventilate, and wear protection.
- Vacuum texture gently.
- Degrease and blot stains.
- Rinse, dry, inspect for damage.
Regular ceiling maintenance prevents recurring issues.
Use Stain-Blocking Primer
Once the ceiling’s clean and dry, you’ll want to seal any remaining stains with a stain-blocking primer before repainting—this prevents smoke, water, and nicotine discoloration from bleeding through fresh paint.
Identify stain types, spot-prime severe areas, then roll evenly across textured surfaces.
Allow recommended dry time, sand any raised bits, and apply a full coat of primer application for consistent adhesion before your topcoat.
How to Paint Textured Ceilings With Glossy Existing Finishes
A glossy textured ceiling needs careful prep before you paint so the new finish will adhere and look even.
Use glossy paint techniques sparingly and follow ceiling preparation tips:
- Sand lightly to dull shine and clean dust.
- Apply a high-adhesion primer designed for glossy surfaces.
- Use a nap roller and thin, even coats to avoid drips and preserve texture.
How to Preserve Texture Detail While Painting
To keep your ceiling’s texture crisp, pick a brush that fits the pattern so you can reach crevices without flattening peaks.
Use thick-nap rollers to carry enough paint into the recesses, and avoid heavy pressure that smears detail.
Apply several thin coats rather than one thick one so you build coverage without filling in the texture.
Choose The Right Brush
Brush selection matters when you want to keep your ceiling’s texture crisp: pick a high-quality nylon or polyester blend angled brush for cutting in and a thick, high-density roller or specialty texture brush for the field, so paint goes into crevices without flattening peaks.
- Choose brush types by bristle materials and brush sizes.
- Match handle lengths for reach and control.
- Follow cleaning brushes and specific painting techniques.
Use Thick Nap Rollers
Reach for a thick-nap roller to get paint into the peaks and valleys of a textured ceiling without sanding down the pattern.
You’ll choose thick nap rollers sized for ceiling work, load them evenly, and roll gently in overlapping strokes to preserve texture detail.
Practice a short section first to check coverage and avoid pressing too hard, keeping textured ceiling techniques intact.
Apply Thin Multiple Coats
Start with thin, even coats and build coverage gradually so you don’t fill in or flatten the texture.
You’ll use careful paint application techniques and monitor coat thickness considerations.
Follow steps:
- Roll lightly with a thick-nap roller to settle paint into crevices.
- Let each thin coat dry fully.
- Add subsequent thin coats until coverage is even without losing texture.
How to Achieve a Uniform Color on High Ceilings
When you’re painting a high, textured ceiling, proper lighting and the right tools make it far easier to get an even finish across the whole surface.
Use high ceiling techniques: map out sections, work wet‑edge to wet‑edge, and maintain consistent roller pressure and nap.
Employ uniform color strategies like mixing all paint in one batch and backrolling to blend overlapping strokes evenly.
How to Select Ladders and Scaffolding for Ceiling Work
Although sturdy access is essential for safe, efficient ceiling work, choosing the right ladder or scaffold comes down to height, stability, and the tasks you’ll do up there; match the platform to your ceiling height, account for textured-surface needs (like room to maneuver a roller and tray), and prioritize a model rated for at least 25% more weight than you’ll carry so you’re not overloaded.
- Compare ladder types for reach and mobility factors.
- Evaluate scaffolding options for workspace setup and stability.
- Follow safety tips and height considerations when selecting equipment.
How to Work Safely on a Ladder While Painting Ceilings
Place your ladder on firm, level ground and angle it so the base is about one-quarter of the ladder’s working length from the wall.
Keep three points of contact as you climb and never overreach—move the ladder instead.
Wear slip-resistant shoes and keep tools in a belt or secured bucket to keep your hands free.
Ladder Placement Basics
Set your ladder on firm, level ground and angle it so the base sits about one quarter of the ladder’s working length away from the wall—this gives you a stable stance and keeps the ladder from tipping while you work on the ceiling.
Prioritize Ladder safety and Ladder stability:
- Lock spreaders and check feet.
- Keep hips centered between rails.
- Avoid overreaching; move ladder as needed.
Safe Climbing Techniques
Climb deliberately and keep three points of contact with the ladder at all times—two hands and a foot or two feet and a hand—so you stay balanced while painting the ceiling.
Inspect the ladder for defects, set it on stable ground, and lock spreaders.
Face the ladder, avoid overreaching, move the ladder frequently, and wear non-slip shoes.
Prioritize ladder safety and proven climbing techniques.
How to Protect HVAC and Electrical Systems From Paint
Before you start rolling, turn off and cover any HVAC vents, thermostats, switches, and exposed junction boxes so paint won’t clog dampers or contaminate wiring; use painter’s tape and plastic sheeting or magnetic vent covers for a snug, removable seal.
- Use HVAC protection methods: seal vents, remove filters.
- Apply electrical system safeguards: switch covers, taped junctions.
- Inspect after drying; restore power only when surfaces are clean.
How to Cut Costs Without Sacrificing Quality
If you plan ahead and shop smart, you can cut costs without cutting corners by choosing the right materials, tools, and techniques for textured ceilings.
Compare paint grades, buy contractor packs, and rent specialty rollers.
Pick budget friendly options like quality alternatives in off-brand primers and trim paints.
Reuse drop cloths, tape carefully, and work methodically to avoid costly fixes.
When to Hire a Pro for Textured Ceiling Jobs
Saving money on materials and doing some of the prep work yourself can go a long way, but there are clear situations where bringing in a pro makes more sense.
You should hire help when:
- You’re tackling complex texture types or repairs beyond your skill.
- You lack scaffolding or safety equipment.
- You want professional advice on matching finishes and troubleshooting defects.
How Long Does a Textured Ceiling Paint Job Last?
A well-done textured ceiling paint job can last 7 to 15 years before it needs touch-ups or a fresh coat.
How long it actually holds up depends on factors like humidity, ventilation, smoking, and how well the surface was prepped and primed.
You can extend the lifespan by controlling moisture, keeping the room clean, and addressing stains or damage quickly.
Expected Lifespan
Most textured ceiling paint jobs will last 7–10 years before they need a refresh, though factors like surface prep, paint quality, and room conditions can shorten or extend that span.
You can preserve ceiling longevity with simple maintenance tips and routine checks.
- Inspect for stains annually.
- Clean gently when dusty.
- Touch up small spots promptly.
Factors That Shorten Life
While regular checks and prompt touch-ups help, several common issues will shorten a textured ceiling paint job’s lifespan.
You’ll want to watch for leaks, poor ventilation, and nail pops.
Follow basic ceiling maintenance tips: fix roof or plumbing problems, improve airflow, and address stains quickly.
The impact of humidity accelerates peeling and mold, so control moisture to extend the finish.
How to Maintain and Clean Painted Textured Ceilings
Because textured ceilings catch dust and stains more easily than flat ones, you’ll need a gentle, regular cleaning routine to keep paint looking fresh and prevent damage.
Use these ceiling maintenance tips and cleaning techniques:
- Vacuum with soft brush attachment, working gently across texture.
- Spot-clean stains with mild detergent and sponge, dabbing, not scrubbing.
- Repaint damaged areas minimally, using matching paint and light touch.
How to Update Ceiling Color Trends and Ideas
Looking to freshen up your textured ceiling without a full renovation? You can update ceiling color by sampling trending shades and modern palettes to suit your space.
Use soft neutrals for calm or bold contrasts for drama; consider light reflections and fixture placement.
Seek design inspiration from photos and swatches, testing small patches to judge mood impact before committing.
Common Mistakes Novices Make and How to Avoid Them
Ever wondered why your fresh paint looks uneven or flakes off a textured ceiling? You’ll avoid common beginner errors by addressing preparation pitfalls and technique troubles.
Follow these steps:
- Check paint selection and equipment choices before starting.
- Fix safety oversights and manage time management to work steadily.
- Prevent cleanup mistakes and touch up missed spots promptly.
Quick Painting-Day Checklist for Textured Ceilings
1 quick checklist will keep your painting day efficient and reduce mistakes: gather your rollers, extension pole, angled brush, drop cloths, painter’s tape, primer and ceiling paint, plus a sturdy ladder and safety gear; confirm the room is well-ventilated and the surface is clean and dry before you begin.
Plan project timeline, confirm color selection and finish options, follow painting techniques, prioritize safety precautions, organize tools, manage texture maintenance, execute paint application, and follow cleanup strategies.
Troubleshooting Flowchart for Problem Ceilings
A simple troubleshooting flowchart helps you quickly diagnose and fix common textured-ceiling problems—identify the symptom (stains, flaking, texture loss, or sagging), check likely causes (moisture, adhesion failure, impact, or aging), and follow the targeted next step (clean, patch, prime, or replace) to resolve it efficiently.
- Inspect: map textured ceiling issues, note pattern and scope.
- Diagnose: match symptom to likely cause; anticipate painting challenges.
- Act: clean, repair, or replace; test a small area before full work.
Cost and Time Estimates for Common Room Sizes
When you plan paint work for a textured ceiling, estimate both time and cost by room size, ceiling height, and prep needs so you won’t get surprised by hidden repairs or extra coats. Use cost breakdown and time allocation by ceiling size and room dimensions. Budgeting tips: factor labor costs, material expenses, surface preparation, project timeline, and local average rates.
| Room | Time | Cost |
|---|---|---|
| Small (10×10) | 3–4 hrs | $60–$150 |
| Medium (12×15) | 5–7 hrs | $120–$300 |
| Large (15×20) | 8–12 hrs | $250–$600 |
| Extra high | 10–16 hrs | $400–$900 |
Pro-Level Tool Picks for a One-Day Ceiling Job
Now that you’ve sized up time and budget, the right gear will keep a one-day ceiling job on schedule and within estimate.
Pick pro-level tools that speed work and improve finish. Essentials:
- Telescoping roller with nap matched to texture — speeds coverage and uses ceiling painting techniques.
- High-quality extension pole and brush set — reach and cut-in precision.
- HVLP sprayer or 9″ microfibre roller — essential painting supplies for smooth results.
Frequently Asked Questions
Can Textured Ceilings Be Painted in Cold or Hot Weather Conditions?
Yes — you can paint textured ceilings in cold or hot weather, but temperature effects and humidity considerations matter: you’ll want moderate temps, avoid extreme heat or cold, and wait for low humidity so paint cures properly.
Will Painting Reduce Ceiling Texture Acoustics or Sound Absorption?
Painting might slightly muffle sound, like wrapping a room in a thin blanket. You’ll notice minimal change; sound quality largely remains, since texture impact dominates absorption. Heavy coatings can reduce some high-frequency dampening.
Can I Use Ceiling Paint on Textured Exterior Soffits or Porches?
Yes — you can use ceiling paint on textured exterior soffits or porches, but you should choose appropriate paint types and do thorough surface preparation; you’ll need exterior-grade, breathable products and proper cleaning, priming, and weatherproofing.
How Do I Match a Repaired Patch to an Existing Aged Ceiling Color?
You’ll test small swatches, blend tint slowly, and feather edges so the patch repair fades into surrounding paint. Use color blending glazes, age the new paint with thin washes, and match sheen for a seamless result.
Are There Eco-Friendly or Low-Voc Primers Specifically for Texture?
Yes — you can find eco friendly options and low VOC choices formulated for textured surfaces; they’re breathable, have good adhesion, and resist staining. You’ll want to test small areas and follow manufacturer surface prep instructions.
Conclusion
You’ve got this—textured ceilings aren’t forever foes, they’re just surfaces waiting for a little courage and the right tools. Whether you’re freshening up popcorn, skim-coating swirls, or deciding to remove texture, tackle one step at a time: test for hazards, prep thoroughly, pick proper tools, and work steadily. Like turning a rough sketch into a finished painting, your ceiling will reward patience with a cleaner, brighter room that feels truly yours.