How to Do Knockdown Texture on Walls Step-By-Step
You can do knockdown texture yourself by prepping and repairing walls, mixing joint compound to a pancake‑batter consistency, and spraying panels evenly with a texture gun or hopper. Keep a consistent spray distance, let the mud skin for 10–30 minutes, then flatten peaks with a broad knockdown knife. Patch mistakes while wet, prime repaired areas, and paint with the proper nap roller. Stick with these steps and you’ll pick up pro tips and troubleshooting as you go.
Who This Guide Is For and What You’ll Learn
This guide is for DIYers, homeowners, and small-scale contractors who want a durable, attractive knockdown texture without hiring pros.
You’ll get beginner tips on prep, tools, mud mixing, and safety. Expect clear steps, troubleshooting, and finishing advice so you can match texture varieties and room styles.
You’ll learn how to work efficiently, avoid common mistakes, and achieve consistent results.
Quick 5‑Step Overview of Knockdown Texture
Follow five straightforward steps to get a clean knockdown texture: prep the area, mix the joint compound to a creamy, sprayable consistency, apply texture with a hopper gun or knockdown knife, wait briefly for partial drying, then lightly flatten peaks with a knockdown knife and finish sanding or touch-ups.
You’ll learn efficient application techniques, timing, and tool handling so you can produce consistent knockdown texture results quickly.
When to Choose Knockdown vs Smooth or Orange Peel
When deciding between knockdown, smooth, or orange peel, think about how tough the surface needs to be, the look you want, and how much time and money you’ve got.
If durability and covering imperfections matter, knockdown is a strong choice; if you want a sleek modern look, go smooth.
Orange peel is a middle ground when you need some texture without the effort or cost of knockdown.
When Durability Matters
If you’re prioritizing longevity and ease of maintenance, knockdown texture often outperforms smooth and orange peel finishes because its flattened peaks resist scuffs and hide minor imperfections without trapping dust like a rough orange peel surface.
Consider durability factors like traffic levels, moisture, and repaint frequency; follow maintenance tips: wipe with mild cleaner, touch up high-wear areas, and inspect seams annually.
Aesthetic And Style Goals
Style matters as much as function, so pick a texture that matches the room’s look and your personal taste.
You’ll choose knockdown for a rustic, forgiving finish, smooth for modern minimalism, and orange peel for subtle uniformity.
Consider your aesthetic preferences and gather style inspiration from photos.
Match texture to architecture, lighting, and furniture so the wall complements rather than competes.
Budget And Time Constraints
Budget and time often decide the finish more than taste, so pick the texture that fits your schedule and wallet. If you want budget friendly options and time saving tips, choose smooth for speed, orange peel for low cost, knockdown for forgiving flaws.
| Option | Best for |
|---|---|
| Smooth | Fast refinishing |
| Orange Peel | Low cost |
| Knockdown | Hides flaws |
| Hybrid | Balance of both |
Light, Medium, and Heavy Knockdown Looks
Texture choice shapes the room’s mood, and with knockdown you can control that by varying how wet the mud is, how long you let it set, and how much you smooth it down.
You’ll pick light texture for subtle depth, medium for balanced interest, or heavy texture for bold character—adjust timing and knockdown pressure accordingly.
- Light texture: subtle
- Medium: versatile
- Heavy texture: dramatic
- Blend for shifts
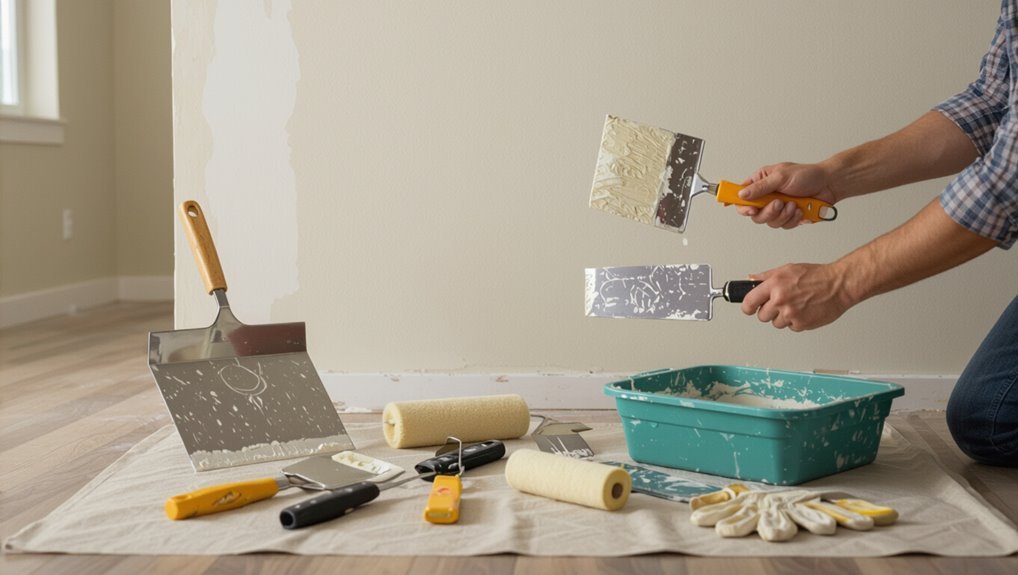
Tools You Need and Why They Matter
Now that you’ve picked the knockdown look you want, gather the right tools so you can get consistent results.
You’ll need hawks, knockdown knives, trowels, texture sprayers, and taping knives — choose tool types by surface size and technique.
Keep blades clean, lubricate moving parts, and inspect seals regularly; proper tool maintenance prevents flaws and saves time.
Materials Checklist: Compounds, Primers, Tapes
You’ll want to pick the right joint compound—setting vs. premixed—because consistency and drying time affect your knockdown finish.
Choose a high-quality primer that promotes adhesion and prevents flash-through, and use paper or fiberglass tape depending on whether you need strength or ease of use.
I’ll explain how each choice impacts prep, application, and the final look.
Joint Compound Types
Before you start knocking down the texture, pick the right joint compound—its consistency and setting time will determine how easy the process is and how durable the finish becomes.
You’ll choose between premixed and powder, slow or fast set, and adjust for your room. Consider compound types and application methods for desired texture and working time.
- Premixed all-purpose
- Setting-type powder
- Lightweight compound
- Trowel-grade compound
Primer And Tape Choices
Since the knockdown process can blur seams and highlight tape lines, pick primers and tapes that prevent soaking, bubbling, and visible joints while you work. Choose primer types (acrylic for adhesion, shellac for stains) and tape options (paper, fiberglass). Compare pros:
| Primer Types | Tape Options | Best Use |
|---|---|---|
| Acrylic | Paper | General |
| Shellac | Fiberglass | Moisture |
Premixed vs Powdered Texture Compound
When deciding between premixed and powdered texture compound, weigh convenience against control: premixed comes ready to use and saves prep time, while powdered mixes let you adjust consistency and shelf life.
You’ll choose based on project size, storage, and skill, comparing premixed advantages with powdered benefits.
- Fast setup
- Custom consistency
- Longer storage
- Less waste
Estimate Compound Quantities for Your Walls
Before you start texturing, you’ll want to calculate the total wall surface area by measuring height and length of each wall and subtracting openings like doors and windows.
Then check the joint compound’s coverage rate on the bag or product sheet to see how many square feet a bucket or bag will cover at the knockdown thickness you plan to apply.
Use those numbers to figure how many units of compound you’ll need, plus a small extra for waste and touch-ups.
Calculate Wall Surface Area
Start by measuring each wall’s width and height and multiplying them to get square footage; add windows and doors separately and subtract their areas from the total so you know how much joint compound and texture mix you’ll actually need.
Use surface area and measurement techniques precisely to avoid waste.
- Measure each wall
- Record openings separately
- Sum totals carefully
- Double-check calculations
Determine Joint Compound Coverage
Now that you know the total wall area and openings, figure out how much joint compound you’ll need for the knockdown texture.
For accurate coverage estimation, check manufacturer yield per bag and factor coat thickness and waste.
Compare premixed versus powder for material selection, then divide total square footage by yield, round up, and buy extra for touch-ups.
Keep receipts.
Safety Gear and Room Protection
1 essential rule: protect yourself and the room before you mix the texture.
Wear proper safety equipment and plan room preparation so dust and splatter stay controlled. Use respirator, goggles, gloves, and breathable clothing.
Seal vents and remove fragile items. Keep a clean work zone and a trash bin nearby.
- Respirator
- Eye protection
- Gloves
- Vent sealing
Masking, Drop Cloths, and Protecting Trim
Before you mix texture, cover everything you don’t want splattered: tape off trim, windows, outlets, and light fixtures, and lay overlapping drop cloths on floors and furniture.
Use effective masking techniques—painter’s tape, plastic sheeting, and paper—so lines stay clean.
For trim protection, wrap edges and secure seams.
Keep tools nearby to quickly reseal any gaps before you start spraying.
Inspect Walls and Identify Repairs Needed
Start by walking the room slowly and scanning every wall for dents, cracks, loose drywall paper, and nail pops—you’ll catch issues that will telegraph through the knockdown texture if you don’t fix them.
You’re doing a careful wall inspection and repair identification to note problem areas before texturing.
- Mark dents and cracks
- Note loose paper
- Flag nail pops
- Map uneven seams
Fixing Holes, Nail Pops, and Seam Issues
Before you start texturing, you’ll want to patch any holes and fix nail pops so the finish sits smooth.
Use joint compound to fill holes and set nail pops with screws or by sinking and covering them.
For seams, tape and skim coat the joints so they blend seamlessly with the surrounding wall.
Patch Holes Properly
Patch holes properly to make sure your knockdown texture adheres and looks seamless. Use appropriate patch types and repair techniques: clean edges, apply patching compound, sand smooth, and prime before texturing.
Follow these steps:
- Remove loose material and dust
- Choose patch type by hole size
- Layer compound thinly, feather edges
- Sand, wipe, and prime for uniform adhesion
Address Seams/Nail Pops
When you’re ready to texture, don’t ignore seams and nail pops—they’ll telegraph through knockdown if left untreated.
You’ll locate low spots, sand glossy tape, and apply seam repair techniques—embed tape, joint compound, and feather edges.
For nail pop solutions, sink or remove fasteners, fill and smooth, then re-tap and compound.
Let each layer dry, sand, and prime before texturing.
Tape and Bed Seams
Start by seating drywall tape firmly into the wet joint compound along each seam so the tape lies flat without bubbles or wrinkles.
You’ll use proper taping techniques for clean seam repairs, embedding tape, smoothing compound, and ensuring flat shifts before texture.
Follow these steps:
- Embed tape with a drywall knife
- Remove excess compound
- Check for gaps or bubbles
- Let compound set partially before knockdown
Sand and Feather Joint Compound
Now that your seams are bedded, you’ll want to pick the right joint compound—lightweight for easy sanding or all-purpose for durability.
Use proper sanding techniques and a fine grit to smooth without gouging, and keep dust control in mind.
Finish by feathering each edge so the repair blends invisibly into the surrounding texture.
Choosing The Right Compound
Pick a joint compound that gives you the right balance of workability and texture—sand for a grittier, more pronounced knockdown and feather (all-purpose) for a smoother, subtler finish.
You’ll choose between compound types to match desired texture finishes and application speed.
- Sanded for bold texture
- Feather/all-purpose for subtlety
- Pre-mixed vs. powder
- Drying time considerations
Sanding Techniques And Tips
After selecting sanded or feather joint compound, you’ll need the right sanding approach to shape the knockdown without overworking the surface.
Use fine-grit palms and light, even strokes to smooth high spots and preserve texture.
Focus on controlled sanding techniques, check progress often, and vacuum between passes.
Prioritize dust management with a vacuum sander or HEPA filter and wear protection.
Feathering For Seamless Blends
When you apply sand-and-feather joint compound, blend each pass outward in thin, tapered strokes so the edge disappears into the surrounding wall; this feathering prevents visible ridges and makes paint finish uniform.
You’ll use feathering techniques to control thickness and improve blend effectiveness. Work wet-on-wet, keep tools clean, and check edges in raking light.
- Use a wide knife
- Feather pressure
- Monitor drying
- Light sand only
Clean Walls and Control Dust Before Texturing
Before you apply texture, make sure the surface is clean and dust-free so the compound will adhere properly and you won’t trap grime under the finish.
Wipe walls with a damp microfiber cloth, vacuum corners and trim, and remove loose paint or debris.
Use plastic sheeting and negative air flow for dust control.
Proper wall preparation prevents adhesion issues and saves rework.
Mix Compound to Knockdown Consistency
You’ll want to pick a joint compound formulated for knockdown texture so it holds peaks but smooths easily.
Mix to a pancake-batter thickness and keep batches uniform so your pattern stays consistent across the wall.
Use a drill with a paddle or a mud mixer and a clean bucket, and stir slowly to avoid lumps and air pockets.
Choosing The Right Compound
If you want the knockdown texture to lay right and flatten smoothly, mix the joint compound to a creamier-than-taping consistency—thick enough to hold peaks but loose enough to spread and knock down without tearing.
Choose compound types that suit drying time and finish, and match your application techniques to the product.
- Premixed all-purpose
- Setting-type powders
- Lightweight compounds
- Acrylic blends
Getting Consistent Thickness
Getting a consistent knockdown consistency means mixing the compound so it holds peaks yet spreads and smooths without tearing—aim for a pancake-batter thickness that slides off a taping knife but still forms soft peaks when you lift it.
You’ll test small batches, adjust water slowly, and use texture application techniques with measured consistency control measures so each pass yields uniform coverage and predictable knockdown results.
Mixing Technique And Tools
Start by choosing the right tools: a clean five-gallon bucket, a margin trowel or mixing paddle, and a drill with a low-speed mixer make quick, consistent batches.
You’ll follow recommended mixing ratios, blend to a pancake-batter texture, and test texture consistency before spraying.
Use these tools and steps:
- Measure water and compound precisely
- Mix slowly to avoid lumps
- Adjust thickness incrementally
- Test and retest consistency
Adjust Mix for Temperature and Humidity
Because temperature and humidity change how quickly joint compound dries, you’ll tweak the water ratio and additives to match conditions.
For temperature adjustments, thin slightly in warm rooms to slow drying, or thicken in cold to prevent sagging.
For humidity considerations, add a retarder in dry air and reduce retarders in damp spaces.
Test small batches before full application.
Choose Spray Equipment: Hopper Gun vs Texture Sprayer
When picking equipment, you’ll weigh a hopper gun’s simple setup and low cost against a texture sprayer’s faster coverage and consistent pattern.
Think about portability for moving between rooms and how much time you want to spend on cleanup after the job. Your choice will affect speed, finish quality, and how much prep and maintenance you handle.
Hopper Gun Pros
A hopper gun gives you fast, consistent coverage for knockdown texture and shines when you’ve got large areas to finish quickly.
You’ll appreciate hopper gun efficiency and straightforward application techniques for uniform results. It’s portable, easy to clean, and works with common mixes.
- Fast coverage
- Consistent pattern
- Simple setup
- Easy maintenance
Texture Sprayer Benefits
Hopper guns work great for large jobs, but you might prefer a texture sprayer for tighter spaces or more control.
You’ll get finer pattern consistency and easier adjustments to spray pressure and nozzle size, improving your texture application techniques. A sprayer also reduces fatigue on detailed areas.
Follow basic sprayer maintenance tips to keep performance reliable and avoid clogging during use.
Portability And Cleanup
If you’re moving between rooms or working on a ladder, portability becomes a real factor—texture sprayers stay lighter and easier to carry, while hopper guns usually tie you to a compressor and heavier hose setup.
You’ll pick portable equipment for mobility and faster efficient cleanup; hopper guns need more teardown.
Consider:
- Weight and ladder access
- Hose and compressor hauling
- Cleanup time and tools
- Material waste
Pick Nozzles and Pressure for Knockdown Texture
Before you spray, choose a nozzle size and compressor pressure that match your material and the look you want—larger nozzles and lower pressure give bigger, chunkier splatters while smaller nozzles and higher pressure create finer textures.
Select nozzle types (fan, round, or adjustable) and set pressure settings to control droplet size. Adjust incrementally so you get consistent coverage without overworking the surface.
Practice Spraying on Scrap Board
Once you’ve dialed in your nozzle and pressure, practice spraying on a scrap board to confirm texture size and knockdown timing.
You’ll refine spray practice and texture techniques before you touch the wall. Test knockdown timing, adjust material mix, and note pressure tweaks so results stay consistent.
- Check coverage consistency
- Time your knockdown pass
- Tweak mix viscosity
- Mark successful settings
Spray Patterns, Distance, and Splatter Size
Start by choosing a spray pattern that matches the texture you want—wide fan for light, even coverage or a narrower cone for denser splatter—and hold the gun at a consistent distance (typically 12–18 inches) to control droplet size and overlap.
You’ll vary nozzle settings and speed to create spray techniques and splatter variations, testing on scrap to dial in size, density, and edge definition.
Section Walls for Even Spraying
Divide the wall into manageable panels—typically 4 to 6 feet wide—so you can keep a steady rhythm and wet edge while spraying.
You’ll plan panel order, mark boundaries lightly, and overlap passes for even coverage. Use consistent spraying techniques to maintain texture consistency across panels and work systematically from one section to the next.
- Mark panel edges
- Keep overlap uniform
- Maintain steady speed
- Check texture consistency
How to Spray Walls Without Drips or Heavy Spots
To avoid drips and heavy spots, hold the spray gun perpendicular to the wall at a consistent distance—typically 10 to 18 inches—and move it in steady, overlapping strokes so each pass blends smoothly into the last.
Use a light, even spray technique, keep nozzle settings consistent, and watch for runs. Adjust pressure or thinning to maintain texture consistency and pause to correct any uneven areas immediately.
When to Knock Down After Spraying
Right after you finish spraying, you’ll want to wait until the texture firms up but is still slightly wet — typically 10 to 20 minutes depending on your compound and spray thickness.
Check surface temperature, humidity, and airflow, because hot or dry conditions speed drying while cool or humid conditions slow it.
Use a few test spots to time your knockdown so you get a clean, consistent finish.
Ideal Knockdown Wait Time
You’ll want to wait until the sprayed texture has set enough to form peaks but still holds moisture on the surface—typically 10–30 minutes depending on temperature, humidity, and compound thickness—so the knife drags smoothly without tearing or smearing.
Aim for ideal drying time and check perfect humidity; adjust timing based on compound and spray density.
- Test a small area first
- Watch peak resilience
- Avoid over-drying
- Keep tools clean
Weather And Surface Conditions
Because temperature, humidity, and surface temperature all affect how quickly the texture sets, plan your knockdown timing around current weather and the wall’s condition so the knife glides without tearing.
Check weather effects: avoid extreme heat, cold, or high humidity.
Confirm surface preparation—clean, dry, and primed walls.
Adjust wait time accordingly and test a small patch before proceeding.
Use a Knockdown Knife for the Mottled Look
Once the joint compound has set into soft peaks, drag a knockdown knife across the surface at a shallow angle to flatten the peaks and create that mottled, flattened texture you’re aiming for.
Once the compound forms soft peaks, drag a knockdown knife at a shallow angle to flatten and texture.
You’ll refine knockdown techniques and explore texture variations while keeping edges soft. Work systematically and blend seams for consistency.
- Start from a corner
- Maintain wet edges
- Wipe blade often
- Inspect lighting
Knockdown Technique: Angle, Pressure, Stroke Speed
You’ll control the look by adjusting the spray angle and distance so the compound lands where you want it.
Then use the knockdown knife with consistent pressure and a steady speed to flatten the peaks without gouging.
Practice a few passes to find the combo of angle, pressure, and stroke speed that gives the finish you want.
Spray Angle And Distance
Start by holding the sprayer at a steady 45-degree angle and about 12–18 inches from the wall — that positioning gives you the broad, even droplets needed for a classic knockdown look.
You’ll control spray technique and texture consistency by managing distance, angle, pressure, and stroke speed.
- Maintain consistent angle
- Keep steady distance
- Use moderate pressure
- Smooth, even strokes
Knife Pressure And Speed
After spraying, switch to your knockdown knife and press flat against the droplets at about a 30–45 degree angle; you’ll want a firm but forgiving touch so the blade drags the peaks without gouging the drywall.
Use steady knife technique, maintain consistent pressure control, and pull slowly—about one to two feet per second.
Vary speed slightly to blend seams and avoid reworking wet areas.
Fix Texture Mistakes Right After Knocking Down
Catch and fix imperfections while the mud’s still wet—knockdown texture dries fast, and small ridges, heavy peaks, or missed spots are easiest to correct immediately.
Use texture correction techniques and knockdown repair tools:
- Smooth ridges with a damp sponge or pan knife
- Re-knock peaks lightly with a broad knife
- Dab missed spots with matching mud
- Feather edges to blend
Blend New Texture Into Existing Walls
1 key to making your repair invisible is matching the surrounding texture’s pattern, scale, and knockdown timing so the new mud settles and flattens the same way as the old. You’ll use texture blending techniques and proper existing wall preparation: feather edges, duplicate tool strokes, and knock down at the same moisture point.
| Step | Action |
|---|---|
| 1 | Prep |
| 2 | Blend |
Drying Times and How to Tell It’s Cured
Once you’ve matched the texture and knocked it down to blend with the surrounding wall, you’ll need to wait for the joint compound to set before painting or sanding.
Track drying phases and watch curing indicators to know when it’s ready.
Monitor drying stages and key curing signs to confirm the compound is ready for finishing.
- Surface color evens out
- Compound feels firm, not tacky
- No coolness to touch
- Edges hold shape without residue
Light Sanding to Remove High Points
Start with a light touch and a fine-grit sanding sponge or 120–220 grit sandpaper to knock down any high points without scuffing the texture’s peaks.
Walk the wall, using high point identification to spot raised areas, and apply gentle sanding techniques in circular motions.
Wipe dust frequently, recheck highs, and stop once the surface reads even to touch and sight.
Priming Textured Walls: Which Primer to Use
Before you prime, choose a product that’ll stick to the texture and seal the surface: use a high-quality latex primer or a bonding primer for glossy or dense textures, and consider a stain-blocking or oil-based primer where tannin bleed or heavy stains exist.
Choose a primer that bonds and seals the texture—latex for walls, bonding for slick surfaces, oil or stain-blockers for tannins.
Pick primer types suited to porosity; test adhesion. Follow proper application techniques for even coverage.
- Use latex for general walls
- Bonding for slick areas
- Oil for stains
- Stain-blocking for tannins
Painting Over Knockdown: Rollers and Technique
Now that your primer’s bonded and sealed the knockdown texture, it’s time to pick the right rollers and paint technique to get smooth, even coverage without filling the texture or leaving lap marks. Use nap 3/8″–1/2″ rollers, work in sections, and maintain a wet edge for consistent paint application and proven roller techniques.
| Tool | Purpose |
|---|---|
| 3/8″ nap | Light texture |
| 1/2″ nap | Medium texture |
| Brush | Cut-ins |
| Roller grid | Even load |
| Extension pole | Reach |
Touch Up High‑Traffic Areas After Painting
Check high-traffic spots—corners, doorways, and chair-rail areas—for scuffs or thin coverage and touch them up while the rest of the wall is still curing.
You’ll use quick high traffic repairs and simple touch up techniques to blend paint and texture without overworking.
Keep tools clean and light-handed for seamless results.
- Feather edges
- Match sheen
- Use small tools
- Dry between coats
Troubleshooting: Uneven Texture, Flaking, Stains
If you notice uneven knockdown texture, flaking, or stains, address each problem quickly to prevent further damage and get a consistent finish.
For uneven texture solutions, sand high spots, reapply thin compound, and re-knockdown.
For flaking repair strategies, remove loose material, prime, and feather in fresh texture.
Treat stains with stain-blocking primer before texturing or painting to prevent bleed-through.
Common Mistakes to Avoid for a Pro Finish
1 essential habit to get a pro finish is to prep thoroughly—skip or rush prep and you’ll see it in every seam, drip, and blotch.
You’ll also follow texture application tips, control drying times, and judge finish quality considerations to avoid patchy or overworked areas.
- Mix consistency
- Tool cleanliness
- Proper knockdown timing
- Even coverage
Cost Breakdown: DIY vs Hiring a Pro
Deciding whether to tackle knockdown texture yourself or hire a pro comes down to balancing material and tool costs, your time and skill level, and the size of the job—DIY can save money on small rooms if you already own or can borrow the right tools, but labor-intensive prep and a learning curve can eat those savings on larger or high-visibility areas.
| DIY savings | Professional fees |
|---|---|
| Tool investment | Time evaluation |
| Skill level | Project complexity |
Cost comparison weighs long term benefits against upfront expense.
When to Call a Professional
After weighing costs and your comfort with tools and prep, you should call a professional when the job exceeds your time, skill, or tolerance for risk—large areas, visible rooms, or surfaces with damage that need patching are good examples.
You’ll want professional experience for tricky spots, complex repairs, or high project complexity to guarantee a consistent finish and avoid costly rework.
- Large open areas
- Historic or textured surfaces
- Structural or moisture damage
- Tight timelines or high visibility
Frequently Asked Questions
Can Knockdown Texture Be Applied Over Wallpaper Without Removing It?
You shouldn’t; applying knockdown texture over wallpaper usually fails. You’ll need thorough wall preparation—remove or score wallpaper, repair surfaces—so texture adhesion holds. If you skip prep, the finish will likely peel or bubble.
How Long Before Trim and Fixtures Can Be Reinstalled After Texturing?
It depends: wait 24–48 hours for drying time in normal conditions, but don’t rush—moisture sensors should read dry before trim installation; in humid rooms, expect up to 72 hours to avoid problems.
Will Knockdown Texture Hide Textured Ceiling Imperfections?
Yes, knockdown texture can help hide ceiling imperfections; you’ll gain texture benefits by masking minor flaws, reducing need for extensive ceiling repairs, though deep damage still needs patching for a durable, professional finish.
Can Knockdown Be Applied Outdoors on Exterior Stucco or Siding?
Sure — you can, but don’t expect it to perform miracles: you’ll use knockdown for exterior applications on a stucco finish only if it’s bonded, sealed, and weatherproofed; otherwise it’ll peel and sulk dramatically.
Does Humidity During Painting Affect Final Texture Appearance?
Yes — humidity effects can alter drying time and knockdown timing, so you’ll get different texture consistency. You’ll need to adjust mix water, work faster in high humidity, or slow drying in low humidity to maintain uniformity.
Conclusion
You’ve learned the steps, picked your tools, and pictured the finish—but one small choice can change everything. Tackle a test patch first; feel the rhythm of spraying, waiting, and dragging the knife. If it clicks, you’ll transform ordinary walls into something textured and alive. If it doesn’t, don’t force it—call a pro. Either way, your walls are about to show personality; the only question is how confident you’ll feel doing it yourself.