How to Fix Chipped Paint on Cabinets Without Refinishing the Whole Surface
You can fix small chipped cabinet paint without refinishing the whole surface by cleaning the area, sanding loose edges, filling deep gouges with an appropriate filler, then priming and touching up with a matched paint. For veneers or laminate use flexible fillers and bonding primer; for metal treat rust first. Use fine-grit sandpaper and light feathering to blend, or a touch-up pen for tiny nicks. Keep coats thin and dry fully—continue for tips on tools, blends, and troubleshooting.
Quick Answer Can You Fix Chipped Cabinet Paint Without Refinishing the Whole Surface?
Yes — you can often fix small chips by cleaning the area, sanding lightly, applying a matching touch-up paint or filler, and sealing.
This quick fix works well for isolated chips or small worn spots that don’t need color-matching across the whole door.
If chips are widespread, the finish is peeling, or colors and sheen don’t match, you’ll need to refinish the entire surface.
Short, direct solution summary
You can fix small chips without refinishing the whole cabinet by cleaning the area, sanding the edges smooth, applying a matching touch-up paint or stain, and sealing it with a clear coat to blend and protect the repair.
For how to fix chipped paint on cabinets, work carefully: fill gaps, feather paint into surrounding finish, let layers dry, then lightly sand and topcoat for a seamless, durable result.
When this approach is appropriate vs when to refinish
Sometimes a quick touch-up will do the job, but you’ll want to refinish when damage is widespread, the finish is failing, or the cabinets have multiple layers of mismatched paint.
Touch-ups suit small chips, isolated wear, or matching a single paint type.
Refinish when texture, adhesion, or color vary across doors, when hardware removal is needed, or when you want a long-term, uniform result.
Basic Understanding What Causes Paint to Chip on Cabinets
You’ll see paint chip when everyday wear, moisture, knocks, or poor surface prep break the bond between finish and cabinet.
The material underneath—raw wood, laminate, or MDF—and the type of paint or finish you used change how easily chips form and how you should repair them.
Knowing what caused the damage and what surface you’re working with makes the fix faster and more durable.
Common causes (wear, moisture, impact, poor prep)
Although cabinets can look sturdy, several common factors make paint chip over time.
You’ll see wear from constant opening and closing, impacts from dishes or tools, and moisture swelling edges or causing adhesion loss.
Poor surface prep—grease, dust, or failing primer—lets paint lift.
Recognize these causes so you can target repairs rather than guess at fixes.
Types of cabinet surfaces and paint finishes and how they affect repairs
Knowing why paint chips helps, but the material under the paint and the type of finish determine how you should repair it.
You’ll match methods to substrate and sheen: wood, veneer, laminate, or metal each need different prep, filler, and touch-up paint choices.
- Wood: sand, stain/prime, blend.
- Veneer: gentle sanding, flexible filler.
- Laminate: scuff, bonding primer.
- Metal: rust treat, epoxy primer.
Materials and Tools You’ll Need
Before you start, gather cleaning supplies and safety gear so you can remove grease and protect yourself.
You’ll also need the right fillers, primers, and touch-up paints—know which type suits your cabinet surface and the size of the chip.
Finally, pick suitable brushes, applicators, sandpaper, and blending tools to get smooth repairs that match the surrounding finish.
Cleaning supplies and safety gear
You’ll want a few basic cleaning supplies and proper safety gear before you start—mild degreaser or dish soap, microfiber cloths, a soft-bristle brush, and a tack cloth for final dust pickup, plus gloves, eye protection, and a respirator rated for paint fumes if sanding or using solvent-based products.
Also keep disposable rags, a bucket, painter’s tape, and a well-ventilated workspace to protect surfaces and yourself.
Fillers, primers, and touch-up paints (types and when to use each)
When you’re repairing chips, choosing the right filler, primer, and touch-up paint makes the difference between a temporary fix and a lasting repair.
Use wood filler for deep gouges and lightweight spot putty for shallow nicks.
Apply a bonding primer on bare wood or exposed laminate.
Match touch-up paint type—latex for water-based finishes, oil or alkyd for older enamel—to guarantee adhesion and color consistency.
Brushes, applicators, sandpaper, and blending tools
Gather the right brushes and applicators so your repair looks seamless: a small angled sash brush for cutting in, a tiny round artist’s brush for pinpoint touch-ups, foam brushes for smooth laydown, and disposable cotton swabs or toothpicks for applying filler or paint into tight chips.
- Fine-grit sandpaper (220–320) for feathering edges.
- Tack cloth for dust removal.
- Blending pad or makeup sponge for soft blends.
- Mixing stick and palette for small batches.
Step-by-Step Repair Process
Start by evaluating the chip to pick the right repair method and gather your supplies.
Clean the area, remove loose paint, and lightly sand the edges to feather them.
For deep chips, fill with the appropriate filler, then prime the repaired spot and let it dry before painting.
Step 1 Assess the damage and choose the right repair method
Before you begin repairs, take a close look at each chip to decide what method will work best: note size, depth, and whether bare wood, primer, or just paint is exposed.
Tiny surface flakes need touch-up paint; deeper gouges require filler and sanding.
Also check surrounding adhesion—if paint is lifting, plan to remove loose material before repairing for a lasting fix.
Step 2 Clean the area thoroughly
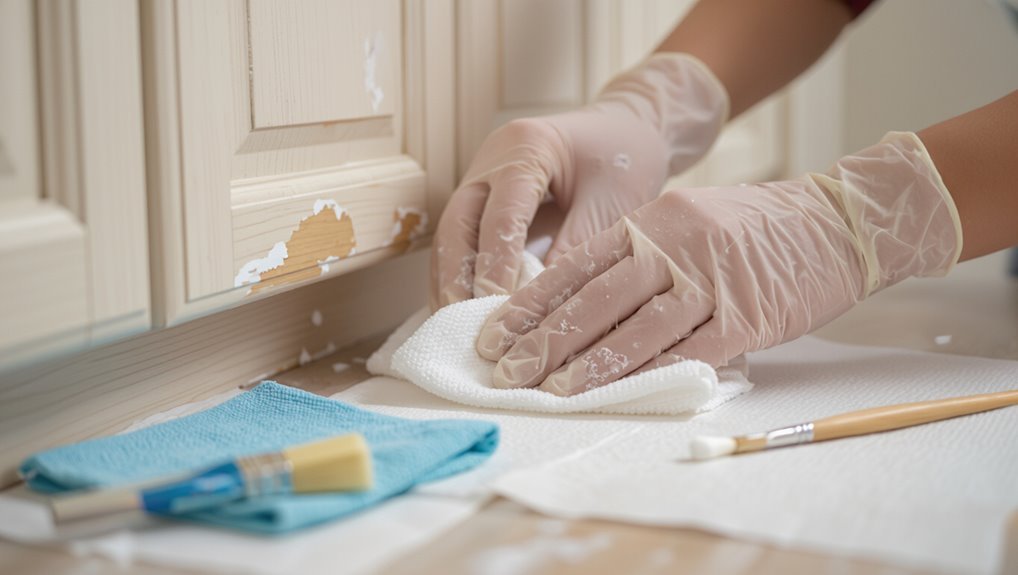
1. You’ll want to remove dirt, grease, and grime before any repair. Wipe the chip and surrounding area with a microfiber cloth and a mild degreaser or dish soap solution.
Rinse with a damp cloth, then dry completely. For stubborn residue use rubbing alcohol sparingly.
Clean surfaces help primers and touch-up paint adhere and give a neater, longer-lasting finish.
Step 3 Remove loose paint and lightly sand edges for feathering
Now that the surface is clean and dry, remove any loose or flaking paint around the chip so the repair will bond properly.
Use a utility knife or stiff putty knife to lift edges, then gently sand the perimeter with fine-grit (220–320) sandpaper to feather the old paint into the surrounding finish.
Wipe away dust with a tack cloth before proceeding.
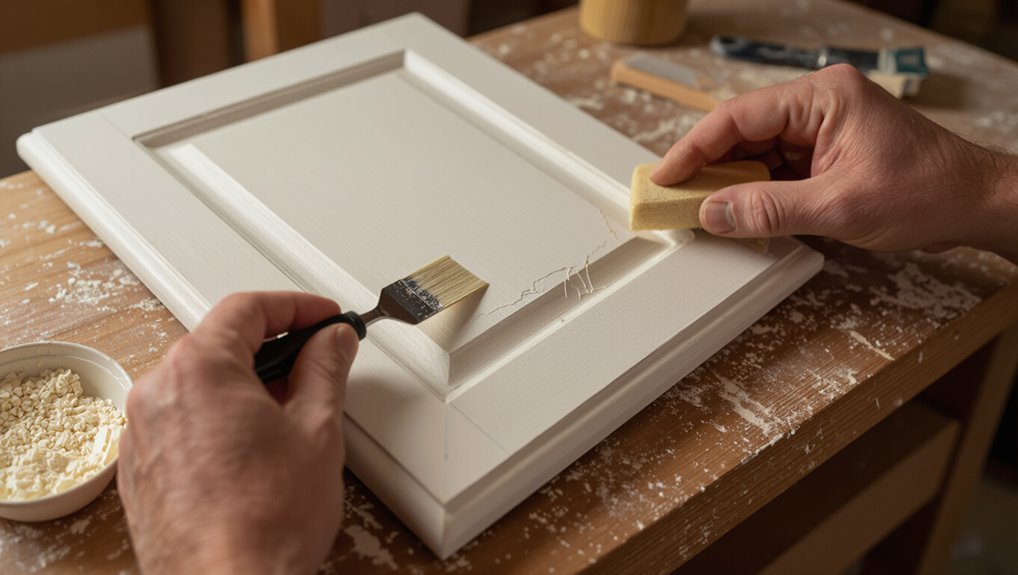
Step 4 Fill deep chips or gouges (products and techniques)
If the chip’s deeper than a hairline or has a gouge, you’ll need to fill it so the surface’s level before repainting; choose a filler based on the cabinet material and the size of the damage.
Use wood filler for solid wood, epoxy putty for large voids, or lightweight spackling for thin veneer.
Pack, smooth with a putty knife, and let it cure fully.
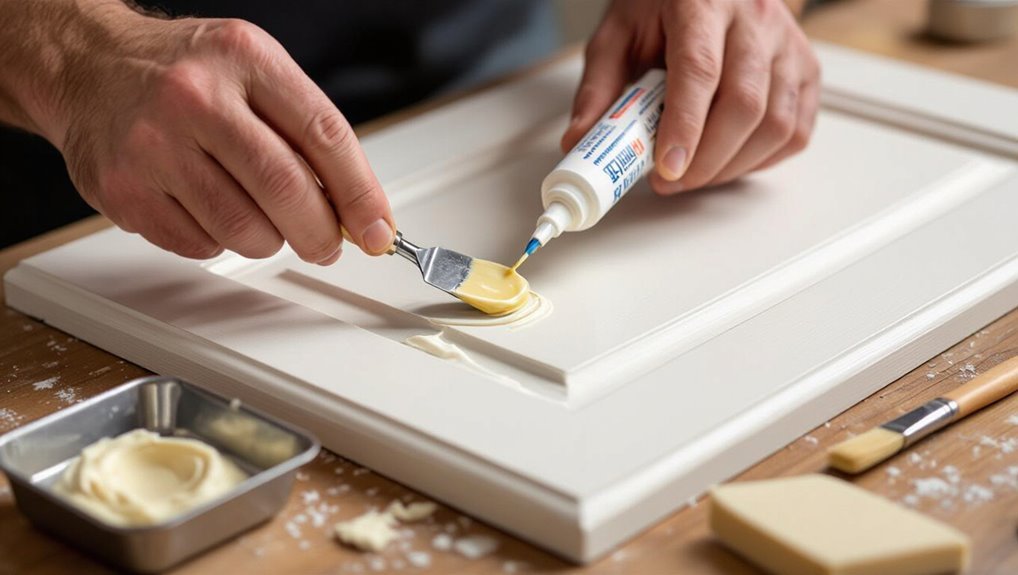
Step 5 Prime the repaired area and let dry
Brush on a thin coat of primer over the repaired spot so the filler seals and the paint will adhere evenly; let it dry fully before sanding or topcoating.
Use a small brush or foam applicator, cover edges feathered into surrounding finish, and avoid heavy buildup.
Follow manufacturer dry-time; test tack-free status before light sanding.
Clean dust, then proceed when surface is smooth and dry.
Step 6 Apply touch-up paint: color-matching tips and application methods
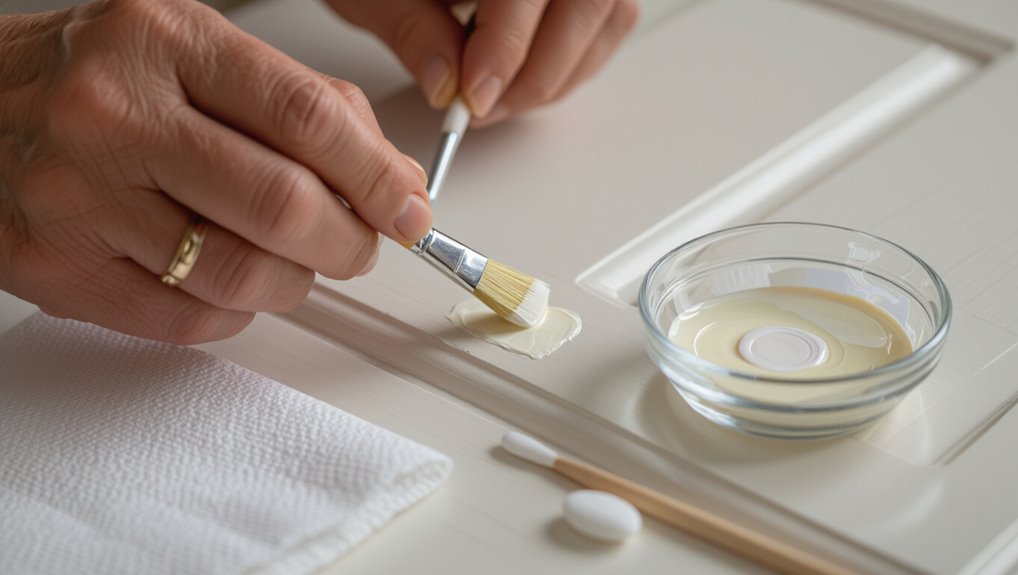
With the primer sanded smooth and dust-free, it’s time to apply touch-up paint that matches both color and sheen so the repair blends seamlessly with the rest of the cabinet.
Test small drops in an inconspicuous spot, thin paint for smooth edges, and use a fine brush or toothpick for precision.
Build thin coats, letting each dry fully before adding more.
Step 7 Blend and feather the repair into surrounding finish (sanding, glazing, topcoat)
Step 7 is where you blend the patched area into the surrounding finish so the repair disappears to the eye: sand the edges featheringly, apply thin glazes to match depth and sheen, then seal with a compatible topcoat.
Lightly sand with fine grit, wipe dust, glaze in thin layers until color and gloss align, then apply a thin, even topcoat compatible with the original finish.
Step 8 Cure time and final inspection
After you’ve blended, glazed, and applied the final topcoat, let the repair cure fully before touching hardware or returning the cabinet to regular use.
Check the manufacturer’s cure time—usually 24–72 hours for surface dryness, longer for full cure.
Inspect for texture, adhesion, and color match under good light.
Lightly test edges; tighten hardware only when the finish resists fingernail pressure.
Alternative Quick Fixes for Small Chips
If you need a fast fix, you can use paint pens or touch-up markers to blend small chips without sanding.
Wax sticks and furniture repair kits are great for filling and concealing dings on wood or laminate.
For rentals, consider purely cosmetic, removable options that won’t damage the finish.
Using paint pens and markers
One quick way to hide small chips is to use a paint pen or furniture touch-up marker, which lets you apply color precisely without brushes or drying trays.
Choose a matched shade, clean and dry the area, then stroke lightly, building thin layers. Wipe excess immediately.
Let each layer dry between passes and finish when the chip blends smoothly with surrounding paint.
Wax sticks and furniture repair kits
Wax sticks and furniture repair kits give you a fast, low-mess way to camouflage small chips without full repainting.
You’ll select a matching wax or putty, press it into the nick, level it with a scraper, and buff gently.
Kits often include color tints and finish coats so you can blend seams and restore smooth appearance quickly without sanding or repainting the whole cabinet.
Temporary cosmetic fixes for rental units
Because you’re renting, you likely want fixes that hide chips quickly and won’t risk your deposit, so focus on nonpermanent solutions that leave no lasting damage.
Use removable touch-up markers or furniture crayons matched to the cabinet color, apply painter’s putty sparingly for deeper nicks, then smooth and wipe clean.
Press-on veneers, decorative magnets, or temporary adhesive patches also conceal flaws without altering surfaces.
When to Match vs Repaint Entire Door or Drawer Front
Decide whether to match a small chip or repaint the whole door by weighing visibility, the size of the damage, and your finish type.
If the chip’s in a low‑visibility spot and the finish is textured, a touch-up might be faster and cheaper.
But when damage is large, obvious, or your finish is smooth, repainting the entire door usually saves time and looks better in the long run.
Factors to consider (visibility, extent of damage, finish type)
When you’re choosing whether to touch up a chip or repaint an entire door or drawer front, weigh three things: how visible the damage is, how extensive it runs, and what finish you’re working with.
If chips sit on focal surfaces, full repainting often looks cleaner.
For small, isolated chips on textured or gloss finishes, targeted matching and blending usually suffices to hide flaws.
Cost vs time trade-offs
After weighing visibility, damage extent, and finish, you’ll also want to balance cost against time to pick the best fix. If chips are small and visible, touch-ups save money and hours. Large or multiple chips justify repainting a door.
| Option | When to choose |
|---|---|
| Touch-up | Single small chips, quick fix |
| Repaint | Multiple/large chips, uniform finish |
Common Mistakes to Avoid
Don’t skip proper surface prep—you’ll regret it when paint won’t stick.
Make sure you’re using the right primer and paint, avoid overbuilding filler or mismatching color, and don’t apply coats so thick that they can’t dry.
Tackling these mistakes up front will save time and give a much cleaner repair.
Skipping surface prep
If you skip prepping the cabinet surface, the new paint won’t adhere properly and chips will reappear quickly.
You should clean grease and dirt, sand glossy edges, and remove loose flakes before touching up.
Wipe dust away and let the surface dry fully.
Skipping these steps wastes time and materials, so take a few extra minutes to guarantee a durable, seamless repair.
Using wrong primer or paint type
Once you’ve cleaned, sanded, and removed loose flakes, pick the correct primer and paint so your repair lasts.
Use a bonding primer for slick surfaces and an oil-based or alkyd primer for bare wood.
Choose paint formulated for cabinets or trim—durable, washable, and compatible with your primer.
Don’t mix water- and solvent-based products; adhesion and finish will suffer.
Overbuilding filler or poor color matching
When you pile on too much filler or skimp on color matching, the repair will stand out no matter how smooth the surface looks.
You should apply filler sparingly, feathering edges and sanding flush. Match paint by testing small swatches under room lighting and blend tones, not just brightness.
Subtle adjustments and thin layers keep the fix invisible.
Applying too-thick coats or inadequate drying time
After you’ve feathered filler and matched tones, pay equal attention to how you apply paint: heavy, thick coats and insufficient drying are two of the quickest ways to ruin an otherwise good repair.
Apply several thin, even coats instead, sanding lightly between them. Let each coat dry fully per the manufacturer’s instructions; rushing causes drips, tackiness, and poor adhesion that’ll show up fast.
Prevention and Maintenance Tips to Avoid Future Chipping
To keep chips from coming back, you should clean cabinets with mild cleaners and soft cloths, and use hardware gently to avoid puckering the paint.
Apply a clear protective finish and do small touch-ups as soon as you spot wear.
Also control humidity and temperature to prevent swelling or shrinking that can crack the paint.
Best cleaning practices and gentle hardware use
Because regular care prevents most wear, adopt gentle cleaning routines and handle hardware with care to keep cabinet paint intact.
Use a soft microfiber cloth, mild detergent diluted in water, and avoid abrasive pads or harsh solvents.
Wipe spills promptly, dry surfaces, and loosen stuck hardware gently with proper tools.
Tighten hinges carefully to prevent stress and avoid slamming doors.
Protective finishes and periodic touch-ups
While regular cleaning helps, applying a protective finish and committing to small, periodic touch-ups will keep chips from spreading and extend your paint’s life.
Use a clear polyurethane or water-based topcoat suitable for painted cabinets, brush thin coats, and sand lightly between layers.
Inspect monthly, fill tiny nicks with matching paint, and seal them quickly to prevent moisture and wear from worsening damage.
Humidity and temperature control recommendations
If you keep humidity and temperature steady, you’ll prevent the wood and paint from expanding and contracting and reduce the risk of new chips and loosening edges.
Use a dehumidifier in humid months and a humidifier in dry seasons to stay within 35–55% relative humidity.
Maintain indoor temperatures around 65–75°F, avoid rapid swings, and ventilate cooking or shower areas promptly to protect cabinet finishes.
Troubleshooting Problems and How to Fix Them
If your repair stands out because it’s glossier or more raised than the surrounding finish, you’ll want to sand and feather the edges and use a matching sheen paint.
If fillers start cracking or peeling later, remove the failed filler, check for adhesion issues or movement, and reapply a flexible, paintable filler.
And if the color looks off after drying, try a tintable primer or mix small test batches until you get a consistent match before finishing the whole area.
Repair stands out or is glossy vs flat surrounding area
When your repair looks glossier or sits higher than the surrounding finish, it draws the eye and ruins the seamless look you want—so you’ll need to blend the texture and sheen before calling the job done.
Lightly sand the repair smooth, feather edges into the old paint, then apply a thin coat of matching sheen paint or a satin/flat topcoat to the whole panel.
Fillers cracking or peeling later
Check the filler bond and surface prep first — most cracking or peeling happens because the filler couldn’t adhere to dirty, oily, or poorly sanded wood, or because the repair was painted before the filler fully cured.
Sand back to solid material, remove dust and grease, then use a compatible filler.
Prime and let it cure completely before repainting to prevent repeat failures.
Color mismatch after drying
Because paint often looks different once it’s fully cured, you may notice a subtle or stark color shift after drying—especially over repairs, primed areas, or when using different paint batches.
If colors don’t match, sand lightly, feather the repair edges, and apply thin coats of the original finish.
Test in hidden spots, adjust with tint or glaze, or repaint the entire panel for uniformity.
Estimated Time and Cost Guide
For a small chip you’ll usually spend 10–30 minutes, while filling and sanding a large gouge can take an hour or more.
Materials like filler, primer, and paint typically cost $10–30 per repair, but hiring a pro can raise that to $50–200 depending on complexity.
Let’s compare time and expense so you can pick the most cost-effective route.
Time per repair size (small chip vs large gouge)
Repair time varies a lot with the damage: a small paint chip usually takes 15–30 minutes, while a large gouge can demand one to three hours including prep, drying, and touch-ups.
You’ll spend most time on sanding, filling, and waiting for primer or filler to dry. Plan multiple short waits; complex gouges need layered filling and careful feathering for a seamless finish.
Cost breakdown (materials vs professional repair)
While a DIY fix usually keeps your out-of-pocket cost low, you’ll need to weigh materials and time against hiring a pro.
For DIY, expect $10–$60 for filler, sandpaper, primer, touch-up paint, and brushes; larger jobs add caulk or wood filler.
Pro repair runs $75–$300+ depending on scope and finish.
Factor your time, skill level, and desired durability.
FAQ
You’ll find quick answers here to common concerns like how long a touch-up typically lasts and whether spray paint works without a full refinish.
I’ll also cover visibility under bright light or in photos, when replacement beats repair for badly chipped doors, and how to match paint from an old can without a sample.
If you still have questions after this FAQ, you can try the troubleshooting tips below.
How long does a touch-up repair typically last?
How long a touch-up lasts depends largely on where the cabinet is, how well you prep the surface, and the quality of the paint and finish you use.
In general, expect a well-done repair to hold for several months to a few years. High-traffic areas wear faster; thorough cleaning, proper adhesion, and matching sheen extend longevity.
Reapply when chipping reappears.
Can I use spray paint for touch-ups without refinishing?
Yes—you can use spray paint for small touch-ups without fully refinishing, but success depends on prep, paint choice, and technique.
Clean, sand, and degrease the chip, mask surrounding areas, and use light, even coats.
Match finish and color, let each coat cure, then blend edges with fine grit.
Test spray in an inconspicuous spot first.
Will a repaired area show under bright light or photography?
Wondering if the repaired spot will stand out under bright lights or in photos?
You might notice slight differences in sheen or texture close up, especially under harsh, directional lighting or flash.
Match paint color and finish, feather edges, and blend carefully to minimize visibility.
From normal viewing distances and diffuse light, a well-done touch-up is usually inconspicuous.
Is it better to repair or replace badly chipped cabinet doors?
If the touch-up is nearly invisible from normal viewing, you might still be weighing whether to repair or replace badly chipped cabinet doors.
Consider damage extent, cost, and time: small localized chips you can repair quickly and affordably.
Replace doors when multiple panels, edges, or structural integrity are compromised, or when matching finish and long-term durability justify the investment.
Can I match paint from an old can if I don’t have a sample?
Can you match paint from an old can without a sample? You can, but it’s tricky.
If the can’s label lists manufacturer, color name and formula, bring that info to a paint store. They can mix a close match.
If the label’s missing, bring a cabinet chip or a high-quality photo; stores use color-matching devices, though lighting and finish differences can affect accuracy.