How to Fix Paint Lines on a Wall for a Smooth Finish
You can fix paint lines by lightly sanding ridges with medium, then fine grit, wiping dust, and feathering edges with thin coats or a glaze to blend. Keep a wet edge, use a mini roller or soft brush, and match sheen and color before touching up. Work in good light and control humidity so coats dry evenly. If you want step-by-step tool choices, sanding grits, and quick-check tips, keep going for more detail.
Quick 5‑Minute Fix After Paint Dries
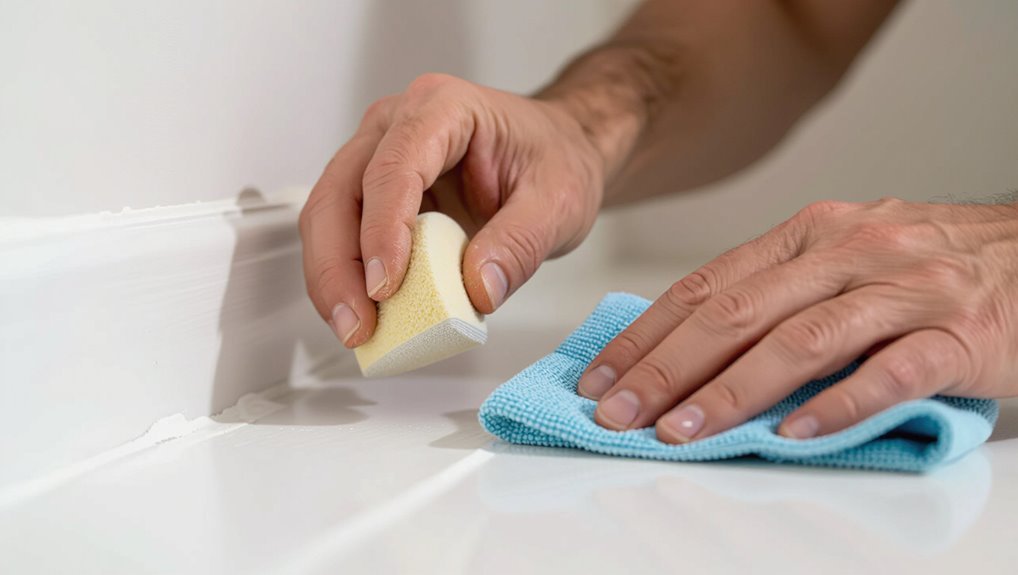
Notice the paint line’s texture and color—you’ll use different fixes for raised ridges versus faint discoloration.
If ridge-like, lightly sand, wipe, then apply thin coat with a small brush for quick touch ups.
For faint discoloration, feather new paint outward and overlap slightly for efficient blending.
Let dry, assess, and repeat sparingly until the line disappears.
Why Do Paint Lines Appear on Walls?
Paint lines usually come from two main issues: improper surface prep and application technique errors.
If you skip cleaning, sanding, or priming, the new paint won’t bond evenly and will show lines.
And if you rush, overload the brush, or stop midway through a section, you’ll leave noticeable edges and lap marks.
Improper Surface Prep
If you skip proper cleaning, sanding, or priming, you’ll almost always see visible lines where new paint meets the old surface.
You need to remove surface imperfections and promote paint adhesion before repainting. Do this:
- Clean dirt, grease, and loose flakes.
- Sand glossy areas and fill dents.
- Apply a quality primer suited to the wall material.
Application Technique Errors
Once you’ve prepped the surface, how you apply the paint makes a big difference—mistakes with rollers, brushes, or timing will leave visible lines where new and old coats meet.
You’ll avoid application mistakes by using correct brush technique and roller usage, matching paint consistency and drying times, mastering edge blending for surface texture, and choosing compatible paint sheens, finish types, and high product quality.
How to Tell Paint Lines From Brush Marks or Texture?
How can you quickly tell whether those unsightly lines are from the paint application or the wall’s texture? Use paint line types and line identification techniques to decide.
Inspect lighting, run your hand, and compare angles.
- Look for raised ridges vs. flat streaks.
- Check under raking light for shadowed texture.
- Feel for brush stroke direction and depth.
Tools You’ll Need to Remove Paint Lines Effectively
You’ll want just a few basic tools to tackle paint lines: sandpaper or a sanding block for smoothing, and a paint scraper or razor for lifting stubborn ridges.
Start with medium-grit sandpaper and finish with a finer grit for a seamless surface.
Use the scraper or razor carefully to avoid gouging the wall.
Sandpaper And Sanding Blocks
Although it’s tempting to grab the nearest sheet of sandpaper, choosing the right grits and a comfortable sanding block will make removing paint lines faster and cleaner.
You’ll use proper grit selection and sanding patterns to control sanding pressure, improve sanding efficiency, and guarantee surface smoothness while following sanding safety.
Block advantages help maintain even sanding techniques.
- Choose progressive grits
- Use firm block
- Vary patterns
Paint Scraper And Razor
After sanding has knocked down the high edges, reach for a paint scraper and a razor to cleanly lift stubborn lines and tight beads of paint.
You’ll use them to adjust surface texture and improve edge blending after varied paint application.
Consider paint adhesion, paint sheens, drying conditions and paint types; pair with proper brush techniques, roller usage and repair methods for a seamless finish.
How to Choose the Right Sandpaper Grit for Edges?
Pick a sandpaper grit that matches how rough your paint edge is and what finish you want to achieve.
You’ll use grit comparison to select coarse for heavy ridges or fine for feathering. Focus on edge preparation and edge blending to maintain finish quality and texture matching.
Apply sanding techniques for surface smoothing. Remember sanding tips for paint application and paint consistency.
- coarse vs fine
- feathering steps
- final polishing
Sanding Block vs. Sanding Sponge for Paint Lines
When you’re smoothing paint lines, choose a sanding block when you need flat, even pressure and a sanding sponge when you need to follow contours or work into corners.
Both let you control edge blending but deliver different feel and finish. You’ll pick based on sanding techniques and surface compatibility: use a block for large flat areas and a sponge for trim, rounded edges, and tight spots to avoid gouging.
How to Feather a Paint Edge for a Smooth Transition?
Moving from choosing the right sanding tool, you’ll next master feathering the paint edge to blend new and old coats seamlessly.
Use subtle feathering techniques and careful paint blending to hide seams. Work lightly, keep edges damp, and match sheen.
- Light, outward strokes
- Thin glaze or diluted paint
- Soft brush or mini roller
Practice until changes disappear.
Step‑By‑Step: Sanding a Paint Ridge Without Damaging Trim
Start by protecting the trim: lay painter’s tape neatly along the edge, press it down firmly, and cover nearby surfaces with drop cloths so you can sand confidently without risking damage.
Use gentle sanding techniques, inspect the surface, control dust with a vacuum, and plan repair strategies.
Consider paint types and finish options for edge blending to preserve paint adhesion while following solid project planning.
How to Clean the Surface Before Blending Paint Lines?
Before you blend paint lines, make the surface spotless so new paint adheres evenly and the repair stays invisible.
Use proper surface preparation tips and simple cleaning techniques before painting. Follow these steps:
- Wipe dust and cobwebs with a dry microfiber cloth.
- Clean grease or stains with a mild detergent solution, then rinse.
- Let the wall fully dry before sanding or touching up.
Best Low‑Tack Tapes to Prevent New Lines When Repainting
When you’re masking off areas to repaint without leaving ridges or torn edges, choosing a low‑tack tape designed for fresh paint is key; these tapes peel cleanly and help you avoid creating new paint lines.
Consider low tack options and tape brands, compare adhesion properties and paint compatibility, test on surface types, follow application techniques and edge sealing best practices, and evaluate tape performance versus tape alternatives.
How to Retape and Protect Adjacent Areas Before Touch‑Ups?
Before you touch up paint lines, pick the right low‑tack tape for the surface so it sticks without peeling off underlying paint.
Mask off trim, floors, and hardware with paper or plastic to protect adjacent surfaces from drips and overspray.
When the paint’s dry, remove the tape slowly at a 45° angle to get a clean edge.
Choose The Right Tape
Because clean retaping makes the difference between a crisp touch-up and smeared edges, pick a tape that matches the surface and paint type.
Consider tape types, tape width and tape brands for proper tape placement and tape adhesion.
Balance tape longevity with easy tape removal.
Alternatives include low-adhesion and specialty tapes.
- Tape application tips
- Tape compatibility notes
- Tape alternatives comparison
Protect Adjacent Surfaces
Start by clearing and protecting the areas next to your repair so paint, dust, or tape adhesive won’t damage trim, floors, or furniture.
Use masking techniques and surface protection like drop cloths.
Focus tape application and tape alignment for straight paint edges and clean changes where your patch meets adjacent walls.
Press edge sealing firmly to prevent bleed and guarantee neat, professional touch‑ups.
Remove Tape Cleanly
When the paint’s dry to the touch, peel the tape back slowly at a 45-degree angle to prevent lifting fresh paint and to leave a clean edge.
You’ll check tape placement and tape application quality, choose tape types wisely, and avoid tape residue.
For touch-ups, consider tape alternatives and proper tape storage to extend tape durability.
- Clean edges prevent removing adhesive mess
- Plan tape cleanup before removing
- Compare tape comparison for best results
How to Pick Matching Paint for Seamless Touch‑Ups?
If you want touch-ups to disappear, matching the original paint’s color and finish is essential; bring a sample—like a swatch or a removable chip—to the store and compare it under the room’s lighting.
You’ll use paint swatches, color matching and color mixing tools, check sheen matching and paint finishes, test lighting effects, confirm surface compatibility, then apply touch up techniques for color consistency.
When to Use Leftover Paint Versus Buying a New Can?
Wondering whether to dig out leftover paint or buy a fresh can? You’ll choose based on color match, condition, and project size.
- Use leftover paint if it matches, isn’t separated, and covers the patch.
- Buy a new can when shade, sheen, or volume won’t match or the leftover smells off.
- Test a small area first to confirm seamless blending before committing.
How Much to Thin Paint for Easier Blending?
How much should you thin paint to make blending easier without sacrificing coverage? Aim for a light reduction—about 5–10% water for latex or manufacturer-recommended solvent for oil—to lower paint viscosity without losing pigment.
Test on a scrap, then adjust. Use proper blending techniques: feather edges, work wet, and match roller nap.
Avoid over-thinning, which causes drips and poor hide.
How to Load a Brush or Roller to Avoid New Lines?
Load the right amount of paint so your brush or roller isn’t dripping but still holds enough to cover a decent area.
Make sure the bristles or nap are evenly coated to prevent streaks or ridges as you work.
Keep a wet edge and work quickly enough to blend each pass into the last.
Load Right Amount
Dip your brush or roller just enough so the bristles or nap are saturated but not dripping — too much paint creates heavy ridges and runs, while too little forces you to overwork a section and leave streaks.
- Use a consistent load technique and load balance to match paint viscosity and absorption.
- Control brush pressure and roller application for coverage consistency.
- Employ edge management, blending technique, and a precise touch up strategy.
Even Bristle/Roller Coverage
Evenly saturating your brush or roller prevents fresh lines from forming as you paint, so aim for a smooth, consistent film of paint without globs or dry spots.
Choose brush types and roller selection for texture matching, check paint consistency and sheen effects, use primer usage and tape application wisely, employ edge technique and blending methods, monitor drying conditions, practice tool maintenance, consider paint extender, color matching, touch up strategies, surface assessment, repair techniques.
Maintain Wet Edge
When you keep a wet edge, you’ll prevent overlaps that show as lines by making sure each stroke blends into the still-wet paint beside it; that starts with how much paint you pick up—neither a dry brush nor a dripping roller will let you feather edges smoothly.
Use wet edge techniques and focus on avoiding laps:
- Load brush moderately, tap off excess
- Roll in a W pattern, reload often
- Blend into wet paint, work quickly
Cutting In Clean Edges With a Steady Hand
Cutting in clean edges takes steady hands, the right brush, and a simple technique you can practice in minutes. You’ll use steady hand techniques, brush control methods, and precision cutting with visual alignment tricks. Focus on hand positioning strategies, angle adjustment techniques, paint application consistency, steady pressure practices, and edge blending methods.
| Tip | Action | Result |
|---|---|---|
| Grip | Stabilize | Control |
| Angle | Adjust | Sharp |
| Stroke | Smooth | Even |
| Pressure | Consistent | Clean |
How to Blend Two Coats So the Line Disappears?
Because the visible line comes from differences in wetness, texture, or paint thickness, you’ll need to work quickly while the edges are still slightly wet and feather the new coat into the old with light, overlapping strokes and a soft-bristled brush or mini-roller.
Use blending techniques, edge feathering, paint viscosity control, color matching, and finish sheens.
- Brush techniques for fine edges
- Roller application for larger areas
- Touch up strategies and paint consistency for smooth shifts
Using a Mini‑Roller to Smooth Touch‑Up Areas
If you want the repaired patch to disappear, grab a small, dense mini-roller and lightly work the fresh paint out from the center toward the edges, keeping strokes short and overlapping so the nap blends with the surrounding finish.
Use mini roller technique and touch up tools, adjust paint consistency for even roller coverage, practice edge feathering and blending techniques for seamless changes; follow touch up tips for a smooth finish.
How to Use a Dry Brush to Feather Paint Edges?
Grab a dry, flat-bristled brush and lightly skim the wet edge of your touch-up area to feather the paint into the surrounding wall.
Use gentle, short strokes and don’t overload the brush. Practice dry brushing techniques and blending methods to match texture.
Use short, gentle strokes and keep the brush light—practice dry-brushing and blending to match the wall’s texture.
- Work outward from the edge
- Vary pressure for soft fade
- Clean brush between passes
How to Apply Glaze or Primer to Fix Stubborn Lines?
When stubborn paint lines won’t feather out, reach for a glaze or a primer to even the sheen and hide the ridge; these products let you blend differences in texture and absorption before repainting.
For glaze application, use light brush techniques and roller tips for even finish sheen.
Choose primer selection by paint types and texture matching, practice edge feathering, and respect drying times for clean color blending.
When to Sand and Prime Before Repainting a Whole Wall?
Wondering whether to sand and prime before repainting an entire wall? You should if surfaces have glossy patches, stains, or uneven texture.
Use proper sanding techniques to smooth edges, then select primer choices based on stain-blocking or adhesion.
Check:
- Rough or glossy spots need sanding first.
- Stains require a blocking primer.
- Fresh drywall may only need light sanding and a drywall primer.
How Humidity and Temperature Affect Paint Lines?
You’ll notice temperature changes how fast paint skins over—too hot and it can dry unevenly, too cold and it won’t set properly.
Humidity affects curing time and can cause lap marks or blistering if moisture traps under the finish.
Control both to get smooth, consistent lines when you repaint.
Temperature Effects On Drying
Because paint cures through a chemical and physical process, temperature and humidity play a big role in whether you get crisp lines or visible bleed; too cold or too humid and the paint can stay tacky longer, letting it sag or seep under tape.
While too hot or too dry can make it skin over unevenly and pull at the edge when you remove masking.
- Monitor temperature extremes and moisture levels.
- Balance drying speed with ideal conditions for paint curing.
- Account for thermal expansion and other environmental factors; humidity effects alter results.
Humidity’s Role In Curing
When humidity rises, paint takes longer to dry and stays tacky at the edges, which gives it more time to seep under tape or droop before it cures; low humidity, by contrast, can cause paint to skin over quickly and pull away from masking when you lift it. Monitor humidity levels, plan your painting schedule, and balance ideal humidity with drying conditions to control paint curing and moisture impact.
| Factor | Effect |
|---|---|
| Atmospheric effects | Alters curing time |
| Paint absorption | Changes finish |
| Weather considerations | Shifts schedule |
| Ideal humidity | Optimizes drying conditions |
How Drying Time Differences Create Visible Edges?
If paint applied to one section dries faster than adjacent areas, you’ll see a sharp edge where the sheen, color, or texture changes; faster-drying paint traps pigments and solvents differently, altering how light reflects and making the boundary obvious.
You’ll notice drying effects from temperature variations, humidity impact, paint curing, surface absorption and differing drying rates causing edge visibility and subtle sheen differences.
- Uneven drying
- Substrate absorbency
- Microclimate shifts
How to Fix Paint Lines Caused by Different Sheens?
Noticing a distinct shine difference between two painted sections? You can correct different sheens by evaluating sheen comparison and choosing compatible finish types.
Sand gently, feather edges, and apply thin coats to improve paint blending and create a smooth sheen shift.
Make sheen adjustments by matching sheen compatibility or repainting the area for sheen consistency.
Test samples before committing.
Fixing Lines Where New Paint Meets Trim
You can use similar blending tactics to handle the lines that form where fresh wall paint meets trim, but the approach changes because trim is usually a different material and often a higher-gloss finish.
Control paint adhesion and line visibility by protecting trim, matching color and sheens, and compensating for texture differences and drying conditions.
Protect trim, match colors and sheens, and adjust for texture and drying differences to minimize visible paint lines.
- trim protection
- edge blending
- application techniques, surface types, color matching
How to Fix Lines at Ceiling and Baseboard Junctions?
1 simple tool and a careful technique will help you erase the visible line where wall paint meets the ceiling or baseboard.
You’ll address ceiling junctions and baseboard edges by sanding, cleaning, and ensuring paint adhesion.
Use precise paint application, match color and paint consistency, and employ edge blending and touch up techniques.
Consider surface texture for line prevention and seamless finish.
How to Handle Paint Lines on Textured Versus Smooth Walls?
First, you’ll assess the surface texture to see whether you’re working with smooth drywall or a textured finish.
Then adjust your sanding technique—gentler, feathered sanding for smooth walls and careful spot-sanding for textured areas to avoid flattening the texture.
Finally, match your paint application (brush, roller nap, or sprayer) to the texture so the repaired area blends seamlessly.
Assess Surface Texture
Start by identifying whether the wall is smooth or textured, because the approach to fixing paint lines changes with surface profile.
Conduct a quick texture assessment and surface inspection to note texture uniformity, wall profile, and wall condition.
Check paint consistency and paint adhesion for finish comparison.
Then perform a focused texture analysis and surface evaluation, using these observations to plan repairs.
- inspect edges
- note variations
- document findings
Adjust Sanding Technique
After evaluating the wall’s texture and noting where paint lines appear, change your sanding approach to match the surface profile: use finer, even strokes and a soft sanding block on smooth walls to feather edges without creating dips.
On textured walls, you’ll work more selectively with a coarser grit or a contour pad to preserve texture and blend ridges.
Use proper sanding techniques, sanding grips, tool selection, and sanding methods for smooth shifts and improved finish quality.
Match Paint Application
1 key difference between repairing paint lines on textured and smooth walls is how you apply and blend the paint: on smooth walls you’ll work with thin, even coats and feather the edges with a brush or roller to eliminate hard lines, while on textured walls you’ll match the texture by using the same nap roller or a stippling brush and apply paint in short, irregular strokes so the repair reads as part of the surface rather than a flat patch.
- Do a surface assessment: check wall texture, paint sheen, and paint viscosity.
- Choose brush selection and roller technique to match.
- Use color matching, blending tips, touch up strategies, and consider drying conditions.
How to Remove Tape Bleed Without Repainting the Whole Wall?
If tape bleed left a thin line of paint on your wall, you don’t have to repaint the entire surface; you can often fix it locally by removing the excess pigment and blending the area with minimal materials and effort.
Use proper paint tape and precise tape application, then try touch up techniques: gentle sanding, edge smoothing, color matching, suitable brush types, blending methods across wall textures, and targeted repair strategies.
How to Fix Paint Lines Caused by Old Paint Buildup?
When old paint layers have built up along trim or seams, they can leave raised or uneven lines that catch light and ruin a clean finish.
Old paint buildup along trim or seams creates raised lines that catch light and spoil a smooth finish.
So you’ll want to remove or level that buildup before touching up the area. Sand, clean, and prime to restore surface adhesion.
Use:
- Sanding block for paint buildup
- Tack cloth to remove dust
- High-quality primer for bonding
Spot and Fix Lap Marks in Latex Vs. Oil Paint
When you spot lap marks, the first step is to identify whether you’re dealing with latex or oil paint, since each responds differently to sanding and recoat.
Latex dries faster and blends more easily with a light scuff and a fresh coat, while oil holds edges longer and may need light sanding and solvent wiping before repainting.
Follow the repair steps for the specific paint type to get a seamless finish.
Latex Versus Oil Differences
Because latex and oil paints behave differently as they dry, you’ll spot and fix lap marks using different techniques for each type.
Balance drying time, application differences, and brush compatibility when choosing tools. Consider latex durability, cleanup ease, and color retention versus oil sheen, odor levels, and finish options. Match roller texture to paint.
- Latex: faster drying time, easy cleanup
- Oil: richer sheen, longer cure
- Tools: choose brush compatibility and roller texture
Repairing Lap Marks
If you spot lap marks, act quickly to blend them before the paint fully cures; latex and oil need different handling to avoid making the streaks worse.
Assess wall, note paint sheen, color matching, drying times and humidity effects.
Choose brush selection or roller application, adjust paint consistency and thickness.
Use edge feathering, blending techniques and repair methods suited to surface texture, drying conditions, touch up strategy.
How to Correct Color Shift That Makes Lines Visible?
Why does color shift make paint lines jump out at you? You’ll fix it by evaluating lighting effects and surface texture, then improving color blending and edge shift.
Match paint consistency and paint quality for cleaner visual impact. Focus on color matching and routine wall maintenance.
- Check lighting and sheen variations
- Smooth texture for seamless blend
- Recoat with matched consistency
How to Match Sheen When Touching Up a Painted Area?
When you touch up a painted area, matching the sheen is just as important as matching color because gloss differences catch light and reveal your repair; check the original finish, use the same sheen level (flat, eggshell, satin, semi-gloss, etc.), and test a small swatch in the room’s lighting before committing. Use these tips, balancing sheen types, paint gloss, touch up techniques, and finish matching.
| Feeling | Result |
|---|---|
| Relief | Seamless |
| Pride | Confident |
| Calm | Consistent |
How to Blend Touch‑Ups on High‑Traffic Walls?
Matching sheen helps hide touch-ups, but high-traffic walls pose extra challenges because constant contact means scuffs and small repairs will keep appearing.
Use targeted touch up techniques and blending methods that focus on traffic durability and wall maintenance. Consider paint types, surface finishes, color matching, and texture coordination.
- Feather edges lightly
- Work in small panels
- Recoat with durable finish
How to Repair Long, Continuous Lines Without Obvious Patches?
First, figure out what’s causing the long line so you know whether it’s a seam, roller mark, or different sheen.
Then feather the edges, sand smooth, and spot-prime the area to create an even base.
Finally, repaint with the same finish and light technique so the repair disappears into the rest of the wall.
Assess The Line Cause
Although long, continuous paint lines can look like a single flaw, they usually point to an underlying issue you need to identify before fixing them.
You should inspect causes and choose correct line removal techniques while noting paint thickness considerations.
- Check substrate irregularities and seams.
- Look for roller or brush overlap patterns.
- Verify drying time and environmental factors impacting finish.
Feather And Blend Edges
Once you’ve identified what caused the line, you’re ready to feather and blend the edges so the repair disappears into the surrounding finish. Use feathering techniques and blending methods with gentle edge smoothing and precise edge detailing. Focus on paint shifts, color matching, paint application and touch up strategies for seamless finishes. Apply repair techniques to minimize visibility and guarantee consistent texture.
| Step | Tip |
|---|---|
| 1 | Feather edges |
| 2 | Blend paint |
| 3 | Match color |
| 4 | Smooth texture |
Sand, Prime, Repaint
Start by sanding the affected area smoothly beyond the visible line so the repair blends with the surrounding surface; then prime the feathered zone to seal differences in porosity before you repaint, which prevents noticeable patches and guarantees a consistent finish across long, continuous lines.
- Use proper sanding techniques: grit progression for smoothness.
- Choose primer selection for adhesion and tinting.
- Recoat with thin, even layers to match sheen and texture.
How to Use Sanding and Feathering for Large Repairs?
Tackle large paint-line repairs by sanding the damaged area down to a smooth, even plane and feathering the edges so new paint blends seamlessly with the old.
Use proper sanding techniques—start coarse, finish fine—and remove dust.
Apply joint compound for deep imperfections, then sand again.
Employ feathering methods to taper repairs into surrounding paint so touch-ups disappear and the wall reads uniform.
How to Use a Paint Extender to Improve Blending Time?
After you’ve sanded and feathered the repair smooth, slow the paint’s dry time with a paint extender so your touch-up blends more easily into the surrounding finish.
You’ll improve paint flow and extend working time, letting you practice blending techniques. Add extender per label, stir well, and test on scrap.
Tips:
- Mix small batches
- Keep edges wet
- Work swiftly but smoothly
When to Call a Professional Instead of Attempting DIY Fixes?
If the repair needs structural work, involves peeling or bubbling over large areas, or goes beyond simple touch-ups, call a pro—these problems often signal moisture, poor substrate adhesion, or widespread finish failure that DIY fixes won’t fully resolve.
You should seek professional assessment when project complexity, scope evaluation, skill level, budget considerations, time constraints, potential risks, or desired long term results exceed your ability.
How to Prevent Paint Lines on Your Next Painting Project?
Whether you decide to call a pro for major issues or handle smaller repairs yourself, preventing paint lines starts with the right preparation and technique.
Use proper brush selection, control paint application, and consider surface texture and humidity effects. Practice color matching and blending methods. Use tape techniques sparingly and plan repair strategies.
- Check paint drying times
- Match sheen differences
- Feather edges when blending
Best Practices for Taping and Un‑Taping to Avoid Lines
Start by picking the right painter’s tape for your surface and paint type so the adhesive won’t pull finish or bleed.
Make sure the wall is clean, dry, and free of dust or loose paint before you apply tape to get a tight seal.
When the paint’s tacky or dry to the touch, remove the tape slowly at a 45-degree angle to prevent lifting or jagged edges.
Choose The Right Tape
Because the tape you pick determines how clean your edges will be, choose one designed for your wall surface and paint type.
Consider tape types by adhesion, width, texture and durability; proper tape application and tape positioning prevent bleed. Plan tape removal timing for clean lines.
- Low-adhesion for delicate surfaces
- Medium-adhesion for typical walls
- High-adhesion for rough or exterior surfaces
Proper Surface Preparation
1 clear, clean surface is the foundation for crisp paint lines, so remove dust, grease, and loose paint before you tape.
You’ll perform surface cleaning and wall inspection, fix imperfections with repair techniques, and smooth surface texture.
Control paint consistency and choose primer application for porous areas.
Mind drying time, environmental factors and paint sheen, then plan blending methods for seamless edges.
Remove Tape Correctly
Remove the tape while the paint is tacky but not fully hardened—this helps you peel a clean edge without lifting fresh paint.
Use correct tape application and tape alignment, and know tape types to control tape adhesion. For tape removal, follow these tape techniques and consider tape alternatives. Store unused rolls properly for tape storage.
- Pull back at a 45° angle
- Score stubborn edges lightly
- Remove slowly and evenly
How to Choose Brushes and Rollers That Minimize Lines?
Choosing the right brushes and rollers can make the difference between smooth walls and visible lines, so pick tools designed for even coverage and minimal marks.
For brush selection consider bristle lengths and quality; use appropriate roller types and roller nap for texture matching.
Match paint quality to finish options, practice application techniques, employ smoothing methods and edge blending to minimize lines.
How to Maintain a Wet Edge While Painting Large Surfaces?
After you’ve picked brushes and rollers that reduce marks, the next challenge is keeping a wet edge so your strokes blend seamlessly across large walls.
Use wet edge techniques and monitor paint consistency. For large surface considerations, try these blending strategies:
- Work in manageable sections
- Keep a damp roller and brush nearby
- Maintain steady overlap and uniform pressure
How to Plan Paint Sequence to Avoid Lap Marks and Lines?
When you plan your painting sequence, think ahead about how each pass will meet the next so wet edges line up and lap marks never form; map zones, work top-down, and keep consistent paint layering and brush technique. Roll contiguous sections while edges stay wet, finish corners last.
| Step | Purpose |
|---|---|
| Zone | Manage drying |
| Order | Preserve wet edge |
| Tool | Match finish |
| Inspect | Spot laps |
| Adjust | Blend seams |
Common Mistakes That Create Paint Lines and How to Avoid Them
Although paint lines often look like a simple cosmetic flaw, they’re usually caused by a few predictable mistakes you can prevent: rolling over partially dried edges, using mismatched tools or paint sheens, applying uneven pressure, or failing to maintain a wet edge.
- Check paint quality, primer usage, and color matching.
- Improve brush selection, roller techniques, and blending methods.
- Control drying conditions, humidity effects, surface texture, and tape adhesion.
How to Inspect Your Work and Find Hidden Paint Lines?
Want to catch paint lines before they become permanent? Use inspection tips: perform a visual assessment under varied lighting effects to reveal hidden lines.
Do a systematic surface inspection, focusing on edge review and texture observation.
Combine line detection with paint evaluation—check paint quality, sheen differences, and shadowing.
Mark flaws, photograph problem areas, and plan targeted touch-ups promptly.
Estimate Time & Cost to Fix Paint Lines (Small, Medium, Large)
Estimating time and cost to fix paint lines depends on the scope—small touch-ups, medium patch-and-blend jobs, or large-scale rework—and on factors like surface prep, paint type, and access; you can generally plan 30–90 minutes and a few dollars for small spots, 2–6 hours and $20–100 for medium areas, and a full day or more with $100+ for large or hard-to-reach corrections.
- Do a surface evaluation for accurate time estimation and cost analysis.
- Include labor costs, material expenses, and duration assessment in project planning.
- Use budget tips to prioritize fixes and avoid unexpected expenses.
Quick Checklist to Fix Paint Lines in Under an Hour
Get your tools and materials ready—brush, small roller, matching paint, sandpaper, and a rag—so you won’t waste time hunting for supplies.
Do a quick surface prep by sanding any ridges, wiping away dust, and feathering the paint edge.
Finish with a fast touch-up technique: thin your paint if needed, apply light coats, and blend into the surrounding wall for a seamless fix in under an hour.
Tools And Materials Ready
Before you start, gather a few reliable tools and materials so you can fix paint lines quickly and cleanly: a small angled brush, a 2–3″ foam or satin roller, painter’s tape, a high-quality acrylic or latex touch-up paint (matched to your wall), a lightweight putty knife, fine-grit sandpaper (220), a damp sponge, and a disposable mixing cup for thinning paint if needed.
You’ll guarantee proper paint adhesion and choose paint types suited to finish.
- Brush, roller, tape
- Sandpaper, putty knife, sponge
- Touch-up paint, mixer cup
Quick Surface Prep
Now that you’ve gathered the right tools and paint, quickly prep the surface so your repair blends smoothly. Wipe areas for surface cleaning, sand edges lightly, and match wall texture before painting. Use this quick checklist:
| Task | Tool | Time |
|---|---|---|
| Clean | Cloth, cleaner | 5 min |
| Sand | Fine sandpaper | 10 min |
| Prime | Small brush | 5 min |
| Texture match | Sponge/knife | 10 min |
Fast Touch-Up Technique
Start by evaluating the line—lightly sand any raised edges, wipe away dust, and check that the surrounding paint is dry and clean so your touch-up will blend.
Use fast application and edge control for quick repairs and efficient retouching. Focus on paint consistency for blending edges and smooth shifts to achieve seamless finishes and routine paint maintenance.
- Use small brush strokes
- Feather edges outward
- Match sheen precisely
Long‑Term Care Tips to Keep Walls Looking Smooth and Line‑Free
If you want your paint lines to stay crisp, make a habit of gentle cleaning, prompt touch-ups, and controlling humidity to prevent peeling and discoloration.
For effective wall maintenance, schedule routine cleaning and touch up scheduling to boost paint preservation and paint durability.
Monitor humidity control and temperature regulation, use surface protection like mats and bumpers, and inspect periodically to catch flaws early.
Frequently Asked Questions
Can Wallpaper Paste or Joint Compound Hide Narrow Paint Ridges?
Yes—wallpaper paste can temporarily fill tiny paint ridges, but joint compound works better for durable smoothing. You’ll need careful wall preparation, sanding, and proper paint application to hide ridges and guarantee a seamless finish.
Will Heat (Hair Dryer) Help Blend Stubborn Paint Lines?
Yes — you can use a hair dryer cautiously to soften paint edges, but it won’t improve paint adhesion. Combine heat with light sanding and proper blending techniques, then prime if needed to guarantee seamless results.
Are There Safe Solvents to Dissolve Enamel Ridges Without Stripping Paint?
About 70% of hobbyists report success using mild solvents; you can try mineral spirits or denatured alcohol depending on enamel types, but use gentle cleaning techniques, test a hidden spot, wear gloves, and avoid strong strippers.
How Do Animals or Kids Affect Paint Line Formation Long-Term?
Animals and kids increase wear, so you’ll see more pet impact and irregular edges from scuffs; child behavior like touching or scribbling accelerates chipping and grime buildup, causing long-term fading, textured roughness, and more frequent repairs.
Can Faux-Finishing Techniques Mask Existing Paint Lines?
Can faux-finishing techniques mask paint lines? Yes, you can hide minor lines with faux techniques and varied paint textures, blending edges and creating visual interest, but deep ridges may need sanding and skim coats first.
Conclusion
Think of your wall as a calm lake: a single ripple — a paint line — stands out until you smooth it with the right touch. You’ve learned how to spot, sand, feather, and blend so the surface reflects light evenly again. With the proper tools and a little patience, restore that mirror-like finish and keep the lake tranquil. Tend it regularly, and the surface will stay peaceful, hiding yesterday’s disturbances from tomorrow’s view.