How to Fix Peeling Paint on Wood the Right Way
You can stop peeling paint and restore wood by removing loose flakes, repairing or replacing damaged wood, then sanding and cleaning the surface. Apply an appropriate primer (oil-based for tannin-rich wood, water-based for newer surfaces) and finish with two thin topcoats, allowing proper dry time. Use proper PPE, contain waste, and test for lead on older paint. Follow correct prep and application, and keep going to learn tips for tricky situations and professional help if needed.
How to Fix Peeling Paint on Wood the Right Way Quick Answer
Start by scraping loose paint, sanding smooth, priming bare wood, and repainting with a quality exterior or interior paint—simple fixes usually solve the problem.
You can handle small areas or single boards yourself if the damage is limited and there’s no rot or lead paint.
Call a pro when peeling covers large areas, the wood is soft or rotten, or you suspect lead or underlying moisture issues.
One-sentence solution
Remove loose paint, sand smooth, prime bare wood with a bonding primer, then repaint with a suitable exterior or interior latex paint applied in thin, even coats.
To fix peeling paint on wood, you’ll scrape, sand, and clean the surface, spot-prime exposed areas, and use paint formulated for the location.
Work in dry conditions, follow manufacturer dry times, and apply two thin coats for durable coverage.
When to call a pro vs. DIY
When should you tackle peeling paint yourself and when should you call a pro?
If damage is small, localized, and wood is sound, you can handle sanding, priming, and repainting with basic tools.
Call a pro if paint covers lead, rot or structural damage exists, large areas peel, or you lack time, skill, or proper equipment.
Pros guarantee safety and lasting results.
Understanding Peeling Paint on Wood
You’ll first spot peeling paint as flaking, bubbling, or large sections lifting away from the wood.
Common causes include moisture intrusion, poor adhesion, old brittle paint, natural wood movement, and surface contamination like dirt or oil.
Check how widespread and deep the damage is—tap, scrape, and look for underlying rot or dampness to judge whether a repair or full repaint is needed.
What peeling paint looks like ()

Peeling paint on wood looks like flakes or sheets separating from the surface, often curling at the edges and revealing bare wood or previous paint layers underneath.
You’ll see irregular patches, blistered or cracked areas, and loose fragments that come away when nudged.
Colors may vary between topcoat and underlayers, and texture changes—smooth paint next to rough, exposed grain—make damage obvious.
Common causes of peeling paint on wood (moisture, adhesion failure, old paint, wood movement, surface contamination)
Several common factors cause paint to separate from wood, and knowing them helps you target the right fix.
You’ll see failures from moisture, poor adhesion, old brittle layers, wood shrinking/expanding, or dirty surfaces. Check for these causes so you can choose repair steps.
- Moisture intrusion or leaks
- Adhesion issues or incompatible paints
- Dirt, oil, or mildew on the surface
How to assess the severity and scope of the problem
Now that you know common causes, start by mapping how much paint has failed and where—this determines whether you’ll spot-repair, strip and repaint, or address underlying issues first.
Inspect all surfaces for blistering, flaking, chalking, and bare wood. Note moisture stains, rot, and peeling patterns near joints or trim.
Photograph areas, measure affected square footage, and prioritize repairs accordingly.
Tools, Materials, and Safety Precautions
Before you start, gather the essential tools and materials—scrapers, sandpaper, brushes, wood filler, and quality primers and paints formulated for wood.
Wear proper PPE (gloves, goggles, and a respirator) and keep the area well ventilated to protect yourself while you work.
Also plan for environmentally safe cleanup and disposal of old paint chips, solvents, and rags.
Essential tools and materials
Tools and materials set the stage for a successful peeling-paint repair, and you’ll want to gather them before you begin so the job flows smoothly.
You’ll need durable tools, proper materials, and safety gear to work efficiently.
Essentials include:
- Scrapers, sanding blocks, and wire brushes
- Drop cloths, tack cloths, and solvent/cleaner
- Gloves, goggles, and a respirator
Recommended primers and paint types for wood
When you’re choosing primers and paints for wood, pick products that match the wood type and the conditions it’ll face—exterior boards need moisture- and UV-resistant formulas, while interior trim benefits from low-odor, mildew-resistant options.
Use a high-quality oil- or acrylic-based primer for bare or tannin-rich woods.
Finish with durable exterior or interior latex or alkyd enamel, matching sheen to wear and maintenance needs.
Personal protective equipment and ventilation
Protect your lungs, eyes, skin, and home environment by wearing the right PPE and ensuring good ventilation before you sand or strip peeling paint.
Use a NIOSH-rated respirator (P100 or N95 for non-lead jobs), safety goggles, nitrile gloves, and disposable coveralls.
Run fans, open windows, and create cross-ventilation.
Stop work if dust or fumes feel excessive; adjust controls or leave.
Environmental and disposal considerations
Because paint chips and solvents can harm waterways and soil, you’ll need to contain waste, choose low-toxicity products, and follow local disposal rules from the start.
Bag chips, label containers, and never wash debris outdoors.
Use lead-test kits for older paint; if positive, hire certified disposal.
Recycle usable solvents at hazardous-waste centers, and document disposal to stay compliant and protect the environment.
Step-by-Step Repair Process
Start by preparing the area and protecting nearby surfaces so you won’t spread debris or damage anything.
Then you’ll remove loose paint (scraping, sanding, heat, or chemical strippers), repair or replace damaged wood, and clean the surface thoroughly.
Finish by sanding to feather edges and create the right grit profile for good adhesion.
Step 1 Prepare the work area and protect surroundings
1. Clear the area and get ready: you’ll want safe, clean space before you work.
Lay drop cloths, tape trim, and move furniture. Wear gloves and a mask, and keep pets and kids away.
- Use heavy-duty drop cloths
- Seal vents and doors with painter’s tape
- Keep a trash bin handy for debris
Step 2 Remove loose and peeling paint (methods: scraping, sanding, heat, chemical strippers)

Tackle the loose paint next by removing any flakes and failing edges so the new finish will adhere properly; you’ll choose between scraping, sanding, applying heat, or using a chemical stripper based on the paint condition, the wood type, and safety considerations.
Remove all loose material, feather edges, and clean dust before priming.
- Scrape stubborn flakes with a sturdy putty knife.
- Sand to smooth edges.
- Use heat or stripper cautiously.
Step 3 Repair and stabilize the wood (fillers, epoxy, replacing rotten sections)
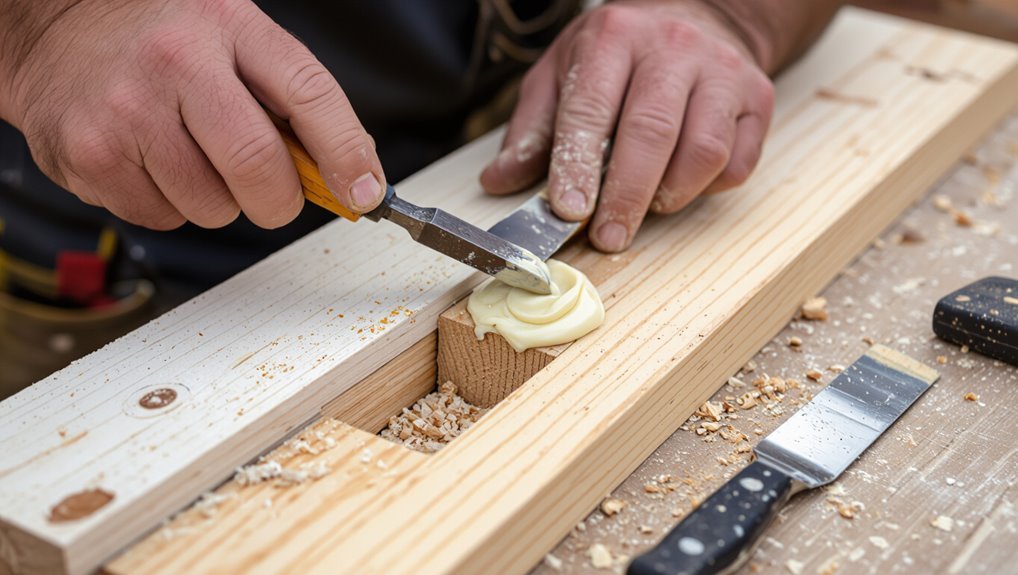
Once you’ve removed all loose paint and smoothed the edges, inspect the wood for soft spots, gouges, or holes and decide whether to fill, reinforce with epoxy, or cut out and replace damaged sections.
Use exterior-grade wood filler for small defects, two-part epoxy for structural repair, and splice in new wood for rot.
Sand repaired areas flush and guarantee solidity before priming.
Step 4 Clean and degloss the surface (washing, TSP alternatives)
Before you prime or repaint, thoroughly clean and degloss the wood so the new coating will stick—dirt, grease, and chalky residue can all prevent adhesion.
Use mild cleaners or TSP substitutes, rinse well, and let dry. Then remove remaining sheen with a deglosser or scouring pad.
- Use TSP substitute or vinegar solution
- Rinse with clean water
- Work in small sections
Step 5 Sand for smooth adhesion and feather edges (grit recommendations)
After the surface is clean and any gloss is dulled, sand the wood to promote good adhesion and feather the paint edges so repairs blend smoothly.
Use sanding to remove loose edges and rough spots, then smooth shifts before priming.
- Start with 80–120 grit to remove loose paint.
- Finish with 180–220 grit for smoothness.
- Sand along the grain, not across it.
Step 6 Apply primer (type selection, application tips, drying times)
1 primer coat sets the foundation for a durable finish, so pick a primer suited to your wood and the topcoat and apply it evenly; use oil-based or stain-blocking primers for tannin-rich or knotty woods, water-based acrylic primers for newer or previously painted surfaces, and shellac primers for severe stain or odor problems, following manufacturer directions for application method and drying times.
Then work in thin, even passes, avoid runs, back-brush to level, and respect tack and recoat intervals so adhesion and cure are reliable.
Step 7 Paint application techniques (coats, brushing vs. rolling vs. spraying, dry times)
With the primer dry and tack-free, you’re ready to apply paint—this is where technique determines the finish’s durability and appearance.
Use two thin coats rather than one heavy coat, allowing manufacturer-recommended dry times.
Brush for detail and edges, roll for broad flat areas, and spray for even coverage on complex profiles.
Maintain wet edges and follow temperature/humidity guidelines.
Step 8 Final inspection and touch-ups
Inspect the surface carefully under good light to catch missed spots, drips, or thin coverage you can fix now.
Move slowly, mark issues with pencil or tape, and feather edges where paint overlaps.
Sand tiny runs, recoat thin areas, and blend texture.
When repairs dry, remove masking, clean edges, and step back to confirm uniform finish before declaring the job complete.
Variations for Specific Situations
Now you’ll adjust the basic repair steps for different situations like exterior versus interior wood and for trim, siding, doors, windowsills, or furniture.
If the paint is old or might contain lead, you’ll follow specific safety and removal protocols before scraping or sanding.
For areas with recurring moisture or rot, you’ll need to stop the water source and repair or replace damaged wood before repainting.
Exterior wood vs. interior wood repairs
Whether the wood’s outside or inside, you’ll need different prep, products, and expectations: exterior wood faces moisture, UV, and temperature swings so choose weather-resistant primers, flexible paints, and thorough sealing, while interior wood tolerates milder conditions and can use softer primers and finishes focused on appearance and indoor air quality.
| Location | Risks | Best product |
|---|---|---|
| Exterior | Moisture, UV | Elastomeric primer |
| Interior | Humidity, wear | Low-VOC primer |
| Changeover | Porches, doors | Hybrid finish |
Historic or lead-based paint considerations and safe removal
Because homes built before 1978 often have lead-based paint, you should treat peeling or chipping historic finishes as a potential health hazard and plan removal or stabilization accordingly.
Test suspect paint with a certified kit or hire a lead inspector. Use HEPA containment, avoid dry scraping, and follow local regulations.
Consider encapsulation or licensed abatement for full removal to protect occupants and workers.
Repairs for painted trim, siding, doors, windowsills, and furniture
Start by evaluating each painted surface individually—trim, siding, doors, windowsills, and furniture all age and fail for different reasons, so your repair approach should match the material, exposure, and finish.
Sand loose paint, clean, prime bare wood, and use appropriate exterior or interior primers and paints.
Patch gaps with flexible caulk, fill gouges with wood filler, sand smooth, then repaint.
Dealing with persistent moisture or rot under paint
If paint keeps peeling despite proper prep, you’re likely dealing with ongoing moisture or wood rot beneath the surface, and that issue must be fixed before repainting.
Locate the moisture source—leaks, poor flashing, or ventilation—and stop it.
Remove rotten wood, treat with a fungicide or wood hardener, replace damaged sections if needed, let everything dry thoroughly, then prime with a high-quality, moisture-blocking primer before painting.
Common Mistakes and How to Avoid Them
Don’t skip proper surface prep—you’ll only invite peeling and adhesion problems later.
Make sure you use a primer and paint suited for wood, and never coat damp or contaminated surfaces.
Also avoid over-sanding, which can weaken the wood’s profile and cause more issues.
Skipping proper surface prep
Because paint only sticks to a clean, sound surface, skipping proper prep guarantees premature peeling and wasted effort.
You should remove loose paint, dirt, mildew, and chalk with scraping, sanding, and a stiff brush. Repair rot or loose boards, fill gaps, and make sure wood is dry.
Don’t skip cleaning or feathering edges—proper prep lets new paint bond and last.
Using wrong primer or paint for wood
When you choose the wrong primer or paint for wood, the finish won’t adhere or protect properly and you’ll be stuck repainting sooner than expected.
Pick a primer formulated for wood—oil-based for tannin-rich or exterior wood, acrylic for interior projects.
Match topcoat chemistry to primer, use quality products, and follow manufacturer instructions so adhesion, flexibility, and durability meet the wood’s needs.
Painting over damp or contaminated surfaces
Picking the right primer and paint won’t save you if you coat damp or dirty wood first: moisture and contaminants break adhesion and lead to bubbling, peeling, or mildew.
Always dry surfaces completely, remove dust, grease, and mold with appropriate cleaners, and test moisture with a meter.
Only paint when readings and conditions meet manufacturer specs to guarantee long-lasting adhesion and finish.
Over-sanding or damaging wood profile
If you sand too aggressively or strip away the wood’s profile, you’ll end up with uneven surfaces that don’t hold primer or paint well and that reveal grain or tool marks after finishing.
Work gently with progressively finer grit, follow contours, and use a sanding block or pad to keep pressure even.
Stop at smooth, uniform profile before priming to guarantee long-lasting adhesion.
Prevention and Best Practices
To keep peeling from coming back, you should follow a simple long-term maintenance schedule and fix small chips before they grow.
Control moisture with proper flashing and ventilation on exterior wood, and pick durable coatings applied in the right season.
With regular inspections and timely spot repairs, you’ll extend the life of your paint and wood.
Long-term maintenance schedule for painted wood
Because regular care prevents most peeling, set a simple, seasonal maintenance schedule and stick to it:
- Inspect paint each spring for chips, cracks, and wear; touch up small areas.
- Clean surfaces every fall to remove dirt, mildew, and pollen; repaint spots as needed.
- Recoat every 5–7 years (or sooner if wear shows); sand glossy spots and use proper primers before painting.
Moisture control and flashing details for exteriors
Keeping a regular maintenance rhythm helps prevent most peeling, but moisture intrusion and poor flashing will undo even the best upkeep—so you’ll want to follow smart moisture-control practices and proper flashing details for exterior wood.
Inspect rooflines, eaves, windows, and deck connections; seal gaps with backer rod and caulk.
Slope surfaces to shed water, install drip edges, and fasten flashings tightly to prevent capillary or wind-driven entry.
Choosing durable coatings and proper application seasons
When you pick durable coatings and time your work for the right season, you’ll dramatically reduce the chance of future peeling and extend the life of exterior wood.
Choose high-quality exterior primers and 100% acrylic or oil-modified topcoats rated for your climate.
Apply when temperatures and humidity fall within manufacturer ranges, avoid rainy forecasts, and follow recommended recoat windows for proper film formation and long-term adhesion.
Small repairs before they escalate
Catch small issues early to stop peeling from spreading and save you time and money down the road.
Inspect trim, corners, and seams regularly; scrape loose flakes, sand edges smooth, and prime exposed wood.
Fill cracks with paintable caulk or wood filler, then repaint promptly.
Address moisture sources—leaks, poor ventilation, gutters—so repairs hold and peeling doesn’t return.
Cost, Time Estimates, and When to Hire a Professional
You can usually fix small peeling spots yourself in a few hours to a day, with materials costing anywhere from $20 to $150 depending on sandpaper, primers, and paint.
If the job requires extensive rot repair, siding replacement, or specialized finishes, professional quotes can rise sharply due to labor and materials.
Hire a pro if you spot structural rot, persistent moisture problems, or if the area is large or hard to access.
Typical DIY time and material cost ranges
Expect most small peeling-paint repairs on wood to take between 1–4 hours and cost $20–$75 in materials, while larger projects can run several days and $100–$500 depending on surface area and prep needs.
Plan time for sanding, patching, priming, and drying. You’ll spend more if you add caulk, specialty primer, or replace rotten boards.
Budget tools if you don’t own them.
Cost factors for professional repair or replacement
When hiring a pro, several cost drivers will determine whether repair is an affordable half-day job or a full replacement that costs thousands: labor rates and minimums, the extent of rot or damage, how much surface prep and priming are needed, materials (paint grade, trim, or new boards), and any access or safety challenges that raise time on site.
Expect quotes to include inspection, disposal, permit fees, and warranty terms.
Red flags that warrant hiring a pro
1 clear sign you should call a pro is widespread peeling combined with soft, spongy wood or visible rot—those mean structural damage that quick DIY patching won’t fix.
Also hire pros if lead paint tests positive, damage spans large areas, or you lack time or tools.
Expect higher costs and a few days for repairs; professionals guarantee safe, durable restoration.
FAQs
You’ll want quick answers to common concerns like whether you can paint over peeling paint or if the old finish might contain lead.
I’ll also cover which primer works best on weathered wood, how long to wait between primer and paint coats, and whether caulk will prevent peeling at joints.
If you’ve got a specific situation, mention it and I’ll tailor the advice.
Can I paint over peeling paint without removing it?
Can you paint over peeling paint without removing it? You shouldn’t. Painting over loose flakes hides problems and causes new failures.
Remove all loose paint, sand edges smooth, clean and prime bare wood, then apply appropriate paint.
If flakes are minimal and tightly adhered after sanding, use a bonding primer first.
Proper prep guarantees adhesion and a durable finish.
How do I know if the paint contains lead?
How can you tell if paint contains lead? You can check the paint’s age—homes pre-1978 often used lead-based paint.
Use a DIY lead test kit for a quick screen, but confirm positives with a certified lab or inspector.
If sanding or scraping, assume lead is present, use proper PPE, contain dust, and follow local disposal rules to protect yourself and others.
What primer should I use on weathered wood?
If your wood’s weathered—grayed, dried, or slightly splintered—pick a primer that seals and binds while promoting adhesion: a high-quality oil‑based or alkyd-modified primer for bare or chalky surfaces, or a bonding/stain‑blocking acrylic primer for surfaces that are mostly intact but need extra grip.
Apply to clean, dry wood; sand glossy areas; remove dust; and choose exterior-grade formulas for durability and moisture resistance.
How long should I wait between primer and paint coats?
Once your primer’s dry and you’ve followed the sanding and surface prep steps above, give it adequate time to cure before painting so the topcoat bonds properly and won’t peel later.
Generally wait the primer manufacturer’s recommended dry time—often 1–24 hours—longer in cool or humid conditions.
Check tack-free status; if it feels dry and firm, you can lightly sand and apply the paint.
Will caulk stop paint from peeling at joints?
Can caulk stop paint from peeling at joints? Yes, when you use a paintable, flexible caulk it fills gaps, blocks moisture, and reduces movement that lifts paint.
Prep by removing loose paint, cleaning, and allowing surfaces to dry.
Apply caulk smoothly, tool it flush, let it cure, then prime and repaint for a durable finish that resists future peeling at joints.