How to Get Stains Off Painted Wood Without Ruining the Finish
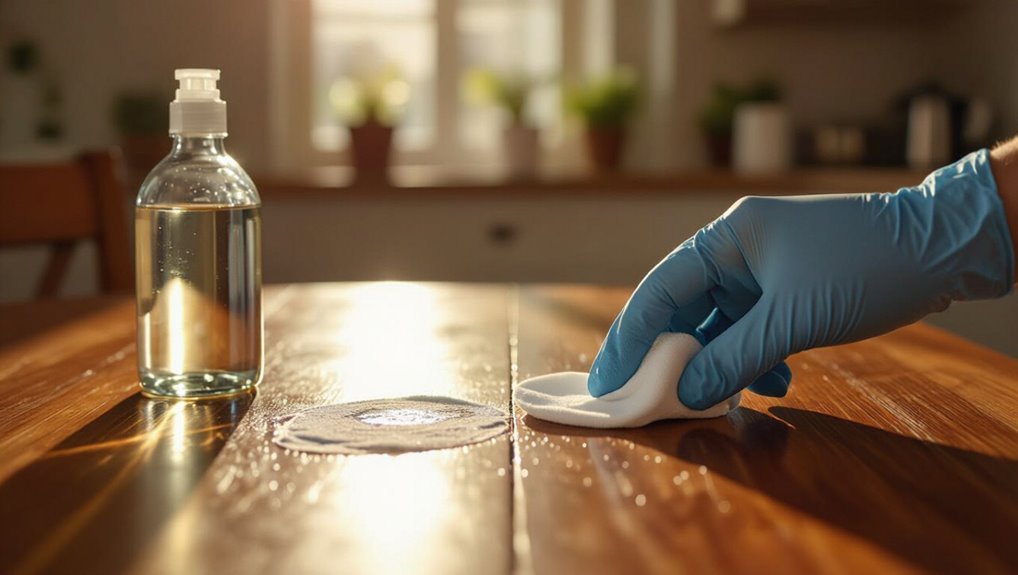
Start by identifying the paint type and finish, then test cleaners on an inconspicuous spot. Work gently with gloves and ventilation: try warm soapy water for general grime, dish soap or baking soda paste for grease, rubbing alcohol or a melamine sponge for ink, and diluted vinegar or hydrogen peroxide for organic stains. Rinse and dry each area, avoid abrasives and over-scrubbing, and spot-prime/touch-up if needed. Keep going to find step-by-step methods and prevention tips.
How to Get Stains Off Painted Wood Without Ruining the Finish
You want a quick, safe plan to lift stains without harming the paint. Start with mild, tested options like soap and water, baking soda paste, or a magic eraser, and only move to stronger cleaners if they’re safe for your finish.
Test every method on an inconspicuous spot first and work gently to avoid sanding or stripping the paint.
Quick Answer Safe, Effective Approaches at a Glance
Start with the gentlest option and work up only as needed: mild soap and water, a magic eraser, or a dab of rubbing alcohol will remove most stains without harming the paint.
For quick guidance on how to get stains off of painted wood, test in an inconspicuous spot, blot don’t scrub, rinse, and dry.
Use stronger solvents only if necessary.
Understanding Painted Wood and Stains
Before you start cleaning, you should know what kind of paint you’re dealing with—latex, oil-based, chalk, milk paint, or enamel—because each reacts differently to cleaners.
Recognize common stains like food, grease, ink, water rings, marker, rust, and mold so you can choose the right treatment.
Also consider the finish—matte, satin, semi-gloss, or gloss—since more durable finishes tolerate stronger cleaners, and some products can strip or etch softer paints.
Types of Painted Wood Surfaces (latex, oil-based, chalk, milk paint, enamel)
Painted wood comes in several common finishes—latex, oil-based, chalk, milk, and enamel—and each reacts differently to stains and cleaners.
You’ll treat latex and enamel as durable and water-resistant; oil-based resists solvents but can soften with harsh cleaners.
Chalk and milk paints are porous and fragile; they need gentle, pH-neutral methods or spot testing.
Always test an inconspicuous area first.
Common Types of Stains (food, grease, ink, water rings, marker, rust, mold)
Although different stains call for different methods, you can usually identify the problem quickly by its appearance and feel: food stains are sticky and colored, grease looks shiny and slippery, ink penetrates and feathers, water rings dull and raise grain, marker sits on surface, rust leaves orange-brown spots, and mold appears fuzzy or black.
Identifying type guides safe, targeted removal steps.
How Paint Finish Affects Cleaning (matte, satin, semi-gloss, gloss)
When you clean painted wood, the finish matters because it controls how tough stains are to remove and what solvents you can use safely.
Matte finishes hide imperfections but scratch or dull easily, so use gentle cleaners and soft cloths.
Satin and semi-gloss resist stains better and tolerate mild detergents.
Gloss offers the most wipeability; you can use stronger cleaners cautiously to avoid streaks.
Why Some Cleaners Damage Paint
Because paint is a thin, engineered layer that sits on top of wood, certain cleaners can break down its binder, soften the finish, or strip pigments away — and that’s why a product that removes a stain might also ruin the surrounding paint.
You should test cleaners in an inconspicuous spot, use pH-neutral or mild detergents, avoid solvents, and rinse promptly to protect the film.
Preparation Before Cleaning
Before you start cleaning, make sure you’ve got the right safety gear and tools on hand and know which cleaners are safe for painted surfaces.
Test your chosen cleaner in an inconspicuous spot to confirm it won’t damage the paint or finish.
Finally, protect surrounding areas and hardware with drop cloths and painter’s tape so you only treat the stained area.
Safety and Tools Checklist
Although a few simple precautions will do, you should gather the right safety gear and tools before you start cleaning painted wood.
Wear gloves and eye protection, guarantee ventilation, and have gentle cleaners ready. Keep a soft cloth and plastic scraper nearby to avoid scratches.
- Nitrile gloves
- Safety glasses
- Mild cleaner and bucket
- Microfiber cloth and plastic scraper
Testing in an Inconspicuous Spot
Once you’ve gathered your safety gear and tools, pick an inconspicuous spot—inside a cabinet, the underside of a trim, or the back of a drawer—and try your chosen cleaner and technique there first.
Watch for discoloration, softening, or loss of sheen for several minutes. If the finish stays intact, proceed cautiously; if not, stop and choose a gentler solution or consult a pro.
Protecting Surrounding Areas and Hardware

Cover nearby floors, furniture, and hardware with drop cloths or old sheets, and tape off trim, hinges, and handles so cleaning solutions won’t drip onto them.
Protect electrical outlets with painter’s tape and plastic, remove loose decor, and put small hardware in labeled containers.
Work from clean to dirty areas, and keep a damp rag handy to wipe accidental splashes immediately to avoid damage.
Step-by-Step Cleaning Methods
Start with the gentlest options and only move to stronger treatments if stains persist.
First dust and wash with mild soap and water, then use dish soap or a baking soda paste for grease, vinegar or diluted hydrogen peroxide for food, drink, and dye, and rubbing alcohol or a melamine sponge for ink and marker.
Follow each step carefully and rinse or blot the surface before trying the next method.
General Cleaning Sequence From Mild to Stronger Methods
Before you try stronger treatments, work through a predictable sequence from gentle to more aggressive methods so you won’t damage the paint or spread the stain.
Start least invasive, test hidden spots, and advance only as needed. Follow this progression:
- Blot excess, avoid rubbing
- Use mild cleaners sparingly
- Try targeted stain removers
- Use solvent or light abrasion last, cautiously
Step 1 Dusting and Gentle Wash (mild soap + water)
Begin by dry-dusting the painted surface with a soft microfiber cloth or a feather duster to remove loose dirt and grit that can scratch the finish.
Then mix a few drops of mild dish soap in warm water, wring the cloth until damp, and wipe gently along the grain.
Rinse with a clean damp cloth and dry immediately to prevent water spots.
Step 2 Tackling Grease and Oil (dish soap, baking soda paste)
Once you’ve removed dust and surface grime, grease and oil spots need a different approach because they repel water and can leave dull residues.
Apply a few drops of dish soap to a damp microfiber cloth, gently blot and lift oil.
For stubborn spots, make a paste of baking soda and water, rub lightly, then wipe clean and dry to protect the paint.
Step 3 Removing Food, Drink, and Dye Stains (vinegar solution, diluted hydrogen peroxide)
When food, drink, or dye leaves a spot on painted wood, act promptly to prevent staining: Blot spills with a soft cloth; don’t rub.
Mix equal parts white vinegar and water for mild stains; apply gently, then rinse and dry.
For stubborn dye, use diluted 3% hydrogen peroxide (test hidden area first), blotting until stain lifts, then rinse and dry.
Step 4 Ink, Marker, and Permanent Pen Removal (rubbing alcohol, melamine sponge)
Step 4 tackles ink, marker, and permanent pen stains with two reliable tools: rubbing alcohol for spot treatment and a melamine (magic) sponge for gentle abrasion.
Dampen a cotton swab with alcohol, blot—don’t rub—testing unseen area first. For stubborn marks, lightly rub with a dampened melamine sponge in short strokes.
Wipe dry and reseal tiny spots if finish dulls.
Step 5 Water Rings and Heat Marks (iron method, baking soda/ toothpaste alternative)
After you handle ink and marker spots, water rings and heat marks require a different approach because they sit in or on the finish rather than on the surface.
For shallow rings, place a cloth over the mark and briefly iron on low, checking often.
For stubborn white rings, try a paste of baking soda and water or non-gel toothpaste, rub gently, then wipe and polish.
Step 6 Rust, Adhesive Residue, and Paint Transfer (commercial rust remover, adhesive remover, careful scraping)
Although these stains sit on different layers of the finish, you can remove rust, adhesive residue, and paint transfer with targeted products and careful technique.
Test a commercial rust remover or adhesive solvent on an inconspicuous spot. Apply gently with a soft cloth, let sit briefly, then wipe.
For paint transfer, lift with a plastic scraper and solvent as needed. Rinse and dry thoroughly.
Step 7 Mold and Mildew Treatment (diluted bleach or specialized cleaner)
If you spot mold or mildew on painted wood, act promptly to prevent staining and finish damage; use a diluted bleach solution or a commercial mildew cleaner tested first in an inconspicuous spot.
Wear gloves and eye protection, ventilate the area, and apply gently with a soft cloth or sponge.
Rinse thoroughly with clean water, dry completely, and repeat only if stains persist.
Step 8 When to Repaint or Spot-Repair (sanding, priming, touch-up paint)
When stains, peeling, or finish wear won’t come out with cleaning, you’ll need to decide whether to spot-repair or repaint the entire surface; choose spot repairs for small, isolated damage and repainting when multiple areas show wear or the color/finish is uneven.
For spot repairs, sand feathered edges, apply primer to bare wood, let dry, then use matching touch-up paint and thin coats until blended.
Product Recommendations and Homemade Solutions
You’ll want to start with cleaners labeled safe for painted surfaces to avoid stripping or discoloring the finish.
If you prefer DIY, try gentle recipes like diluted dish soap, baking soda paste, or a vinegar-water mix for light stains.
Use soft cloths, microfiber, or non-abrasive sponges to apply solutions and protect the paint.
Safer Commercial Cleaners for Painted Surfaces
Whether you pick a gentle commercial cleaner or mix a mild homemade solution, choose products that’re pH-neutral, non-abrasive, and labeled safe for painted surfaces to avoid dulling or stripping the finish.
You’ll test in an inconspicuous spot, dilute when instructed, and wipe gently.
Consider these options:
- Mild dish soap solution
- pH-neutral wood cleaner
- Microfiber-safe spray cleaner
- Cleaning paste for scuffs
Effective DIY Cleaners and Recipes
1 simple homemade cleaner can handle most painted-wood stains without harming the finish, and a few targeted recipes will cover grease, scuffs, ink, and water rings.
You’ll mix gentle ingredients, test a hidden spot, and apply softly. Try these options:
- Baking soda paste for scuffs
- White vinegar diluted for water rings
- Rubbing alcohol for ink spots
- Dish soap solution for grease
Tools That Help Without Damaging Finish (soft cloths, microfiber, non-abrasive sponges)
A few simple tools can prevent scratches and dulling while you remove stains from painted wood, so pick soft cloths, microfiber, and non-abrasive sponges that won’t abrade the finish.
Use lint-free cotton or microfiber for dusting and applying cleaners, wring sponges to avoid soaking, and test any new pad in an inconspicuous spot.
Replace dirty cloths to avoid reapplying grime.
Comparison: Cleaners vs. Surface Types
When you’re choosing a cleaner, match its strength and chemistry to the painted surface: delicate finishes like satin or eggshell need milder, water-based cleaners, while durable gloss paints can handle stronger detergents or ammonia-based solutions. Test first on hidden area. Use gentle scrubbing for most stains; escalate only if safe.
| Surface | Recommended Cleaner | Notes |
|---|---|---|
| Eggshell | Mild soap/water | Low abrasion |
| Satin | pH-neutral cleaner | Test first |
| Semi-gloss | Detergent mix | Spot test |
| Gloss | Ammonia solution | Avoid prolonged use |
Common Mistakes That Ruin Paint Finishes
Don’t reach for abrasive pads or harsh chemicals without thinking—they can strip paint and leave scratches.
Always spot-test cleaners and finishes first, because skipping patch tests is a fast way to ruin a surface.
And don’t over-scrub, soak the wood, or use products meant for a different finish type if you want the paint to last.
Using Abrasive Pads or Harsh Chemicals
If you reach for scouring pads or strong solvents, you’ll likely strip the paint’s protective topcoat and leave visible scratches or discoloration.
Instead, test mild soap and water, a soft cloth, or a magic eraser gently. Work light-handed, rinse thoroughly, and dry.
Reserve stronger cleaners for factory or oil-based finishes only, and follow manufacturer guidelines to avoid irreversible damage.
Skipping Patch Tests
Before you try a new cleaner or repair method on a visible area, always run a small patch test in an inconspicuous spot.
You’ll confirm colorfastness, finish compatibility, and drying behavior before committing. Skipping tests risks blotches, peeling, or soft spots that worsen with time.
Take five minutes to test; it’s cheap insurance that prevents costly repairs and preserves the painted surface.
Over-Scrubbing and Excess Moisture
When you attack a stubborn stain with vigorous scrubbing and soggy rags, you can strip paint, raise the grain, or push moisture into seams where it softens glue and blisters finish.
Don’t soak surfaces; blot gently, work in small sections, and use minimal water with a soft cloth or sponge.
Let wood dry fully between attempts to avoid swelling and peeling.
Applying Wrong Products for Finish Type
After you’ve avoided soaking and aggressive scrubbing, the next risk is using the wrong cleaners or restorers for the paint finish.
You’ll damage lacquer, shellac, or polyurethane if you use harsh solvents or abrasive pads. Always identify the finish, test a small hidden spot, and choose pH-appropriate, nonabrasive products.
When unsure, stick to mild soap, water, or a manufacturer-recommended cleaner to protect the coating.
Prevention and Best Practices
Keep up simple routine maintenance like dusting and wiping spills promptly to prevent stains from setting into painted wood.
Use protective measures—clear sealants, furniture pads, and washable topcoats—to reduce wear and accidental marks.
If something spills, act fast: blot liquids, rinse with mild soap and water, and dry thoroughly to limit damage.
Routine Maintenance to Avoid Stains
Although small habits seem insignificant, they’re the easiest way to prevent stains on painted wood before they start. You’ll stop grime buildup by wiping spills immediately, dusting weekly, avoiding abrasive scrubs, and checking for moisture.
Consistent gentle cleaning preserves finishes and cuts stain-removal time.
- Wipe spills within minutes
- Dust with a soft cloth weekly
- Use mild, pH-neutral cleaners
- Inspect for leaks or dampness regularly
Protective Measures (coatings, sealants, furniture pads)
When you protect painted wood with the right coatings and simple accessories, you’ll stop many stains before they form.
Apply a clear polyurethane or water-based sealer compatible with your paint, let it cure fully, and use felt pads, coasters, and silicone mats under objects.
Reapply sealant as recommended and inspect pads regularly to prevent trapped moisture or scratches that lead to stains.
Quick-Response Steps When a Spill Occurs
Even with good sealants and pads, spills can still happen, so respond fast to stop stains from setting.
Blot—don’t rub—with a clean, soft cloth to lift liquid. Rinse the spot with a damp microfiber, then dry immediately.
For sticky residue, use mild dish soap diluted in water, test hidden area first, and re-seal if finish looks dulled.
Troubleshooting: Stubborn or Unknown Stains
If a stain won’t budge after gentle cleaning, pause and assess whether further action might harm the paint or finish.
You’ll want a clear decision flow: try a stronger, targeted method only if the finish looks intact and you can test an inconspicuous spot.
If the stain persists, has penetrated the paint, or the surface shows damage, call a professional restorer to avoid making it worse.
Decision Flow: When to Continue Cleaning vs. When to Stop
Because some stains respond to gentle methods while others need professional care, you’ll want a clear decision flow to avoid damaging painted wood.
Test a mild cleaner in an inconspicuous spot, wait, and inspect. If finish dulls or stain persists after two gentle attempts, stop.
Document results, switch to less abrasive options, or consider expert evaluation rather than risking further harm.
Professional Restoration and When to Hire Help
When stains resist your best efforts or you’re unsure what caused them, call a professional before you risk stripping or sanding through the paint.
A conservator or experienced restorer can identify stain type, test solvents safely, and match paint or glaze. You’ll avoid costly mistakes like bleeding, ghosting, or finish loss.
Get estimates, check references, and ask about guarantees before hiring.
FAQs
You probably have quick questions like whether bleach or vinegar will harm painted wood, or how to get permanent marker off without sanding.
You’ll also want the safest way to lift grease from painted cabinets and how to restore shine without damaging the finish.
Below are clear, practical answers to each concern.
Can I use bleach on painted wood?
Wondering whether bleach is safe for painted wood? You can use diluted bleach for mildew or organic stains, but test an inconspicuous spot first.
Use a mild solution, rinse thoroughly, and avoid prolonged contact to prevent discoloration or finish damage.
For glossy or delicate finishes, consider a gentler cleaner or consult the paint manufacturer before applying bleach.
Will vinegar strip paint?
If you tried diluted bleach for mildew, you might be wondering whether common household vinegar will do the same — and whether it could strip paint.
Vinegar (5% acetic acid) is mild; it won’t strip durable latex or oil finishes with brief use. Test a hidden spot first, avoid prolonged soaking, and rinse thoroughly.
Don’t use vinegar on sensitive or waxed finishes.
How do I remove permanent marker without sanding?
How can you lift permanent marker from painted wood without sanding?
Use isopropyl alcohol on a soft cloth, dabbing gently and testing an inconspicuous spot first.
For stubborn marks, try a melamine sponge lightly dampened.
Rinse with a damp cloth, then pat dry.
Avoid harsh scrubbing or abrasive powders to protect the finish; repeat cautiously until the mark fades.
What is the safest way to remove grease from painted cabinets?
Because grease can build up without changing paint, you’ll want to remove it gently to protect the finish:
Start with warm soapy water using a mild dish detergent and a soft microfiber cloth, wiping in the grain direction.
For stubborn spots, mix equal parts water and white vinegar or use a diluted ammonia solution.
Test a hidden area first, then rinse and dry thoroughly.
How can I restore shine after cleaning without damaging the finish?
When you’ve removed grime, restoring shine takes gentle products and light technique to avoid harming the paint or clear coat.
Use a microfiber cloth and a small amount of diluted furniture polish or a dedicated clear-coat restorer. Buff lightly in circular motions, testing an inconspicuous area first.
Avoid silicone sprays or abrasive pads; repeat sparingly to maintain finish without buildup.