How to Paint an Accent Wall That Transforms a Room Instantly
Pick a natural focal wall—behind the bed, sofa, or fireplace—then test colors on large swatches to see them in different light. Prep by cleaning, filling holes, sanding, and priming. Tape edges, cut in with an angled brush, and roll paint in a W pattern for even coverage, removing tape while tacky for crisp lines. Choose finish for durability and coordinate with your decor. Keep going for tips on tools, techniques, and pro tricks.
How to Paint an Accent Wall That Transforms a Room Instantly
Yes—you can transform a room with a single accent wall by changing focal point, scale, or mood instantly.
This guide is for DIYers and homeowners who want high-impact results without a full remodel.
Follow these steps and you’ll pick the right wall, color, and finish to achieve that wow factor.
Quick Answer Can an Accent Wall Transform a Room?
Curious how a single painted wall can change a whole room? You can—when you learn how to paint an accent wall with purpose.
Choose color, texture, placement, and finish to shift mood, depth, or focus.
Try these quick impacts:
- Bold color for drama
- Light tone to enlarge
- Textured paint for warmth
- Dark shade for coziness
Who This Guide Is For and What You’ll Achieve
If you liked the quick impact ideas above, this guide is for homeowners, renters, and DIYers who want a fast, affordable way to change a room’s look without a full remodel.
You’ll learn simple prep, color choice, painting technique, and finishing touches so you’ll confidently create a focal point that boosts style and value.
- Prep
- Color
- Technique
- Finish
Basic Understanding What Is an Accent Wall and Why It Works
An accent wall is a single wall you paint differently to highlight a focal point or change a room’s mood, and you’ll choose it for purpose, not just color.
The right hue and contrast can make a space feel larger, cozier, or more energetic by influencing perception and emotion.
You’ll usually pick a wall behind a bed, sofa, fireplace, or an architectural feature, and can paint drywall, wood, brick, or even cabinetry depending on the effect you want.
Definition and Purpose of an Accent Wall
Think of an accent wall as a focal point you create to give a room personality and direction; it’s one wall painted or treated differently from the others to draw the eye and set the tone.
You use it to highlight architectural features, anchor furniture, define zones, or introduce texture and pattern.
It’s a deliberate design choice that organizes and elevates the space.
Psychological and Visual Effects of Color and Contrast
You’ve already learned how an accent wall gives a room focus; now consider how color and contrast do the heavy lifting psychologically and visually.
Color changes mood—warm hues energize, cool tones calm—while contrast defines depth and hierarchy. A bold shade draws attention, creates perceived size shifts, and highlights architectural features.
Choose combinations that support the room’s purpose and your desired emotional response.
Common Locations and Surfaces for Accent Walls
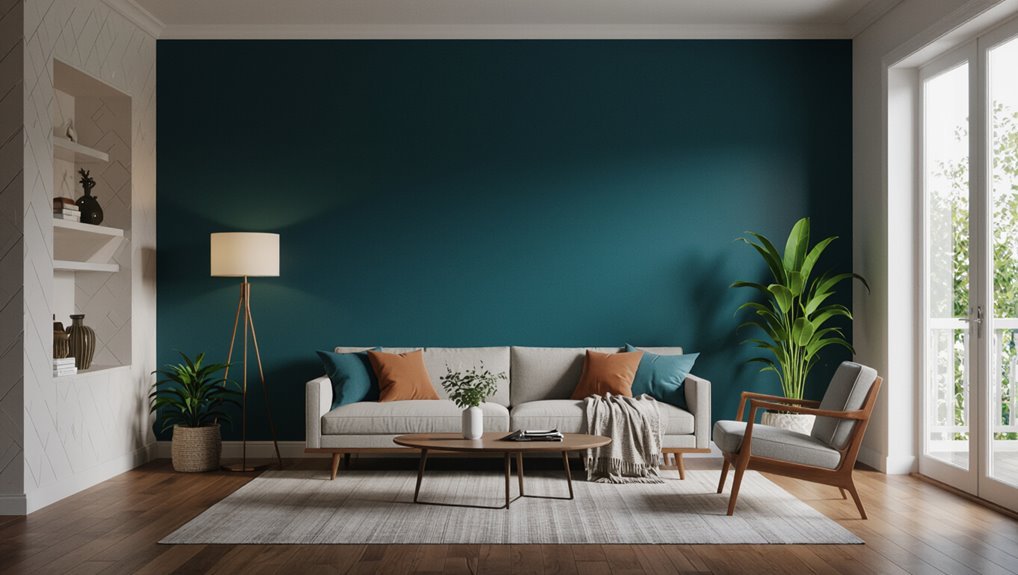
Consider which wall naturally becomes the room’s focal point—behind the bed, sofa, fireplace, or a stair landing—because that’s where an accent color will have the most impact.
Choose surfaces that read well from entry points and pair with lighting.
Options:
- Drywall behind seating
- Brick or stone around a fireplace
- Paneling or shiplap in a dining room
- Staircase or hallway feature wall
Planning Your Accent Wall Design Decisions Before You Paint
Before you pick up a brush, think about which wall will act as the room’s focal point and how natural light and traffic flow will affect it.
Choose a color by testing hue, value, and undertones in the room, and decide on a finish—matte, eggshell, satin, or even wallpaper or plaster—based on durability and texture.
Make sure the choice coordinates with your existing decor, flooring, and lighting so the accent wall enhances the whole space.
Choosing the Right Wall: Focal Points, Light, and Flow
Which wall will draw the eye when someone walks into the room? Choose the wall with a natural focal point—fireplace, built-ins, or large window—and consider traffic flow so the accent doesn’t compete with movement.
Test how light hits surfaces throughout the day; pick a wall that benefits from flattering light and balances the room, anchoring furniture and visual interest without overpowering sightlines.
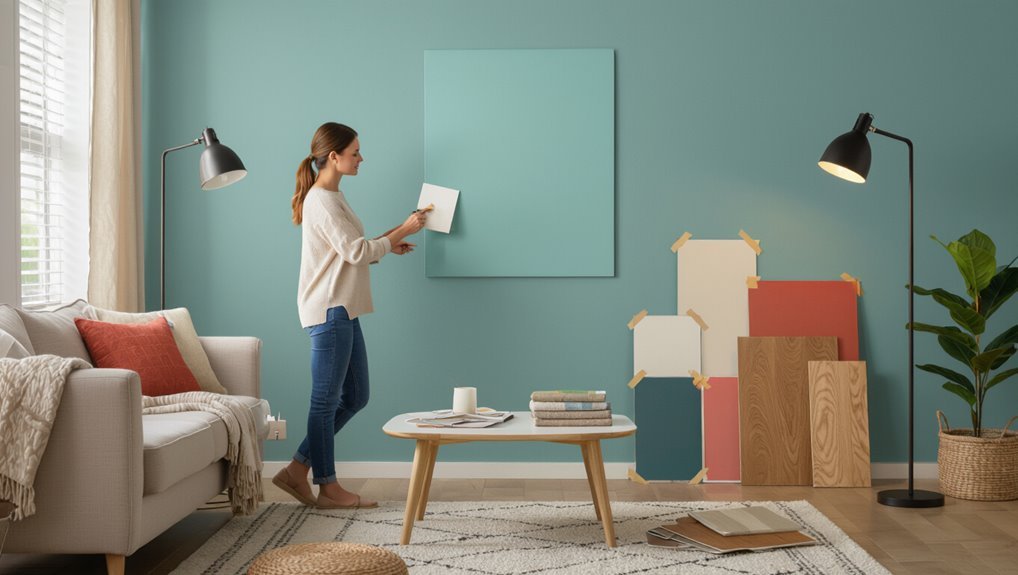
Selecting Color: Tips for Hue, Value, and Undertones
When you’re choosing a color for an accent wall, focus on hue, value, and undertones together so each decision supports the room’s mood and existing finishes.
Pick a hue that complements furniture, test values to keep balance—lighter to expand, darker to anchor—and check undertones against trim and textiles.
Sample large swatches in different light before committing to guarantee harmony.
Finishes and Textures: Matte vs. Eggshell vs. Satin vs. Wallpaper/Plaster Alternatives
Choose a finish and texture that match the room’s function and your desired impact, because sheen and surface treatment change how color reads, hides imperfections, and reflects light.
Go matte for depth and to mask flaws; eggshell for subtle warmth; satin for durability and slight glow in high-traffic areas.
Consider wallpaper or plaster for pattern, texture, or tactile interest when paint alone won’t achieve the look.
Coordinating with Existing Decor, Flooring, and Lighting
Since your accent wall should feel intentional, look at the room’s existing colors, flooring tones, and light sources before you pick a hue or finish.
Match undertones to wood or tile, contrast neutrals with a bold color, and test swatches in morning and evening light.
Consider furniture, rugs, and metal finishes so the wall complements rather than competes with your space.
Materials, Tools, and Cost Estimate
You’ll need a concise checklist of tools and materials—rollers, brushes, tape, primer, and the right paint—to make the job efficient.
I’ll show how to choose paint types and calculate the quantity based on your wall size.
Then we’ll compare low, mid, and premium budget scenarios so you can pick what’s realistic for your project.
Essential Tools and Materials Checklist
A clear checklist makes buying and prepping for an accent wall simple: gather paint, primer, tape, rollers, brushes, drop cloths, sandpaper, patching compound, a level or chalk line, and basic safety gear (gloves, goggles, mask).
You’ll also want measuring tools and a small ladder. Estimate costs by listing items and local prices.
- Tools
- Materials
- Safety
- Budget
Paint Types and Quantity Calculator
While choosing paint, focus on finish, formulation, and coverage so you get the look and durability you want without wasting money; pick washable satin or eggshell for living areas and semi-gloss for trim or high-traffic walls. Use this quick calculator: estimate area (width×height), divide by coverage (sq ft/gal), round up.
| Item | Value |
|---|---|
| Area | 150 sq ft |
| Coverage | 350 sq/gal |
| Gallons | 0.43 → 1 |
| Primer | 1 coat |
Budgeting: Low, Mid, and Premium Cost Scenarios
Three straightforward budget tiers—low, mid, and premium—help you plan costs by matching materials and tools to your goals; pick the tier that balances durability, finish, and how much time you want to spend.
For low, buy budget paint, basic rollers, and tape—expect DIY finish, minimal prep.
Mid upgrades paint quality, brushes, and primer for smoother results.
Premium adds high-end paint, pro tools, and possible contractor help.
Step-by-Step Painting Process
Before you pick up a brush, you’ll clear the room, protect floors and furniture, and get fresh air flowing.
Next you’ll prep the wall by cleaning, repairing, sanding, and priming, then measure and tape for perfectly straight lines.
Finally you’ll cut in with a steady brush and finish with smooth rolling, back-rolling, and careful strokes to avoid marks.
Step 1 Prepare the Space: Clear, Protect, and Ventilate
Step 1 is all about setting yourself up for a clean, safe paint job: clear the room, protect floors and furniture, and open windows or set up fans for good ventilation.
You’ll work efficiently if you:
- Move furniture away and remove wall decor.
- Lay drop cloths and tape baseboards.
- Cover vents and outlets.
- Keep windows or fans running for airflow.
Step 2 Surface Prep: Clean, Repair, Sand, and Prime
Now that the room’s cleared and protected, it’s time to prep the wall so paint will stick and look its best.
You’ll clean grime, repair holes, sand smooth, and prime for even coverage. Follow these steps:
- Wash with mild detergent and rinse.
- Fill cracks and sand patchy spots.
- Sand whole surface lightly.
- Apply primer and let cure before painting.
Step 3 Mark the Area: Measure, Tape, and Create Straight Lines
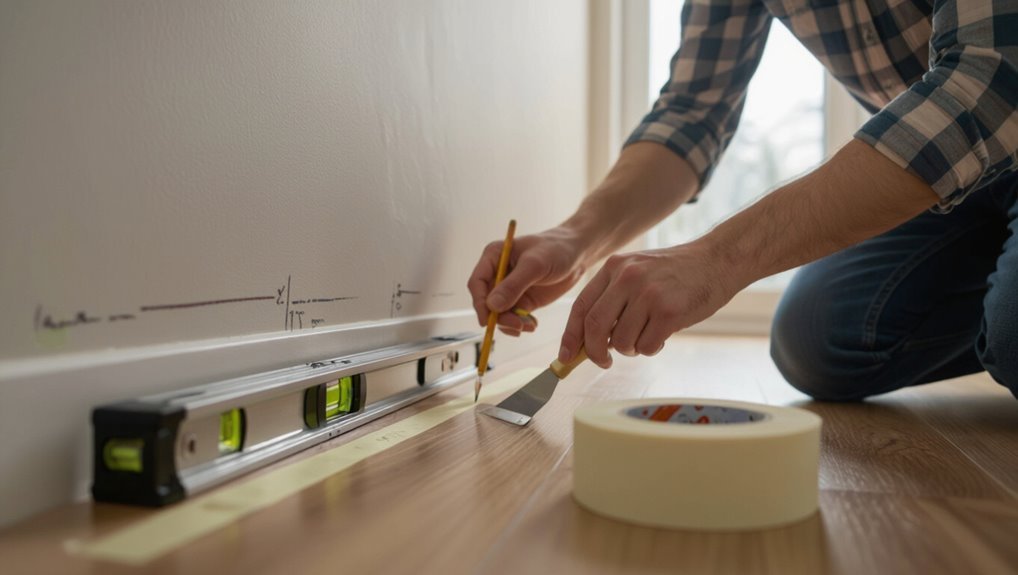
1. Measure the wall, mark edges with a pencil, and use a level to guarantee straight lines.
Apply painter’s tape along those marks, pressing the edges firmly to prevent bleed. Mask baseboards, trim, and adjacent walls.
Double-check alignment from different angles, remove dust, and keep a clean edge by sealing the tape with a thin coat of base color before you paint.
Step 4 Cutting In: Brush Techniques for Clean Edges
With your tape sealed and base coat dry, it’s time to cut in the edges with a brush for the cleanest results.
Load a 2–2.5″ angled brush lightly, tap off excess, and paint a steady 2–3″ band along ceilings, corners, and trim.
Hold the brush like a pencil, use short smooth strokes, and feather the edge toward the center for a sharp, paint-ready line.
Step 5 Rolling: Coat Application, Back-rolling, and Avoiding Roller Marks
Start by loading your roller evenly—dip it into the tray, roll it along the ridged area to remove excess, and aim for a damp, not dripping, nap.
Roll in a W pattern, fill sections without restarting mid-panel, then back-roll vertically to smooth.
Work wet edges, maintain light pressure, and overlap passes to avoid lap marks and roller texture for a consistent, even finish.
Step 6 Second Coat and Touch-Ups: When and How to Recoat
Once the first coat’s dry and the finish looks even, you’ll decide where to recoat and what needs touching up; apply the second coat only after the paint has cured to the manufacturer’s recommended time, inspecting for thin spots, roller marks, and missed edges before you begin.
Feather brush strokes into surrounding paint, keep a wet edge, and blend quickly for uniform coverage.
Step 7 Remove Tape, Clean Up, and Reinstall Decor
Peel the tape carefully while the paint is slightly tacky to avoid lifting or jagged edges; pull it back at a 45-degree angle and keep your hand steady so lines stay crisp.
Clean brushes and rollers immediately, dispose of drop cloths appropriately, and wipe splatters with a damp cloth.
Let paint cure fully before rehanging art and trim, then reinstall hardware and enjoy your refreshed accent wall.
Design Variations and Creative Techniques
Now you can experiment with two-tone color blocks, bold stripes, geometric shapes with painter’s tape, or softer faux finishes like ombre, sponging, and metallic glazes.
You might also use wainscoting, shiplap, or paneling as the backdrop for a painted effect that adds texture and depth.
Think about scale, contrast, and finish to pick the technique that fits your room and skill level.
Two-Tone and Color-Block Accent Walls
If you want a bold but controlled look, two-tone and color-block accent walls let you combine hues and shapes to define space and set mood.
Choose complementary or tonal colors, decide a horizontal, vertical, or anchored block placement, and measure carefully.
Use crisp edges with a level and quality brush or tape, then balance furnishings to echo the chosen palette for cohesion.
Stripes, Geometric Patterns, and Painter’s Tape Designs
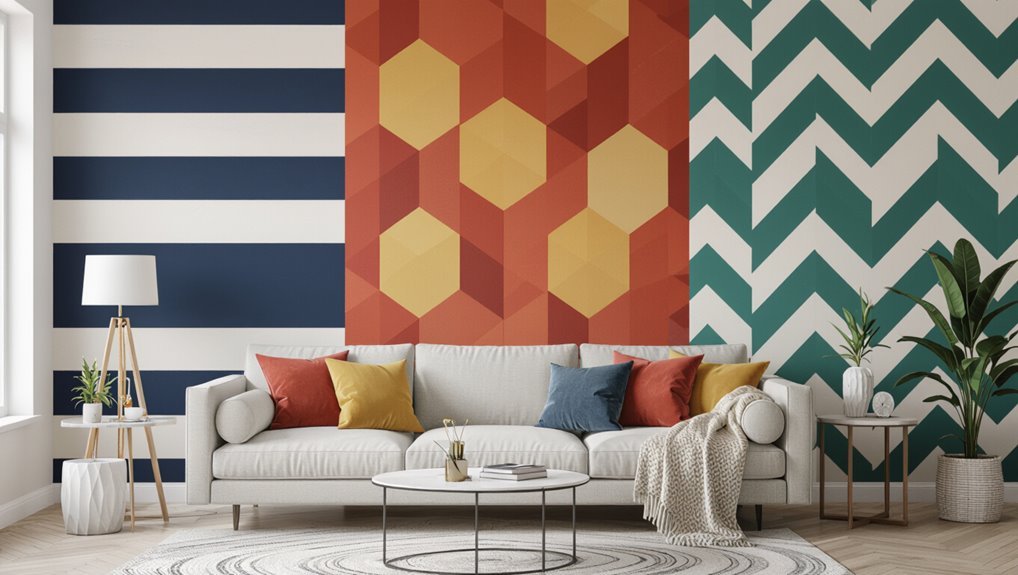
When you want a graphic statement, stripes, geometric patterns, and painter’s-tape designs give you precise, repeatable results that transform a plain wall into art.
Plan measurements, use level and chalk lines, and apply high-quality tape for crisp edges.
Paint contrasting or tonal colors, peel tape while paint is tacky, and touch up cleanly.
These techniques add rhythm and modern structure to your room.
Faux Finishes: Ombre, Sponging, and Metallics
Faux finishes like ombre, sponging, and metallics let you add depth and texture without complex stenciling—so you can create a moodier, more tactile accent wall with tools as simple as brushes, sponges, and glaze.
Blend tones vertically for ombre, dab glaze with a sea sponge for subtle texture, and apply metallics sparingly to catch light.
Seal with a clear coat for durability.
Using Wainscoting, Shiplap, or Paneling as Accent Features
Blending paint effects with architectural elements can deepen a room’s character, so consider pairing ombre or metallic glazes with wainscoting, shiplap, or decorative paneling to add structure and rhythm to your accent wall.
- Paint lower wainscoting darker for grounded contrast.
- Stain shiplap for texture, then glaze lightly.
- Highlight panels with metallic trim.
- Use vertical panels to heighten small rooms.
Common Mistakes and How to Avoid Them
Before you start rolling, be aware of common mistakes that can undo your work: picking the wrong color or finish, skipping proper surface prep, leaving uneven edges or brush marks, and ignoring how lighting and room proportions affect the result.
You’ll learn how to choose colors and sheens that suit the space, prep and prime surfaces correctly, and use techniques to get crisp lines and smooth coverage.
With a few simple checks, you’ll avoid the pitfalls that make an accent wall look amateurish.
Mistake 1 Choosing the Wrong Color or Finish
When you pick the wrong color or finish, the whole accent wall can clash with your room instead of enhancing it.
Test swatches at different times of day, consider undertones, and match finishes to function—matte for hiding flaws, satin for durability, gloss for trim accents.
Think about light, furniture, and mood before committing so the wall complements, not competes, with the space.
Mistake 2 Poor Surface Preparation
Picking the right color and finish only gets you so far if the wall itself isn’t ready to accept paint. You should clean, sand, and repair holes or cracks first.
Remove loose plaster, fill imperfections with spackle, sand smooth, and wipe away dust.
Prime patched or stained areas so paint adheres evenly and lasts longer. Proper prep saves time and prevents peeling.
Mistake 3 Uneven Edges and Brush Marks
Although you might be enthusiastic to finish, rushing edges or skimping on tools will leave you with uneven lines and visible brush marks that ruin the clean look of an accent wall.
Use high-quality angled brushes and a steady hand for cutting in, apply thin, even coats, and feather brush strokes into the roller-applied paint for a seamless, professional finish.
Mistake 4 Overlooking Lighting and Room Proportions
You’ve fixed your edges and smoothed out brush marks, but lighting and room proportions can still make or break your accent wall.
Consider how light, scale, and placement interact so the wall enhances, not overwhelms.
- Test paint swatches in morning and evening.
- Use vertical stripes to heighten low rooms.
- Keep focal points clear.
- Balance with furniture size.
Best Practices and Pro Tips
Before you pick a final color, test swatches and live samples on the wall to see how they look in both natural and artificial light.
Decide whether the job is something you can handle or if it’s worth hiring a pro for complex finishes or tricky prep.
Finally, follow simple maintenance tips—like using washable paint and touching up chips promptly—to keep your accent wall looking fresh for years.
Testing Swatches and Live Samples
Wondering how that swatch will really look on your wall at different times of day?
Paint small 12×12″ samples directly on the wall and on poster board you can move. Live samples show texture, sheen, and undertones; label each with brand and mix.
Observe over several days, noting how nearby colors and finishes alter perception before committing.
Working with Natural vs. Artificial Light
When light changes, so does your accent wall’s color—so test paint under both natural and artificial lighting before you commit.
Observe swatches morning, midday, and evening; note warmth, coolness, and reflectivity. Use bulbs matching your room’s fixtures when evaluating artificial light.
Adjust shade or sheen based on how highlights, shadows, and color temperature alter the wall’s mood and perceived size.
Professional vs. DIY: When to Hire a Pro
Deciding whether to tackle an accent wall yourself or hire a pro comes down to scope, skill, and time—so be honest about what you can handle.
If walls need repairs, complex finishes, or perfect edges, hire a pro to save stress and guarantee quality.
DIY makes sense for simple, small walls if you’ve got steady hands, basic tools, and patience.
Maintenance and Longevity Tips for Painted Accent Walls
A few simple habits will keep your accent wall looking fresh for years: clean it gently, spot-repair chips quickly, and touch up scuffs with matching paint.
- Wash with mild soap and soft cloth.
- Patch dents and sand lightly before repainting.
- Store leftover paint for perfect touch-ups.
- Use a breathable protective sealer in high-traffic areas.
Quick Comparison Paint vs. Wallpaper vs. Panels for Accent Walls
Although paint, wallpaper, and panels each give you a bold focal point, they differ in cost, installation time, durability, and style flexibility—so pick the option that fits your budget, skill level, and how permanent you want the look to be.
| Option | Quick Take |
|---|---|
| Paint | Cheapest, fastest, very flexible |
| Wallpaper | Patterned impact, moderate cost, careful install |
| Panels | Durable, textured, higher cost, more permanent |
Before-and-After Case Examples (Inspiration and Lessons)
You’ll see three real before-and-afters that show how color and placement transformed a cramped living room, made a bedroom’s headboard sing, and helped zones read clearly in an open-plan space.
Pay attention to the choices—shade, wall selection, and scale—and the practical results they produced.
Use these examples to copy what worked and avoid what didn’t for your own project.
Small Living Room Turnaround: Color, Placement, and Result
When you’re working with a compact living room, choosing the right accent wall color and placement can make the space feel larger, brighter, or cozier depending on your goal.
These before-and-after examples show how small changes—like shifting a bold hue to the far wall or painting an alcove instead of the whole room—deliver dramatic visual results and practical lessons you can copy.
You’ll learn to pick contrast, position, and finish to visually expand sightlines, anchor furniture, or create intimacy without clutter, using scale, light reflection, and a single confident color to transform proportion and mood quickly.
Bedroom Focal Wall: Headboard Integration and Mood Change
If you want your bedroom to feel calmer or more dramatic without swapping furniture, paint the wall behind the bed to integrate the headboard and set the room’s mood.
Choose soft neutrals or muted blues for serenity; deep jewel tones or charcoal for drama.
Anchor art and lighting to that wall, and watch textiles and accessories read as intentional, cohesive choices that transform the space.
Open-Plan Space: Using Accent Walls to Define Zones
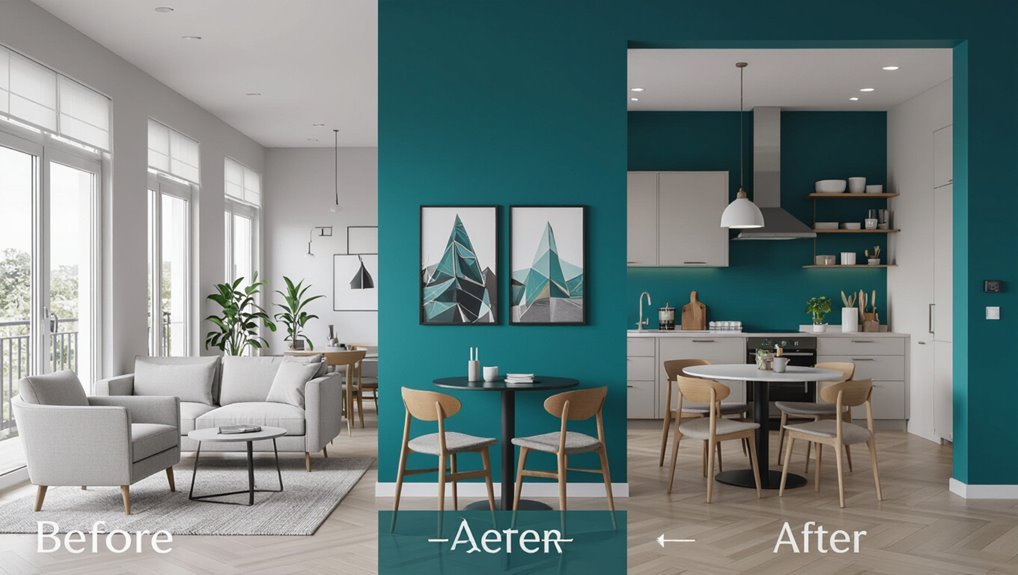
Because open-plan rooms juggle multiple functions in one sightline, an accent wall can give each zone a clear visual identity without adding physical partitions.
You’ll see before-and-after examples where color anchors a dining area, separates a living nook, or frames a workspace.
Choose hues, patterns, or textures that suit each function, then balance scale and lighting so shifts feel intentional and cohesive.
FAQ Common Questions About Painting Accent Walls
You probably have a few practical questions before you start, like which wall to pick, how much paint you’ll need, and whether primer is necessary.
You’ll also want to know if bold colors will make a small room feel smaller and how long paint needs to cure before you rehanging decor.
Let’s answer those FAQs so you can plan confidently and avoid common mistakes.
How do I choose the best wall for an accent wall?
Which wall makes the biggest visual impact in your room? Choose the wall you see first when entering or where furniture and focal points naturally point—behind the bed, sofa, or fireplace.
Pick a wall without doors or busy interruptions so the color reads clearly.
Consider lighting: natural or accent lights enhance depth.
Test a swatch before committing.
How much paint do I need for one accent wall?
Once you’ve picked the wall that will carry the room’s focus, figure out how much paint you’ll need so the project stays on schedule.
Measure width × height, subtract doors/windows. Most accent walls need one to two coats; a gallon covers ~350–400 sq ft, but darker or new surfaces may need primer or extra coat.
Buy slightly more for touch-ups.
Can I use bold colors in small rooms without shrinking the space?
Curious whether a bold accent wall will make a small room feel cramped? You can use bold hues without shrinking space by choosing one wall only, keeping surrounding walls light, and maximizing natural light.
Balance with minimal, low-profile furniture and mirrors to reflect depth. Scale patterns and trim simply so the color reads as intentional, not overwhelming, preserving openness and character.
Is primer always necessary for an accent wall?
Do you always need primer for an accent wall? Not always.
If the surface is clean, previously painted in a similar shade, and in good condition, you can often skip primer by using a high-quality, pigmented paint or paint-and-primer blend.
But for stains, drastic color changes, raw drywall, or uneven porosity, primer guarantees adhesion, true color, and fewer coats—so use it.
How long does it take for paint to fully cure and be ready for decor?
How long will the paint feel dry to the touch and actually be cured enough to hang art or push furniture against it? Touch-dry happens in a few hours, but full cure usually takes 2–4 weeks.
Latex paints cure faster than oil-based. Confirm good ventilation and moderate temperatures to speed curing.
Wait at least a week for light handling and up to a month for heavy items or adhesive hangers.