How to Paint a Ceiling After Removing Popcorn for a Smooth, Clean Result
After you remove popcorn, you’ll get a smooth, paint-ready ceiling by cleaning up dust, repairing dents and seams, sanding smooth, and sealing repairs with the proper primer (stain-blocking or bonding as needed). Cut in edges with a brush, use a roller for broad areas, and apply two thin, even coats of flat ceiling paint while keeping a wet edge to avoid lap marks. Follow the right prep and techniques and you’ll see professional-looking results and more tips ahead.
Quick Answer Can You Paint a Ceiling After Removing Popcorn?
Yes — you can paint after removing popcorn, but wait until the ceiling is fully dry and any joint compound or skim coat has cured.
Make sure the surface is clean, smooth, and free of loose texture, with any gouges or seams patched and sanded.
Prime stained or repaired areas before you start painting for an even finish.
Short, direct recommendation for timing and readiness
After you strip popcorn, wait until the ceiling is fully dry and smooth before you paint—usually 24–48 hours for patched or skim‑coated drywall, longer if you used a wet compound or primer.
When you’re ready, test small areas for adhesion, dust off residues, and apply primer if needed.
For clear guidance on how to paint a ceiling after removing popcorn, start with thin, even coats.
Summary of required surface condition before painting
If you removed popcorn texture, make certain the ceiling is completely dry, smooth, and free of loose bits or dust before you paint—patch any gouges, sand seams and repairs flush, and apply primer where compound or bare drywall shows.
Check for hairline cracks, remove grease or stains, and guarantee uniform porosity.
Only paint when repairs are fully cured and the surface feels consistently smooth to the touch.
Basic Understanding What Is Popcorn Ceiling and Why Removal Changes Painting Approach
Popcorn ceilings are a textured spray finish often made from drywall compound, vermiculite, or acoustical materials, and you’ll want to know what was used before you start.
Removing that texture can damage the underlying drywall, joint compound, or skim coat, so expect repairs and smoothing.
Repainting is mandatory if you’ve sanded or skim-coated the surface, but it can be optional if removal left the substrate intact and visually sound.
What popcorn texture is and common materials used

A textured ceiling’s bumpy, spray-on finish was popular from the 1930s through the 1980s and can be made from materials like vermiculite, asbestos (in older homes), gypsum, or acoustic aggregates mixed with paint.
Knowing which material you’re dealing with matters because some require special handling or testing before removal, and that changes how you’ll prep and paint the surface.
You should identify the texture type, assess risks, and plan appropriate cleanup, containment, and disposal.
How removal affects substrate (joint compound, drywall, skim coat)
When you remove a textured ceiling, you’ll often expose or damage the underlying substrate—joint compound, drywall paper, or a skim coat—and that changes how you prep and paint the surface.
You’ll inspect for gouges, paper tears, and thin spots, then repair with compatible joint compound or skim coats, sand smooth, prime properly, and guarantee adhesion before applying finish paint for an even, durable result.
When repainting is necessary vs. optional
If you’ve stripped a popcorn ceiling or are deciding whether to repaint it, know that removal often exposes damaged or porous substrate that usually makes repainting necessary rather than optional.
You should repaint when you see uneven texture, joint compound dust, stains, or bare drywall.
Repainting’s optional only for uniformly smooth, fully sealed surfaces; otherwise prime and paint to guarantee durability and consistent finish.
Overview of the Process Step-by-Step Roadmap
Start by inspecting and evaluating the ceiling to spot cracks, stains, or texture issues.
Then repair and prepare the surface, prime it, and pick the right paint and tools.
Finish by applying the paint in the proper sequence and technique for an even, lasting result.
Step 1 Inspect and Assess Ceiling Condition
1. You’ll first inspect the ceiling to gauge overall condition and plan work. Check for damage, texture uniformity, and previous paint issues.
Note moisture, stains, and cracks so you know what to address later.
- Look for water stains and mold
- Scan for cracks and delamination
- Inspect texture consistency
- Note any previous paint failures
Step 2 Repair and Prepare Surface
Begin by addressing any damage so the ceiling is sound and smooth before you paint.
Remove loose debris, patch holes and cracks with joint compound, sand for an even surface, and wipe away dust.
Protect fixtures and floors with plastic and tape.
Check for lingering texture, then feather edges so repairs disappear before priming.
- Remove loose debris
- Patch holes and cracks
- Sand and clean dust
- Protect fixtures and floors
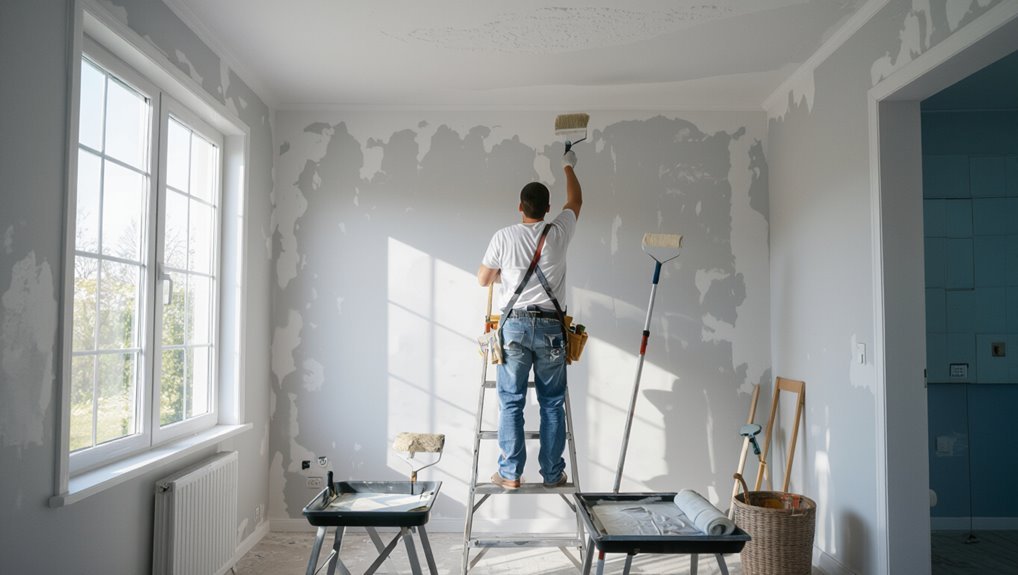
Step 3 Prime the Ceiling
With repairs smooth and dust-free, you’re ready to prime the ceiling to guarantee even paint adhesion and uniform color coverage.
Apply a quality primer, work in sections, and maintain a wet edge to avoid lap marks.
- Choose a stain-blocking, high-adhesion primer
- Use a roller with appropriate nap
- Cut in around edges first
- Allow full dry time before painting
Step 4 Choose Paint Type and Tools
Now pick the right paint and tools so your primer work translates into a smooth, durable finish.
Choose flat or matte ceiling paint for low sheen, high-hide formulas, and a warm white to mask imperfections.
Select tools that reduce texture and lap marks:
- 3/8″ nap roller for smooth ceilings
- Extension pole for reach
- Angular brush for edges
- Paint tray and filter
Step 5 Apply Paint (technique and sequence)
Start by cutting in around the room’s perimeter and any fixtures with your angular brush. Then switch to the roller to apply paint in manageable sections so you keep a wet edge and avoid lap marks.
- Work in overlapping 2–3 foot passes from one side to the other.
- Maintain a consistent roller pressure.
- Reload before paint thins at the edge.
- Let each coat dry to spec before a second.
Step 6 Finish, touch-ups, and cleanup
After the paint has dried to the manufacturer’s recommended time, you’ll move into the finish stage where you tidy edges, fix any flaws, and clean up tools and surfaces.
You’ll inspect for drips, feather edges, and guarantee consistent sheen. Then restore fixtures and ventilate.
- Check and touch up drips or thin spots
- Feather roller marks with light passes
- Clean brushes, rollers, trays
- Remove drop cloths, tape, and debris
Detailed Preparation Tools, Materials, and Safety
Before you start painting, gather the right tools and materials—rollers, extension poles, drop cloths, quality ceiling paint, and patching supplies—so you won’t stop midway.
Put on PPE like goggles, a respirator or mask, and gloves, and make sure the room is well ventilated to minimize fumes.
Use plastic sheeting, tape off vents and fixtures, and control dust with gentle sanding and a HEPA vacuum to keep the workspace clean and safe.
Recommended tools and materials
A few reliable tools and the right safety gear will make ceiling painting faster and keep you safe: you’ll need a sturdy ladder or adjustable platform, an extension pole with a roller and 9–12mm nap cover, angled brushes for cut-ins, a quality paint tray and liners, painter’s tape, drop cloths, putty knife and spackle for repairs, sanding block, and a respirator or mask, safety glasses, and gloves.
- Primer and ceiling paint
- Sandpaper (120–220 grit)
- Joint compound and patching supplies
- Microfiber rollers and extra covers
Personal protective equipment and ventilation requirements
You’ll want to gear up with proper personal protective equipment and set up ventilation before you open a can of ceiling paint:
- Wear a NIOSH-approved respirator rated for particulates and fumes.
- Use safety goggles to block dust and splatter.
- Don disposable coveralls and gloves to protect skin and clothing.
- Run fans and open windows to guarantee steady air exchange while painting.
Containment and dust control strategies
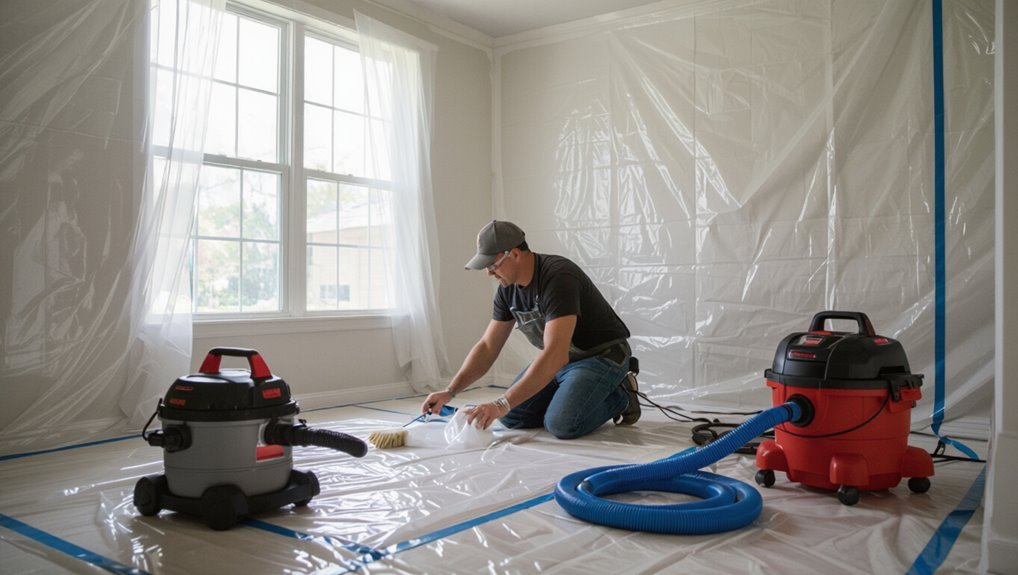
Now that you’re protected and the room’s ventilated, focus on containment and dust control to keep paint and prep mess from spreading.
Seal doorways with plastic sheeting and painter’s tape, cover floors with drop cloths, and wrap vents.
Use a HEPA-filter shop vac while scraping, mist surfaces lightly to reduce airborne dust, and change filters or bags frequently to prevent redistribution.
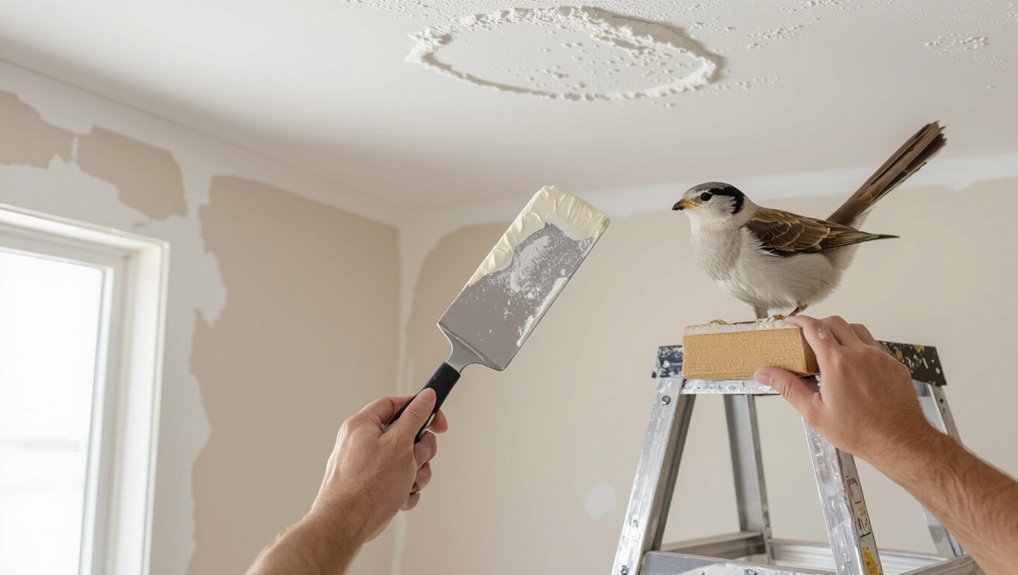
Repair and Surface Prep Making the Ceiling Smooth
After you remove fixtures and loose material, inspect the ceiling for dents, gouges, and open seams so you know what needs patching.
You’ll learn a stepwise joint-compound and skim-coating technique, the right sanding grits and dust-control methods, and how to decide when a structural or large repair needs a pro.
Tackle small fixes yourself, but call an expert for anything that affects framing, drywall integrity, or safety.
Identifying common defects after removal (dents, gouges, seams)
When the old texture and fixtures come down you’ll often find a mix of dents, gouges, and open seams that need attention before any paint goes on.
You should inspect under good light, mark shallow dents, deeper gouges, seam gaps, and any loose drywall tape.
Note nail pops, uneven joints, and surface dust so you can prioritize repairs and cleaning before patching.
How to apply joint compound and skim coat stepwise technique
Start by gathering the right tools—taping knife, hawk or mud pan, pre-mixed all-purpose joint compound, drywall tape, and a sanding block—so you can work steadily and avoid interruptions.
Apply tape over seams, embed with thin compound, let set, then build two thin skim coats feathered wide for uniformity.
Finish by checking for low spots.
- Embed tape smoothly
- Thin first coat
- Broad second skim
- Feather edges wide
Sanding: grit selection, methods, and dust management
Once your skim coats have set and low spots are identified, sanding shapes the surface for a seamless finish—pick the right grit, use steady methods, and control dust so you don’t undo your work.
Start with 120–150 grit to level seams, finish with 180–220 grit for smoothness.
Sand with a pole sander or sanding block, keep movements even, vacuum frequently, and use a HEPA mask and drop cloths.
When to call a pro for structural or large repairs
If you spot major cracks, sagging, water damage, or any structural movement in the ceiling, call a pro—these issues can hide compromised joists, rot, or active leaks that DIY patching won’t fix safely.
Don’t attempt large drywall replacements, structural reinforcement, or concealed mold remediation alone. Hire a licensed contractor or structural engineer to assess, secure supports, and repair safely so paint and finish last.
Priming Why It Matters and Which Primer to Use
After repairs, you’ll want to prime to seal patches, hide stains, and give paint a uniform surface to stick to.
Choose a primer type based on the job—stain-blocking for water marks, drywall primer for fresh mud, or a bonding primer for slick surfaces.
Apply the recommended number of coats, respect drying times, and use a roller for broad areas plus a brush for edges.
Purpose of primer on repaired ceilings
Prime your repaired ceiling to seal patch materials, block stains, and create an even surface that helps new paint adhere and look uniform.
You’ll prevent flashiness where patched areas reflect light differently, reduce paint soak-in variations, and lock joint compound so texture matches surrounding drywall.
Proper priming saves time and gives a consistent finish, minimizing touch-ups and repainting needs.
Primer types compared (stain-blocking, drywall primer, bonding primer)
Choosing the right primer matters because each type tackles different problems: stain-blocking primers lock out smoke, water, and tannin stains; drywall primers seal joint compound and paper to prevent flashing; and bonding primers promote adhesion on glossy or problematic surfaces. Pick based on surface needs: stain-blocker for discoloration, drywall primer for repaired seams, bonding for slick or patchy areas.
| Type | Best use |
|---|---|
| Stain-blocking | Discolored ceilings |
| Drywall | Seams, compound |
Application tips: number of coats, drying times, and tools
Because the right primer only works if it’s applied correctly, you’ll want to get the number of coats, drying times, and tools right before you start rolling.
Apply one full coat of drywall primer; use a second only for stains or uneven absorption.
Let each coat dry per label—typically 1–4 hours.
Use a 3/8–1/2″ nap roller for smooth ceilings and a brush for edges.
Painting Choosing Paint, Finish, and Application Techniques
Choose a flat or matte ceiling paint (or a specialty ceiling formula) for the least sheen and best flaw-hiding. Then pick tools—roller, brush, or sprayer—based on room size and your comfort.
Start by cutting in with a brush. Use a consistent rolling pattern to blend sections and avoid lap marks. Understand each tool’s pros and cons for control, speed, and finish.
Plan for two thin coats with proper drying time between them to guarantee even coverage and durability.
Best paint types and sheens for ceilings (flat, matte, ceiling paint)
When you’re picking paint for a ceiling, prioritize flat or matte finishes and formulas labeled specifically as “ceiling paint” because they hide imperfections and minimize glare.
These paints have lower sheen and thicker pigments that provide even coverage and reduce the number of coats you’ll need.
Choose high-quality acrylic latex for durability and easy cleanup, and pick a bright white or soft off-white to maximize light and conceal flaws.
Roller, brush, and sprayer pros and cons
After picking the right flat or matte ceiling paint, you’ll need to decide how to apply it—roller, brush, or sprayer—since each method affects finish, speed, and cleanup. You’ll use rollers for coverage, brushes for edges, sprayers for speed. Choose based on room size, detail, and cleanup tolerance.
| Tool | Strength | Weakness |
|---|---|---|
| Roller | Even coverage | Slow edges |
| Brush | Precise | Laborious |
| Sprayer | Fast | Overspray, prep |
Cutting in, rolling pattern, and avoiding lap marks
Although the room looks ready, you’ll want to start by cutting in around all edges with a good angled brush so your roller can work uninterrupted.
Then follow a consistent rolling pattern—usually an overlapping “W” or “M” motion—and maintain a wet edge to prevent lap marks.
Work in manageable sections, reload the roller evenly, blend into the cut-in immediately, and check under angled light for missed spots.
Recommended number of coats and drying schedule
Because ceilings are a large, flat surface that shows inconsistencies easily, most rooms need two coats of quality ceiling paint for full, even coverage.
You’ll sometimes get away with one coat if the primer is tinted and the color is light, but darker or dramatic hues usually require a third coat.
Wait recommended drying times—typically 2–4 hours between coats for latex, longer for oil—then inspect and touch up.
Common Problems and How to Fix Them
You’ll encounter issues like visible seams, texture mismatches, roller stipple, lap marks, peeling, and stains when painting a ceiling.
For each problem you can diagnose the cause—poor surface prep, wrong primer, uneven technique, or moisture—and apply fixes like sanding and skim-coating seams, using the correct roller and consistent overlap, stripping and re-priming peeling areas, and treating stains with a stain-blocking primer.
Follow the right repair and prevention steps so your finish stays smooth and durable.
Visible seams or texture differences causes and remediation
When seams or texture differences show up after painting, they draw the eye and make even a fresh ceiling look unfinished. Addressing them early saves time and prevents bigger repairs later.
You’ll likely see gaps from taped drywall joints, uneven skim coats, or differing sheen. Sand seams smooth, reapply thin joint compound, feather edges, and match texture with light trowel or spray before repainting.
Flashing, roller stipple, and lap marks fixes
If paint dries unevenly, flashing, roller stipple, and lap marks will jump out under normal room lighting.
But you can fix them with targeted sanding, blending, and consistent application techniques. Lightly sand high spots, feather edges with fine-grit paper, and wipe dust.
Recoat using uniform roller pressure, overlapping wet edges, and maintain a wet edge. Match sheen and thin coats for seamless blending.
Paint peeling or poor adhesion diagnosis and solutions
Although peeling often looks like a cosmetic problem, it usually signals poor adhesion caused by contamination, moisture, or incompatible coatings. You’ll need to diagnose the root cause before rehanging a ladder.
Inspect for chalky residue, dampness, or oil-based undercoats.
Scrape loose paint, clean with TSP or a degreaser, sand glossy areas, prime with a bonding primer, then repaint with compatible ceiling paint.
Discoloration or staining after painting treatment steps
Because stains and yellowing can sometimes appear days or weeks after you paint, it’s important to identify their source before you repaint so the problem doesn’t come back.
Locate moisture, smoke, or nicotine origins. Clean with trisodium phosphate or a mildew cleaner, let dry, then seal stains with a stain-blocking primer.
Repaint with quality ceiling paint and address underlying issues to prevent recurrence.
Tips, Best Practices, and Time-Saving Strategies
You’ll learn quick ways to cut sanding and dust, plus masking tricks that make room prep faster and cleaner.
We’ll compare budget-friendly supplies to pro-grade options so you can pick what saves time without costing quality.
Finally, you’ll see when a spray application is worth the setup and when a roller is the smarter choice.
How to minimize sanding and dust
When you’re prepping a ceiling, plan smart to keep sanding and dust to a minimum: mask off vents and fixtures, lay down drop cloths, and choose low-dust methods like wet-sanding, tack cloths, or high-quality primer that hides imperfections so you don’t have to over-sand.
Work in small sections, use a vacuum sander or HEPA vacuum, wear a respirator, and wipe surfaces with a damp cloth.
Efficient room prep and masking techniques
Although prep might feel tedious, efficient room setup and smart masking cut your painting time and protect surfaces, so plan like a pro: clear furniture to the center and cover with breathable drop cloths, remove or tape off trim and outlet covers, and use painter’s tape along clean, dry edges for sharp lines.
- Seal vents and light fixtures
- Work top-down for debris control
- Keep tools organized nearby
- Replace tape after 24 hours
Budget-friendly vs. professional-grade approaches
If you’re working on a tight budget, smart choices let you achieve a clean, durable ceiling without splurging, while knowing where to invest in professional-grade tools saves time and improves results when it matters most.
Use quality roller covers and good primer, rent or borrow specialty gear for tricky spots, and prioritize proper prep.
Spend more on paint and a sturdy pole for faster, even coverage.
When spray application makes sense
Because spray guns cover large, flat ceilings much faster than rollers, you’ll save significant time on big rooms or multiple rooms and get a very even finish with minimal lap marks.
Use spray when surfaces are smooth, you can protect floors/furniture, and ventilation is adequate.
Practice on cardboard, thin coats, and overlap consistently.
Rent quality equipment and mask thoroughly to avoid overspray.
Comparison DIY vs. Hiring a Professional
You can save money by painting the ceiling yourself, but factor in time and the learning curve compared with a pro’s speed and expertise.
Leave complex or hazardous jobs—like lead paint, major repairs, or very high ceilings—to professionals who’ve the right equipment and training.
We’ll compare costs, time, and difficulty to help you decide which route fits your situation.
Cost, time, and complexity comparison
Comparing DIY versus hiring a pro comes down to three straight factors—cost, time, and complexity—and knowing how each one affects your project helps you pick the right route. You’ll save money DIY but spend more time; pros cost more but finish faster and handle tricky steps. Consider skill, schedule, and desired finish quality.
| Factor | DIY vs Pro |
|---|---|
| Cost | Lower vs higher |
| Time | Longer vs shorter |
| Complexity | You handle vs they handle |
| Quality control | Variable vs consistent |
Situations best left to pros (lead, large repairs, high ceilings)
While DIY can save money on straightforward ceiling jobs, some situations are better entrusted to professionals.
If your home has suspected lead paint, extensive water or structural damage, or ceilings above two stories, hire licensed pros.
They’ll test for hazards, handle large repairs, use proper scaffolding, and guarantee safety and code compliance, saving you risk, time, and potentially higher costs from mistakes.
Maintenance and Long-Term Care After Painting
After painting, you’ll keep your ceiling looking fresh by cleaning gently with a soft brush or mild detergent and avoiding harsh scrubbing.
Check for stains, peeling, or discoloration every few years so you can spot repairs early.
You’ll likely need to repaint in 8–15 years depending on traffic, moisture, and paint quality to maintain appearance and protection.
How to clean and preserve painted ceilings
Though ceilings don’t see daily contact like walls do, they’ll still collect dust, cobwebs, and occasional stains—so keeping them looking fresh means a few simple, regular steps.
Use a soft broom or microfiber duster for weekly dusting, spot-clean stains with a mild detergent and damp sponge, avoid harsh scrubbing, touch up scuffs with matching paint, and guarantee good ventilation to prevent mildew.
When and why to repaint in the future
Keeping up with dusting and spot-cleaning will stretch the life of your ceiling paint, but you’ll still need to repaint eventually to restore color, hide wear, or address damage.
Plan repainting every 8–12 years for normal rooms, sooner if moisture, stains, or frequent traffic accelerate wear.
Touch up isolated spots when small; schedule full repaints when overall fading, peeling, or repairs become obvious.
Frequently Asked Questions
You probably have a few quick questions before you start the next coat, like how long to wait after skim coating and whether leftover wall paint will work on the ceiling.
You’ll also want to know if paint will hide minor texture issues, how to prevent drips and splatter, and whether ceiling paint differs from wall paint.
Read on for clear answers and practical tips.
How long should I wait to paint after skim coating?
After skim coating, wait until the joint compound is fully dry and cured before priming or painting—usually 24 to 72 hours depending on temperature, humidity, and coat thickness.
Test dryness by touching multiple spots and checking for coolness or powdery residue.
Sand lightly, remove dust, then apply a quality primer formulated for new drywall or joint compound.
Paint only when primer is dry.
Can I use leftover wall paint on the ceiling?
Wondering if that leftover wall paint will work on your ceiling? You can use wall paint if it’s the same sheen and color you want overhead.
Flat or ceiling-specific formulas hide imperfections best. Stir thoroughly, check for odor, and do a small test patch to verify adhesion and coverage.
If the paint’s old, consider tinting or using fresh ceiling paint for reliable results.
Will painting hide slight texture inconsistencies?
How well will paint disguise small texture flaws?
Paint can minimize minor unevenness, especially with flat or matte ceiling paint and a roller with even nap. It won’t erase ridges, seams, or deep gouges; those need skim-coating or sanding first.
Use primer to equalize porosity, then apply thin, even coats. Inspect under good light to decide if repairs are necessary.
How do I prevent paint drips and splatter on walls and fixtures?
Start by protecting everything you don’t want painted: cover walls, light fixtures, and furniture with drop cloths or plastic sheeting and secure edges with painter’s tape so paint can’t seep through.
Use a roller with proper nap and don’t overload it; work in small sections.
Keep a damp cloth and a bucket nearby for quick cleanup, and use an extension pole for steady control.
Is ceiling paint different from wall paint?
Because ceilings face different challenges than walls, manufacturers often formulate ceiling paint to perform better overhead: it’s typically thicker, less glossy, and designed to hide imperfections and minimize drips and splatter when you paint with an upward stroke.
You can use wall paint in a pinch, but ceiling paint reduces touch-ups and sagging.
Pick a flat, stain-resistant formula for best, uniform coverage.