How to Paint a Cement Wall: Preparation and Painting Guide
You can paint a cement wall successfully if you prep it right: inspect for cracks, efflorescence, and loose paint, test for moisture, and fix leaks or drainage first. Clean thoroughly, remove salts and stains, then patch spalls and voids, sand smooth, and prime with a breathable masonry primer. Use acrylic or elastomeric masonry paint and the proper rollers, brushes, or sprayer, allow full drying between coats, and follow maintenance tips to keep the finish durable—keep going to learn detailed steps and troubleshooting.
Can You Paint Your Cement Wall Now? Quick Answer & Checklist
Wondering if you can paint your cement wall right now? You can, if the surface is clean, dry, and free of loose material.
Check weather (no rain, moderate temp), gather primer, masonry paint, brushes/roller, and respirator.
Consider cement wall aesthetics and plan color selection to match light and surroundings.
Ready? Proceed with proper prep and tools for lasting results.
Inspect Walls: Cracks, Efflorescence, Paint Failure
Start by giving your cement wall a close visual and tactile inspection for three common problems: cracks, efflorescence, and paint failure.
Begin with a close visual and tactile inspection of your cement wall for cracks, efflorescence, and paint failure.
For crack assessment, probe and map hairlines versus structural gaps, then clean and fill appropriately.
For efflorescence treatment, dry, brush away salts, and apply a salt-blocking primer.
Scrape loose paint and note areas needing full removal before repainting.
Test for Moisture and What to Do If the Wall Is Damp
Before you paint, check for moisture so your new finish won’t peel or trap water; use a moisture meter or the simple plastic-sheet test to spot damp areas. If readings show moisture, pause painting and follow damp remediation: fix leaks, improve drainage, add ventilation, and let the wall dry fully before priming.
| Test | Action |
|---|---|
| Meter high | Repair source |
| Condensation | Ventilate & dry |
Interior Cement Walls: Best Paint Types & Finishes
For interior cement walls you’ll want paints formulated for masonry—acrylic latex and masonry elastomeric are common recommendations.
Choose a finish based on room use: flat or matte hides imperfections, eggshell or satin balances durability and washability, and semi-gloss gives the most scuff resistance for high-traffic areas.
Also consider long-term maintenance—pick formulations with good adhesion and mildew resistance so cleaning and touch-ups stay easy.
Recommended Paint Types
Choosing the right paint for interior cement walls matters because breathable, durable formulas prevent moisture problems and give you a finish that lasts. You’ll prefer masonry primer, breathable acrylic latex, or limewash for moisture control. Consider eco friendly options and smart color selection for longevity and indoor air quality.
| Type | Benefit |
|---|---|
| Masonry primer | Seals and bonds |
| Acrylic latex | Breathable, durable |
Finish Options Explained
Want a smooth, washable finish or something with texture and depth? You’ll choose between matte, eggshell, satin, and semi-gloss sheens, each yielding distinct finish textures and light reflection.
Consider faux finishes, stucco effects, or micro-texture for visual interest. Test swatches to see color variations and sheen together, then pick the finish that complements room lighting and style.
Durability And Maintenance
Because interior cement walls face moisture, scuffs, and frequent cleaning, pick paint systems that resist wear and are easy to maintain.
Choose high-quality masonry primers and acrylic or epoxy finishes for weather resistance and quick cleanup.
Clean gently, touch up chips promptly, and reseal joints yearly.
Routine care prolongs surface longevity, prevents mold, and keeps walls looking professional with minimal effort.
Exterior Cement Walls: Durable Paints & Weatherproofing
For exterior cement walls you’ll need paint and sealers built to resist moisture, UV, and temperature swings, so pick coatings labeled for masonry or concrete and formulated for outdoor use. Choose eco friendly options when possible and plan color selection for heat reflection and curb appeal. Seal joints, use breathable topcoats, and maintain yearly checks.
| Coating | Benefit | Lifespan |
|---|---|---|
| Elastomeric | Waterproofing | 10–15 yrs |
| Acrylic | UV resistance | 7–10 yrs |
| Silane/Siloxane | Deep water repellency | 5–12 yrs |
Pick the Right Primer for Cement Walls (Masonry, Bonding, Sealer)
Start by choosing a primer that matches the job: masonry primers help fill pores and improve adhesion on rough cement.
Use a bonding primer when the surface is dusty or previously coated to guarantee paint sticks.
For high-moisture areas, pick a sealer primer to block efflorescence and prevent moisture from ruining your finish.
Masonry Primer Benefits
Primer choice makes a big difference when you’re painting cement: the right masonry, bonding, or sealer primer improves adhesion, blocks stains, and evens out porosity so your topcoat lasts and looks uniform.
You’ll enjoy masonry primer advantages like moisture resistance and better coverage.
Follow proper primer application techniques—clean, repair, brush or roll consistently—to guarantee even penetration and a durable, paint-ready surface.
Bonding Primer Uses
When adhesion is your main concern, a bonding primer is the go-to choice for cement walls because it’s formulated to grab slick, dense surfaces and tie new paint to old masonry.
You’ll notice bonding primer benefits like improved adhesion, reduced peeling, and uniform topcoat coverage.
For proper bonding primer application, clean and dry the surface, patch defects, and apply thin, even coats per manufacturer instructions.
Sealer Primer Selection
Bonding primers do a great job of improving adhesion, but you’ll also want a sealer primer when moisture, stains, or high porosity are your bigger problems. Choose among sealer types (acrylic, penetrating, blocking) based on substrate and stains. Compare product data for VOC, coverage, and cure time. See quick primer comparisons:
| Type | Best for | Note |
|---|---|---|
| Acrylic | General | Fast |
| Penetrating | Porous | Deep |
| Blocking | Stains | Oil |
Gather Tools & Materials for a Professional Job
Start by assembling the right tools and materials so you’ll work efficiently and get a professional finish.
Gather quality masonry paint, sealer primer, rollers (thick nap for rough surface texture), brushes for edges, extension pole, paint tray, drop cloths, painter’s tape, sanding block, patching compound, respirator, gloves, and sturdy ladder.
Prep tools save time and improve paint application.
Clean and Degrease the Cement Surface Effectively
Start by sweeping or brushing away loose dirt, dust, and flaking paint so the surface is sound.
Then mix a mild detergent with water and scrub grease, oil spots, and grime with a stiff brush.
Rinse thoroughly and let the cement fully dry before priming or painting.
Remove Loose Debris
Kick loose dust and crumbling mortar away with a stiff-bristled brush or a pressure washer, then sweep or vacuum the surface so you’re left with only sound cement.
Use debris removal techniques like soft tapping with a scraper for flakes and a wire brush for stubborn spots.
Follow surface preparation tips: remove loose particles, check for hollows, and clear all dust before any patching or priming.
Degrease With Detergent
1–2 passes with a mild detergent solution will remove oils, grease, and grime that stop paint from adhering properly.
You mix warm water with a suitable detergent, test detergent types on a small area, then scrub with a stiff brush.
Rinse thoroughly, let dry, and repeat stubborn spots.
These cleaning techniques guarantee primers and paint bond for a lasting finish.
Etch Smooth Concrete So Paint Will Adhere
Because smooth concrete is often too dense for paint to grip, you’ll need to etch the surface so the coating can bond properly.
Use etching techniques like muriatic acid or a concrete etcher, following label directions and safety gear.
Rinse thoroughly, neutralize if needed, and let dry completely.
Proper surface preparation creates the tooth paint needs without altering structural areas.
Repair Cracks, Spalls, and Surface Voids (Step-by-Step)
Start by evaluating the extent of cracks, spalls, and surface voids so you know what tools and materials you’ll need.
Clean and prep the damaged areas thoroughly to remove loose debris and dust.
Then patch and smooth each spot with the appropriate compound so the wall is ready for primer and paint.
Assess Damage Extent
Before you prime or paint, take a close look at every crack, spall, and surface void so you know exactly what needs repairing and how deep the damage goes.
You’ll perform a damage assessment and choose repair options based on depth and location.
Check these quickly:
- Minor hairline cracks: monitor or fill
- Deep cracks/spalls: widen and patch
- Surface voids: spot-fill and smooth
Clean And Prep
1. You’ll remove loose debris, dust, and efflorescence with a wire brush and pressure washer, matching technique to Surface Types.
Let the wall dry fully. Inspect for hidden damage, then clean grease or stains with mild detergent.
Consider Environmental Factors—temperature and humidity—so repairs bond properly.
Wear protection and keep runoff contained to avoid contaminating nearby areas.
Patch And Smooth
Patch and smooth the wall by systematically repairing cracks, spalls, and surface voids so paint will adhere and the finish looks uniform.
Use proper patching materials and proven smoothing techniques; work from small to large defects. Clean, dampen, fill, then level with a trowel. Let cure and sand before priming.
- Cut and clean edges
- Apply patching materials
- Sand and inspect
Prevent Common Paint Failures Before You Start
Start by walking the surface and checking for moisture, efflorescence, cracks, and loose material—you’ll fix these issues first so paint will adhere and last.
Address damp spots, salt deposits, and friable areas; remove loose particles, repair cracks, and let surfaces fully dry.
Good surface preparation prevents peeling and blistering and guarantees paint adhesion, saving time and money on future repairs.
Prime Cement Walls Correctly for Long-Term Adhesion
Now that you’ve fixed moisture, salts, and loose material, prime the wall to lock in those repairs and give paint something the finish can grip.
Use a quality masonry primer suited for cement; it’s central to adhesion techniques and good surface preparation.
- Choose breathable, alkali-resistant primer
- Apply thin, even coats per label
- Allow full cure before painting
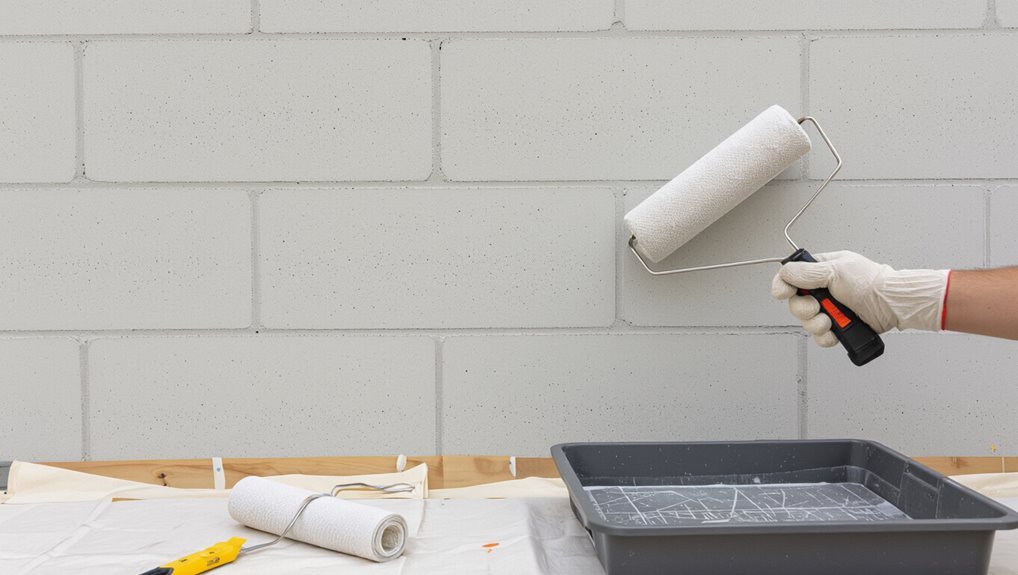
Paint a Cement Wall: Brushes, Rollers, and Sprayers
When you choose tools, match them to the texture and size of the wall: use nylon or polyester brushes for trim and edges, a 3/8″–1/2″ nap roller for relatively smooth cement, and a thick 1″–1¼” nap roller for rough or textured surfaces; reserve an airless sprayer for large areas or heavily textured walls to save time and guarantee even coverage.
Use consistent paint application techniques, practice tool selection tips, maintain wet edges, and work methodically to avoid laps and overspray.
Apply Multiple Coats and Wait Times Between Coats
Although one good coat can look promising, you’ll usually need two or more to get durable, even coverage on cement. Apply the first coat thin and uniform, let it cure fully, then inspect for thin spots or texture that needs filling before adding the next coat.
- Space coats per manufacturer drying times.
- Use varied coating techniques for texture matching.
- Lightly sand between coats for adhesion and smoothness.
Troubleshoot Peeling, Blistering, and Efflorescence
Once your final coat has cured, you’ll want to watch for signs of failure like peeling, blistering, or white, powdery efflorescence, since each problem has a different cause and fix.
Inspect to identify peeling causes—poor adhesion or contaminants.
For blistering solutions, remove blisters and improve drying.
Use efflorescence treatment to remove salts and address underlying moisture issues before repainting with proper primer.
Maintain Your Painted Cement Wall: Cleaning & Touch-Ups
Keep your painted cement wall looking its best with simple regular care: dust or rinse it monthly, spot-clean stains promptly, and perform small touch-ups as soon as chips or scratches appear.
Keep painted cement walls fresh: rinse monthly, spot-clean stains quickly, and touch up chips or scratches promptly.
Use proper cleaning techniques and approved touch up methods to extend life. Try these quick routines:
- Rinse with mild detergent and soft brush.
- Blot stains, avoid harsh solvents.
- Sand, prime, and feather in paint.
Frequently Asked Questions
Can I Paint Over Painted Cinder Blocks Without Removing the Old Paint?
Yes — you can paint over painted cinder blocks if you address paint adhesion factors and use proper surface preparation techniques: clean, remove loose paint, etch or sand glossy areas, repair cracks, prime compatible, then apply masonry paint for durable results.
Will Concrete Stain or Sealer Change Paint Adhesion Long-Term?
Yes — sealers or stains can alter adhesion factors and affect long term durability; you’ll need compatible products, proper surface prep, and testing. If you don’t confirm compatibility, paint may peel or fail prematurely.
Can I Use Hobby or Craft Paints for Small Decorative Concrete Areas?
“Measure twice, cut once.” You can use craft paint suitability for small decorative concrete areas, but you’ll prep, prime, and seal properly; combine decorative paint techniques and a concrete-specific sealer for better adhesion and durability.
How Do Color Choices Affect Heat Absorption on Exterior Cement Walls?
Darker colors absorb more heat, so you’ll feel increased warmth and thermal transfer; lighter hues boost heat reflection, lowering surface temperature. Consider color psychology too, since shades influence perceived warmth, mood, and exterior comfort.
Are There Eco-Friendly Low-Voc Options for High-Alkali Cement Surfaces?
Yes — you can use eco friendly primers and alkali resistant paints; picture a faded wall transforming as breathable, low‑VOC coats block alkalinity. You’ll protect masonry, cut emissions, and keep colors stable without harsh solvents or odors.
Conclusion
You’ve got the tools and the steps — now go paint. I once patched a cracked basement wall at midnight, flashlight in teeth, and felt like a surgeon sealing a wound; that careful prep stopped future leaks and saved me a weekend of repairs. Studies show proper surface prep cuts repainting frequency in half, so take your time, follow the checklist, and enjoy a finish that lasts. Small effort now means big peace later.