How to Paint a Circle on a Wall Perfectly Every Time
You’ll get a perfect circle by measuring and marking a precise center and radius, anchoring a string or compass, and scribing a light guideline. Mask the edge with quality painter’s tape or a reusable stencil, seal gaps with liquid frisket on textured walls, then roll thin, even coats with a high-density foam roller and trim edges with a small angled brush. Let each coat dry and touch up bleed or thin spots for a crisp finish—keep going for full technique and troubleshooting.
Quick Method: Mark, Mask, and Paint a Circle
Start by marking the circle’s center and radius on the wall so you know exactly where to cut the mask. You’ll handle circle placement and wall preparation before masking.
Cut a precise template, adhere painter’s tape around its edge, and smooth for no bleed.
Prime if needed, paint in thin coats from center outward, then peel tape carefully once tacky to reveal a clean circle.
Measure and Mark a Circle on Your Wall
Pick a clear reference point and measure from it to mark the circle’s center. Use reliable circle measuring techniques and wall marking tools: tape measure, level, pencil, string, and nails. Anchor string at center, tie marker, rotate to scribe. Check measurements at multiple angles, adjust center as needed, and lightly mark the perimeter before masking and painting.
| Tool | Purpose |
|---|---|
| Tape | Measure radius |
| Level | Align center |
| Pencil | Mark points |
| String | Draw arc |
| Nail | Anchor center |
Pick Paint, Finish, and Color for Sharp Edges
With your circle scribed and perimeter masked, choose a paint, finish, and color that’ll highlight the edge and resist bleed-through.
Pick a low-absorption primer, then a medium paint sheen—eggshell or satin—for crisp lines.
Choose a low-absorption primer and a medium-sheen paint—eggshell or satin—for clean, crisp edges.
Use contrasting color psychology to make the circle pop or recede.
Test swatches and finish on scrap before rolling or cutting in to guarantee sharp, consistent results.
Compare Methods: Template, String Compass, Projector, Jig
You can weigh the pros and cons of a rigid template—quick and repeatable but limited to one size—against more flexible options.
A string compass is cheap and accurate for large circles, while a projector gives instant precision and easy adjustments but needs power and ideal lighting.
Think about scale, surface, and how permanent or repeatable you need the circle to be.
Template Pros & Cons
While a template gives you an instant guide and steady edge, it also limits flexibility and can be tricky to center precisely on uneven surfaces. Templates work best when the wall is flat and the circle size matches the template, but they can leave visible seams or cause paint buildup at the edge if not taped and pressed firmly.
- You benefit from template durability and quick setup.
- You lose template versatility for odd sizes.
- You must guarantee firm adhesion to avoid bleed.
Projector vs Compass
Because each method balances speed, accuracy, and setup differently, pick the one that fits your circle size, wall surface, and comfort with tools. You’ll use projector accuracy for large, complex designs; rely on compass precision for small, repeatable circles. Choose projector for ease, compass for control.
| Method | Best for | Trade-off |
|---|---|---|
| Projector | Large designs | Setup/time |
| Compass | Small circles | Reach/steady hand |
| Jig | Repetition | Rigidity |
Make or Buy a Reusable Circle Template
If you plan to make multiple circles or want perfect shapes every time, a reusable circle template will save you time and headaches.
Decide whether to buy pre-cut or make one from durable template materials like acrylic or thin plywood. Consider stencil options for edges and cleanup.
- Buy: precision, saves time
- Make: custom size, cheap
- Hybrid: modify bought stencil
Make and Use a String Compass
A simple string compass gives you a perfectly round guide without special tools: tie a length of string to a pencil, fasten the other end at the circle’s center with a thumbtack or removable adhesive, then keep the string taut as you sweep the pencil in a smooth arc to mark the circumference.
Adjust string length for desired circle diameter, set a stable anchor point on your wall surface, use tension control while marking, and choose paint type compatible with surface prep.
Use a Projector or Stencil for Large Circles
When a string compass won’t reach the size you need or you want a crisp, repeatable outline, use a projector or a stencil to lay out large circles.
Position for accurate projector setup or cut a lightweight stencil. Then:
- Center and lock projector, focus image.
- Tape stencil, check stencil alignment.
- Trace lightly, remove device, paint within the line.
Mask Edges: Tape, Liquid Frisket, and Edge Guards
Now that your circle’s layout is set, you’ll want clean, sharp edges by picking the right masking method.
Choose painter’s tape with the right adhesion for your wall surface and consider low-tack options for delicate finishes.
For intricate curves or bleed-prone paints, use liquid frisket to seal gaps and peel it away after the paint dries.
Choosing Tape Types
If you want crisp, clean edges for your painted circle, choosing the right masking method matters as much as your paint and brush.
You’ll pick tape based on surface, paint type, and removal time. Consider masking techniques and tape brands.
- Painter’s tape — gentle, precise.
- FrogTape — sharper lines on textured walls.
- Drafting film edge guards — reusable, sturdy.
Using Liquid Frisket
Because liquid frisket flows into tiny gaps that tape can miss, it’s ideal for sealing curved or textured edges before you paint a circle. You’ll brush a thin layer along the mask, wait until tacky, then paint.
Proper liquid frisket application prevents bleed and guarantees crisp lines. The liquid frisket benefits include flexibility on uneven surfaces and easy removal without damaging underlying paint.
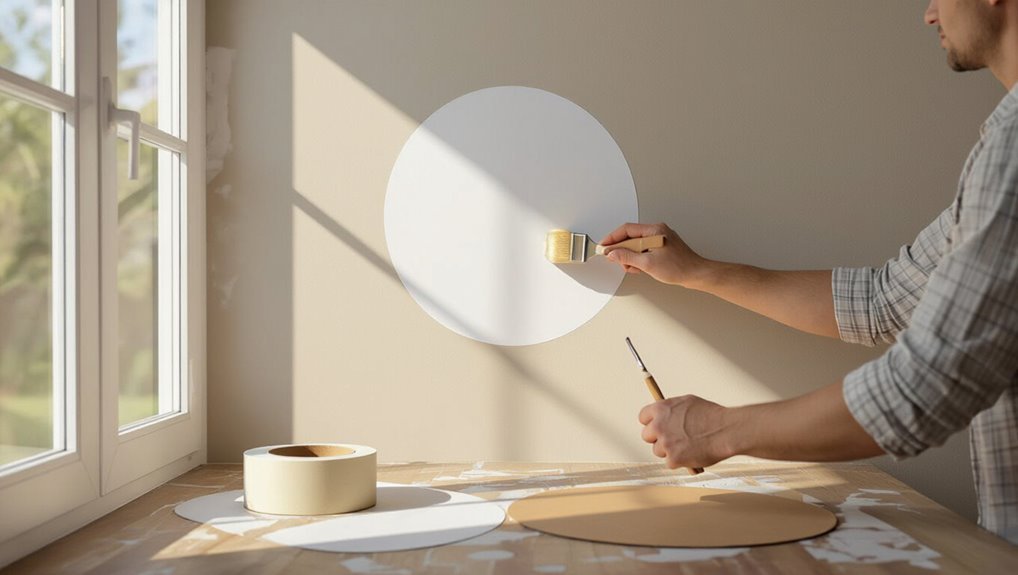
Best Brush and Roller Techniques for Smooth Coverage
Choose the right tools and you’ll cut painting time and get a flawless circle edge: use a high-density foam roller for the body of the circle to lay down even coats without texture, and a slim angled brush for clean, precise edges where the roller can’t reach.
Choose the right tools — a high-density foam roller for smooth coverage and a slim angled brush for crisp edges.
- Match brush types to edge control.
- Use roller techniques for even coverage tips.
- Balance paint consistency, drying time, blending techniques, and stroke patterns.
Touch Up and Clean Edges for Razor‑Sharp Circles
After laying down even coverage with your roller and refining the outline with an angled brush, you’ll want to clean up the circle’s perimeter for a razor‑sharp look.
Use a small, stiff brush for edge detailing techniques, feathering tiny strokes toward the center.
Wipe the blade, remove tape slowly, and apply minimal touch‑ups with controlled paint application tips to preserve crispness.
Common Problems and Fixes: Bleed, Wobble, Uneven Paint
To avoid paint bleed, press the stencil edges firmly and seal them with a thin layer of clear medium or spray adhesive.
If your circle wobbles while painting, brace the stencil with a small block or clamp and use short, controlled strokes.
For uneven coverage, apply multiple thin coats instead of one heavy one and feather the edges for a smooth finish.
Prevent Paint Bleed
When you’re painting a crisp circle, preventing bleed is essential so your edges stay sharp and professional; the key is sealing and prepping the edges before you apply paint.
You’ll focus on paint thickness and edge sealing to stop seepage.
- Wipe and prime the surface.
- Apply thin coats; control paint thickness.
- Seal stencil edge with clear medium, then paint.
Steady The Stencil
Sealing the edge stops most bleed, but you still need to steady the stencil so it won’t wobble or lift while you paint.
Anchor edges with low-tack tape or temporary spray adhesive for stencil stability. Press firmly after proper wall preparation—clean, dry, and smooth.
Hold a lightweight frame or use clamps for curves. Test one quick pass to confirm secure placement before painting.
Ensure Even Coverage
If paint is bleeding, the stencil shifts, or coverage looks thin, you can fix each issue with targeted steps that keep edges crisp and paint even.
- Use proper color selection and test swatches for opacity.
- Apply thin layers, let each dry, then repeat paint application.
- Secure stencil firmly; feather edges with a dry brush to stop bleed and wobble.
Materials Checklist, Time‑Savers, and Pro Tricks
Before you start, gather a concise kit of tools and a few pro shortcuts so you don’t stop mid-job: a high‑quality primer and paint, a steady pencil or chalk, a compass or string-and-nail template, painter’s tape, a small angled brush and foam roller for clean edges, a drop cloth, and a level or laser.
Choose paint types suited to surface; do wall preparation, tape precisely, cut with an angled brush, roll light coats, and remove tape when tacky for crisp edges.
Frequently Asked Questions
Can I Paint a Perfect Circle on Textured Walls?
Yes — you can, but it’ll be harder on textured walls. You’ll use circle painting techniques, sand and prime during wall surface preparation, apply thicker paint, a stencil or compass, and touch up edges with a small brush.
Will Humidity or Temperature Affect Circle Paint Drying?
Yes — humidity effects and temperature fluctuations will affect drying: you’ll see slower cure and tacky paint in high humidity, faster skinning or cracking with heat swings, so you’ll want to control climate for consistent results.
Can I Use Spray Paint for Crisp Circle Edges?
Yes — you can use spray paint for crisp circle edges. Think of the stencil as a compass; with proper spray paint techniques and sturdy circle stencils, you’ll control overspray, distance, and layering to achieve clean, sharp rings.
How Do I Match Circle Paint to Aged Wall Color?
You match the circle paint by sampling nearby aged tones, using color blending techniques and test patches, and following wall preparation tips like cleaning, priming, and feathering edges so your new paint will seamlessly age with the existing wall.
Are There Safety Concerns With Projectors or Power Tools?
Yes — you should. You’ll follow projector safety guidelines, avoid eye exposure, secure cords, and use PPE. For power tools, prioritize tool maintenance, unplug before adjustments, inspect cords, and keep guards in place to prevent injuries.
Conclusion
You’ve learned the rhythm — measure, mask, paint — until the circle sings. Trust the tools you choose; they’re your compass and steady hand when the wall tries to wander. Patch mistakes like leaves on water, blending edges until they disappear. With practice, each perfect ring becomes less luck and more craft, a quiet halo on your wall that holds a room’s gaze. Keep the checklist handy, and you’ll paint circles that keep coming back.