How to Paint Half a Wall for a Modern Accent Look
You can create a modern accent by splitting your wall vertically or horizontally, measuring and leveling a straight line, priming if needed, and taping the edge for crisp results; clean and patch first, choose contrasting or coordinating colors and matching finishes (eggshell top, satin bottom), then roll in manageable sections and feather edges for a smooth blend. Place the split to frame furniture or define zones. Keep going to learn detailed tips and troubleshooting.
Why Paint Half a Wall: Benefits and Use Cases
When you paint half a wall, you get a big design impact with less time, money, and effort than repainting the whole room.
You’ll create focal points, frame furniture, and adapt trends as design inspiration. It’s ideal for renters, nurseries, or accent walls.
You’ll test color psychology on a small scale, balancing mood and contrast without committing to a full makeover.
Step‑By‑Step Overview: What You’ll Do in an Afternoon
Block off a few hours, gather your tools, and you’ll transform the room by painting half the wall in a simple, step-by-step sequence:
prep the surface, measure and mark your dividing line, apply painter’s tape and primer as needed, cut in the edges, roll the paint, remove the tape, and do a quick touch-up.
You’ll pick a color using color psychology, execute clean edges, and create an accent wall that refreshes the space.
Choosing a Vertical vs. Horizontal Split
Think about whether a vertical split will make the ceiling feel taller or a horizontal split will widen the room, since each orientation changes perceived scale.
Consider the practical benefits of a horizontal band for hiding scuffs in high‑traffic areas versus a vertical divide that frames an entry or focal wall.
Match your choice to the room’s function—bedrooms, hallways, and living rooms often call for different visual priorities.
Vertical Split Impact
1 clear choice that shapes the room’s feel is whether you split the wall vertically or horizontally.
If you pick a vertical design, you’ll emphasize height, create a focal stripe, and guide sightlines—use bold color for punchy accent strategies.
Quick tips:
- Place the split near an entry or feature.
- Match trim for cohesion.
- Balance with furniture height.
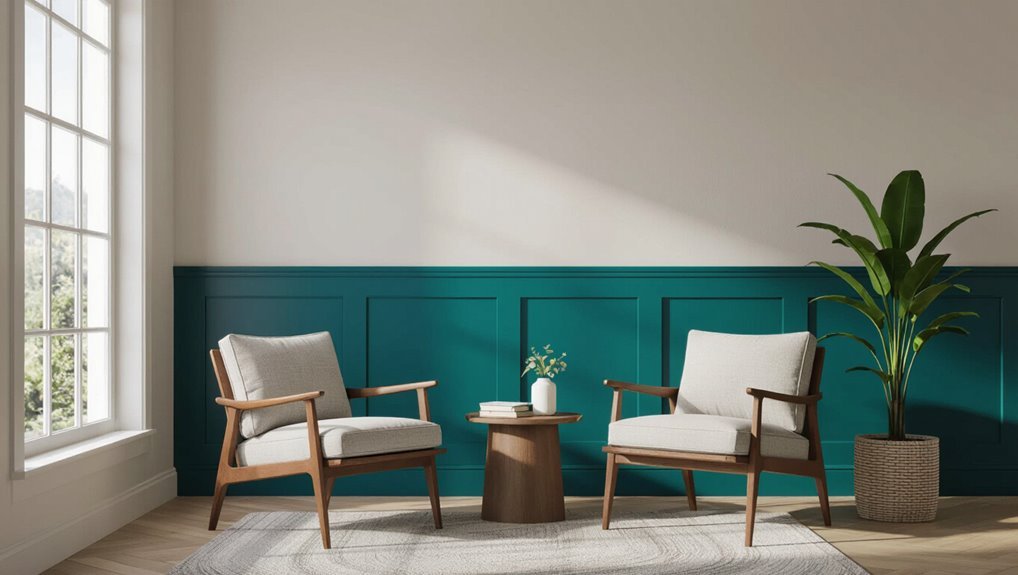
Horizontal Split Benefits
A horizontal split draws the eye across the room and anchors furniture by creating a clear base and upper zone, so you’ll feel a stronger sense of grounded balance than with a vertical division.
You’ll achieve modern aesthetics while adding visual interest without overpowering the space.
Use contrasting tones or textures low and light above to define zones and guide sightlines.
Room Function Considerations
While a horizontal split anchors furniture and guides sightlines, the room’s function should steer whether you choose vertical or horizontal painting.
You’ll consider wall function, traffic flow, and color psychology to match mood and purpose.
- Use vertical for narrow rooms to add height.
- Use horizontal to define seating areas.
- Match colors to activity: calm for bedrooms, vibrant for playrooms.
Where to Place the Split for Best Impact
Place a horizontal split at eye level to make the room feel balanced and to show off both colors.
You’ll also want to align the split with architectural features like chair rails, windows, or moldings so it looks intentional.
Small adjustments up or down can change the room’s proportions, so test with tape before you commit.
Eye-Level Horizontal Split
When you split a wall at eye level, you create an instant focal band that guides sightlines and balances proportions; choose a height that complements both the room’s scale and the furniture arrangement.
You’ll use color psychology to lower or raise perceived height and respect wall proportions for harmony.
- Align split with seating sightlines
- Keep a clear paint edge
- Test swatches in daylight
Architectural Feature Alignment
If you want the split to read as intentional architecture rather than a random stripe, align it with existing features—like chair rails, window sills, door headers, or the tops of built-ins—so your eye follows a continuous line through the room.
You’ll achieve architectural harmony and clean feature integration by matching sightlines; measure carefully, test paint samples, and let the split reinforce the room’s proportions and flow.
Picking the Best Wall to Accent in Your Room
Wondering which wall will make the biggest impact? Pick a wall that complements your room layout and follows core Design Principles for balance and focus.
Choose a wall you’ll notice first and that suits an Accent Wall without clashing.
- Behind focal furniture (so the accent reads clearly)
- Near entry or sightlines (maximizes impact)
- With simple surfaces (easier to paint cleanly)
How Room Size and Light Affect Your Half‑Wall Color
Now that you’ve picked the right wall, consider how room size and light will shape your half‑wall color choice. You’ll use lighting effects to make small rooms feel larger or cozy, and color psychology to influence mood. Test samples at different times.
| Room Size | Lighting |
|---|---|
| Small | Bright |
| Large | Soft |
| Narrow | Side-lit |
| Open | Even |
| Dim | Accent |
Choosing a Color Scheme for a Half‑Painted Wall
Think about how your room’s lighting changes throughout the day before you pick a shade, since natural and artificial light can shift a color’s tone.
Balance a bold hue on the lower or upper half with a neutral on the opposite half to keep the room grounded.
Test swatches on the wall to see how the combo reads in your actual space.
Consider Room Lighting
How will the light in your room change the way those two colors read together? You’ll test lighting effects and note color temperature shifts at different times.
Natural and artificial light alter contrast, saturation, and mood, so sample paint on the wall.
- View swatches by the window and under lamps
- Observe morning, midday, evening
- Photograph samples for reference
Balance Bold And Neutral
After you’ve checked samples in different lighting, decide how much drama you want by pairing one bold color with a neutral.
You’ll anchor the room with neutral tones—cream, gray, or beige—then let bold colors pop on the half wall.
Balance saturation and scale: use muted accessories, limit contrast to one strong hue, and test small areas before committing.
Using Contrast vs. Tonal Variation for Different Moods
When you choose between high contrast and subtle tonal variation, you’re deciding the room’s emotional volume: bold contrasts energize and define, while tonal shifts soothe and unify.
- Use Contrast techniques to create focal points and activate space.
- Favor Tonal harmony for calm, layered depth and Mood enhancement.
- Apply Color psychology to match contrast or subtlety with function and desired atmosphere.
Matching Paint Finishes for Top and Bottom Halves
Although paint color grabs attention, the finish you pick for the top and bottom halves determines durability, light reflection, and how the two areas read together, so choose finishes that balance aesthetics with function. You’ll match sheen for cohesion or contrast gloss for interest; consider paint finish types and color matching to guarantee the halves read intentional.
| Area | Suggested Finish |
|---|---|
| Top | Eggshell |
| Bottom | Satin |
| Trim | Semi-gloss |
| Durable spots | Low-gloss |
| Accent | Matte |
Durable and Low‑VOC Paint Options for Half Walls
Matching sheens helps your half wall look intentional, but you also need paint that stands up to wear and keeps indoor air quality healthy.
Choose low‑VOC, water‑based latex for easy cleanup and long lasting durability. Consider eco friendly options like plant‑based or zero‑VOC formulas. Test colors on scrap drywall first.
- Durable eggshell or satin
- Zero‑VOC brands
- Washable finish
Budget‑Friendly Paint and Materials Choices
You can cut costs without sacrificing quality by choosing budget-friendly paints like acrylic blends or contractor-grade options.
Grab a few cost-saving tools—like reusable rollers, angled brushes for trim, and a quality paint tray—to make the job easier and last longer.
Shop smart by comparing store brands, buying off-season, or sourcing surplus materials from reclamation stores or online marketplaces.
Affordable Paint Types
Picking affordable paint and materials doesn’t mean you have to sacrifice quality; smart choices let you cover half a wall with good-looking, durable results on a budget.
You’ll want affordable finishes from trusted paint brands, low-VOC options, and durable sheens for high-traffic areas.
Consider:
- Economy latex for smooth coverage
- Mid-tier brands with tested colorfastness
- Satin or eggshell for easy cleaning
Cost-Saving Tools
While you can spend a lot on premium gear, sensible tool choices let you paint half a wall well without breaking the bank.
Choose budget tools like a decent angled brush, small roller, inexpensive tray, and painter’s tape.
Buy only essential supplies—drop cloth, sandpaper, primer—and reuse or borrow a pole or ladder.
Smart selection saves money and keeps quality high.
Smart Material Sourcing
Saving on tools only goes so far—material choices make a big difference in final cost and finish. You can pick budget paints that still perform, hunt discounts, and prioritize eco friendly materials and sustainable sourcing to lower impact.
Consider these tips:
- Buy eggshell or satin for durability and coverage
- Reuse drop cloths and brushes when possible
- Compare recycled or low‑VOC primers for adhesion and savings
Tools and Materials You Need for a Crisp Half‑Wall Paint
A few reliable tools make a crisp half‑wall paint job much easier: a quality angled brush for cutting in, a mini-roller and tray for the main area, painter’s tape for a sharp edge, a drop cloth to protect floors, and sandpaper plus a mild cleaner for prep. Use recommended paint brands, brush techniques, color matching, paint finishes, and consider wall textures, paint layering, wall patterns, accent styles, design trends.
| Tool | Purpose | Tip |
|---|---|---|
| Angled brush | Cutting in | 2–3″ |
| Mini-roller | Smooth coverage | Short nap |
| Painter’s tape | Sharp line | Press firmly |
| Drop cloth | Protect floors | Canvas recommended |
| Sandpaper | Prep surface | 120–220 grit |
Calculate Paint Quantities for a Half Wall
Start by measuring the wall’s width and the height you plan to paint (usually half the wall or a set chair-rail height).
Then multiply to get square footage so you can determine how much paint you’ll need.
Calculate wall area, factor in coat number and coverage per gallon to find paint quantity.
- Measure twice
- Check paint coverage
- Add 10% waste buffer
Prepping the Wall: Cleaning, Patching, and Sanding
Before you paint half the wall, clean the surface thoroughly to remove dust, grease, and cobwebs so the paint will stick.
Patch any holes or cracks smoothly with spackle and let it dry completely.
Lightly sand patched areas and any rough spots until the wall is even and dust-free.
Clean Surface Thoroughly
You’ll want the wall to be spotless and smooth before any paint goes on it, because dirt, grease, and rough patches will show through and ruin crisp lines.
Focus on surface preparation and reliable cleaning techniques:
- Wipe with mild detergent solution, rinse, dry thoroughly
- Use trisodium phosphate for stubborn grease (follow safety steps)
- Remove dust with tack cloth before priming
Patch Holes Smoothly
With the wall clean and dry, inspect it closely for nail holes, dents, and cracks so you can fix them before painting.
Use appropriate patching techniques: push out dust, apply lightweight spackle or joint compound with a putty knife, and feather edges.
For larger flaws, layer drying smoothing compounds, let each coat set, then prepare for sanding and priming to guarantee a flat finish.
Sand For Evenness
Sand the patched areas until they’re flush with the surrounding surface so paint won’t reveal ridges or dips.
You’ll use proper sanding techniques for surface smoothness, moving from coarse to fine grit and feathering edges. Check with light across the wall and wipe dust before priming.
- Use 80–120 grit for shaping
- Finish with 220 grit
- Vacuum and tack cloth after sanding
Priming the Half Wall: When and How
Before you start rolling, decide whether the surface actually needs primer: bare drywall, patched areas, or drastic color changes do.
Choose priming techniques that suit the substrate—latex for drywall, bonding primer for glossy surfaces.
Apply thin, even coats and let proper drying time before paint application.
Priming guarantees adhesion, hides flaws, and reduces the number of finish coats you’ll need.
Which Painter’s Tape to Use (And Why It Matters)
Because clean, crisp edges make a half-painted wall look professional, picking the right painter’s tape matters as much as choosing the paint.
You’ll consider painter’s tape types and tape application techniques to prevent bleed and protect trim. Choose low- or medium-adhesion tape for delicate surfaces; high-adhesion for textured walls.
Follow these steps:
- Clean surface
- Press edge firmly
- Remove tape angled, while paint’s tacky
Protect Floors, Furniture, and Fixtures Before Painting
1 simple step you shouldn’t skip is covering everything that could catch drips or dust—floors, furniture, and fixtures—so you won’t be cleaning up mistakes later.
Lay down quality floor protection, tape edges, and use drop cloths. Move small items or wrap larger pieces with furniture covering.
Protect light switches and hardware, and keep a trash bin handy to discard used tape and wrappings as you work.
Measure and Mark the Split Line Accurately
Pick a clear starting point at one end of the wall and measure the height where you want the split to begin.
Use a level to draw a straight reference line across the wall so the split stays perfectly even.
Then mark that line with painter’s tape for a crisp edge and an easy guide while you paint.
Choose A Starting Point
Anyone can get a crooked split line if they skip measuring—so start by deciding exactly where the color change should sit and mark it clearly.
Choose a starting point based on room function and design inspiration, then test sightlines.
Consider starting point options that flow with furniture and windows.
- Align with a focal wall
- Match furniture heights
- Use architectural cues
Use A Level Line
Once you’ve chosen where the color should sit, it’s time to lay down a level, accurately measured split line so the paint looks professional from every angle.
Use a laser level or chalk line and measure at multiple points to confirm consistency. Mark reference points, connect them with a straight edge, and double-check leveling techniques to guarantee precise paint alignment before you tape.
Mark With Painter’s Tape
After confirming your level line, transfer those reference marks onto the wall and apply painter’s tape directly over them, pressing firmly to seal the edge; this keeps paint from bleeding and gives you a crisp split.
You’ll plan tape application, smooth edges, and note tape removal timing to avoid peeling fresh paint.
- Press tape firmly along the line
- Check for gaps or bubbles
- Peel slowly after topcoat sets
Leveling Tips for Perfect Horizontal Split Lines
Because a perfectly level split line defines the whole project’s look, take time to measure and mark carefully before you paint.
Use reliable measuring tools and a long level or laser to establish your horizontal reference.
Apply painter’s tape along that line, press edges for smoothing edges, then remove tape while paint is tacky to keep the split crisp and even.
How to Sight and Mark Vertical Split Lines
Start by measuring the wall and finding the exact center so your split will look intentional and balanced.
Use a level or plumb bob to transfer that center into a true vertical line from ceiling to baseboard.
Mark the plumb line lightly with a pencil so you can align tape and paint edges precisely.
Measure And Find Center
Measure the wall and mark its midpoint so your vertical split line sits perfectly centered; use a tape measure and pencil to note the full width, divide that number by two, then transfer the center point to the wall at eye level.
Use wall measurement techniques and center alignment strategies to confirm accuracy.
- Recheck measurements at both ends
- Note baseboard or trim offsets
- Use a small pencil dot as reference
Mark Plumb Vertical Line
With the center point marked, you’ll need a true vertical reference to guide your split line.
Use a plumb bob or laser level for precise vertical alignment. Hold the tool at the ceiling center, drop or project the line, and mark several points down the wall.
Connect them with a light pencil line. These marking techniques guarantee a straight, professional-looking half-wall division.
Applying an Edge Coat to Prevent Paint Bleed
Before you roll the main color, apply an edge coat of the same base or primer along the taped line to seal the edge and stop bleed-through.
Use edge sealing techniques for paint bleed prevention so your accent stays crisp.
Press tape firmly, paint a thin seal, then remove tape while wet.
Press tape firmly, apply a thin seal coat, and peel the tape off while the paint is still wet.
- Smooth pressure
- Thin seal coat
- Remove tape promptly
Painting Technique for Smooth, Even Coverage
Start by making sure the surface is clean, patched, and primed so your paint will adhere evenly.
Use proper application methods—load your brush or roller correctly, work in manageable sections, and maintain a wet edge to avoid lap marks.
Finish with light feathering and a final inspection to catch streaks or missed spots before the coat fully dries.
Surface Prep Essentials
Although you’re only painting half a wall, proper surface prep makes the difference between a sloppy job and a smooth, even finish.
You’ll use surface cleaning techniques to remove dust and grease, then apply wall patching methods for holes and cracks. Sand smoothly and tape edges.
- Clean with mild detergent
- Patch and sand imperfections
- Mask trim and adjacent surfaces
Paint Application Methods
With the wall prepped, it’s time to focus on paint application so the half-wall looks seamless and even.
You’ll use paint roller techniques for broad, consistent coverage—load the roller evenly, work in W patterns, and blend edges while paint’s wet.
Reserve brush application methods for cutting in and smoothing corners, feathering strokes to avoid visible brush marks and guarantee uniform finish.
Finishing Touches Techniques
Tidy up any stray drips and soften roller lines while the paint’s still tacky so the finish stays smooth and even; use light, overlapping passes and a damp brush or foam pad for tiny imperfections, working outward from seams to blend the new coat into the existing surface.
- Feather edges into surrounding paint for invisible shifts
- Inspect under different light to catch flaws
- Protect accent materials edges and remove tape carefully
Using a Roller and Brush for Clean Transitions
When you want a crisp line where two paint colors meet, pair a brush for the edge with a roller for the field to get the best results.
Start by cutting in with brush precision, feathering along tape or freehand.
Then use roller techniques—short, overlapping passes—to blend coverage without pushing paint under the edge.
Finish by inspecting and touching small flaws with the brush.
Drying Times and When to Apply a Second Coat
After you’ve cut in and rolled, you’ll need to wait for the paint to dry before adding a second coat—how long depends on the paint type, humidity, and temperature.
Check can instructions and touch-test a small area; if it’s tack-free, you can proceed.
Consider these guidelines:
- Water-based: 2–4 hours typical drying times
- Oil-based: 6–24 hours
- High humidity: allow extra time before a second coat
Removing Tape for the Sharpest Line: Timing and Method
If you want the sharpest paint line, remove the tape while the final coat is still slightly tacky rather than waiting until it’s fully hard. You’ll lift less paint and get crisper edges if you pull slowly at a 45° angle. Use these tape removal timing techniques to plan the moment.
| Action | When |
|---|---|
| Peel | Slightly tacky |
| Angle | 45° |
| Speed | Slow |
| Repeat | Once only |
Fixing Edge Issues and Touch‑Up Techniques
Though edges can still look crisp, you’ll sometimes spot thin gaps, nibs, or slight bleed where tape met paint. You can fix most of these issues without repainting the whole wall.
Use precise edge finishing and simple touch up techniques:
- Feather with a small brush to blend tiny bleeds.
- Fill gaps with matching paint and a thin brush.
- Smooth nibs with light sanding, then retouch.
Troubleshooting Uneven Coverage and Streaks
Before you blame the paint, make sure you prepped the surface—clean, sand, and prime any problem spots so the finish lays down evenly.
When you roll or brush, feather the edges and work wet into wet to blend paint seams without leaving ridges.
If streaks appear, go back with light, overlapping passes to even out coverage before the coat dries.
Prep Surface Properly
- You’ll avoid streaks by prepping thoroughly: focus on surface cleaning and checking wall stability before you paint.
- Remove dust, grease, and loose paint with a degreaser and tack cloth.
- Patch holes, sand smooth, and guarantee stable drywall or plaster to prevent absorption issues.
- Prime repaired areas with a bonding primer so coverage stays even and predictable.
Blend Paint Edges
When paint looks streaky or patchy where two sections meet, you can fix it by softening and feathering the edges so the color reads continuous.
Use a light roller pass or a dry brush stroke to blend fresh paint into the surrounding area while it’s still tacky. Work quickly, using gentle pressure and overlapping strokes.
Practice blending techniques and maintain edge precision to avoid visible seams.
Refreshing or Repainting an Existing Half‑Wall Accent
If your half‑wall accent looks tired or the color’s faded, rejuvenating it can revive the room without a full repaint. Start by cleaning the surface, repairing chips or dents, and deciding whether you’ll touch up the existing hue or switch to a new one.
Use color psychology to guide choice and respect wall texture; then:
- Test samples lighting
- Sand and prime edges
- Apply two thin coats for durability
Create Texture Contrast: Matte vs. Textured Paint
One clear way to make a half‑wall stand out is to contrast a matte finish with a textured paint—matte looks smooth and modern, while texture adds depth and tactile interest that catches light differently.
You’ll pair matte finishes on clean surfaces with textured layers below to boost aesthetic appeal.
This combo also improves paint durability in high‑touch zones, creating visual and practical contrast.
Alternatives: Wallpaper or Paneling for a Half‑Painted Wall
You can swap paint for textured wallpaper to add pattern and depth, or choose beadboard, shiplap, or modern slat paneling for a more architectural look.
Consider texture options and patterns that complement your upper wall and the room’s style.
Think about installation complexity and upkeep—some wallpapers are peel-and-stick while certain panels need trimming, sealing, or occasional repainting.
Wallpaper Texture Options
When you’re deciding between wallpaper and paneling for the lower half of a wall, texture changes both the look and the feel of the room—smooth grasscloth reads refined, while embossed vinyl adds depth and durability.
You’ll choose textured finishes to contrast paint and apply wallpaper strips for clean seams. Consider tactile impact and maintenance.
- Subtle weave for warmth
- Embossed vinyl for high traffic
- Peel-and-stick for easy swaps
Paneling Style Choices
If wallpaper brings pattern and tactile variety to the lower half of a wall, paneling offers structure and dimensional interest that can feel both cozy and architectural.
You’ll choose between beadboard, shiplap, board-and-batten or raised panels to set the mood.
Consider paneling styles and material choices—wood, MDF or PVC—for texture, durability and budget, matching height and paint finish to your room’s scale and style.
Installation And Maintenance
1 clear plan makes installing and maintaining a half‑painted wall—whether you choose wallpaper or paneling—much easier and longer‑lasting.
You’ll prep surfaces, align edges, and seal connections to boost paint durability and simplify wall maintenance. Follow steps, inspect seams, and touch up promptly to prevent damage.
- Prep and measure precisely
- Seal edges and joints
- Inspect and touch up periodically
Stenciling and Patterns on the Painted Half
Although a painted half-wall already defines the room, adding stencils or patterns gives it personality and visual interest you can’t get from a solid color alone.
You can pick stencil designs or create subtle pattern ideas to complement furniture and trim. Tape crisp guides, work in sections, and use a pouncer for even coverage.
Test colors first and keep motifs scaled to wall height.
Built‑In Shelf Accents Within a Half‑Painted Wall
Built-in shelves within a half-painted wall give you a chance to turn functional storage into a deliberate design feature: paint the back of the niches the same color as the lower wall to create continuity, choose a contrasting shade to make objects pop, or combine finishes—matte backs with glossy shelves—for subtle depth.
You’ll consider built-in styles and shelf placement to balance form and function.
- Align shelves with the paint line
- Mix textures for interest
- Keep styling minimal to highlight color
Defining Zones in Open‑Plan Spaces With a Half Wall
You can use a half wall to create a clear visual boundary without building full walls, giving each area its own sense of place.
Pick a contrasting or coordinating paint color to signal function—calm tones for a reading nook, bolder hues for a dining zone.
Anchor each side with furniture placement and rugs so the painted half wall feels intentional and connected to the layout.
Visual Boundary Without Walls
When you need to define separate areas in an open-plan room without closing it off, a half wall creates a clear visual boundary that still lets light and sightlines flow.
You’ll use visual contrast and current design trends to anchor zones without bulk.
Consider these approaches:
- Use texture or material change
- Layer furniture along the wall
- Add integrated shelving or lighting
Color To Define Function
If you want each zone in an open-plan room to feel purposeful, use color on a half wall to signal function without adding bulk.
Choose hues with color psychology in mind—calming blues for relaxation, energetic yellows for activity—and align shades with functional design goals.
A painted half wall subtly cues purpose, creates flow, and helps occupants intuitively understand each area’s designated use.
Furniture Anchoring Techniques
1 simple strategy is to position key furniture pieces—like a sofa, console table, or dining bench—so they visually and functionally hug the half wall, creating a clear boundary without closing off the space.
You’ll use furniture placement and wall art to anchor zones, guide traffic, and maintain sightlines.
- Align seating along the half wall
- Layer rugs to define areas
- Hang coordinating wall art
How a Half‑Painted Wall Affects Perceived Ceiling Height
Because our eyes are drawn to contrast and horizontal lines, painting the lower half of a wall can make your ceiling feel taller than it is. You’ll use contrast to alter visual perception and suggest increased ceiling height. Position the dividing line thoughtfully to guide sightlines and balance proportions.
| Effect | Placement | Tip |
|---|---|---|
| Elongates | Low dividing line | Use light upper color |
| Grounds | Midline | Keep trim simple |
| Balances | High dividing line | Match furniture accents |
| Focuses | Doorway | Align with architectural lines |
| Expands | Vertical elements | Add tall decor |
Half‑Wall Design Tips for Small Rooms and Narrow Hallways
When you’re working with a small room or a narrow hallway, painting only the lower half of the wall can add depth and keep the space from feeling boxed in; choose a light upper color and a slightly darker lower tone to visually widen the area while keeping the scheme cohesive.
Use color psychology to guide choices and try these tips:
- Keep contrast low for a seamless look
- Add vertical accents to lift sightlines
- Use durable, washable paint for traffic areas
Half‑Wall Ideas for Living Rooms, Bedrooms, and Nurseries
Think about using a bold color block on a half wall to anchor your living room or add drama to a bedroom without overwhelming the space.
You can mix two-tone textures—like matte below and satin above—to create depth and visual interest that still feels cohesive.
For nurseries and multifunctional rooms, paint functional features such as a chalkboard section, built-in toy shelf, or a stripe that hides scuff-prone areas.
Bold Color Block
Curious how a single, bold stripe can transform a room? You’ll use bold color psychology and accent color trends to make a dramatic half‑wall that anchors furniture and mood.
Pick one vivid hue, tape a clean edge, and paint confidently. Keep surrounding decor simple so the block sings.
- Choose contrast
- Balance scale
- Coordinate textiles
Two‑Tone Textures
If you want a subtle yet layered look, two‑tone textures let you split a wall into complementary finishes—smooth paint above and tactile material below—to add depth without overwhelming the room.
You can pair textured finishes like beadboard, plaster, or grasscloth with flat paint, using careful color blending at the seam.
This approach suits living rooms, bedrooms, and nurseries for a refined, cozy accent.
Functional Painted Features
When you paint half a wall with a purpose, it can do more than look good—it can organize, protect, and define a space.
You’ll use painted accents for functional aesthetics: durable lower halves resist scuffs, visual anchors frame beds or sofas, and playful nursery panels hide marks.
Choose washable finishes and complementary hues to balance style with practicality.
- Durable scuff-resistant base
- Visual framing for furniture
- Kid-friendly washable panel
Styling Furniture and Decor Around a Half‑Painted Wall
Though a half‑painted wall already defines a strong visual line, you can reinforce or soften that divide by placing furniture and decor with intention.
Anchor larger pieces like sofas or consoles along the painted section, layer rugs or tables to bridge the connection, and use accessories to echo or contrast the paint’s tone so the room feels cohesive rather than split.
Arrange furniture arrangement, decor accents, color coordination, texture layering, lighting placement, style harmony, space definition, visual balance.
Lighting Strategies to Enhance Your Half‑Wall Accent
Because lighting shapes how color and texture read, use layered light to make your half‑wall pop without overpowering the room.
You’ll balance ambient, task, and accent fixtures, minding lighting placement for even wash and targeted accent highlights. Aim low glare and adjustable dimming so the mood shifts with activities.
- Track or picture lights
- Wall sconces
- LED strip under rail
Combining Woodwork or Wainscoting With a Half‑Painted Wall
Good lighting makes the paint’s color and texture read true, but pairing that paint with woodwork or wainscoting brings the whole wall into sharper focus.
You’ll choose wainscoting styles to match room scale—picture raised panels for formality or beadboard for casual charm.
Test paint combinations against trim, decide whether to contrast or coordinate, and install crisp divider molding for a clean, modern edge.
Child‑Safe and Pet‑Safe Paint Choices and Finishes
When you’re picking paint for rooms where kids and pets roam, prioritize low-VOC or zero-VOC formulas and durable finishes that stand up to scrubbing and spills.
For kid- and pet-friendly rooms, choose low- or zero-VOC paints with durable, scrub-resistant finishes for easy cleaning.
Choose eco friendly options and non toxic alternatives with low odor paints and quick drying formulas.
Consider hypoallergenic choices and durable coatings like matte finishes, satin sheen, or gloss options.
- washable finishes
- easy application
- safe labeling
Maintenance and Cleaning for Half‑Painted Walls
If you keep a simple routine—regular dusting, spot-cleaning spills promptly, and occasional touch-ups—you’ll preserve the crisp line and finish of a half‑painted wall with minimal effort.
For wall care, adopt a gentle wall cleaning method, addressing stain removal quickly.
Use appropriate paint maintenance and touch up techniques, follow a consistent cleaning routine, and you’ll boost finish preservation and paint longevity.
Seasonal Color Trends That Work for Half‑Wall Accents
Keeping your half‑painted wall looking sharp through regular care also gives you a perfect chance to refresh the color each season.
You can follow seasonal palettes and use color psychology to set mood without repainting the whole room. Try subtle swaps and accessories to test warmth, then commit.
- Warm terracotta for cozy fall
- Soft pastels for spring uplift
- Cool blues for summer calm
How to Test Colors With Samples and Mockups
How do you know a color will work on just half a wall? Test with peel‑and‑stick samples and painted swatches, observing at different times of day.
Do a controlled sample application to check texture and sheen.
Consider color psychology—warm tones energize, cool tones calm—and how the half‑wall interacts with furnishings and light before committing to the full accent.
Before‑And‑After Half‑Wall Examples to Copy
Once you see side‑by‑side photos of rooms before and after a half‑wall treatment, you’ll spot practical ideas you can copy—like grounding a busy sofa with a darker lower half, brightening a narrow hallway with a pale lower stripe, or adding trim for instant polish.
See before-and-after half-wall photos and steal simple tricks—darker bases to ground sofas, pale stripes to widen halls, trim to polish rooms.
You’ll get before and after inspiration and quick color combination ideas to replicate.
- Living room: contrast lower half
- Hallway: pale stripe
- Dining: trim detail
When to Hire a Pro vs. DIY for Half‑Wall Painting
Those before-and-after examples should help you picture the outcome, but deciding whether to DIY or hire a pro depends on more than visuals.
Do a quick DIY assessment: consider skill, tools, time, and prep needs. If walls need repairs, tricky trims, or you want flawless edges, book a pro consultation.
Choose DIY for simple, low-risk projects; hire pros for complex or time‑sensitive jobs.
Quick Checklist to Complete Your Half‑Wall Project
1 simple checklist keeps your half‑wall project on track: gather materials (paint, rollers, trim brushes, drop cloths, sandpaper, putty), prep the surface (clean, sand, patch holes, tape edges), set up protective coverings and lighting, mark the cutting line and test your paint on a small patch, then work in logical steps—prime if needed, paint from top to bottom, inspect for missed spots, and clean up tools when you’re done.
- Use Inspiration sources and Design trends for your Accent wall.
- Combine Color psychology with Paint techniques and Wall textures.
- Choose Modern finishes and follow practical DIY tips.
Common Mistakes to Avoid When Painting Half a Wall
When you rush prep or skip test swatches, the finished half‑wall almost always looks off; avoid common mistakes like poor surface prep, mismatched sheen, uneven cutting lines, and overloading the roller, and focus on careful measuring, proper priming, and testing paint in the room’s light before committing.
Use paint preparation tips to sand, clean, and prime; steer clear of common painting pitfalls like sloppy edges.
Final Styling Tips to Showcase Your Half‑Painted Wall
Now that your half‑wall’s paint and edges are clean and even, styling will make the effect feel intentional and polished.
You’ll use shelf styling, wall art, and lighting placement to create decor balance. Integrate color accents, texture layering, and fabric choices while planning furniture arrangement for flow.
Tips:
- Curate shelf styling with varied textures.
- Place wall art for eye level balance.
- Use lighting placement to highlight accents.
Frequently Asked Questions
Can I Paint a Half Wall on Textured or Popcorn Ceilings Nearby?
Yes — you can paint a half wall near textured ceilings or popcorn ceilings, but you’ll need careful taping, drop cloths, and gentle brushwork to avoid knocking texture loose; consider cutting in with a small angled brush.
Will Baseboards or Trim Need Repainting After Splitting a Wall?
My neighbor repainted her baseboards after splitting a wall, so yes—you’ll likely repaint. You’ll match baseboard colors and trim styles to the new split for cohesion, unless you want a deliberate contrast for drama.
How Do I Blend Repairs Where Wallpaper Was Removed Before Painting?
You’ll use repair techniques like skim-coating and sanding, then blending methods such as feathered primer coats and fine texture matching. You’ll sand smooth, prime, and repaint in thin layers so seams vanish and finish looks seamless.
Can Radiant Heating or Underfloor Systems Affect Paint Adhesion?
Like a slow sunrise warming a canvas, yes — radiant heating can affect adhesion. You’ll want thorough paint surface preparation and heed temperature considerations: dry, stable surfaces and recommended temps so paint bonds instead of peeling.
Is There a Preferred Trim Height for Future Wallpaper or Wainscoting Additions?
You should plan trim height considerations around standard 36–42 inches for wainscoting, or align with typical wallpaper junction techniques at baseboard or chair-rail level; you’ll match future patterns and maintain balanced visual proportions.
Conclusion
You’ve got this — half a wall can transform a room with minimal fuss. Remember, measure twice and paint once: careful prep and clean lines make the look feel intentional, not accidental. Choose contrast or harmony based on mood, place the split where it balances furniture, and finish with trim or staging to elevate the effect. If it feels too tricky, call a pro, but for most rooms, a confident DIY afternoon will do the trick.