How to Prep a Wall for Paint After Removing Wallpaper
After removing wallpaper, you’ll need to clean off all adhesive and dust, repair holes or gouges with spackle or joint compound, sand smooth between thin fills, then wipe down with a tack cloth so paint will adhere evenly. Use a stain-blocking primer on discoloration or stubborn glue, match primer type to your surface, and let each coat fully dry before topcoating. Follow temp and humidity guidelines for best results, and keep going to learn specific tips and timing.
What to Expect After Removing Wallpaper
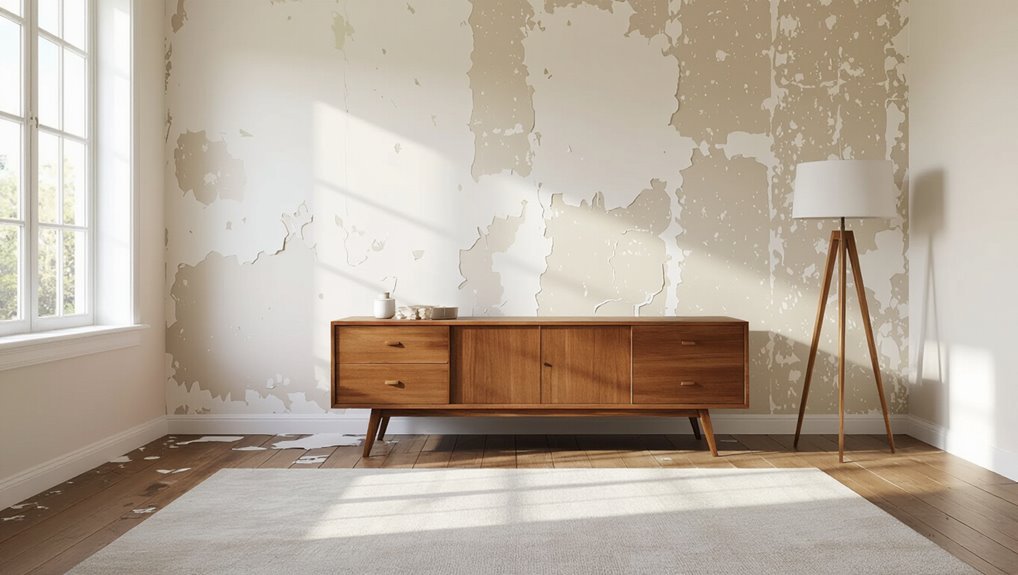
Once you strip the paper, expect the wall to look rough and uneven — glue residue, small tears in the plaster or drywall paper, and discoloration are common.
You’ll assess wall damage, note adhesive types, and evaluate wall texture.
During wallpaper removal you’ll use cleaning methods, address moisture issues, apply repair techniques, and plan surface preparation, primer selection, and steps to guarantee paint adhesion.
Quick Roadmap: Clean → Repair → Sand → Prime
Now that you’ve removed the wallpaper and assessed damage, follow a simple four-step roadmap: clean, repair, sand, then prime.
Start by washing residue and dust so paint color adheres evenly.
Begin by thoroughly washing away residue and dust to ensure the paint adheres evenly and looks consistent.
Patch holes, feather joint compound into wall textures, then sand smooth.
Remove dust, tack cloth, and apply a suitable primer.
That sequence guarantees consistent adhesion and a professional finish.
How to Assess Damage and Adhesive Residue
Start by inspecting the surface thoroughly for cracks, holes, bubbles, or areas where paint is peeling.
Note any adhesive residue from tape, stickers, or wallpaper and test whether it rubs off with a damp cloth.
Identify the adhesive type—water-based, rubber, or solvent—so you can choose the right remover and repair approach.
Inspect Surface Thoroughly
Before you pick up a scraper, do a careful walkthrough of the wall to find dents, cracks, peeling paint, and any sticky residue from tape or adhesives.
Note surface imperfections and areas where previous wall treatments altered texture or absorption. Mark spots needing fill, sanding, or priming.
Take photos for reference, then plan repairs and select appropriate materials before you begin work.
Identify Adhesive Types
Adhesive residue can come from tape, wallpaper paste, mounting squares, or heavy glues, and each leaves different marks and damage you’ll want to spot before painting.
Check for gummy film, hardened spots, staining, or paper backing fragments.
Identify adhesive types visually and by texture, then choose appropriate adhesive removal—gentle solvent, warm water, or scraping—so repairs and priming will bond properly.
Identify Wall Type: Drywall, Plaster, or Lath
Figuring out whether your wall is drywall, plaster, or lath helps you choose the right patching and primer methods.
You’ll check drywall characteristics like smooth seams and paper facing, note plaster differences such as thickness and hairline cracks, and use lath identification—narrow wooden strips or rusted nails—to guide wall preparation.
Matching repair and primer improves paint adhesion and long-term finish.
When to Hire a Pro vs. DIY Wall Repair
Start by evaluating the scope of damage—small dents and nail holes you can usually fix yourself, but widespread cracks, sagging, or water damage often need a pro.
Consider your skill and time: do you have the tools and patience to get a smooth finish, or would hiring someone save hours and headaches?
Finally, weigh cost versus value—compare material and rental costs plus your time against a contractor’s estimate and the long-term results.
Scope Of Damage
Sometimes the damage to a wall is something you can handle yourself, but other times it needs a pro—know which is which before you pull out tools. Do a scope assessment and wall evaluation via inspection methods to sort damage categories: adhesive types, surface conditions, moisture issues, and wall integrity. Choose repair options and repair techniques accordingly.
| Damage | DIY | Pro |
|---|---|---|
| Peel/adhesive | Yes | No |
| Small holes | Yes | No |
| Moisture | No | Yes |
| Structural | No | Yes |
| Uneven surface | Maybe | Yes |
Skill And Time
Decide honestly about your skills and schedule before you tackle wall repairs: if you’re comfortable with basic tools, following instructions, and have a few hours to spare, small fixes like patching holes or stripping peelable adhesive are practical DIY projects.
But if the repair requires specialized techniques (plaster work, moisture mitigation, or structural reinforcement) or would eat into weeks of your free time, hiring a pro will save you headaches and likely money in the long run.
Conduct a frank skill assessment, set realistic time management expectations, and choose the path that keeps your project on schedule and safe.
Cost Versus Value
Having weighed your skills and schedule, weigh the numbers next: compare the out-of-pocket cost of materials and your time against the value a professional brings. Do a cost analysis and value assessment to decide.
| DIY | Pro |
|---|---|
| Lower materials | Higher speed |
| More time | Guaranteed finish |
| Learning curve | Warranty & experience |
Safety Gear for Wallpaper Cleanup
Before you start stripping wallpaper, make sure you’re geared up to protect your skin, eyes, lungs, and floor—removing paper and adhesive can splash water and chemicals, kick up dust, and loosen old paint.
Wear safety goggles, protective gloves, a dust mask, work apron, knee pads and safety shoes.
Use drop cloths, a ventilation fan, and keep a first aid kit nearby.
Tools for Prepping Walls After Wallpaper Removal
Gather a compact kit of reliable tools so you can move efficiently from stripped wall to smooth surface:
- Metal scraper, sanding block, and putty knife — core essential painting tools for removing remnants.
- Sandpaper (medium/fine) and sanding sponge to refine surfaces using proven wall preparation techniques.
- Painter’s tape, patching compound, and a dust brush to prep edges, repair nicks, and clear debris.
Best Cleaners for Paste and Glue
When you’re removing paste and glue, pick a cleaner that matches the job: solvent-based adhesive removers work fast on heavy residue, while eco-friendly options let you clean with less odor and toxicity.
Start with the gentler, greener cleaners and move to solvents only for stubborn paste that won’t come off.
I’ll cover how to use each safely and when to switch tactics.
Solvent-Based Adhesive Removers
Solvent-based adhesive removers cut through hardened paste and glue fast, so you can strip residues that water and scrapers can’t touch.
You’ll learn solvent safety, how adhesive types respond, residue removal tips, and application techniques to work efficiently.
- Wear gloves and ventilate, test small areas first.
- Apply thinly, let dwell, then wipe.
- Neutralize residues before painting.
Eco-Friendly Cleaning Options
Because you want to avoid harsh chemicals and still remove paste and glue effectively, eco-friendly cleaners use simple, non-toxic ingredients—like citrus solvents, vinegar solutions, and biodegradable surfactants—to soften residues without harming paint or indoor air.
You’ll try eco-friendly options: a vinegar mixture with baking soda, plant-based cleaners and citrus solvents, or natural cleaners with essential oils—green products and other non-toxic alternatives.
Tackling Stubborn Paste Residue
Tackling stubborn paste and glue calls for the right cleaner and a bit of patience, since scraping alone can damage drywall or paint.
Use targeted residue removal and paste solutions with safe adhesive techniques and cleaning methods. Follow safety precautions, use removal tools, and practice effective scrubbing for proper surface treatments.
Try:
- Vinegar-based clean solutions for light residues
- Commercial paste removers for stubborn adhesives
- Warm water and detergent for final wipe-down
Dissolve Stubborn Adhesive Safely
Old glue and sticker residue can stop paint from sticking, so you’ll want to remove it safely before priming.
Use adhesive removal methods like warm soapy water, a mild citrus cleaner, or rubbing alcohol for spot tests.
Apply safe solvents sparingly, work gently with a plastic scraper, rinse, and dry.
Wear gloves and ventilate the room to protect surfaces and yourself.
Remove Paper Backing Without Damaging Drywall
Soak the paper backing with a damp sponge to loosen the strands before you start scraping.
Use a putty knife at a shallow angle and work gently to lift the paper without gouging the drywall.
When the backing’s gone, patch any nicks with joint compound, let it dry, and sand smooth.
Wet Strand Loosening
Peel back loose paper by wetting just the damaged strands with a sponge or spray bottle so the backing loosens without over-saturating the drywall; work in small sections, let the moisture absorb for 30–60 seconds, then gently lift the paper with a putty knife at a shallow angle to avoid gouging the gypsum beneath.
- Target wet adhesive removal only.
- Monitor moisture impact.
- Pat dry, repeat briefly.
Gentle Scraping Technique
Once the paper backing has loosened from targeted wetting, switch to a gentle scraping technique to lift it without gouging the gypsum beneath.
Work with a wide, sharp putty knife at a shallow angle, easing under softened fibers. Peel slowly, re-wet stubborn areas, and avoid forcing adhesive residue off—save deeper repairs for the patch and sand stage.
This gentle scraping aids clean wallpaper removal.
Patch And Sand Carefully
Start by evaluating the drywall for any torn paper, gouges, or remaining adhesive so you know which spots need filling.
You’ll use careful patch techniques and gentle sanding methods to avoid tearing paper or damaging drywall seams.
- Remove loose paper with a damp sponge.
- Apply thin joint compound; feather edges.
- Sand lightly with a fine-grit block, vacuum dust.
Tackling Glue That Won’t Scrape Off
If adhesive won’t come off with a scraper, you’ll need a mix of solvent, patience, and gentle elbow grease to remove it without damaging the wall.
Try adhesive removal techniques like diluted fabric softener or commercial removers, test a small spot, then gently rub with a sponge.
For stubborn glue solutions, repeat applications, scrape lightly, and wipe residue away—don’t sand until it’s fully lifted.
Washing Walls: Step‑by‑Step Technique
Before you paint, remove any residue thoroughly so the new finish will stick.
Use a mild cleaning solution to lift dirt and grease without damaging the surface.
Rinse and let the wall dry completely before you prime or paint.
Remove Residue Thoroughly
1 clear wash removes dirt, grease, and grime that would otherwise prevent paint from adhering properly.
You’ll follow residue removal techniques and use adhesive removal products where needed. Scrub gently, rinse fully, and let dry.
Key steps:
- Test product on a small area first
- Scrape stubborn bits with a plastic blade
- Rinse until no residue film remains
Use Mild Cleaning Solution
Mix a mild cleaning solution—about a teaspoon of dish soap per gallon of warm water—to lift dust, fingerprints, and light grime without harming paint or drywall.
Use a soft sponge, work in small sections, and apply gentle pressure. Mild detergent solutions help prevent damage while promoting effective wall surface preparation.
Spot-test first on an inconspicuous area to verify compatibility.
Rinse And Dry Completely
Wipe the wall with clean water to remove any soap residue left from washing; this prevents streaks and helps new paint adhere evenly.
You should eliminate wall moisture fully before priming. Use these drying techniques:
- Open windows and run fans for cross‑ventilation.
- Pat stubborn damp spots with lint‑free cloths.
- Use a moisture meter to confirm surface is dry and ready for paint.
Treat Mildew and Stains After Removal
Once you’ve removed the bulk of the mildew and stains, treat the area promptly to prevent regrowth and discoloration—apply an appropriate cleaner or stain-blocking primer, follow product directions, and let the surface dry completely before painting.
Choose mildew treatment options like diluted bleach or commercial fungicide, test stain removal techniques on a small patch, scrub gently, rinse, and guarantee the wall is spotless and dry before priming.
Check for Moisture and Underlying Issues
Look over the wall for visible stains or peeling that could signal ongoing moisture.
Tap or use a moisture meter to check for hidden dampness behind the paint.
If you find wet spots or crumbling plaster, fix the source of water and repair structural damage before you paint.
Inspect For Visible Stains
Before you reach for primer or paint, inspect the wall for visible stains and signs of moisture so you don’t seal in a problem that’ll come back later.
You’ll do stain identification, note colors and texture, and plan stain removal steps.
Check these:
- yellow or brown water marks
- mold spots or fuzzy growth
- crusty salt stains or peeling paint
Test For Hidden Dampness
After you’ve dealt with visible stains, check for hidden dampness that can cause paint to bubble, peel, or encourage mold later on. Use simple dampness detection: touch, smell, and a moisture testing meter. Record spots, then dry and retest before priming.
| Method | Purpose | When |
|---|---|---|
| Touch | Detect cool/wet areas | Immediate |
| Smell | Identify moldy odors | Ongoing |
| Meter | Quantify moisture | Confirm |
Address Structural Water Damage
1 clear sign of trouble is persistent damp that won’t go away with surface drying — that often means water’s reached structural elements like studs, sheathing, or floor joists.
You should inspect, dry, and repair before painting. Consider professional assessment and use waterproofing techniques and moisture barriers to prevent recurrence.
- Inspect framing and sheathing
- Replace or treat rotten wood
- Install proper moisture barriers
Repair Gouges and Knife Cuts in Drywall
Gouges and knife cuts in drywall are common but simple to fix if you follow the right steps: clean the damaged area, fill it with a suitable joint compound or spackle, and feather the edges so the patch blends smoothly with the surrounding wall.
Use proper surface preparation and adhesive removal, choose patching strategies that match drywall textures, apply sanding methods, then prime for paint adhesion and consistent wall finishes.
Fill Seams and Nail Holes With Joint Compound
Start by wiping down seams and nail holes so the joint compound adheres properly and you’re not trapping dust under the patch.
Wipe seams and nail holes first so joint compound bonds well and dust won’t ruin the patch.
Use thin layers, let each dry, then sand smooth. Focus on joint compound techniques and quick nail hole repairs for a seamless finish.
- Apply thin coats
- Sand between layers
- Feather edges for paint-ready walls
Replacing or Re‑taping Drywall Tape
If your tape is bubbling, torn, or missing, remove the old tape and replace it before skim-coating so your seams stay invisible under paint.
For drywall repair, cut back damaged paper, apply new tape, and embed it with joint compound.
Focus on tape replacement, seam finishing, texture matching, and clean surface preparation.
Use proven repair techniques for smooth, paint-ready walls.
Best Patching Compounds for Plaster Walls
When you’re repairing plaster, choosing the right patching compound makes the job easier and more durable.
For small imperfections, lightweight pre-mixed compounds are quick to apply and sand smooth.
For larger cracks or missing sections you’ll want traditional plaster mixes or setting-type compounds that bond and shrink less.
Best Lightweight Patching Compounds
Patching plaster calls for a lightweight compound that bonds well, sands smoothly, and won’t sink or crack as it dries.
You’ll want products that’re easy to shape and compatible with your patching techniques.
- Lightweight gypsum-based spackle — fast-setting, sands fine
- Polymer-modified patch — flexible, bonds to old plaster
- Lightweight joint compound — for shallow dents and feathering
Traditional Plaster Repair Options
You’ve looked at lightweight compounds for quick fixes; for traditional plaster walls you’ll want materials that match the original substrate’s hardness and curing behavior.
Choose gypsum-based plasters, lime putty, or cementitious mixes, and follow plaster patching techniques like keyed bonding, scratch coats, and feathering.
These traditional repair methods guarantee adhesion, compatible shrinkage, and durability so your paint finish stays smooth and stable.
How to Feather Patches for Invisible Repairs
Feathering a patch means tapering the joint compound so its edges melt into the surrounding paint, and doing it right makes the repair virtually invisible.
You’ll use precise feathering techniques and proven patching strategies to blend seams. Work thin layers, sand between coats, and finish with light sanding before priming.
- Apply thin coats
- Sand progressively
- Blend edges seamlessly
Match Texture: Skim Coat vs. Spot‑Skim
Once the patch is smooth and primed, you’ll need to match the wall texture so the repair disappears.
Decide between skim coating the entire wall for uniformity or spot‑skim for localized blending. For large areas, skim coating gives consistent results; spot‑skim saves time on small flaws.
Match tools and compound texture, feather edges, and test a small area before committing.
How to Apply a Skim Coat Step by Step
Start by gathering your tools—taping knives (6–12″), hawk or mud pan, mixing bucket, pole sander, and a pre-mixed or powdered joint compound—and clear the area so you can work uninterrupted.
Gather your tools—taping knives, hawk or mud pan, bucket, pole sander, and joint compound—then clear the area to work uninterrupted.
Mix to a creamy consistency using ideal materials, apply thin even layers, feather edges, and sand between coats.
Use these skim coat techniques:
- Apply full-wall coats
- Feather seams outward
- Sand and spot as needed
Drying Times and Curing for Repairs
Because drying depends on compound type, thickness, temperature, and humidity, you should plan repair timing rather than guess—light skim coats can dry in a few hours, full drywall fills may take 24–48 hours between coats, and powdered mixes often need longer curing than pre-mixed compounds.
Check manufacturer drying times, control humidity and temperature, and allow proper curing processes before priming and painting to avoid failure.
Sanding: What Grit to Use and When to Stop
Pick a sanding grit that matches the job—coarser (80–120) for heavy filler and finer (150–220) for smoothing finish.
Feel the surface and watch for visible scratches or feathered edges to know when to stop.
Stop sanding once the patch blends with the surrounding wall and the surface is uniformly smooth to the touch.
Choosing The Right Grit
When prepping a wall for paint, choosing the right sandpaper grit makes the job quicker and gives you the smooth surface paint needs to adhere properly.
You’ll use grit selection and sanding techniques to match damage and finish. Pick coarser grits for level work, finer for smoothing.
- 80–120 for heavy removal
- 150–180 for prep
- 220+ for final finish
Knowing When To Stop
Although you want a perfectly smooth surface, you should stop sanding as soon as the repair blends with the surrounding wall and no visible scratches or ridges remain.
Watch for stop signs like feathered edges or dust buildup that hide imperfections.
Respect preparation limits: don’t oversand painted layers or underlying drywall.
Test with light and fingertip touch, then clean and prime immediately.
Sanding Techniques for Flat, Textured, and Plaster Walls
Sanding flat, textured, and plaster walls calls for different tools and pressure, so start by matching your technique to the surface:
- For flat walls use sanding tools with fine grit selection (120–220) for smooth, even results.
- For textured surfaces employ a light touch and coarser abrasives to blend high spots.
- For plaster walls choose softer pads and medium grit to avoid gouging while smoothing.
Remove Sanding Dust Effectively
Brush or vacuum away loose dust, then wipe the surface with a damp microfiber cloth to pick up the fine particles that sanding leaves behind.
After sanding techniques, follow with a tack cloth or mild detergent wipe to remove residues.
Use a HEPA vacuum, sealed bags, and plastic sheeting for dust containment.
Let the wall dry fully before inspecting for missed spots and repainting.
When to Use Stain‑Blocking Primer
Sometimes you’ll encounter stains—water marks, smoke, tannin bleed, or ink—that standard primer can’t seal, so use a stain‑blocking primer to stop discoloration from bleeding through your topcoat.
You’ll assess stain types, moisture issues, and adhesive removal before primer application to guarantee surface preparation and paint adhesion.
- Seal stubborn stains
- Treat moisture sources
- Smooth wallpaper patterns and residue
Best Primers After Wallpaper Removal
Once you’ve stripped the paper, you’ll need to choose between oil-based and latex primers based on adhesion and drying time.
Consider stain-blocking formulas if glue residue or tannin bleed remains.
I’ll outline the pros and cons so you can pick the right primer for your wall.
Oil-Based Versus Latex Primers
Wondering which primer to use after pulling down wallpaper? You’ll weigh oil based benefits versus latex advantages for primer application.
Consider surface compatibility, drying times, odor differences, cost comparison, and environmental impact before choosing.
- Oil: strong adhesion, stain sealing, longer drying.
- Latex: quicker drying, lower odor, easier cleanup.
Choose based on substrate and priorities.
Stain-Blocking Primer Options
If old adhesive, water stains, or ink marks are visible after you take down wallpaper, grab a stain-blocking primer before you paint; it’ll prevent bleed-through and give you a uniform base.
Choose between oil-based, shellac, or water-based options: oil blocks severe stains, shellac excels on ink and odor, and newer water-based stain blocking primers balance low odor with strong adhesion.
Priming Patched and Bare Spots Evenly
Patch primed correctly, and your paint job will blend smoothly instead of showing obvious spots.
You’ll use proper priming techniques and patching methods to level texture and absorption before topcoat. Work consistently, feathering edges and matching sheen.
Tips:
- Sand and clean patched areas thoroughly.
- Apply thin, even coats of primer.
- Let primer cure fully before painting.
Sealing Stains With Shellac or Oil‑Based Products
Stains from water, smoke, or tannin can bleed through paint, so you’ll want to stop them at the source by sealing with shellac or an oil‑based primer before you topcoat.
Choose shellac for quick drying and superior stain blocking—shellac benefits shine on persistent marks.
Use oil based applications where odor and longer cure time are acceptable; apply thin, even coats and sand lightly between layers.
Priming Plaster vs. Priming Drywall
When you prime plaster versus drywall, you’ll notice plaster soaks up more product because it’s more porous, while drywall paper and joint compound behave differently.
Pick a primer that promotes strong adhesion and bonding for the specific surface so your paint won’t peel.
Also choose a primer that blocks moisture and alkali on plaster, which is more likely to cause staining and failure than drywall.
Surface Porosity Differences
Because plaster and drywall absorb primer differently, you’ll need to choose your products and technique based on each surface’s porosity.
Match primer to porosity to protect surface texture and guarantee paint adhesion. Consider:
- Plaster: often more porous, may need sealer.
- Drywall: smoother, usually accepts standard primer.
Test a small area to confirm coverage and drying time.
Adhesion And Bonding
After matching primer to porosity, you’ll need to focus on how well that primer will stick—adhesion on plaster and drywall differs because of surface texture and composition.
You’ll use different adhesion techniques: sand and key plaster to accept primer, and lightly scuff drywall paper.
Apply appropriate bonding agents where repairs or gloss remain.
Test a small area to confirm proper bond before full priming.
Moisture And Alkali Blocking
If you’re working with plaster or drywall, you’ll need primers that block moisture and alkaline salts differently: plaster can leach lime and moisture from beneath, while drywall’s paper and gypsum absorb surface dampness.
Use primers emphasizing moisture prevention and alkali resistance to protect paint.
- Plaster: high alkali resistance
- Drywall: moisture prevention sealer
- Universal: test adhesion first
Choose Paint Sheen for Repaired Walls
Pick a paint sheen that matches the repair’s visibility and the room’s wear: higher sheens (satin, semi-gloss) highlight imperfections but clean easily, while flat or matte hides minor flaws but soaks up scuffs and is harder to clean.
Consider paint finish options and sheen effects: choose satin or semi-gloss for trim, flat for low-traffic ceilings, and matte for disguise where touch-ups aren’t frequent.
How to Test Paint Adhesion Before Painting
Before you paint, verify the new coat will stick—poor adhesion means peeling, bubbling, and wasted effort.
Test small areas to confirm paint adhesion after surface preparation. Try these quick checks:
- Clean, dry spot: apply a dab and watch for lifting.
- Tape test: press tape, pull sharply; loose paint shows poor bond.
- Scratch test: gently score to ascertain coating grips.
Prevent Bleed‑Through From Old Wallpaper Patterns
When old wallpaper patterns seep through new paint, they’ll show as faint shadows or bold stains that ruin a fresh finish, so you need to block them before you roll. Use shellac or oil‑based primer for bleed through prevention, spot‑prime stained areas, sand lightly, then apply full‑wall primer. Treat seams and paste residues to erase wallpaper patterns.
| Step | Result |
|---|---|
| Shellac primer | Seals stains |
| Oil primer | Blocks tannins |
| Spot priming | Targets spots |
| Sanding | Smooths surface |
| Full primer | Guarantees uniform finish |
Remove Odors and Chemical Residue Before Painting
Kick any lingering smells and chemical residue to the curb before you paint so your new finish looks and smells clean.
Use odor neutralization techniques and chemical residue removal to prep surfaces quickly.
Try these steps:
- Wipe walls with a mild degreaser, then rinse thoroughly.
- Ventilate and run an air purifier to remove fumes.
- Apply a stain‑blocking primer after surfaces dry.
Repair Corners, Moldings, and Trim Correctly
Start by inspecting every corner, molding, and trim piece for gaps, dents, or loose nails so you know exactly what needs fixing.
Fill gaps with paintable caulk, hammer or replace loose nails, and use wood filler for dents.
Fill gaps with paintable caulk, reset or replace loose nails, and use wood filler to repair dents.
Sand smooth, prime bare spots, and touch up with quality paint.
Proper corner repair and careful trim finishing give crisp, durable edges.
Masking, Taping, and Protecting Floors and Fixtures
Before you bring out the paint, protect every surface that won’t get a coat: cover floors with drop cloths or rosin paper, tape baseboards and trim with low‑tack painter’s tape, and shield light fixtures, vents, and hardware with plastic or paper.
Use masking techniques for tidy tape application, edge sealing, and surface shielding to guarantee fixture safety and damage prevention.
- Floor protection: secure seams
- Prep essentials: remove dust
- Tape application: smooth edges
Fix Uneven Walls and Lippage
Now that surfaces are protected, check your walls for unevenness and lippage so you can get a smooth paint finish.
Run a straightedge and mark high or low spots. Use joint compound to fill low areas and skim-coat for wall smoothing.
Sand highs and repeat thin coats until flat. Consider lippage solutions like feathering or patching seams to eliminate ridges before priming.
Work Safely Around Outlets and Switches
When you’re working near outlets and switches, cut power at the breaker and verify it’s off with a non-contact tester before touching anything; treat every opening as live until you’re positive it isn’t.
Follow basic outlet safety and switch protection steps, and perform a wiring inspection as needed.
Take these electrical precautions:
- Remove plates, keep screws organized
- Tape exposed terminals
- Use insulated tools only
Moisture Checks Under Wallpaper: What to Inspect
If wallpaper’s been up for a while, check for moisture right away because trapped damp will ruin new paint and hide mold. Peel a corner or use a small hole to inspect the backing and paper for soft spots, discoloration, or a musty smell.
Note nearby moisture sources like leaks, plumbing, or poor ventilation. Document any wallpaper damage and delay painting until dry.
Mold Remediation Basics Before Repainting
Address mold promptly before repainting, because paint won’t stick to or hide active growth and trapped spores can return once conditions are right.
Address mold before repainting — paint won’t adhere or hide active growth, and trapped spores can resurface later.
You should use inspection techniques to find affected areas, prioritize health concerns, and limit moisture exposure.
Consider treatment options and mold prevention steps to stop recurrence.
- Identify visible mold
- Use safe cleaning methods
- Fix moisture sources
Timing Your Paint Project for Humidity and Temperature
Pick a day when temperatures stay within the paint’s recommended range—usually between 50°F and 85°F—so it can cure properly.
Check humidity and aim for levels below about 50–60% to avoid slow drying or blistering.
Paint in the late morning or early afternoon when temperatures and humidity are most stable for best results.
Ideal Temperature Range
Because paint cures best within a narrow climate window, you should plan your project around both temperature and humidity to get durable, even results.
Aim for the perfect temperature range to support paint adhesion and steady surface drying. Keep an eye on favorable humidity without detailed thresholds here.
- Work when temps are stable
- Avoid cold starts or hot spikes
- Let primer fully dry before topcoat
Humidity Levels To Monitor
Temperature sets the stage, but humidity dictates how fast paint will dry and how well it bonds—so keep an eye on moisture in the air when scheduling your work. You’ll use simple humidity monitoring: aim for 40–60% relative humidity for perfect conditions. If too high, use dehumidifiers; if too low, add moisture.
| Low (<40%) | Ideal (40–60%) | High (>60%) |
|---|---|---|
| Fast dry | Best bonding | Slow dry |
Best Time Of Day
When you schedule painting for early morning or late afternoon, you’ll catch cooler temperatures and steadier humidity that help paint flow and bond without drying too quickly or sagging.
You should pick times that use natural cues like morning sunlight and afternoon warmth to stabilize conditions.
- Start at dawn for lower humidity.
- Avoid midday heat.
- Finish by evening cool-down.
Cost‑Saving Hacks for Wall Prep (Without Cutting Corners)
If you want to save money on wall prep without sacrificing quality, focus on smart substitutions and a few time-tested DIY techniques you can do yourself.
Choose cost effective materials like multipurpose primers and patching compounds, rent sanding tools, reuse drop cloths, and mix small batches of filler.
Prioritize prep steps, work methodically, and you’ll cut costs without cutting corners.
Common Mistakes That Cause Bubbled or Peeling Paint
If your paint is bubbling or peeling, it usually comes down to a few avoidable mistakes: not cleaning the surface, skipping primer, or trapping moisture.
You’ll want to remove dirt and grease first, always apply a suitable primer, and fix any moisture sources before painting.
Addressing those three issues will stop most adhesion problems before they start.
Improper Surface Cleaning
One common cause of bubbled or peeling paint is skipping proper cleaning before you prime and paint. You must remove surface residue and use effective cleaning techniques so paint bonds.
Do this:
- Wipe with degreaser and rinse thoroughly.
- Sand glossy spots, then vacuum dust.
- Spot-treat mold or adhesive with appropriate cleaner.
Skip none of these steps, or paint won’t adhere properly.
Skipping Primer Application
Skipping primer often seems like an easy shortcut, but it’s a common reason paint bubbles or peels because the finish can’t properly bond to the substrate.
If you skip primer, uneven porosity and leftover adhesives prevent proper paint adhesion.
Always apply a suitable primer to seal the surface, promote uniform adhesion, and reduce the risk of bubbling, peeling, or uneven sheen.
Trapped Moisture Issues
Primer won’t fix paint that’s applied over damp surfaces; trapped moisture creates pressure under the finish and makes bubbles or peeling inevitable.
You should stop, dry, and diagnose before painting. Check with moisture detection tools and do an insulation evaluation to find sources.
- Dry thoroughly with fans and dehumidifiers
- Repair leaks and improve ventilation
- Replace wet drywall or insulation
Quick Pre‑Paint Inspection Checklist
Before you grab paint, walk the wall and note every blemish, crack, hole, stain, and trim gap so you don’t discover problems mid-job.
Check wall condition, identify adhesive types, perform moisture assessment and damage evaluation.
Plan surface preparation with cleaning methods, choose repair techniques and texture matching, then specify priming process to guarantee paint adhesion.
Document steps before starting.
How Long to Wait Between Prep Steps and Painting
Now that you’ve documented repairs, cleaning, and priming needs, you need to allow proper drying and curing times between each step so paint will adhere and finish evenly.
Wait recommended drying time and monitor humidity. Typical guidance:
- Primer: 2–4 hours before sanding or topcoat.
- Joint compound: 24 hours to fully dry.
- Final primer/topcoat: allow 7–14 days for full paint curing before heavy use.
Do a Test Area: How to Evaluate Success
Pick a small, inconspicuous wall section to test your prep and paint — a 2×2-foot area works well — and apply the full sequence you’ll use on the rest of the room.
Use test area techniques: sand, fill, prime, and paint.
After drying, inspect finish, adhesion, texture, and color in different light.
Note adjustments so you can accurately evaluate success before proceeding.
Tool Care and Cleanup After Wall Prep
Store and clean your tools right after prepping so they last and your next job goes faster.
You’ll follow basic tool maintenance and quick cleanup tips to avoid rust, clogged blades, or dried compound. Rinse, dry, and lubricate; label containers; discard waste properly.
- Rinse brushes and rollers thoroughly
- Wipe putty knives and sanders clean
- Seal leftover compounds tightly
Post‑Paint Maintenance to Protect Prepped Walls
Once the paint’s dry, give your walls a simple maintenance routine to keep the finish looking fresh and prevent damage: dust or vacuum regularly, spot-clean stains with a gentle detergent, avoid harsh scrubbing, and check for chips or moisture so you can touch up small areas before they become repairs.
For post paint care, create a quick wall maintenance checklist and act promptly on issues.
Frequently Asked Questions
Can I Paint Over Wallpaper Paste Without Removing It Completely?
You can, but it’s risky: leftover paste can harm paint adhesion and show wallpaper texture. You’ll need thorough cleaning, priming with a high-adhesion primer, and smoothing any texture to avoid visible imperfections after painting.
Will Wallpaper Removal Damage Insulation or Wiring Inside Walls?
You generally won’t tear into hidden systems; you’ll scrape and soak paper without harming wiring, though aggressive demolition can compromise wall integrity and raise insulation concerns, so work gently and probe carefully to avoid surprises.
How Do I Prep and Paint Ceiling Areas Where Wallpaper Was Removed?
You’ll clean, repair and match ceiling texture before priming; sand smooth, use a stain-blocking primer, then choose paint types—flat for flaws or eggshell for durability—and apply with roller and brush for even coverage.
Can I Reuse Removed Wallpaper Scraps to Patch Other Walls?
Yes — you can reuse scraps like a patchwork sail, but treat them as temporary solutions: clean edges, use proper wallpaper recycling glue or adhesive, match patterns, and combine with solid patching techniques for durable, seamless repairs.
Are There Eco‑Friendly Disposal Options for Wallpaper and Adhesive Waste?
Yes — you can choose eco friendly disposal: separate paper backing for wallpaper recycling, composting natural paste, and taking vinyl or adhesive‑contaminated waste to special collection or hazardous/recycling centers; check local rules and drop‑off options.
Conclusion
So you thought wallpaper removal was the hard part—how quaint. Now you’ll clean, patch, sand, prime, wait (yes, patience), test, and maybe call in backup if the wall looks like a crime scene. Do it right and your paint will behave; do it wrong and you’ll rediscover every missed strip. Still, you’ll learn more about drywall’s emotional needs than you expected—and the room will finally look like you meant to do it.