How to Prep Canvas for Oil Painting Like a Professional Artist
Tighten and inspect your stretched canvas, sand lightly, and seal raw fibers with rabbit-skin glue if needed to stop oil seepage. Roll on two thin, even coats of oil-compatible gesso, sanding with 220–320 grit between coats for a smooth, consistent tooth. Match canvas type and weave to your technique—linen for detail, cotton for economy—and seal edges on gallery wraps. Follow archival tension and priming steps for longevity, and keep going to learn detailed tips and troubleshooting.
Quick Step-by-Step Canvas Prep for Oil Painting
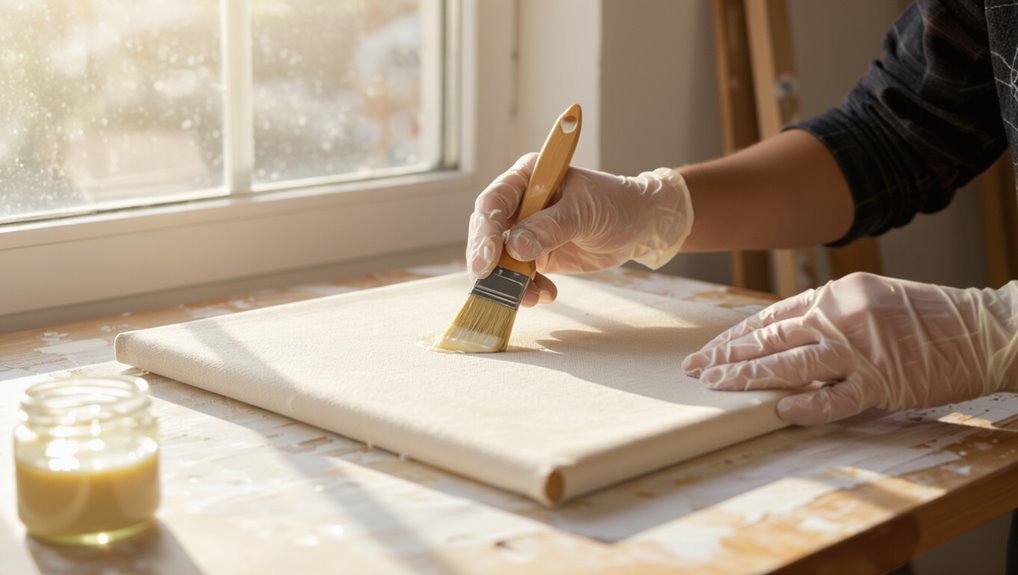
1. You’ll follow concise canvas priming techniques: tighten the stretched canvas, sand lightly, apply a thin coat of rabbit-skin glue if needed, then roll on gesso in even layers, sanding between coats.
You’ll let each layer dry fully. These oil painting essentials guarantee a stable, absorbent ground so your paint adheres correctly and your surface won’t warp or deteriorate over time.
Why Prepping Canvas Matters for Oil Painting
Preparation matters because it determines how your painting will look, feel, and last. You’ll control oil absorption, texture consistency, and painting longevity by following surface preparation and priming importance aligned with canvas quality and professional standards.
Proper preparation shapes a painting’s look, feel, and lifespan—controlling oil absorption, texture, and professional finish.
That foundation supports oil paint and artistic techniques while honoring artist preferences.
- Prevents uneven oil absorption
- Guarantees texture consistency
- Upholds professional standards
- Enhances painting longevity
- Tailors to artist preferences
Choose the Best Canvas Types for Oil Paint
When you’re choosing a canvas for oil paint, think about the weave, weight, and priming rather than just the price—these factors directly affect paint handling, drying, and longevity.
You’ll evaluate canvas materials and painting surfaces for oil paint compatibility, balancing texture preferences and texture effects with color choices.
Consider surface preparation, material durability, canvas flexibility, and how artist techniques will interact with the support.
Pick the Right Weave and Thread Count
When prepping your canvas, decide between cotton and linen—cotton’s affordable and forgiving, while linen’s stronger and holds finer detail.
Pay attention to thread count because a tighter weave gives less texture for smooth brushwork and a looser weave offers more tooth for impasto.
Match the weave and thread count to the finish and handling you want before you prime.
Cotton Vs. Linen
Although both cotton and linen can make a fine support, you’ll want to choose based on strength, texture, and how the weave holds paint.
You’ll weigh canvas types by material durability, paint absorption, texture differences, artist preferences, cost comparison, weight considerations, environmental impact, historical use, and maintenance tips.
- Cotton: affordable, lighter
- Linen: stronger, archival
- Absorption: varies
- Texture: coarse vs smooth
- Care: cleaning and priming
Thread Count Impact
Choosing the right weave and thread count makes a big difference in how your oil paint behaves, so pick a canvas that matches your technique and desired finish.
You’ll want a thread count comparison: tighter weaves support fine detail and smoother layers, while lower counts stretch easier and suit bold strokes.
Consider thread count benefits for durability, priming absorption, and how paint sits.
Texture And Tooth
Thread count tells you how dense a canvas is, but texture and tooth determine how paint grips and reads on the surface, so consider both when selecting a weave.
You’ll assess tooth importance for paint interaction, tactile feedback, and layering effects during surface preparation.
Match weave to application methods, finish types, and texture techniques; experiment with texture mediums to manage tooth variation.
- Feel: tactile feedback guides choice
- Grip: tooth importance for layering effects
- Method: application methods influence weave
- Mediums: texture mediums change paint interaction
- Finish: finish types alter final read
Buy Pre-Stretched Canvases or Stretch Your Own?
You can buy pre-stretched canvases for convenience, consistent tension, and ready-to-paint surfaces.
If you prefer control over size, tension, and cost, stretching your own gives you that flexibility but requires tools and practice.
We’ll compare the pros of pre-stretched options with the practical considerations of DIY stretching so you can choose what fits your workflow.
Pre-Stretched Canvas Pros
Many artists prefer buying pre-stretched canvases because they save time and arrive ready to prime and paint.
You’ll enjoy pre-stretched benefits like canvas convenience and a ready to use, consistent surface that feels professional.
It’s a time saving option, beginner friendly, and offers a portability advantage for plein air work.
- professional quality
- reliable tension
- saves setup time
- easy storage
- consistent priming
DIY Stretching Considerations
Whether you buy pre-stretched canvases or stretch your own, weigh time, cost, and control: pre-stretched options save hours and give consistent tension, while DIY stretching costs less per canvas and lets you choose stretcher width, canvas weave, and custom sizing.
You’ll assess DIY options, stretching techniques, material considerations, tension adjustments, frame choices, surface preparation, tool selection, sizing methods, corner alignment, and canvas maintenance before starting.
Tools You Need to Stretch Canvas Properly
Start with a small kit of reliable tools so stretching goes smoothly: a stretcher frame or stretcher bars, canvas, a pair of good pliers, a staple gun or tacks with a hammer, measuring tape, and a straight edge or stretcher key set; optional but helpful are a canvas roller and a tack hammer.
You’ll use essential stretching tools and follow canvas stretching techniques, proper tension methods, stretching safety precautions.
- canvas frame options
- maintaining canvas integrity
- stretching tips
- canvas care essentials
- essential stretching tools
Stretching Canvas on a Wooden Frame: Step-by-Step
With your tools gathered and the frame assembled, you’ll stretch the canvas in a few clear steps that give you a taut, even surface for oil paint.
Choose canvas types, position and perform alignment checks, use proper stretching techniques and gradual tension adjustments, then secure with archival materials.
After surface preparation, apply gesso, do absorbency testing, note humidity impacts, and consider desired texture effects.
Square and Tension a Stretched Canvas
Now that the canvas is on the frame, check the corner alignment to make sure all four sides sit square.
If any edges sag or pull, adjust the canvas tension by re-stretching and adding or moving staples as needed.
Finally, trim excess staple flaps close to the frame for a clean, safe edge.
Check Corner Alignment
Before you prime the canvas, make sure the stretcher is square and the fabric has even tension across all corners.
You’ll perform corner checks and use alignment techniques to verify right angles and consistent pull. Adjust only frame joints or keys if needed, avoiding major re-tensioning here. Confirm flatness before priming.
- Visual right-angle check
- Measure diagonals
- Inspect corner wraps
- Tap joint gaps
- Confirm edge straightness
Adjust Canvas Tension
You’ll want the canvas evenly taut and perfectly square before priming, since uneven tension causes warping and paint cracking later.
Check diagonals, adjust corner wedges, and tighten opposite sides gradually using proven canvas adjustment techniques.
Tap staples inward a bit or retension keys while stretching fabric evenly.
Monitor for ripples, test tension by sight and touch, and focus on maintaining tension before priming.
Trim Excess Staple Flaps
Trim the loose staple flaps close to the stretcher so they don’t catch paint, snag brushes, or create uneven edges when you prime.
Use proper tool selection and steady staple removal to protect the weave. Practice canvas maintenance and canvas care, inspect the surface, and apply finishing touches with artist techniques.
Follow these professional tips:
- Use sharp cutters
- Trim toward wood
- Keep tension steady
- Inspect for snags
- Clean debris
Re-Stretch a Loose or Warped Canvas
If your canvas has loosened or developed a slight warp, re-stretching it will restore a taut, flat surface essential for even paint application and reliable brushwork.
For proper canvas maintenance, use proven stretching techniques and tightening methods: loosen opposing staples, pull evenly, tap new staples, and adjust corner folds.
Follow canvas care tension adjustment and repair techniques; re-stretching tips help prevent future warps.
Size Canvas: Rabbit Skin Glue vs. Acrylic Size
When preparing a canvas you’ll need to choose a size that protects the fabric and gives your ground the right absorbency; rabbit-skin glue and acrylic size are the two common options, each with distinct handling, flexibility, and archival implications.
You’ll weigh rabbit skin benefits against acrylic size advantages, noting flexibility considerations, drying times, adhesion properties, texture differences, and longevity comparison.
- traditional methods
- modern alternatives
- application techniques
- flexibility considerations
- longevity comparison
When to Use Acrylic Size Instead of Rabbit Skin?
After weighing rabbit-skin glue against acrylic size for factors like flexibility and longevity, you’ll find clear situations where acrylic is the better choice:
choose acrylic for Acrylic advantages like stable, flexible seals, better Surface compatibility with synthetic grounds, and easier Application techniques.
Consider Size alternatives when you need quick drying, reduced cracking, and varied Medium considerations.
Follow Artist preferences for longevity and workflow.
Prepare Linen Differently From Cotton
Because linen fibers are longer and stronger than cotton’s, you’ll prepare it with fewer, more deliberate steps: stretch tighter, size carefully, and use fewer ground layers to preserve its natural tooth and longevity.
You’ll respect linen advantages while acknowledging cotton durability and texture differences, monitor absorption rates, and weigh cost comparison before committing.
- Stretch tighter
- Size carefully
- Fewer ground layers
- Test absorption
- Compare costs
Choose the Right Gesso for Oil Painting
Since gesso sets the tone for how oils adhere and how your brushwork reads, pick a formulation that matches your painting goals and surface.
You’ll compare gesso types and gesso brands, weigh application techniques and drying times, choose surface finishes and priming methods, and consider gesso alternatives for unique texture effects.
Always check oil compatibility and environmental factors before priming.
How Many Coats of Gesso Do You Really Need?
Now that you’ve picked a gesso that matches your goals and surface, you’ll need to decide how many coats to apply — and that number depends on the texture you want, the absorbency of the canvas, and the gesso’s pigmentation.
You’ll usually use 1–3 coats for canvas priming; consider gesso types, gesso application, professional techniques, gesso drying, ideal layers for painting readiness.
- surface preparation
- gesso benefits
- texture enhancement
- durable foundation
- controlled absorbency
Sand Between Gesso Coats for a Smooth Finish
Sanding between gesso coats helps you build a glass-smooth surface that keeps brushstrokes true and colors even; do it lightly with fine-grit sandpaper (220–320) once each coat is fully dry.
You’ll choose sand types and grit levels for subtle smoothing techniques during gesso application and surface preparation.
These professional tips prevent uneven texture, control texture enhancement, and guarantee a consistent painting finish.
Create a Toothy Surface for Impasto
If you’ve smoothed the ground for a sleek finish, you’ll want a different approach when planning heavy impasto work: a toothy surface gives thick paint something to grip.
You’ll roughen areas, adjust texture variation, and choose media that boost paint adhesion so your impasto techniques and oil paint application support dramatic brushstroke effects and layering strategies.
Roughen select areas and build tooth with the right media so impasto and bold brushstrokes hold their drama.
- Sand selectively
- Add clear gesso
- Use toothy medium
- Test brushstroke effects
- Plan layering strategies
When and How to Use Oil Ground
1 good reason to reach for an oil ground is when you want a warm, flexible base that improves adhesion and color depth for oil paint; apply it after sizing and before any underpainting so the canvas is sealed and tuned to the working method you plan to use.
You’ll enjoy oil ground benefits like reduced absorbency and richer tones—use thin, even oil ground application with brushes or rollers, letting each coat dry fully.
Tint Your Ground: Choosing a Starting Tone
When you tint your ground, choose a starting tone that supports the mood and values of your composition. You’ll pick a hue that aids color harmony, speeds establishing mids, and preserves tonal balance.
Choose a ground tone that reinforces mood, harmonizes colors, speeds midtone setup, and keeps tonal balance.
A thoughtful ground guides temperature, midtone relationships, and paint transparency.
- Establish mood quickly
- Unify palette choices
- Preserve value structure
- Ease underpainting shifts
- Control reflectivity and warmth
Seal Gallery-Wrap Canvases and Exposed Edges
Before you start painting, seal the gallery-wrap canvas and its exposed edges so the ground and paint adhere evenly and the stretcher bars stay protected.
Use canvas sealing techniques like a thin acrylic primer or diluted gesso applied to edges. Mask and sand for smoothness.
Employ edge protection methods—taping, sealing with varnish, or painting edges—to prevent wear and guarantee a clean, durable finish.
Prevent Oil Seepage and Yellowing Over Time
Although oil paints give rich, lasting color, you’ll need to control oil absorption and varnish yellowing to keep your painting stable and true over decades.
Use archival techniques and priming alternatives to maintain substrate integrity and oil paint stability.
Adopt archival methods and alternative primers to protect your support and ensure long-term oil paint stability
Consider surface protection and environmental factors for canvas longevity.
- oil seepage prevention
- yellowing solutions
- painting preservation
- surface protection
- priming alternatives
Inspect Canvas for Defects Before Priming
Before you prime, check the stretcher and canvas tension so the surface stays flat while you work.
Run your hand and eyes over the texture to spot uneven weave or hard bumps, and look closely for stains, tears, or small holes that need repair.
Fix any issues now so the primer and paint bond evenly and your final piece lasts.
Check For Tension
When you pick up the stretched canvas, give it a firm press near the center and along each edge to check the tension; a properly taut surface will feel springy and snap back, while looseness or soft spots signal the need for re-stretching or tightening before priming.
You’ll protect canvas durability and guarantee tension maintenance.
- Locate soft spots
- Test all edges
- Note corner slack
- Adjust keys evenly
- Re-stretch if needed
Examine Surface Texture
Texture matters: run your hand lightly over the stretched canvas and scan closely for irregularities like bumps, loose threads, thin patches, or weaving errors that will show through oil paint.
Your texture evaluation guides surface preparation and canvas treatment choices.
Consider texture variety and surface characteristics for desired texture effects, brush interaction, layering techniques, tactile feedback, and how they support your painting style.
Identify Stains Or Holes
A careful inspection will catch stains, punctures, and loose threads that can ruin a finished oil painting. So run your hand and eyes across the canvas to spot any discoloration, holes, or thin spots that need repair before you prime.
Use canvas inspection, stain identification, damage assessment, and defect recognition to guide hole repair and surface evaluation for material integrity and canvas maintenance.
- preparation tips
- professional standards
- spot cleaning
- patching methods
- tension check
Repair Holes, Punctures, and Frays
Small tears, pinholes, and loose threads can compromise your painting’s longevity and should be fixed before you prime.
You’ll do canvas patching with fabric backing for hole filling and puncture repair, trim frayed edges, and glue or stitch seams for seam reinforcement.
Sand or texture match the repair for consistent surface preparation so primer and paint adhere evenly and invisibly.
Join Canvas Pieces for Larger Formats
When you need a larger support than a single bolt of canvas offers, join pieces carefully so seams stay flat, strong, and invisible under primer.
You’ll use canvas joining techniques like overlap, butt joints with backing, and adhesive tapes, aligning weave and grain while planning larger format considerations for even tension and minimal bulging during priming.
- Align weave and grain
- Clean, dry seams
- Use flat backing
- Choose neutral adhesive
- Sand and prime seams
Brace Very Large Canvases for Stable Tension
After joining canvas pieces, you’ll want to brace the stretcher frame so the whole surface holds even tension and won’t sag under paint and primer.
Add crossbars or X-bracing, secure corners with blocks, and use adjustable keys sparingly to fine-tune.
These canvas stability techniques and large canvas bracing methods keep planes flat, prevent bowing, and guarantee an even, paint-ready surface.
How Humidity Affects Canvas Tension
Humidity causes your stretched canvas to expand and contract, which will change its tension over time.
If you don’t control moisture, that shifting tension can lead to sagging or edge warping that ruins paint layers.
Keep humidity steady and use proper priming and stretcher bracing to prevent those problems.
Canvas Tension Changes
Because canvas fibers absorb and release moisture, your stretched canvas will tighten in dry conditions and sag in humid ones. Those tension shifts can warp the surface, affect brushwork, and even crack paint over time.
You’ll monitor humidity impact, perform tension adjustment, and apply canvas care using stretching techniques, material selection, and canvas maintenance to preserve surface integrity.
- Check humidity daily
- Adjust keys gradually
- Choose stable materials
- Store rolled properly
- Inspect paint layers
Preventing Warping
In moist or dry environments your stretched canvas will change tension, so you should control humidity and respond quickly to prevent warping.
Monitor canvas humidity, use moisture control like dehumidifiers, and store canvases flat with proper canvas storage.
Apply stretching techniques, protective coatings, and routine canvas upkeep to boost warp resistance.
Consider environmental factors for warp prevention and consistent tension maintenance.
Store Primed Canvases Safely Between Sessions
When you’re taking a break between priming and painting, store your canvases flat or upright in a clean, dry spot where they won’t get bumped, warped, or dusty.
Use organized storage with protective covers, humidity control, and sensible stacking methods.
Follow transport precautions and climate considerations to prevent damage.
- canvas storage
- protective covers
- humidity control
- stacking methods
- transport precautions
Choose Stretcher Bar Profiles and Corner Keys
Choose stretcher bar profiles that match the weight and texture of your canvas so it stays taut without warping.
Check that the corner keys work smoothly to allow future tightening as the canvas relaxes.
Matching profile to canvas type and ensuring functional keys will give you a stable, long-lasting support.
Stretcher Bar Profiles
Because the profile of your stretcher bars determines both the look and the stability of your finished canvas, pick one that matches your painting style and framing plan.
Consider stretcher bar types and materials, dimensions for tension, stability and durability.
Evaluate configurations and advantages, weigh options for installation and maintenance, and choose profiles that balance form, function, and long-term stretcher bar performance.
- Choose profile by stretcher bar types
- Match stretcher bar materials
- Verify stretcher bar dimensions
- Plan for stretcher bar installation
- Schedule stretcher bar maintenance
Corner Key Functionality
Corner keys are small wedges that let you tighten your canvas after stretching, and they play a big role in keeping your frame square and the surface taut over time.
You’ll learn corner key purpose, corner key types and corner key sizes.
For proper corner key selection and corner key installation note corner key materials, corner key usage, corner key adjustments and corner key maintenance to enjoy corner key benefits.
Matching Profile To Canvas
Picking the right stretcher bar profile and matching corner keys means your canvas will hold tension, sit correctly on the frame, and present the surface you want to paint on.
Choose profile selection for canvas compatibility and dimensional stability; align art style with texture variation and composition alignment. Trust personal preference to secure visual harmony, aesthetic balance, and clear artistic intention.
- Match depth to medium
- Check warp resistance
- Pair keys to tension
- Consider edge display
- Respect surface tooth
Prepare Canvas for Underpainting and Grisaille
When you’re ready to block in values, prepare the canvas with a thin, neutral-toned ground that accepts both thin washes and heavier paint; this creates a consistent, absorbent surface ideal for underpainting and grisaille.
You’ll focus on underpainting techniques and grisaille applications, establishing tonal values, layering methods, brush selection, color mixing, contrast strategies, composition planning, palette organization, and sensible drying times.
Test Canvas Absorbency and Tooth Before Painting
Before you lay down any paint, test the canvas to see how it absorbs thinned washes and how much tooth it offers—this tells you whether your ground needs another coat, a light sanding, or a misting of medium.
You’ll perform absorbency testing and texture evaluation so your first strokes behave predictably.
- Drop small wash
- Note drying speed
- Scrape for tooth
- Sand lightly if slick
- Record results
Avoid Common Priming Mistakes Beginners Make
Don’t rush your priming—uneven gesso coverage can leave blotchy areas that soak up paint differently and ruin your underpainting.
You should apply thin, even layers and sand lightly between coats to keep a consistent tooth.
Also avoid overpriming, since too many coats will fill the tooth and make the surface slick and hard to absorb oil.
Uneven Gesso Coverage
Even if you’re careful, uneven gesso coverage will leave visible streaks and thin spots that show through your paint and affect adhesion.
You should control primer consistency, use proper gesso application, and address drying issues to avoid uneven texture. Focus on surface preparation and brushing strategy so layering techniques improve painting results.
- Use even brush techniques
- Thin coats, not thick
- Sand between layers
- Check drying times
- Maintain consistent primer consistency
Overpriming Canvas
While it’s tempting to keep adding coats for a super-smooth surface, overpriming a canvas can create a thick, plasticky layer that cracks, peels, or prevents oil from properly bonding to the fibers.
You should stop after two to three even gesso coats, sand lightly, and test adhesion.
Learn overpriming effects so your canvas preparation guarantees long-lasting paint and stable support.
Surface Texture: How It Guides Brushwork and Layering
Texture sets the conversation between your brush and the canvas, so choose it with purpose: a smooth, tightly woven surface lets you lay down crisp edges and thin glazes, while a coarse, primed weave encourages broken brushstrokes and impasto.
Choose your surface deliberately; smooth canvases yield crisp glazes, coarse weaves invite texture and expressive impasto.
- Consider brush dynamics and brush type for texture influence
- Match layering techniques to paint absorption
- Adjust application methods for surface interaction
- Use impasto effects sparingly
- Exploit glazing techniques for creative outcomes
Archival Standards That Affect Your Priming Choices
When you choose primers, think about archival-grade materials that won’t break down or yellow over decades.
You’ll want products tested for long-term stability to protect your paint layers and substrate.
Selecting the right archival primer now saves restoration headaches later.
Archival-Grade Materials
1 key consideration before you prime is choosing archival-grade materials, because the longevity of your painting starts with what you put on the canvas.
Use archival grade techniques and quality materials to meet professional standards, consider environmental factors, select protective finishes, and plan storage solutions and restoration methods.
- Cotton vs linen
- Acid-free primers
- UV-resistant varnish
- Breathable backing
- Climate control options
Long-Term Stability
Having chosen archival-grade supports and finishes, you’ll want to think next about long-term stability and how your priming choices will affect a painting’s lifespan.
You’ll balance material selection and treatment methods to protect surface integrity, enhance oil stability, and mitigate aging effects.
Follow archival practices, consider environmental factors, apply preservation techniques, and weigh durability considerations to maximize canvas longevity.
Adapt Prep Methods for Plein Air vs. Studio
Because plein air and studio painting demand different logistics and time frames, you’ll change how you prep a canvas to suit each setting.
Balance plein air techniques with studio practices by weighing environmental factors, lighting considerations, portability issues, workspace organization, time constraints, weather challenges, material choices, and location inspiration.
- Prime fast, tack-free
- Use rigid supports
- Pack compact tools
- Seal edges quickly
- Plan drying stages
Scale Prep Techniques for Small Studies and Large Works
When you pick a canvas size, consider how detail, transport, and framing will affect your study or finished piece.
Adjust your ground layers—thinner, quicker-drying coats for small studies; more robust, flexible builds for large works—to match scale and support.
Plan your workflow and drying times so stages don’t bottleneck, scheduling longer cure times for big canvases and faster passes for small ones.
Choosing Appropriate Canvas Size
How big should your canvas be for the piece you’re planning—small and intimate or large and immersive? You’ll match canvas dimensions to artistic intent, composition balance, and space considerations.
Consider painting scale for visual impact while weighing personal preference and project requirements.
- Test scale with thumbnails
- Measure display space
- Prioritize focal strength
- Factor transport limits
- Keep budget practical
Adapting Ground Layers
Adapting your ground layer to the scale of the work changes how the paint sits, dries, and reads.
You’ll choose ground layer techniques and surface preparation based on size, adapting textures for small studies or large canvases.
Control oil absorption, application methods, and texture applications to manage color saturation.
Consider flexibility considerations and layering strategies while mindful of drying times to optimize finish.
Workflow And Drying Times
After adjusting your ground for scale and texture, plan a workflow that matches drying times and handling needs for small studies versus large works.
You’ll stage layers to optimize workflow efficiency and respect drying duration, scheduling varnish and transport accordingly.
- prioritize thin-to-thick layers
- test drying times per pigment
- use heat/light cautiously
- work in zones for large canvases
- keep records of timing
Cost Out Materials and Troubleshoot Adhesion or Cracking
Start by listing every material you’ll need—canvas, primer, sizes, brushes, mediums, and fasteners—and assign realistic prices so you can compare brands and bulk options.
Next, tally material costs and prioritize canvas quality and primer selection.
Use troubleshooting techniques for adhesion issues and cracking solutions: check surface preparation, paint compatibility, and environmental factors to guarantee long term durability.
Frequently Asked Questions
Can I Paint Directly on Unstretched Canvas Mounted to a Board?
Yes — you can paint directly on unstretched canvas mounted to a board. You’ll improve canvas preparation and painting technique by sealing, sizing, and priming the surface first, ensuring stability, tooth, and proper adhesion for oils.
How Do I Transport Large Stretched Canvases Without Damaging Edges?
You’ll wrap edges with foam or corner protectors, cover canvases in breathable cloth or bubble wrap, secure in upright racks or padded crates, label fragile, and use straps during transit — canvas protection and transportation tips that prevent damage.
Can Household Acrylic Gesso Be Safely Used for Oil Painting?
Yes — you can use household acrylic gesso; it gives tooth, fast drying, and acrylic gesso benefits like flexibility, sealing, and adhesion. You’ll guarantee proper oil paint compatibility by allowing full cure and applying an oil-friendly ground or isolation layer.
Should I Prime Both Sides of the Canvas to Prevent Warping?
Want stable results? Yes — you should prime both sides: canvas preparation prevents uneven tension and warping, promotes consistent oil paint adhesion, and reduces cupping. Apply thin, even coats and allow proper drying between layers.
How Long Before Varnishing a Finished Oil Painting on Canvas?
You should wait months before varnishing; drying time varies by medium, thickness, and varnish types. For small studies, six months often suffices; for thick-layered or alkyd-free works, you’ll wait a year or more.
Conclusion
You’ve learned the nuts and bolts—stretch, size, prime, and mind archival choices—so your oil paintings won’t age like Icarus. Treat canvas prep like tuning an instrument: get the tension, tooth, and ground right and the paint will sing. Whether plein air or studio, small study or mural, these routines protect your work and free your hand. Stick to them, and your paintings will fly farther than you ever planned.