How to Remove Cracked Paint the Right Way Before Repainting
You’ll start by testing for lead and wearing a fitted respirator with HEPA filters, gloves, goggles, and disposable coveralls, then contain dust and ventilate the area. Score and lift loose flakes with a wide scraper, sand edges smooth, or use a compatible chemical stripper or heat gun for stubborn spots; collect debris with a HEPA vacuum. Clean, neutralize, prime with an adhesion/sealant primer, let it cure, then repaint. Follow the full guide below for step-by-step tips.
Quick Steps to Remove Cracked Paint Safely
Before you repaint, remove all cracked paint so the new finish will adhere and look smooth.
You’ll scrape loose flakes, sand edges, and vacuum dust for rapid removal.
Mask nearby surfaces, work in ventilated areas, and use gentle solvents on stubborn spots.
Rinse and dry thoroughly, then prime bare areas.
Follow safety gear and disposal rules to finish prep correctly.
Why Paint Cracks : And When You Must Remove It
Because paint reflects both the surface beneath it and the conditions it’s exposed to, cracks usually signal problems you can’t ignore: aging, moisture, thermal movement, poor surface prep, or incompatible layers.
You’ll need to remove cracked paint when it exposes bare substrate, allows moisture ingress, or results from ongoing substrate movement.
Assess environmental causes and extent before stripping and repairing to guarantee lasting results.
Safety Gear, Lead Testing, and Prep Before Stripping
Before you start stripping, put on proper protective gear — gloves, a respirator rated for dust and fumes, and eye protection — to keep dust and chemicals off your skin and lungs.
You should test for lead paint on older surfaces and follow local rules if the test is positive.
Prep the area by sealing off floors and vents so debris doesn’t spread while you work.
Wear Proper Protective Equipment
Always start by protecting yourself: wear a properly fitted respirator, gloves, eye protection, and disposable coveralls when testing or stripping old paint.
Check respirator fitment every use, choose chemical resistant gloves rated for solvents, and seal gaps around cuffs.
Work in ventilated areas, contain dust with plastic sheeting, and dispose of contaminated PPE per local regulations to avoid spreading hazardous debris.
Test For Lead Paint
When you’re about to strip old paint, assume it could contain lead and gear up accordingly: wear a fitted respirator with HEPA filters, chemical-resistant gloves, eye protection, and disposable coveralls, and keep a HEPA vacuum and plastic sheeting ready.
Test using EPA-recognized field kits for quick screening, send suspicious samples for lab analysis, and consider soil sampling around exteriors.
Follow disposal rules strictly.
How to Choose the Right Removal Method for Your Surface
Because every surface reacts differently to paint removal, you’ll want to match your method to the material and condition—softwood, metal, plaster, or drywall each demand specific tools and care.
You’ll perform substrate mapping to locate fragile areas, assess adhesion, and test surface compatibility with chemical strippers, heat, or sanding.
Pick the least invasive effective method and plan containment for dust or runoff.
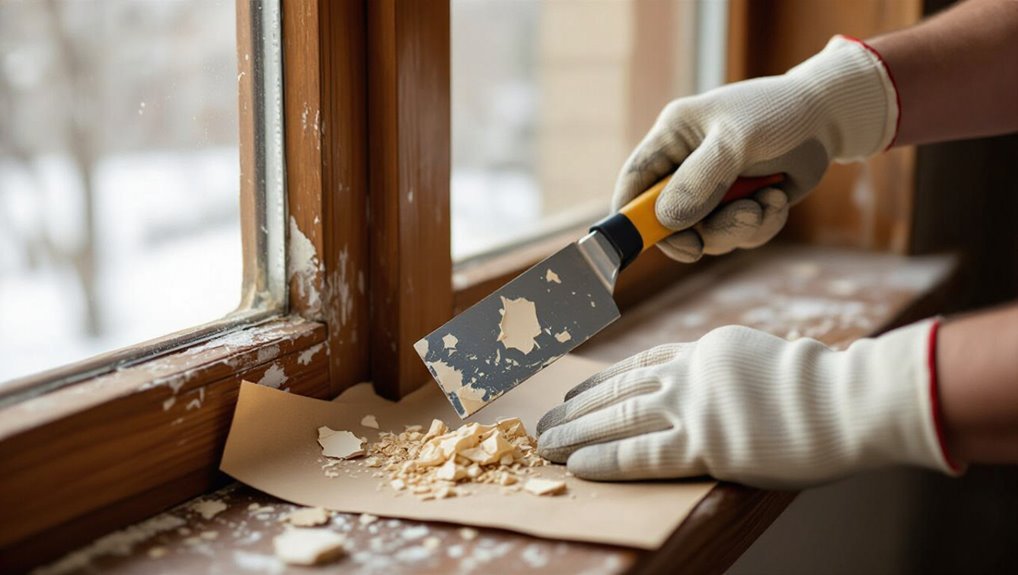
Scrape Peeling Paint Correctly
Now that you’ve matched removal methods to the substrate and mapped weak spots, it’s time to tackle the peeling paint itself. You’ll work carefully to avoid power tool risks and respect seasonal timing.
Follow these steps:
- Score edges, lift flakes with a rigid scraper.
- Use a wide blade, keep shallow angles.
- Collect debris, vacuum, and dispose safely.
When and How to Sand: Tools, Grits, and Techniques
If you’re prepping a surface for repainting, sanding creates the smooth, keyed profile paint needs to adhere and hides stubborn feathered edges left by scraping.
Use orbital sanders for large flat areas and hand sanding for contours.
Start with 80–120 grit to remove roughness, finish with 180–220 grit or micro mesh for fine smoothing.
Clean dust before priming and painting.
Use Chemical Strippers Safely and Effectively
Pick a chemical stripper suited to your substrate and the paint type, and read the label to confirm compatibility. Wear gloves, goggles, and a respirator and work in a well-ventilated area to protect yourself.
After the stripper lifts the paint, neutralize any residue per the product instructions and thoroughly rinse and dry the surface before repainting.
Choose The Right Stripper
Before you start stripping, match the stripper to the paint type and the surface so you get the job done efficiently and safely. Choose based on paint compatibility and manufacturer recommendations, and consider environmental impact and proper stripper disposal.
Follow this quick checklist:
- Identify paint chemistry.
- Pick compatible stripper.
- Plan disposal and ventilation.
Follow Safety Precautions
When you’re working with chemical strippers, prioritize personal protection and clear ventilation so fumes and splashes don’t put you or others at risk. Wear gloves, goggles, and a respirator, and keep a safety checklist handy.
Set up ventilation strategies—open windows, use fans, and block off the area. Read labels, avoid open flames, and dispose of waste per local regulations to minimize hazards.
Neutralize And Clean Surfaces
Having stripped away loose paint, neutralize and clean the surface promptly to stop chemical action and prepare a sound base for new coatings.
You’ll test surface pH, rinse thoroughly, and make certain residue removal before repainting.
Follow these steps:
- Apply neutralizer per label, scrub gently.
- Rinse until runoff is clear.
- Dry and recheck surface pH; repeat if residues persist.
How to Soften and Remove Paint With Heat Tools
Use a heat gun or infrared heater to soften old, cracked paint so you can scrape it away more cleanly and with less effort. Aim heat, work in small sections, and peel softened paint with a scraper. Wear gloves and a respirator, and ventilate the area.
| Tool | Use | Safety |
|---|---|---|
| heat gun | quick softening | gloves |
| infrared heater | deep heating | respirator |
| scraper | remove flakes | ventilation |
| brush | tidy edges | eye protection |
Repair Underlying Wood Rot, Rust, and Moisture Damage
After you strip away flaky paint with heat, inspect the substrate for wood rot, rust, and moisture damage before you repaint. Address issues promptly so repairs hold.
- Remove rot pockets, cut out affected wood, treat surrounding area.
- Wire-brush and neutralize rust, replace compromised metal.
- Install or repair moisture barriers and make certain proper drainage before finishing.
Clean and Prime Stripped Surfaces for Best Adhesion
Start by thoroughly cleaning every stripped surface so primer can bond properly. You’ll remove dust, oil, and salts, then perform adhesion testing and address moisture mitigation before priming. Use a clean tack cloth and a mild detergent rinse; let surfaces dry fully.
| Step | Tool | Result |
|---|---|---|
| Clean | Cloth/sponge | Debris-free |
| Test | Tape test | Verify bond |
| Dry | Fans | Ready to prime |
| Seal | Primer | Long-lasting adhesion |
Choose the Right Primer and Paint After Stripping
Now you’ll pick a primer and paint that match the stripped surface and the job conditions, ensuring adhesion, durability, and the finish you want.
Choose products that provide a moisture barrier and stain blocking where needed.
Consider:
- Primer type: oil, latex, or shellac for stains.
- Paint finish: flat to gloss for wear.
- Compatibility: primer-to-paint bonding and surface porosity.
Common Mistakes That Make Paint Fail Again
If you skip proper surface prep, the new paint won’t bond and will peel again.
Using cheap primers or paints cuts short the coating’s lifespan and invites failure. Fix the substrate and choose quality materials to make your work last.
Skipping Proper Surface Prep
When you skip prepping the surface—failing to remove loose paint, dirt, or mildew—you’re setting up the new coat to fail quickly.
You’ll also invite adhesion problems from poor planning or a rushed application. Fix it by cleaning, sanding, and priming properly:
- Remove loose paint and debris.
- Clean mildew and contaminants.
- Apply suitable primer and allow full cure.
Using Low-Quality Materials
You’ve prepped the surface properly, but cheap supplies can undo that work fast.
If you use cheap brushes and inferior primers, paint adhesion and finish suffer. Invest in quality brushes, rollers, and a proper primer to seal and bond surfaces.
Skimping saves money now but guarantees flaking, uneven coverage, and faster failure—so choose reliable materials for lasting results.
Troubleshooting: Paint Keeps Peeling – What to Try Next
Because paint keeps peeling for a few common reasons, you can narrow the cause quickly by inspecting the surface, the paint type, and the conditions during application.
Check these next steps to stop peeling and restore adhesive bonding and humidity control:
- Remove loose paint, sand, and clean.
- Prime with appropriate adhesion primer.
- Repaint when temperature and humidity are within manufacturer specs.
Frequently Asked Questions
Can I Remove Cracked Paint From Antique Furniture Without Reducing Its Value?
You can, but play it safe: consult a conservator to respect conservation ethics and preserve historical finish. Don’t rush; use reversible, minimal interventions so you won’t unknowingly erase provenance or lower the piece’s value.
How Do I Dispose of Paint and Chemical Waste Legally and Safely?
You’ll follow municipal guidelines: label containers, store hazardous disposal separately, never pour chemicals down drains, and use local household hazardous waste events or licensed disposal services. Keep records and transport materials per local regulations to stay compliant.
Will Removing Cracked Paint Release Hazardous Fumes Outdoors at Night?
An old proverb says, “Better safe than sorry.” You won’t usually get hazardous fumes outdoors at night, but you should guarantee night ventilation and fume dispersion by staying upwind, using masks, and avoiding disturbed lead-based paint.
Can Pet-Safe Alternatives Be Used for Stripping Paint Around Animals?
Yes — you can use non toxic strippers and pet safe masking; you’ll choose low-odor, biodegradable products, ventilate well, keep animals distant, wipe surfaces thoroughly, and dispose residues safely to protect pets and air quality.
How Long Should I Wait After Priming Before Moving Heavy Objects Back?
Think of primer as a bridge: you should wait until dry time is fully reached—usually 24–48 hours—then respect load limits for cured strength; if uncertain, give 72 hours so heavy objects won’t damage the finish.