How to Remove Dog Urine Stains From Painted Walls for Good
Act fast: blot fresh urine with paper towels, don’t rub, then apply an enzymatic cleaner to break down odor molecules and blot again. Rinse lightly, dry thoroughly, and repeat until the smell’s gone. For set-in stains, clean, sand damaged paint, prime with a stain-blocking primer, and repaint or replace saturated drywall or trim. Seal with a quality paint to prevent reabsorption. Follow-up training and deterrents will stop repeats, and below you’ll find step-by-step fixes and tips.
Who This Guide Is For & How to Use It
Who’s this guide for? You’re a dog owner dealing with persistent wall stains who wants practical, safe cleaning techniques and insight into dog behavior to prevent repeats.
You’ll find clear steps for evaluating damage, choosing products, and prepping surfaces, plus tips to modify habits that cause marking.
Use this as a focused reference before tackling treatments or consulting pros.
Quick Fix: Remove Dog Urine From Painted Walls
If you catch fresh urine on painted walls, act fast and blot the area—don’t rub, or you’ll spread the stain and push it into the paint.
Use paper towels or a clean cloth to soak up as much as you can, then apply an enzyme cleaner according to the label to break down odors and stains.
Let the product sit, blot again, and repeat if needed until the spot’s gone.
Act Fast Immediately
When you spot fresh urine on a painted wall, act fast to prevent staining and lingering odor: blot up any moisture with paper towels or a clean cloth, working from the outside of the spot inward to avoid spreading it.
Your immediate response matters—treat the area with a mild cleaner suited for paint.
Cleaning urgency reduces staining and long-term odor; then ventilate the room.
Blot, Don’t Rub
1 quick and careful blotting can save your paint finish: press a clean paper towel or cloth onto the spot and lift—don’t rub—so you absorb urine instead of spreading it or driving it deeper into the paint.
Use gentle blotting techniques, replacing soaked layers until the area’s damp, not dripping.
Ignore rubbing myths; rubbing spreads stains and damages the finish, so keep it gentle.
Use Enzyme Cleaner
Because enzyme cleaners break down urine at the molecular level, you’ll remove both stains and odors instead of just masking them.
Choose a pet-specific product; test a hidden spot first. Spray generously, follow label dwell time for enzyme effectiveness, then blot excess.
Repeat if needed. Rinse lightly and dry. Proper cleaner application prevents re-marking and keeps paint intact.
Why Dog Urine Keeps Staining Paint and Drywall
When you keep smelling urine after cleaning, it’s usually because odor-causing compounds penetrate paint and primer layers.
Many paints and primers don’t seal well against ammonia and salts, so stains reappear or bleed through.
Plus, drywall’s paper and gypsum soak up moisture, creating hotspots that hold odor and discoloration.
Persistent Urine Odor
If your home keeps smelling like urine even after you clean, it’s usually because dog urine soaks into porous surfaces—paint, drywall, and the wood behind them—and leaves behind ammonia and uric acid crystals that keep releasing odor over time. You need targeted urine retention testing and odor neutralization methods to remove embedded residues.
| Source | Problem | Fix |
|---|---|---|
| Paint | Absorbs | Clean/seal |
| Drywall | Wicks | Replace/encapsulate |
| Wood | Holds | Sand/neutralize |
| Insulation | Traps | Remove/replace |
| Baseboard | Hides | Inspect/clean |
Paint And Primer Issues
Although paint looks like a sealed surface, many common paints and primers are porous or chemically reactive enough that dog urine can still penetrate, discolor, and break down finishes.
You’ll learn that paint durability varies widely; low-quality eggshells or flat paints absorb odors and stains.
Proper primer selection—stain-blocking, oil-based or shellac—creates a barrier and improves long-term resistance.
Drywall Absorption Zones
Paint and primer only protect the surface; urine that soaks through paint keeps migrating into the drywall’s inner layers and keeps causing stains and odors.
You’ll need to find saturation zones, cut out contaminated drywall, and replace or treat studs.
Proper drywall repair includes sealing with moisture barriers and using enzymatic cleaners before patching.
Otherwise, odors return as residues wick back through new paint.
Spotting Fresh vs. Set-In Urine: Signs & Tests
When you spot a stain on the wall, quick assessment can tell you whether it’s fresh or set-in and guide your cleanup approach; fresh urine usually looks wet or glossy, may still smell sharp, and can feel slightly tacky.
In contrast, set-in stains are duller, often discolored, and carry a lingering, musty odor even after drying.
Use fresh detection tests—blot with paper, sniff carefully—to judge stain longevity and choose treatments.
Health and Safety Risks of Untreated Urine on Walls
If you leave dog urine on walls, it can release ammonia and other fumes that irritate your eyes, nose, and lungs.
Untreated stains also encourage bacterial growth and can attract pests, increasing infection risk.
Cleaning promptly reduces these respiratory and microbial hazards.
Respiratory Irritation Risks
Because urine contains ammonia, bacteria, and organic compounds, untreated stains on walls can release odors and irritants that make breathing uncomfortable or worse for people with asthma or sensitivities.
You should address stains promptly to protect respiratory health and guarantee cleaning safety.
Use ventilated rooms, wear a mask if sensitive, and choose cleaners that neutralize odors without harsh fumes to reduce irritation risks.
Bacterial Growth Hazards
Along with irritating fumes, untreated urine creates a damp, nutrient-rich spot where bacteria thrive, raising infection risks for anyone who touches contaminated surfaces or breathes in aerosolized pathogens.
You should act fast to stop bacterial growth and limit health risks.
- Wear gloves and ventilate.
- Clean with enzyme cleaner.
- Discard contaminated materials promptly.
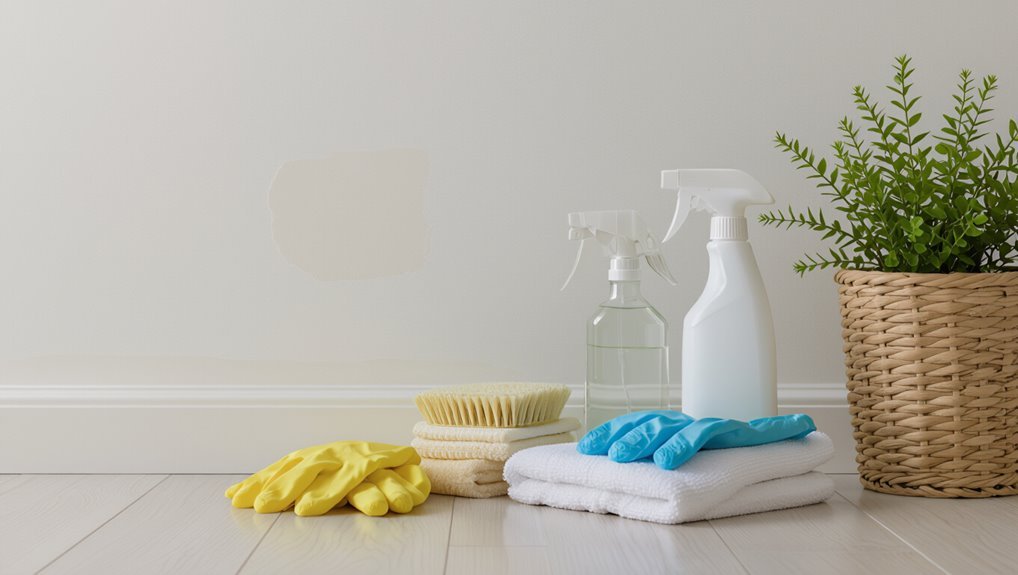
Tools and Supplies You’ll Need for Effective Removal
You’ll want a short list of reliable supplies before you start: gloves, absorbent cloths or paper towels, a mild detergent, an enzymatic cleaner formulated for pet urine, a soft-bristled brush or sponge, and a spray bottle or bucket for rinsing.
Collect cleaning tools and targeted stain removers, plus a towel for drying.
Have ventilation, a trash bag, and optional protective eyewear ready.
Cleaners Safe for Painted Walls (And Which to Avoid)
Use a gentle pH-neutral cleaner on painted walls to lift urine without stripping the finish.
Don’t use bleach or ammonia-based products, since they can discolor paint and react with urine to create strong fumes.
Always test any cleaner on an inconspicuous spot first to make sure it won’t damage the paint.
Gentle pH-Neutral Cleaners
1 key rule when cleaning painted walls is to choose a pH-neutral, nonabrasive cleaner so you won’t strip paint or dull the finish.
You’ll get pH neutral benefits and gentle cleaning without damage.
Follow simple options:
- Mild dish soap diluted in water
- Commercial pH-neutral wall cleaner
- Microfiber cloth with gentle cleaner
Test a hidden spot first.
Avoid Bleach And Ammonia
While strong cleaners like bleach or ammonia can seem like quick fixes, they’ll often damage painted walls by stripping color, dulling sheen, and weakening finishes—so don’t reach for them.
Instead, use gentle, pH-neutral products and enzyme cleaners designed for pet messes. That protects paint and prevents odors that reinforce unwanted dog behavior.
Choose proven cleaning techniques and follow label directions carefully.
Test Spots First
After steering clear of bleach and ammonia, you’ll want to spot-test any cleaner before treating a visible stain.
Use these test spot techniques for safe testing and paint protection:
- Apply a tiny amount behind furniture, wait 10 minutes.
- Blot—don’t rub—to check color lift or softening.
- Rinse and inspect after 24 hours; proceed only if unchanged.
How to Test Cleaner Compatibility on Your Paint
Before you apply any cleaner to a visible spot, test it on a hidden patch of the same paint to make sure it won’t dull, peel, or bleed through.
Try different cleaner types—mild detergent, vinegar solution, enzymatic cleaner—apply, blot, wait 15 minutes, then inspect for color change or texture shift.
Record results to confirm paint compatibility before full use.
Treating Fresh Dog Urine: Step-by-Step
Now that you’ve confirmed a cleaner won’t harm the paint, tackle fresh urine right away to prevent staining and odor.
Use these quick wall cleaning techniques for fresh stain prevention:
- Blot excess with paper towels, don’t rub.
- Apply mild cleaner, test edge first, blot again.
- Rinse with damp cloth, dry fully to stop lingering odor and damage.
Treating Old Dog Urine Stains and Odor: Step-by-Step
Start by identifying the full extent of the damage—follow the odor with your nose (or a UV light) to locate all affected areas, then assess whether the urine has soaked into drywall, trim, or baseboards so you can choose the right cleaning and repair steps.
For old stains, prioritize urine detection, remove surface paint or damaged drywall, clean and neutralize odors, then perform stain removal and repaint or replace affected materials.
Enzymatic Cleaners: Why They Work and How to Use Them
One essential tool for removing old dog urine stains and odors is an enzymatic cleaner, because it uses live enzymes and beneficial bacteria to break down urine’s proteins, urea, and ammonia at the molecular level rather than just masking the smell.
You should follow simple cleaning techniques and trust enzyme effectiveness.
- Pre-test paint.
- Saturate stain.
- Let sit per label.
Using Vinegar Solutions Safely on Painted Walls
Before you grab the vinegar, test a diluted solution on an inconspicuous spot to make sure the paint won’t soften or discolor.
Use a mix of one part white vinegar to four parts water for most painted surfaces, and never apply full-strength vinegar.
If the test spot looks fine after a few minutes, proceed cautiously and blot rather than scrub.
Test Spot First
How can you safely use a vinegar solution on painted walls without damaging the finish? You’ll use test spot techniques to check colorfastness and sheen—test spot importance matters.
Do this in an inconspicuous area, wait 10–15 minutes, then inspect.
- Pick hidden spot.
- Apply small dab.
- Rinse and dry, then compare.
Dilute Vinegar Properly
After you’ve confirmed the paint holds up in a hidden spot, dilute vinegar properly so it cleans without harming the finish. Use a mild dilution ratio (1:3 vinegar to water) to test vinegar effectiveness, dab gently, then rinse. Keep ventilation on and avoid prolonged soaking.
| Mix | Use | Note |
|---|---|---|
| 1:3 | Test | Gentle |
| 1:1 | Stain | Stronger |
| Water only | Rinse | Finish safe |
When and How to Use Baking Soda for Odor Control
When you want to neutralize lingering urine smell, baking soda is a simple, effective option you can reach for; it absorbs odors rather than just masking them.
Use baking soda effectiveness with these odor absorption methods:
- Sprinkle on dry area, wait 15–30 minutes.
- Vacuum thoroughly.
- Repeat after cleaning solution dries to guarantee full neutralization.
Hydrogen Peroxide and Ammonia Alternatives: Pros and Cons
While hydrogen peroxide and ammonia can both tackle pet urine stains, they behave very differently and you should know the trade-offs before you use them: you’ll find cleaning alternatives like enzyme cleaners safer for odor removal, while peroxide bleaches and ammonia can lighten paint or react dangerously if mixed.
Prioritize chemical safety, test a hidden spot, ventilate, and follow label instructions to avoid damage.
Removing Urine From Textured or Semi-Gloss Surfaces
If your walls have texture or a semi-gloss finish, you’ll need a gentler, more targeted approach because those surfaces trap urine in crevices and show cleaning marks more easily.
Use these steps for textured surfaces and semi-gloss finishes:
- Blot with microfiber, avoid scrubbing.
- Apply diluted enzyme cleaner, work into crevices.
- Rinse gently, air-dry, repeat if odor remains.
Removing Urine From Flat or Matte Painted Walls
Because flat and matte paints absorb moisture and show fewer sheen variations, you’ll need a careful, low-abrasion approach that removes urine without disturbing the finish. You should blot, use mild enzyme cleaner, rinse lightly, and pat dry. Remember flat paint challenges and matte finish considerations when testing first.
| Step | Action | Tip |
|---|---|---|
| 1 | Blot | Use paper towel |
| 2 | Test | Small area |
| 3 | Clean | Enzyme solution |
| 4 | Rinse | Damp cloth |
| 5 | Dry | Air or pat |
Dealing With Urine That Soaked Into Drywall or Baseboards
If urine soaked into your drywall or baseboards, start by evaluating the damage to see how far the contamination goes.
You’ll likely need to cut out and replace any saturated drywall or trim, then clean and deodorize the surrounding area.
Once repaired and odor-free, seal and repaint to prevent future absorption.
Assess The Damage
Start by inspecting the affected area closely to determine how far the urine penetrated—surface stains, soaked paint, damp drywall, or saturated baseboards all require different approaches.
You’ll perform a quick damage assessment to note discoloration, soft spots, odors, and overall wall condition.
Then follow these steps:
- Check texture and firmness.
- Smell for lingering urine.
- Mark affected boundaries.
Remove Contaminated Material
Cut away any drywall or baseboard that’s soft, crumbling, or holds odor—these materials won’t reliably clean up and will keep smelling even after treatment.
Remove affected sections down to dry, solid material, bag and dispose safely, and replace with new drywall or trim.
Document the repair for prevention strategies and future stain removal reference so you can avoid repeat damage and speed restoration.
Deodorize And Seal
When urine soaks into drywall or baseboards, you’ll need to neutralize odor-causing compounds and then seal the area to prevent recontamination; cleaning alone won’t stop lingering smells or future discoloration.
Use targeted deodorizing techniques, then apply sealing methods to lock residues in.
- Enzymatic cleaner: saturate, wait, blot.
- Dry thoroughly with fans.
- Prime with stain blocker, then paint.
When to Remove and Replace Damaged Drywall or Trim
If urine has soaked into the drywall or trim so that stains, odors, or soft spots remain after cleaning, you’ll need to remove and replace those sections to fully resolve the problem.
Perform a trim assessment and inspect studs, insulation, and adjacent paint.
Choose drywall replacement for crumbled or odorous panels.
Cut out affected areas, dry surrounding material, and install new trim and drywall promptly.
Stain-Blocking Primers: When to Use Them and Recommended Products
Because pet urine can leave persistent stains and odors that bleed through paint, you’ll want a true stain-blocking primer before repainting—especially on repaired drywall or new trim.
Because pet urine can stain and seep through paint, use a true stain-blocking primer before repainting.
Use products with stain blocking benefits and follow primer application steps.
Recommended choices:
- Shellac-based primer
- Oil-based stain killer
- High-hide latex primer
Apply thin coats, dry fully between layers.
Repainting Over Treated Areas Without Odor Return
Before you paint, make sure the urine odor is fully neutralized using an enzymatic cleaner so the smell doesn’t come back.
Then seal the area with a stain-blocking primer to lock in any remaining residue.
Finish with a durable topcoat to protect the repair and keep the wall looking fresh longer.
Ensure Odor Is Neutralized
When you’re ready to repaint, make sure the urine odor’s truly gone so it won’t return through fresh paint; sealing over lingering ammonia will only trap and later release the smell.
Use odor neutralization techniques, not effective scent masking. Do this:
- Apply enzymatic cleaner thoroughly and let it dwell.
- Rinse and dry completely.
- Smell-test repeatedly before painting.
Use Primer For Seal
If the odor’s truly gone, seal the spot with a stain-blocking primer so residual molecules won’t leach through new paint.
Primers formulated for smoke, grease, or pet stains create a barrier that locks in any remaining discoloration and prevents odor recurrence.
Choose primer types suited to your surface, follow recommended sealing techniques—thin, even coats—and let it cure fully before repainting to avoid odor return.
Apply Durable Topcoat
Choose a high-quality, semi-gloss or satin topcoat designed for kitchens and bathrooms—these finishes resist moisture, are easy to clean, and help lock in any remaining odor you’ve already sealed with primer.
You’ll apply durable finishes and protective coatings to prevent odor return.
- Clean surface
- Roll thin coats
- Cure fully before use
Quick Fixes to Stop Dogs Marking Walls
Though it can feel frustrating, you can stop your dog from marking walls quickly by interrupting the behavior, cleaning scent thoroughly, and redirecting them to appropriate spots.
Use preventive measures like blocking access and applying deterrent scents.
Block access to tempting spots and try safe deterrent scents to discourage indoor marking.
Employ clear training tips: catch acts early, give a firm no, lead them outside, reward success.
Clean with enzyme cleaners to remove odor.
Long-Term Behavior Strategies to Stop Wall Marking
Develop a consistent plan and stick with it: long-term success comes from changing the reasons your dog marks, not just reacting to each incident.
Use behavior modification and environmental enrichment to reshape habits. Create a routine:
- Reward calm, appropriate elimination.
- Increase play, toys, and mental puzzles.
- Remove triggers and reinforce boundaries.
Stay patient, consistent, and track progress daily.
Crate, Leash, and Schedule Adjustments That Reduce Accidents
Once you’ve settled into a consistent routine and reduced triggers, adjust containment, walking habits, and daily timing to cut down on accidents. Use crate training for supervision; shorten unsupervised time. Strengthen Leash discipline on walks to prevent sudden marking. Shift potty times earlier or after activity.
| Action | Benefit |
|---|---|
| Crate training | Fewer unsupervised accidents |
| Leash discipline | Controlled outings, less marking |
Cleaning Routine to Keep Walls Fresh and Odor-Free
When you spot a fresh mark, act quickly: blot moisture with paper towels, then treat the area with an enzymatic cleaner to break down urine proteins and stop odors at the source.
Act fast on fresh marks: blot moisture, then use an enzymatic cleaner to eliminate urine proteins and odors.
Keep a simple routine focusing on cleaning frequency and regular wall inspection:
- Weekly quick wipe with mild cleaner.
- Monthly deep enzymatic treatment.
- Immediate spot-check after accidents to prevent odor.
Best Paint Finishes and Formulations for Easy Cleaning
When you’re choosing paint to make cleanup easier, finish matters: eggshell gives a subtle sheen but satin and semi-gloss stand up better to scrubbing.
You’ll find semi-gloss is the most durable for high-traffic or pet-prone areas, while satin balances washability with a softer look.
Also look for stain-resistant or washable formulations labeled for kitchens and bathrooms to repel urine and simplify cleanup.
Eggshell Vs. Satin
Pick eggshell if you want a soft, low-sheen finish that hides wall imperfections and wipes up occasional marks.
But choose satin if you need a more durable, higher-sheen surface that stands up to frequent cleaning and scrubbing.
You’ll compare eggshell finish vs satin sheen:
- Eggshell: gentler, hides flaws.
- Satin: tougher, resists stains.
- Cleaning: use mild detergent and soft cloth.
Semi-Gloss For Durability
Semi-gloss gives you the best balance of durability and cleanability for high-traffic areas prone to stains and scrubbing.
You’ll appreciate semi-gloss benefits when you wipe walls repeatedly; the finish resists moisture and holds up to mild cleaners.
Choose it for paint durability in hallways, entryways, and around pet areas so stains lift without damaging the surface or needing frequent repainting.
Stain-Resistant Formulations
If you’ve settled on semi-gloss for durability, the next step is to look at stain-resistant paint formulations that make cleanup even easier.
You’ll want options that boost stain prevention and resist odors. Consider these product recommendations:
- High-performance acrylic latex for washable walls.
- Silicone-modified paints for repellency.
- Anti-odor, stain-blocking primers under topcoat for best results.
Pet-Safe Wall Coatings and Stain-Resistant Paints
When you’re choosing finishes for rooms with pets, opt for pet-safe, stain-resistant coatings that stand up to urine, scrubbing, and repeated cleanings. You’ll prefer eco friendly coatings and stain resistant paints labeled low-VOC and washable. Test samples, follow manufacturer prep, and seal edges.
| Feature | Benefit |
|---|---|
| Washable | Easy cleanup |
| Low-VOC | Safer air |
| Durable | Resists scrubbing |
| Sealer | Blocks stains |
How Humidity and Ventilation Affect Urine Odor Persistence
Choosing washable, low‑VOC, stain‑resistant coatings helps prevent stains, but air movement and moisture control play a big role in how long urine odors stick around.
You should focus on humidity control and ventilation strategies to dry walls and stop odors from setting.
- Increase airflow.
- Reduce indoor humidity.
- Dry affected areas quickly.
Using Air Purifiers and Deodorizers to Speed Odor Removal
Although air purifiers and deodorizers won’t fix stains, they can speed up odor removal by capturing airborne molecules and masking residual smells while you clean and dry the wall.
Use a HEPA or activated-carbon purifier to improve air quality and place enzymatic or alcohol-free deodorizers for odor neutralization.
Run devices during and after cleaning until the smell subsides.
When to Call a Professional Cleaner or Restoration Service
If the smell persists after you’ve cleaned and aired the room, it’s time to contemplate professional help.
Call a cleaner or restoration service if urine has soaked through paint or drywall and caused visible damage.
You should also get professionals involved when there are health or safety concerns, like mold growth or strong ammonia fumes.
Persistent Odor After Cleaning
When lingering urine smell won’t disappear after thorough cleaning, it’s time to contemplate a professional cleaner or restoration service; they’ve the tools and expertise to locate embedded odor sources in walls, insulation, and structural cavities that routine methods miss.
You’ll get advanced odor removal techniques and lasting lingering scent solutions.
Consider hiring for:
- Ozone or hydroxyl treatment
- Thermal drying
- Enzymatic deep-cleaning and sealing
Extensive Paint Or Drywall Damage
Persistent odor problems can signal deeper damage, but visible paint bubbling, peeling, or sagging drywall is a clearer sign you should call a professional cleaner or restoration service.
You should hire pros when stains penetrate layers, since they assess structural harm, recommend paint repair or drywall replacement, and use industrial cleaners and sealants to stop recurrence and restore appearance safely and effectively.
Health Or Safety Concerns
Wondering whether the mess is more than cosmetic? You should call a pro if you’re facing health risks or safety concerns beyond surface stains.
Consider:
- Strong ammonia smell or mold growth.
- Deep drywall saturation or structural weakening.
- Repeated incidents causing persistent odors or unseen contamination.
A restoration service will assess hazards, remove contamination, and restore surfaces safely.
Cost Estimate Checklist: DIY vs. Professional Restoration
Decide up front whether you’ll tackle the cleanup yourself or hire a pro, because each route has very different costs and trade-offs.
List supplies, time, and potential repainting for DIY; get quotes for inspection, odor removal, and restoration options from pros.
Do a clear cost comparison: include materials, labor, disposal, and warranties so you can pick the most practical, budgeted path.
Common Mistakes That Make Urine Stains Worse
Don’t grab random cleaners — harsh chemicals or ammonia-based products can set the stain and odor instead of removing them.
When you scrub instead of blotting, you push urine deeper into paint and drywall.
Learn which solutions and techniques actually lift the mess so you don’t make it worse.
Incorrect Cleaning Solutions
One common mistake is grabbing whatever cleaner’s on the shelf and scrubbing immediately, which can actually set the stain or spread the odor.
You should avoid incorrect products and common misconceptions; pick enzyme cleaners or mild detergents.
Follow these steps:
- Test cleaner on a hidden spot.
- Use enzyme cleaner per instructions.
- Rinse and dry thoroughly to prevent residue.
Rubbing Instead Of Blotting
While it might feel natural to scrub at a fresh urine spot, rubbing can push liquid deeper into paint, drywall, or trim and spread odor-causing bacteria. You should blot gently, not use aggressive rubbing techniques, to avoid permanent paint damage and staining. Use absorbent cloths and proper cleaners to lift urine without sanding or repainting.
| Action | Result |
|---|---|
| Scrubbing | Spreads urine |
| Blotting | Removes surface |
| Aggressive rubbing | Paint damage |
| Gentle blot | Less odor |
| Proper cleaner | Prevents reoccurence |
How to Remove Yellow Discoloration Left by Urine
Since urine pigments can soak into paint and primer, you’ll need to act deliberately to lift the yellow without damaging the wall.
Understand urine chemistry so you choose safe cleaners and test a hidden spot.
Follow steps:
- Dab with a mild detergent solution, then rinse.
- Use a diluted hydrogen peroxide spot treatment briefly.
- Prime and repaint if staining persists for proper wall maintenance.
Tackling Urine Odors That Return After Cleaning
If odors keep coming back after you clean, they’re probably coming from urine that’s soaked into porous materials or hidden crevices you missed.
To stop the smell for good, you need to locate and treat every contaminated surface and neutralize the urine’s ammonia and bacteria.
Use enzyme cleaners, follow odor elimination techniques like deep extraction and ventilation, and combine with effective cleaning methods to prevent recurrence.
Cleaning Multiple Incidents: How to Treat Repeated Spots
When spots keep appearing, start by identifying the exact odor sources so you know whether the issue is surface-level or soaked into the wall.
Treat each affected area with a quality enzyme cleaner to break down urine proteins and stop dogs from re-marking.
If odors persist after treatment, you’ll need to check for hidden saturation inside the wall cavity or baseboards.
Identify Odor Sources
Because repeated accidents often leave hidden residues and lingering odors, you’ll need to track down every source before treating new spots.
Use odor detection methods and inspect common odor sources:
- Walls, baseboards, behind furniture.
- Carpet seams, padding, vents.
- Hidden cushions, pet beds, closets.
Document findings, mark spots, and plan targeted cleaning so you don’t miss any lingering smell.
Use Enzyme Cleaners
1 simple, effective step is to apply an enzyme cleaner to every affected area so you break down the organic matter that keeps odors returning.
Treat each spot thoroughly, follow dwell times, and blot—don’t scrub.
Track enzyme effectiveness by noting odor return and test products side-by-side for cleaner comparisons.
Reapply as needed after drying, then seal or repaint once odors are gone.
Pet-Specific Factors That Influence Marking Behavior
Although every dog can mark, individual factors like age, sex, reproductive status, and temperament shape how and why they do it. You should watch for cues and respond accordingly.
- Age: puppies mark more during learning phases.
- Sex/reproductive status: intact animals show stronger marking behavior.
- Temperament: anxious or dominant dogs use marking more to express territorial instincts and stress.
How to Document Damage for Renters or Insurance Claims
When you’re dealing with urine stains on walls as a renter, documentation is the first line of protection for deposits and claims—so act quickly, thoroughly, and objectively.
Photograph stains with date-stamped images, note locations, take close-ups and wide shots, and save repair receipts.
Log communications with your landlord or insurer.
Clear damage documentation protects your deposit and shows you met renter responsibilities.
Eco-Friendly Cleaning Options That Still Work
If you prefer greener solutions, you can tackle dog urine stains with common, non-toxic ingredients that still get results.
Use eco friendly alternatives and biodegradable cleaners to protect paint and air quality.
Try these steps:
- Blot with paper, dilute with water.
- Apply vinegar solution briefly, rinse.
- Finish with baking soda to neutralize odor, vacuum when dry.
DIY Enzymatic Cleaner Recipes That Are Effective
Eco-friendly options are great for light spots, but for stubborn urine you’ll want enzymes that break down proteins and neutralize odor at the source.
You can mix simple homemade solutions using natural ingredients: water, a bit of liquid castile soap, and a commercial enzyme powder or yeast-based starter.
Apply, let sit per product directions, blot, and air-dry to fully neutralize.
How Long to Wait Before Repainting
Before you repaint, make sure the wall is completely dry and odor-free—typically that means waiting 24 to 72 hours after treatment for light to moderate urine stains, and up to a week for heavy saturation or multiple treatments.
Check by touching the surface, sniffing for odor, and using a moisture meter if you have one.
- Assess Surface preparation needs.
- Apply stain-blocking primer.
- Use proper Repainting techniques.
Quick Emergency Fixes Before Guests Arrive
Once the wall’s dry and you’ve prepped as much as time allows, you can still make the room presentable in minutes with a few emergency fixes.
Blot remaining dampness, apply a quick enzymatic spray, and dab with a clean cloth.
Mask odor temporarily with baking soda or a fabric freshener.
These emergency solutions support fast guest preparation until full cleaning and repair.
Seasonal Considerations for Urine Odor and Stain Management
Because temperature, humidity, and seasonal routines change how urine smells and sets, you should adjust your cleanup and prevention strategies accordingly.
Temperature, humidity, and seasonal routines alter urine odor and setting—adjust cleanup and prevention strategies accordingly.
Consider seasonal humidity and temperature fluctuations when planning treatments and ventilation.
Follow simple steps:
- Increase ventilation in summer to reduce odor.
- Dry thoroughly in humid seasons to prevent staining.
- Monitor heating-season indoor dryness to avoid concentrated odors.
Recommended Cleaners and Tools: Brands and Picks
Seasonal adjustments affect which products will work best, so pick cleaners and tools that match your climate and the wall surface you’re treating. Choose enzyme cleaners, mild detergents, a soft brush, microfiber cloths, and consider eco friendly options; avoid cleaning myths like bleach for all stains. Test first on hidden paint.
| Tool | Purpose |
|---|---|
| Enzyme cleaner | Odor breakdown |
| Microfiber | Gentle wipe |
If Stains Persist: Targeted Troubleshooting Steps
If stains don’t lift with your first pass, don’t give up — try targeted troubleshooting to pinpoint the cause and choose the right follow-up treatment.
Use these concise troubleshooting tips for effective stain removal:
- Test cleaner on hidden spot to check paint reaction.
- Blot, don’t rub, and repeat enzyme treatment if odor remains.
- Sand and spot-prime only as last resort before repainting.
Final Checklist: Inspecting to Ensure Urine Is Gone for Good
Now that you’ve tried targeted fixes, do a final inspection to confirm the stain and odor are truly gone.
Walk the room, check under varied light, and smell at nose level and near baseboards. Use a blacklight for hidden spots.
Perform a thorough assessment of paint, caulk, and trim. If anything remains, repeat cleaning or seal and repaint as needed.
Frequently Asked Questions
Can Dog Urine Ruin Electrical Outlets or Wiring Inside Walls?
Yes—you can damage wiring and outlets: urine damage can corrode contacts and create shorts, so you should act fast, turn off power if soaked, and prioritize electrical safety by calling a professional to inspect and repair.
Will Pet Urine Attract Pests Like Flies or Rodents?
Yes — pet urine can attract pests like flies and rodents because its odor triggers urine detection by animals; you’ll want to clean thoroughly and deodorize so scent trails don’t promote pest attraction and repeat visits.
How to Prevent Landlords From Charging for Urine Damage at Move-Out?
Document incidents, fix stains promptly, and notify your landlord in writing; you’ll keep records, photos, and receipts to support pet deposit disputes. Use urine stain prevention measures, like training, covers, cleaners, and professional restoration if needed.
Do Urine Odors Trigger Smoke/Carbon Monoxide Detectors?
No, urine odors don’t trigger smoke or carbon monoxide detectors; you’ve got to investigate sensor types—ionization or electrochemical—since they detect particles or gases. Use urine detection products and odor elimination measures to prevent nuisance complaints.
Can Certain Dog Diets Alter Urine Smell or Staining Behavior?
Yes — you’ll notice dietary changes can alter urine acidity and odor; higher protein or certain supplements often increase smell and staining potential, while tailored diets and hydration usually reduce acidity, odor, and related discoloration risks.