How to Remove Mold From Back of Canvas Painting Without Damage
You can often remove mold from the back of a canvas without damage by working slowly with dry, gentle methods: wear an N95, lay plastic sheeting, test a small spot, then use soft brushes, a low-suction HEPA vacuum, and dry sponges to lift spores. Avoid bleach, keep moisture minimal, and stabilize any flaking paint before touching it. If mold is extensive, smelly, or returns, stop and consult a conservator — keep going for step-by-step guidance.
Quick Answer: Can You Safely Remove Mold From the Back of a Canvas?
Quick answer: yes—you can often remove mold from the back of a canvas, but you should proceed cautiously.
You’ll assess mold types (surface spores versus ingrained growth) and choose appropriate cleaning techniques like gentle brushing, low-moisture vacuuming, and targeted solvent swabs.
Work in a ventilated area, wear protection, test a small spot first, and stop if staining, fragility, or odor worsen.
When DIY Is Appropriate Versus Calling a Conservator
You can often handle light, recent mold on a canvas yourself if the fabric and paint feel stable, the growth is only on the surface, and the affected area is small; but there are clear signs that should make you stop and call a conservator.
Use DIY Techniques only for contained, non-invasive cases.
Seek Conservator Expertise for paint lifting, extensive spread, odors, or historical/value concerns.
Intended Audience and Guide Format
Who should read this guide and how it’s organized? You’re a homeowner, hobbyist, or small-gallery staffer—audience demographics include nonprofessionals with basic tools.
You’ll find stepwise sections, safety notes, and decision checkpoints for DIY versus pros. The guide’s layout boosts guide accessibility with clear headings, short procedures, and resource links so you can assess risk and act confidently without guessing.
Active vs. Inactive Mold on Canvas
After you’ve decided whether to attempt DIY treatment or call a conservator, the next step is to tell if the mold on your canvas is active or inactive.
You’ll check mold characteristics: fluffy, spreading, damp areas indicate active growth; powdery, dry spores suggest inactivity.
Understanding the mold lifecycle helps you choose immediate cleaning, isolation, or professional intervention to prevent recurrence.
Signs the Painting Itself Is at Risk From Mold
1 clear sign that your painting is at risk from mold is visible staining or discoloration that spreads beyond isolated spots. You should act fast with mold identification steps and consult conservation resources to protect surfaces. Early intervention preserves value and aids painting preservation.
| Sign | Action |
|---|---|
| Stains spreading | Isolate |
| Surface fuzz | Photograph |
When Mold Poses a Health Risk and When to Stop
If you or anyone around the painting starts coughing, wheezing, getting headaches, or experiencing persistent allergy-like symptoms, stop handling the artwork and move it to a well-ventilated area or out of the home if possible.
Take mold symptoms and health impacts seriously: if symptoms persist, worsen, or you’re immunocompromised, cease DIY attempts and seek professional remediation or medical advice immediately.
Tools and PPE You Actually Need Before Cleaning
Before you start, make sure you’ve got the right personal protective equipment—an N95 or better respirator, gloves, and eye protection—to keep spores off your skin and out of your lungs.
You’ll also need gentle cleaning tools like soft brushes, low-lint cloths, and a vacuum with a HEPA filter, plus appropriate mild cleaning solutions.
Know which materials to avoid—harsh bleaches, abrasive pads, and excess moisture can ruin the canvas and paint.
Personal Protective Equipment
Mold spores are airborne and can irritate your lungs, eyes, and skin, so you’ll want the right PPE: an N95 or P100 respirator, nitrile gloves, eye protection, and a disposable gown or apron to keep spores off your clothing.
Use PPE consistently to protect yourself while practicing mold prevention techniques and safe cleaning practices, disposing or sanitizing gear after each session.
Cleaning Tools Needed
Gather a handful of specific tools and supplies so you can work efficiently and safely: an N95 or P100 respirator and nitrile gloves (you already have these), soft natural-bristle and synthetic brushes, low-lint microfibers or cheesecloth, a vacuum with a HEPA filter and soft brush attachment, distilled water, mild conservation-grade detergent or ethanol for spot treatment, cotton swabs, blotting paper, and shallow trays to catch any runoff.
Use them carefully to support canvas preservation and mold prevention.
Materials To Avoid
You’ve already assembled the right protective gear and brushes, but you also need to know what to leave on the shelf: common household cleaners, wire brushes, abrasive sponges, bleach, and ammonia can damage paint layers or react dangerously with residues.
Don’t use strong chemicals or harsh tools; they hinder mold prevention and ruin surfaces. Stick to gentle cleaning techniques, soft brushes, and appropriate PPE.
Safe Workspace Setup to Protect You and the Painting
Start by choosing a well-ventilated, well-lit area where you can work flat—ideally a large table or workbench covered with clean, disposable sheeting.
Choose a well-ventilated, well-lit workspace—flat surface like a large table or bench with disposable sheeting.
Wear gloves, an N95 mask, and eye protection.
Keep tools, brushes, and cleaners organized for workspace organization.
Isolate the painting from other items, control humidity, and use gentle air circulation for mold prevention.
Dispose of contaminated sheeting safely.
How to Test a Small Spot Before Full Treatment
Before treating the whole painting, pick an inconspicuous area—like a corner or the stretcher edge—to test your method.
Apply your chosen cleaner or antifungal in a small patch and let it sit the recommended time.
Check for color change, paint lift, or fabric damage before proceeding with full treatment.
Choose An Inconspicuous Area
Pick a tiny, out-of-sight spot—like the back edge or stretcher bar—so you can test cleaning without risking visible damage; this lets you confirm how the paint and ground react before treating the whole canvas.
Choose an area that reflects typical soiling. You’ll assess effects, support mold prevention and canvas preservation, and decide whether the method is safe to use elsewhere.
Perform Patch Treatment First
Now that you’ve located an inconspicuous test spot, perform a patch treatment to see how cleaning agents and techniques affect the paint, ground, and canvas. You’ll try gentle patch techniques and simple treatment methods, observe for 24–48 hours, and document any changes before treating the whole painting.
| Step | Action | Note |
|---|---|---|
| 1 | Select spot | Corner or stretcher edge |
| 2 | Apply agent | Lowest strength |
| 3 | Blot gently | No rubbing |
| 4 | Wait | 24–48 hrs |
| 5 | Record | Photograph results |
Drying the Canvas: When and How to Reduce Moisture Safely
If your canvas feels damp or you can see raised paint or musty odors, start lowering moisture right away to stop mold growth from worsening.
You’ll use gentle canvas preservation techniques: move the painting to a dry, ventilated area, prop it upright, and avoid direct heat.
Employ gradual moisture control methods—dehumidifier on low and fans at a distance—to prevent cracking or paint lift.
Surface Cleaning First: Soft Brushing and Vacuuming Technique
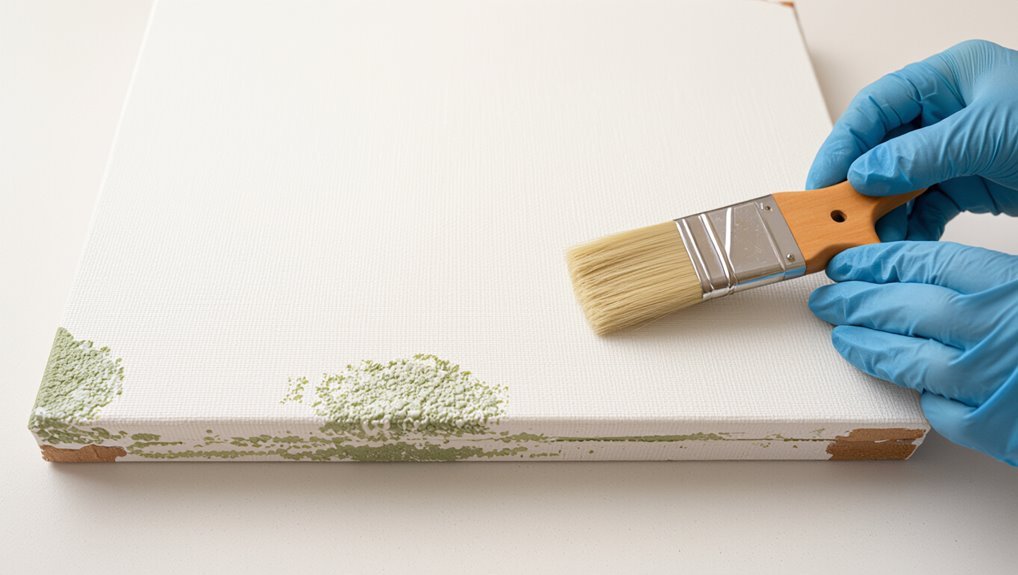
Start by gently dry-brushing the affected areas with a soft natural-bristle brush to lift loose mold without abrading the paint.
Follow with a low-suction vacuum fitted with a HEPA-filtered hose and a soft brush attachment to capture spores while keeping pressure minimal.
Wear a mask and use temporary protective masking (tissue or Mylar) around vulnerable edges to prevent accidental contamination.
Gentle Dry Brushing
Begin by taking your painting outside or to a well-ventilated area and gently dry-brush loose mold and dust with a soft-bristle brush, working from the center outward so you don’t grind particles into the paint.
Use gentle techniques and careful brush selection.
- Choose soft sable or synthetic brush
- Hold brush flat, light pressure
- Sweep outward strokes
- Inspect and repeat as needed
Low-Suction Vacuuming
Once you’ve loosened surface mold with a soft brush, move on to low-suction vacuuming to lift remaining spores without stressing the paint layer. You’ll test vacuum settings and keep suction strength minimal. Work slowly, nozzle just above fabric. Avoid contact; hold at an angle. Repeat short passes until spores stop appearing.
| Step | Action |
|---|---|
| 1 | Inspect |
| 2 | Set |
| 3 | Hover |
| 4 | Pass |
| 5 | Recheck |
Protective Masking Techniques
Now that you’ve loosened and lifted surface spores with gentle brushing and low-suction vacuuming, protect the rest of the painting and surrounding areas before moving on.
Use masking tape and protective sheets to isolate sections, and place adhesive barriers where needed for mold prevention.
- Edge off with low-tack masking tape
- Drape protective sheets
- Apply adhesive barriers
- Seal work area
Choosing the Right Brush and HEPA Vacuum Attachment
Because mold spores are delicate and your painting’s surface is fragile, you’ll want tools that remove growth without abrading the canvas or dislodging paint.
So choose both brush and HEPA attachment carefully. Use soft natural-hair or microfibre brushes—avoid stiff bristles—and test gently.
Select HEPA vacuum attachments with low-suction settings and soft collars to lift spores without touching paint or canvas fibers.
How to Isolate the Painting to Prevent Spore Spread
After you’ve loosened surface spores with a soft brush and low-suction HEPA attachment, keep them from drifting to other objects by isolating the painting before further cleaning.
Use these steps for mold prevention and spore containment:
Follow these steps to prevent mold spread and contain spores during painting cleanup.
- Move to a well-ventilated, empty room.
- Lay down plastic sheeting.
- Work over the sheeting with PPE.
- Seal removed debris in double bags and dispose.
Noninvasive Mold Cleaners That Are Safe for Canvas Backs
1 simple rule will keep you safe: choose cleaners that remove mold without soaking or weakening the canvas backing. Use gentle, noninvasive solutions like soft brushes, dry sponges, and light vinegar misting; consider eco friendly options such as diluted hydrogen peroxide alternatives. Test a small area first.
| Cleaner | Use |
|---|---|
| Dry sponge | Lift spores |
| Soft brush | Dislodge mold |
| Vinegar mist | Light treatment |
| Eco spray | Safe alternative |
Using Isopropyl Alcohol Correctly on Canvas Fibers
If you move from gentle tools to a disinfectant, isopropyl alcohol can be effective when used sparingly and with care.
You’ll focus on targeted isopropyl alcohol application to protect canvas fiber safety.
Follow steps:
- Test a hidden spot.
- Use 70% solution on a swab.
- Dab; don’t soak.
- Air dry away from heat.
When to Use a Mild Detergent Solution and How to Rinse
When mold staining has resisted gentle brushing or isolated isopropyl spot treatments, you can try a mild detergent solution to lift surface grime without damaging the canvas or paint.
Test a tiny area, use a soft cloth dampened (not soaked), blot gently, and follow with careful rinsing techniques—wipe with a clean damp cloth, then dry with airflow to prevent rewetting.
Applying White Vinegar Safely on Wood Stretcher Bars and Canvas
After rinsing away detergent residue and letting the piece dry, you can use diluted white vinegar to address mold on wooden stretcher bars and stubborn surface spores on the canvas edge.
Apply sparingly, test a hidden spot, and protect painted faces. Focus on vinegar application for wood preservation and canvas edges.
- Dilute 1:4
- Blot, don’t soak
- Air dry fully
- Repeat if needed
Why Bleach Is Usually a Bad Idea for Canvas
You shouldn’t reach for household bleach on a painted canvas because its harsh chemicals can weaken fibers and strip protective coatings.
Bleach will often fade or alter pigments, leaving permanent discoloration and a weakened surface that’s prone to tearing.
Instead, you’ll get better results and preserve the painting by using gentler, conservation-minded methods like careful mechanical cleaning, diluted vinegar, or consulting a conservator.
Harsh Chemical Effects
Although bleach can seem like a fast fix, it often does far more harm than good on canvas paintings. You risk damaging fibers and causing unsafe chemical interactions that can worsen mold toxicity.
Consider safer steps you can take:
- Test small hidden area.
- Use mild detergent and water.
- Employ HEPA vacuuming.
- Consult a conservator for persistent mold.
Color And Fiber Damage
Bleach strips pigments and weakens canvas fibers, so don’t reach for it when you spot mold.
You’ll cause color fading and accelerate fiber weakening, compromising both paint and support.
Bleach can alter binders, lift paint layers, and make the canvas brittle, increasing risk of tears and long-term deterioration.
Avoid it to preserve original hues and structural integrity.
Safer Alternative Methods
A gentler, conservation-minded approach will protect both paint and canvas better than harsh chemicals, so don’t reach for household bleach when you find mold.
Use natural cleaners, eco friendly solutions, and safe solvents sparingly. Focus on canvas care and mold prevention with preventive measures.
Try these cleaning techniques and restoration tips:
- Soft brush
- HEPA vacuum
- Isopropyl wipe
- Controlled drying
Hydrogen Peroxide on Canvas: Pros, Cons, and Dilution
When you’re treating mold on a canvas, hydrogen peroxide can be a useful antiseptic because it kills many fungi without the harshness of household bleach; however, it isn’t universally safe for all paints or varnishes.
You should test a hidden corner first to assess hydrogen peroxide effectiveness, use a 3% solution diluted further if needed, and follow canvas preservation techniques to avoid pigment lift or varnish damage.
Dry Cleaning Sponges and Erasers: When to Use Them
If mold growth is light and dry, reach for a dry cleaning sponge or a soft art eraser before using liquids—you’ll remove surface spores and soot with far less risk of spreading moisture into the weave.
Use dry cleaning sparingly; test an inconspicuous spot.
Consider:
- Sponge effectiveness on soot
- Eraser options for paint layers
- Gentle strokes
- Cleaning limitations and when to stop
Mechanical Methods: Dry Sponges, Micro‑Scalpel, and Low‑Pressure Vacuuming
Before you reach for solvents, try mechanical methods that remove surface mold without wetting the paint.
Use a dry sponge for gentle blotting and lifting, a micro-scalpel for careful lifting of stubborn spots, and a low-pressure vacuum to capture spores as you work.
Each technique needs steady hands and patience to avoid abrasion or paint loss.
Dry Sponge Technique
Start by working in small, well-lit sections and use a soft, dry chemical sponge to lift surface mold without abrading the paint; you’ll hold the sponge flat and make gentle, repeated passes until the spores stop transferring.
For dry sponge application and mold removal effectiveness, follow steps:
- Test an inconspicuous area.
- Work outward from test spot.
- Replace sponge face frequently.
- Vacuum residue with low pressure.
Micro‑Scalpel Precision
While dry sponges remove loose mold, you’ll use a micro-scalpel for stubborn spots that cling to the paint surface.
Working with steady, feather-light strokes, you will lift colonies without gouging the canvas. You’ll employ micro scalpel techniques to target surface growth, holding the blade flat and moving at a low angle.
Precision cleaning means patience, proper magnification, and stopping whenever paint shifts.
Low‑Pressure Vacuuming
When loose spores and surface dust resist your dry sponge and micro‑scalpel work, use a low‑pressure vacuum to draw them away without stressing the paint or canvas; set the suction to the gentlest effective level, fit a soft brush or foam sleeve to the nozzle, and keep the tool moving so you never focus suction on one spot.
- Test suction on edge
- Hold nozzle off surface
- Move consistently across area
- Monitor for paint lift
Practice vacuum techniques for mold prevention and minimal intervention.
How to Treat Mold on Stretcher Bars Versus Canvas Fabric
Mold on stretcher bars and mold on the canvas itself need different approaches because the materials respond differently to cleaning and moisture; you’ll treat wood with surface cleaning and drying, while the fabric often requires gentler, localized methods to avoid damaging paint and ground layers.
You should remove loose spores from wood, dry thoroughly, apply mild biocide for wood, while testing solvents on canvas.
Use mold prevention strategies and canvas care.
Removing Mold From the Frame Without Harming the Finish
Because frames often have delicate finishes, you’ll want to remove mold with methods that clean without stripping varnish or paint.
Because frames often have delicate finishes, remove mold using gentle methods that won’t strip varnish or paint.
You’ll focus on frame protection and finish preservation. Follow steps:
- Dust gently with a soft brush outdoors.
- Test a mild detergent solution on an inconspicuous spot.
- Lightly dab mold with a barely damp cloth.
- Dry immediately and apply microcrystalline wax for protection.
Dealing With Stubborn Mold Stains Without Aggressive Scrubbing
Start by evaluating how deep the mold has penetrated the canvas so you know whether surface cleaning will suffice or you need a conservator.
Use gentle, pH-balanced cleaners and lightly dab with a soft swab to lift stains without saturating the fibers.
Take care to avoid aggressive scrubbing that can fray or distort the weave and worsen the damage.
Assess Mold Extent
1 clear assessment will tell you whether the dark spots are superficial surface growths or deeper stains that require professional treatment; gently inspect the paint and back of the canvas in good light.
Note texture (powdery, fuzzy, or embedded), and test a small area with a dry, soft brush to see if spores come away before attempting any wet cleaning.
- Record locations
- Note texture/type
- Use mold identification techniques
- Log canvas condition assessment
Gentle Cleaning Solutions
When surface scrubbing risks lifting paint, opt for gentle, low-moisture cleaning solutions that soften and lift mold without aggressive abrasion; you’ll typically use mild detergents, alcohol solutions, or enzyme-based cleaners applied sparingly with cotton swabs or soft brushes to work stubborn stains while protecting the paint layer and canvas.
You should test a small area, choose gentle solutions and safe alternatives, and blot—never rub.
Prevent Fiber Damage
Handle stubborn mold stains with techniques that protect the canvas fibers—don’t resort to vigorous scrubbing that can fray threads or lift paint.
You should focus on fiber protection and mold prevention using gentle methods and spot treatments.
Try these steps:
- Vacuum with a HEPA brush on low.
- Blot with alcohol-diluted solution.
- Use poultice to lift stains.
- Dry thoroughly in airflow to prevent recurrence.
How to Stabilize Flaking Paint Before Cleaning the Back
Before you clean the back of a canvas, you’ll need to secure any flaking or lifting paint so cleaning won’t dislodge it; stabilizing first prevents further loss and makes the whole treatment safer.
You’ll gently test affected areas, choose appropriate reversible adhesives, and apply minimal adhesive with fine brushes or syringes.
Use consolidation and stabilization techniques to reattach flakes, working under magnification and controlled humidity.
Steps to Consolidate Loose Canvas Fibers After Treatment
After treatment, you’ll first assess the fiber stability by gently testing for weakness or friability across the affected area.
Next, choose a conservation-grade adhesive that matches the canvas type and aging characteristics.
Finally, apply the adhesive sparingly and let it dry slowly under light pressure to reconnect loose fibers.
Assess Fiber Stability
Stability check: once you’ve removed visible mold and allowed the canvas to dry, examine the weave and paint interface for lifted or fraying fibers and any paint flaking that might’ve weakened the support.
Assess fiber integrity and overall canvas condition, then:
- Note loose threads.
- Pinpoint paint losses.
- Test small tension.
- Photograph areas for records.
Choose Conservation Adhesive
Now that you’ve documented loose threads and paint losses, you need an adhesive that will securely consolidate fibers without harming the canvas or altering the paint surface.
Choose conservation techniques that favor reversible, inert materials. Test compatible adhesive types on a swatch, evaluating flexibility, aging, and solubility.
Select the least invasive option and note concentration and application method for future care and documentation.
Apply And Dry Gently
Begin by working steadily and with a light touch: apply the chosen adhesive in thin, controlled amounts to the areas of loose canvas using a fine brush or syringe, keeping the paint surface protected and avoiding saturation.
Then gently consolidate and dry to achieve gentle drying and moisture reduction:
- Blot excess adhesive
- Place breathable support
- Use low airflow
- Monitor humidity and time
Allowing the Painting to Dry After Cleaning: Best Airflow and Time
After you’ve gently cleaned the mold, let the canvas dry slowly in a well-ventilated, shaded area—fast drying can stress the paint and warp the fabric, while stagnant air risks lingering spores.
Use gentle air circulation tips: position a fan to create indirect airflow, avoid heat, and elevate the painting.
Expect a drying duration of 24–72 hours depending on humidity; check gently for residual dampness.
Monitoring for Recurrence in the First 6–8 Weeks
Once the canvas feels dry and stable, check it regularly over the next 6–8 weeks for any signs that mold is returning.
You’ll monitor surface, edges, and back; maintain humidity control; and act fast if you spot spots.
Follow these checks:
- Visual inspection under good light
- Smell test for mustiness
- Touch for dampness
- Record conditions and any mold growth
Quick Decision: When to Use a Conservator‑Approved Biocide
If the mold keeps returning, spreads into the ground layers, or the painting is valuable, you should call a conservator rather than try stronger chemicals yourself.
Using consumer biocides can bleach pigments, alter varnish, or leave residues that promote future growth.
A conservator‑approved biocide is worth it when the risks of DIY treatment outweigh the benefits.
When Professional Help Needed
When mold is widespread, has penetrated the paint or ground, or keeps coming back despite careful cleaning, you should call a conservator and consider a conservator-approved biocide.
They’ll assess the risk to the painting and choose a treatment that won’t harm pigments or varnish.
You’ll get professional guidance on:
- Extent of contamination
- Appropriate biocide choice
- Stabilization steps
- Mold prevention and Artwork preservation
Risks Of DIY Biocides
Although it might seem faster and cheaper to reach for household disinfectants or DIY biocide mixes, those products can easily damage canvas, paint layers, and varnish—and they often don’t kill all mold spores.
You’ll face DIY Risks like staining, solvent migration, and hidden regrowth.
Use conservator-approved biocide only when advised; otherwise consider Biocide Alternatives such as controlled humidity, HEPA vacuuming, and professional cleaning.
How to Document Damage and Treatment for Records
Before you begin any cleaning, create a clear, dated record of the painting’s condition and every step you take, because accurate documentation protects the artwork and guides future care.
Before cleaning, make a dated visual and written record of the painting’s condition and every treatment step.
You’ll do a damage assessment and keep treatment documentation. Follow this checklist:
- Photograph overall and close details.
- Note materials, measurements, and locations.
- Log cleaning steps, products, times.
- Record environmental conditions and signatures.
Questions to Ask a Conservator Before Handing Over a Painting
Why are these questions important? You’ll confirm scope, timeline, and materials before handing over a painting.
Ask specific questions to ask about the conservator’s experience with mold, documented conservation techniques, proposed steps, and risk management.
Request references, condition reports, and insurance details.
Clarify who’ll handle transport, storage, and final approval so you stay informed and in control.
Cost Factors for Professional Mold Remediation of Artwork
When you’re budgeting for professional mold remediation, the primary cost drivers are the scope of damage to the canvas and any underlying layers.
Extensive mold, paint loss, or structural weakening will raise the price because they require more time and specialized interventions.
The remediation method selected—surface cleaning, localized consolidation, or full restoration—also determines labor, materials, and facility needs.
Scope Of Damage
Scope of damage determines most of the cost you’ll face for professional mold remediation of a canvas painting: surface-level mildew takes far less time and specialized treatment than deep-seated mold that has penetrated ground layers, varnish, or original paint.
Restorers will charge more when consolidation, inpainting, or structural repairs are required.
- Extent of penetration
- Paint/media sensitivity
- mold identification techniques and testing
- environmental factors and stabilization
Remediation Method Selected
Choosing the remediation method strongly influences cost because each approach—surface cleaning, solvent swabbing, localized varnish removal, or full conservation treatment—requires different materials, time, and specialist skill.
You’ll pay more when mold growth is extensive or embedded in fibers, or when delicate pigments need bespoke canvas care.
Ask conservators for itemized estimates and treatment goals before approving work.
Preventing Mold Return: Humidity and Storage Targets
Because mold thrives in damp, poorly ventilated spaces, you’ll reduce the chance of recurrence by keeping relative humidity around 45% (±5%) and maintaining consistent temperatures near 65–70°F (18–21°C).
Use humidity control and practical storage solutions to protect canvases.
- Monitor RH with a hygrometer.
- Run dehumidifiers as needed.
- Guarantee steady airflow.
- Inspect regularly for spikes.
Choosing Storage Materials That Resist Mold Growth
When you store canvas paintings, pick acid-free, breathable materials like unbuffered paper and cotton sleeves to prevent chemical damage and trapped moisture.
Use packing that allows air exchange rather than sealed plastic, and include silica gel or other desiccants to keep humidity controlled. Those choices help stop mold before it starts and make future inspections easier.
Acid-Free, Breathable Materials
1 simple rule will keep many paintings safer: store them in acid-free, breathable materials.
You’ll prevent mold with mold resistant materials and proper archival storage.
Consider these items for packing and shelving:
- Acid-free paper interleaving
- Archival boxes
- Breathable cotton covers
- Aluminum or wooden racks
Use materials that let air circulate while blocking acids and dust.
Controlled Humidity Packing
Keeping humidity steady is the single most important step you can take when packing canvas paintings to resist mold.
You should use silica gel packets, breathable archival wraps, and ventilated storage to maintain humidity control and prevent condensation.
Seal packs in vapor-resistant boxes only when paired with desiccants, monitor RH with a gauge, and rotate inspections for effective mold prevention.
How to Hang and Display Paintings to Reduce Mold Risk
Although humidity and airflow are the biggest factors in mold growth, how you hang and display a painting can make a real difference; position canvases where air can circulate behind them, avoid direct contact with damp walls, and keep them out of basements or bathrooms.
Proper hanging matters: allow airflow behind canvases, avoid damp walls, and keep paintings out of basements or bathrooms.
Use proper hanging techniques and monitor display conditions:
- Use spacers for airflow.
- Hang away from dampness.
- Avoid uninsulated exterior walls.
- Keep frames slightly tilted for drainage.
Seasonal Maintenance Routine to Keep Mold Away
When seasons change, set a simple routine you can follow every few months to inspect and protect your canvas paintings from mold; a short checklist keeps small issues from becoming permanent damage.
Check for musty odors and damp spots, monitor seasonal humidity with a hygrometer, rotate and air canvases, wipe frames, use breathable protective coverings, and document conditions so you catch problems early.
Common Mistakes That Cause More Harm Than the Mold
Don’t scrub a painting like it’s a floor—too much abrasion can lift paint and damage the canvas.
Don’t soak the artwork either; excess water can swell the canvas, loosen glue, and spread spores.
Instead, use minimal moisture and gentle techniques to remove mold safely.
Scrubbing Too Aggressively
Scrub too hard and you’ll strip paint, tear canvas fibers, or push mold spores deeper into the work.
You should use gentle mold removal techniques and follow strict cleaning precautions. Don’t improvise force.
Consider these safer choices:
- Soft brush, light strokes
- Cotton swab, minimal solvent
- Vacuum with HEPA, low suction
- Consult a conservator before more action
Using Excess Water
You’ve just learned to use gentle tools and restraint; now watch how much moisture you introduce.
Don’t douse the canvas—excess moisture soaks fibers, weakens glue, and invites mold growth behind paint layers.
Use minimal dampness on a cloth, work in small areas, blot instead of rubbing, and dry thoroughly with airflow.
Controlled moisture prevents bigger damage than the original mold.
Case Studies: Successful DIY Mold Removals and Lessons Learned
1 clear case shows how a small, steady approach can save a cherished canvas: you follow careful mold removal techniques learned from conservation experiences, and the painting survives.
You’ll:
- Isolate and assess damage
- Dry gently
- Brush spores with soft tools
- Monitor over weeks
These steps let you act confidently, learn from outcomes, and avoid rushed mistakes.
Supplies Checklist: What to Buy for Safe Canvas Mold Cleanup
Before you start, gather a compact kit of essentials so you can work safely and efficiently: protective gear (N95 or P100 respirator, nitrile gloves, safety goggles), soft brushes and microfibre cloths, a HEPA-filtered vacuum or small handheld with HEPA attachment, blotting paper or clean absorbent towels, pH-neutral conservation soap, 70% isopropyl alcohol for spot testing, and sealable plastic bags or containers for contaminated materials.
Also buy archival tape, cotton swabs, a gentle sponge, a humidity meter, and a spray bottle. Choose supplies supporting mold prevention strategies and conservation techniques.
Quick Troubleshooting: What to Do If Stains or Odor Persist
What if stains or a lingering musty smell don’t disappear after your initial cleaning? Act promptly with targeted mold persistence solutions and odor removal techniques:
- Re-clean with a mild enzyme cleaner.
- Gently blot stains; avoid scrubbing paint.
- Air-dry in sunlight or using dehumidifier.
- Consult a conservator for stubborn discoloration or pervasive odor.
Insurance and Legal Steps for Valuable or Historic Works
If you own a valuable or historic canvas, take immediate steps to document damage and notify your insurer—time limits and policy terms can affect coverage.
You’ll need insurance coverage confirmation, a professional value assessment and appraisal process, and clear records of historical significance.
Address legal considerations, restoration rights, conservation ethics, and liability issues before any treatment so you protect provenance and future claims.
Further Reading and Trusted Conservation Resources
When you’re ready to dive deeper, consult trusted conservation texts, museum guidelines, and professional organizations that set standards for safe mold treatment and restoration.
You’ll find practical conservation techniques and mold prevention strategies. Start with:
- AIC (American Institute for Conservation) resources
- National museum conservation departments
- Peer-reviewed conservation journals
- Specialized restoration handbooks for canvas care
Frequently Asked Questions
Can Mold Spores on the Paint Surface Transfer to Other Artworks During Transport?
Yes — mold spores on paint can transfer to other artworks during transport, so you should isolate infected pieces, use sealed packaging, and follow mold prevention and art preservation practices to protect surrounding works and prevent cross-contamination.
How Long Should a Treated Painting Be Quarantined Before Returning to Collection Storage?
Like a sigh of relief, you should quarantine treated paintings for 2–4 weeks to guarantee spores are gone; this quarantine duration supports collection care, and you’ll monitor humidity, inspect regularly, and document before returning.
Are There Insurance Claims Tips Specific to Mold Damage on Fine Art?
Yes — you should review insurance policies, document damage thoroughly, get a professional mold assessment, notify insurers promptly, keep quarantine and treatment records, and preserve receipts and conservation reports so your claim’s stronger and quicker to resolve.
Can Household Dehumidifiers Used Long‑Term Harm Old Canvases?
Yes — if you’re careless. Picture creeping salt stains, warped stretcher bars, subtle paint crazing. You’ll avoid that by combining canvas preservation techniques with steady humidity control methods, monitoring levels, and using gentle, museum‑grade dehumidifiers.
Is It Safe to Use Odor‑Neutralizing Sprays on Mold‑Affected Paintings?
No, you shouldn’t—sprays can harm pigments and canvases. You should address mold prevention first, remove active growth safely, and use odor absorption methods like charcoal or baking soda instead of aerosol neutralizers on mold‑affected paintings.
Conclusion
You’ve done the careful work needed to coax your canvas back to calm—gentle cleaning, good airflow, and knowing when to call a conservator. Don’t beat yourself up over lingering spots; they’re reminders, not failures. If the piece is dear or valuable, let a professional take over so the memory it holds isn’t compromised. With steady hands and patience, you’ll help the painting breathe again and keep its story intact for years to come.