How to Spray on Wall Texture Like a Professional Painter
You’ll get pro-level results by choosing the right sprayer (airless for heavy texture, HVLP or texture gun for control), mixing compound to manufacturer ratios, and testing nozzle size and pressure on scrap. Prep the room, patch and prime, and wear a respirator and goggles. Spray with steady 12–18 inch distance, overlapping passes 30–50% and feathering edges while wet. Clean and lubricate the sprayer promptly. Keep going and you’ll pick up detailed tips and fixes.
What This Guide Covers and Who It Helps
Because you’ll be working with texture sprayers, patching compounds, and surface prep, this guide focuses on the practical steps, tools, and settings you need to spray consistent wall textures—plus troubleshooting tips for common problems.
You’ll learn texture application basics, equipment choices, mixing ratios, and masking techniques. These professional tips help you plan jobs, avoid mistakes, and finish walls that look uniform and durable.
Common Wall Textures: Knockdown, Orange Peel, Stomp
Now that you know what tools, mixes, and prep steps matter, it’s helpful to recognize the three most common wall textures you’ll spray: knockdown, orange peel, and stomp. You’ll learn the knockdown technique for subtle flattening, use orange peel for uniform dimpled finishes, and try stomp for bold, raised patterns. Practice matching sprayer settings and pressure.
| Texture | Purpose |
|---|---|
| Knockdown | Subtle flattening |
| Orange Peel | Dimpled finish |
| Stomp | Raised pattern |
Choose the Right Texture for Your Room and Surface
Texture matters: pick one that fits the room’s purpose, lighting, and the surface condition you’re covering.
You’ll weigh texture styles—subtle orange peel for modern spaces, knockdown for hiding flaws, or stomp for character.
Consider surface compatibility: smooth drywall needs different prep than patched plaster.
Choose a texture that complements function, hides imperfections appropriately, and matches the room’s visual scale.
Choose the Right Sprayer and Essential Tools
Now you’ll pick the right sprayer for your texture—airless, hopper, or HVLP—so you match output and finish to the job.
You’ll also want must-have accessories like extension hoses, different nozzles, and a pressure regulator to keep things consistent.
I’ll explain which tools suit common textures and how to set them up.
Sprayer Types Explained
Choosing the right sprayer can make or break your wall-texturing project, so you’ll want to match the tool to the job before you start. Know sprayer types and sprayer features: HVLP for control, airless for heavy texture. Pick nozzle size and pressure. Compare options:
| Type | Best for |
|---|---|
| HVLP | Fine control |
| Airless | Thick textures |
| Texture gun | Fast coverage |
Must-Have Accessories
Once you’ve picked a sprayer that fits the job, gather the accessories that make the job faster, cleaner, and more consistent.
You’ll need gear that aids texture application and simplifies equipment care. Prioritize ease and durability.
- Tripod or hoist for steady spray
- Extension hoses and nozzles
- Protective tarps and masks
- Cleaning kit and spare filters
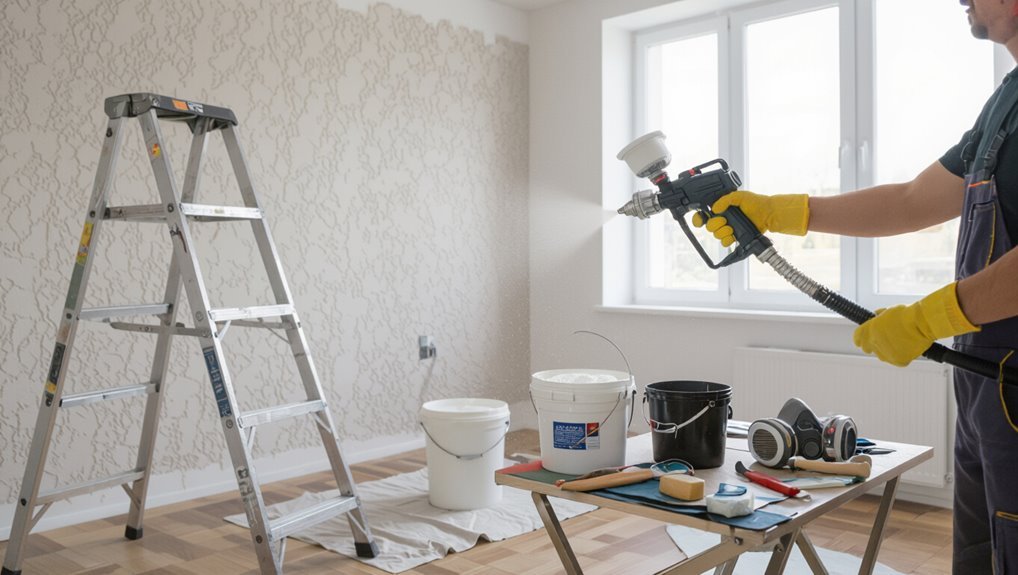
Safety Gear Checklist and Room Prep Steps
Before you spray, gear up and prep the room so you stay safe and avoid costly cleanups.
Wear safety equipment: respirator, goggles, gloves, ear protection, and coveralls.
Turn off HVAC, remove or cover furniture, tape trim, and hang plastic sheeting.
Organize pathways and designate a ventilated staging area.
Keep a fire extinguisher and first-aid kit nearby.
Prepare Drywall and Repair Defects
Before you spray, inspect the drywall for cracks, water stains, and soft spots so you know what needs fixing.
Patch holes and seams quickly with joint compound or spackle, then let them dry and sand smooth.
Finish by priming repaired areas so the texture adheres evenly.
Inspect For Damages
While you’re prepping to spray, walk the entire surface and look closely for dents, nail pops, cracks, or soft spots that’ll telegraph through any texture you apply.
Do a thorough damage assessment and wall inspection, noting areas that need sanding or reinforcement before texturing.
- Mark defects
- Check for moisture
- Tap for hollow spots
- Verify fastener security
Patch Holes Quickly
Grab your putty knife and a handful of materials—you’re about to make the surface smooth and sound so texture goes on evenly.
For quick patching, remove loose debris, press lightweight filler into holes, and level it flush.
Use small backing for larger gaps, apply successive thin layers, and keep tools clean.
These efficient repairs prevent texture defects and speed up the next steps.
Sand And Prime
Smooth the repaired areas with fine-grit sandpaper until seams and filler blend seamlessly with the surrounding drywall; aim for a flat, even surface so texture won’t highlight low or high spots.
- Use proper sanding techniques to feather edges.
- Vacuum and tack cloth dust away.
- Choose primer types suited to drywall and patching.
- Apply thin, even primer coats; dry fully before spraying texture.
Mix Texture: Ratios, Thinning, Rest Time
Before you load the hopper, get your texture mix right: follow the manufacturer’s base-to-water ratio, thin gradually if needed, and let the mixture rest so trapped air and dry particles settle.
Use proven mixing techniques—stir slowly to avoid bubbles, check texture consistency against a sample board, and adjust water in small increments.
Rest 5–15 minutes, then skim off foam before spraying.
Load and Prime Your Texture Sprayer
Start by pouring your rested texture mix into the hopper until it’s about two-thirds full to leave room for agitation, then secure the lid and check all seals.
Start by pouring the rested texture mix into the hopper about two-thirds full, secure the lid, and check seals.
Follow these steps to load and prime efficiently:
- Inspect hoses and fittings for clogs.
- Set pressure low, increase slowly.
- Run material until flow is steady.
- Flush and clean after use.
Apply texture application techniques; follow sprayer maintenance tips.
Pick Nozzle Size and Spray Pattern for Each Texture
You’ll match the nozzle to the texture type—smaller tips for fine knockdown or orange peel, larger ones for heavy popcorn.
Pick a spray pattern shape (round, fan, or oval) that gives the coverage and edge control you need.
Start with a mid-size tip and adjust gradually until the texture lays out correctly.
Match Nozzle To Texture
Picking the right nozzle size and spray pattern makes the difference between a smooth, consistent wall texture and a blotchy, overworked finish.
You’ll focus on nozzle selection for texture consistency—match tip diameter to material thickness and surface. Use testing to confirm.
- Small tip — thin knockdown
- Medium — orange peel
- Large — heavy popcorn
- Adjust pressure, test samples
Choose Spray Pattern Shape
1 key decision when choosing a spray pattern is matching the fan width and angle to the texture you’re after—narrow, concentrated patterns give more definition for knockdown, while wide, even fans cover faster and suit orange peel or popcorn.
You’ll test spray patterns on scrap, adjust overlap and distance, and watch how different passes create distinct texture effects so you get consistent, controlled results.
Adjust Tip Size Gradually
Start by testing progressively larger tips so you can see how each nozzle changes droplet size, coverage, and texture.
You’ll make sprayer adjustments methodically to achieve consistent results and texture consistency.
Try these steps:
- Begin with a fine tip for light texture.
- Move to medium for balanced coverage.
- Use large tips for heavy knockdown.
- Record pressure and pattern for repeatability.
Set Air Pressure and Pump Speed for Even Coverage
When you set the air pressure and pump speed correctly, the texture material atomizes evenly and lays down a consistent pattern across the wall.
You’ll check sprayer settings, then make gradual pressure adjustments while pumping a test patch. Increase pump speed for heavier texture, reduce pressure to tighten the spray.
Lock settings once coverage looks uniform to avoid sputtering or overspray.
Spray Technique: Stance, Distance, and Motion
With your sprayer dialed in and a test patch that shows even coverage, focus on how you hold and move the gun—stance, distance, and motion make the pattern consistent across the wall.
With your sprayer set, concentrate on grip, stance, and steady motion for uniform coverage.
You’ll control spray patterns and texture consistency by steady posture and measured motion.
- Feet shoulder-width
- Elbow relaxed
- Maintain 12–18 inches
- Smooth, even sweep
Overlap, Pass Spacing, and Timing to Avoid Seams
Keep each pass overlapping the previous one by about 30–50% so the texture blends and you don’t get visible ridges.
Move at a steady pace and start the next pass while the material is still wet enough to feather into the last coat.
If you wait too long or rush, seams will show—so time your passes for consistent coverage.
Overlap Width Guidance
Because seams show up where coverage is uneven, you’ll want to overlap each spray pass far enough to blend textures but not so much you puddle the compound.
Use consistent overlap techniques and maintain spray consistency.
- Aim 30–50% edge overlap.
- Keep gun speed steady.
- Watch wet edge boundaries.
- Feather final pass lightly to blend.
Optimal Pass Timing
Although timing feels subtle, it’s what prevents visible seams—so plan your passes to overlap consistently, space each pass to let the texture lay just enough to meld, and avoid long pauses that let edges dry before you blend.
Use ideal timing in your application techniques: maintain steady speed, stagger pass spacing slightly, and work wet-on-wet so you can feather edges and keep seams invisible.
Step‑By‑Step: Spraying Orange‑Peel Finish
Start by preparing your spray gun, compressor, and masking so everything’s within reach and the room’s protected—this will keep you moving smoothly through the process.
Use texture techniques and application tips:
- Thin compound per manufacturer specs.
- Adjust nozzle and pressure for fine mist.
- Test spray on cardboard, tweak pattern.
- Spray even, overlapping passes; let texture set before light touch‑ups.
Step‑By‑Step: Spraying Knockdown Finish
Before you spray the knockdown finish, you’ll prep the wall, cover trim and floors, and mask off any areas you don’t want textured.
You’ll spray a heavy, even pattern and wait just long enough for the peaks to set but not fully dry.
Then you’ll use a wide knockdown knife at a shallow angle to flatten the peaks into the characteristic look.
Prep Wall & Masking
Once you’ve cleared the room and patched any holes, prepare the wall surface and mask adjacent areas precisely so overspray never becomes your problem.
Follow these concise steps:
- Clean walls for proper wall preparation.
- Sand rough spots and remove dust.
- Use quality tape application on trim and outlets.
- Cover floors, fixtures, and furniture tightly before spraying.
Knockdown Technique Timing
With masking complete and surfaces prepped, it’s time to get the knockdown technique right by nailing the timing between spray and knockdown.
You’ll wait for peaks to form but remain wet enough to flatten. Use consistent intervals, test on scrap, and adjust nozzle and air pressure.
These timing techniques preserve texture consistency and help you achieve an even, professional knockdown finish every time.
Feathering and Matching Existing Texture
When you’re blending new texture into existing walls, feathering is the technique that keeps the patch from standing out. It’s about softening the edges and matching the rhythm of the surrounding pattern so the repair disappears.
- Inspect pattern and spray pressure.
- Practice feathering techniques on scrap.
- Use light, overlapping passes for texture blending.
- Blend edges with a damp sponge and light touch.
Fix On‑The‑Fly Problems: Sagging, Splatter, Uneven Spots
After you’ve feathered and matched the texture, you’ll still run into on‑the‑fly problems like sagging, splatter, and uneven spots that can ruin the blend if you don’t correct them quickly.
After feathering and matching texture, fix sagging, splatter, and uneven spots immediately to preserve the blend.
For sagging solutions, scrape and retexture while damp; press excess into place with a knife.
Use quick splatter fixes—wipe fresh blobs, re-spray light.
Address uneven spots by blending edges and re-feathering immediately.
Fix Sprayer Issues: Clogs, Uneven Flow, Air Leaks
If your texture sprayer starts clogging, spitting, or losing pressure mid-job, stop and troubleshoot immediately to avoid ruining the finish.
Use sprayer troubleshooting techniques and regular maintenance routines to fix issues fast.
- Clear nozzle with solvent and soft brush.
- Check hose and fittings for air leaks.
- Thin material per manual to restore flow.
- Rebuild seals or replace worn parts.
Drying, Curing, and When to Sand or Paint
1 key to a professional-looking texture job is knowing exactly how long materials need to dry and cure before you sand or paint, because timing affects adhesion, appearance, and durability.
Check drying times for your compound, respect the curing process—often 24–72 hours.
Use light sanding techniques, remove dust, then follow painting tips: prime when fully cured and apply thin, even coats for best results.
Cleanup and Sprayer Maintenance Tips
When you finish spraying, don’t let compound dry in the gun—flush the sprayer immediately with the manufacturer-recommended solvent or water until runs are clear.
Then disassemble key parts for a deeper clean so buildup doesn’t clog nozzles or pits.
Disassemble key parts for a deeper clean to prevent buildup from clogging nozzles and pits.
- Rinse thoroughly using proper cleaning techniques.
- Brush and pick passages.
- Lubricate seals and o-rings.
- Follow sprayer storage guidelines in a dry, labeled case.
Cost vs. DIY: Save Money or Hire a Pro (Quick Checklist)
Although tackling wall texture yourself can shave a chunk off your budget, you’ll need to weigh materials, tool rental or purchase, time, and the learning curve against hiring a pro who brings speed and guaranteed results.
Quick checklist: estimate material and rental costs, compare with labor quotes for a clear cost comparison, factor cleanup time, and consider professional benefits like warranty, consistency, and faster completion before deciding.
Frequently Asked Questions
Can I Spray Texture Over Existing Paint Without Priming?
You can sometimes spray texture over existing paint without priming, but you’ll need proper spray techniques and to match texture types; clean, scuff, and verify the paint is sound—otherwise prime to guarantee adhesion and uniform finish.
Will Humidity Ruin the Texture Application?
Yes — high humidity can ruin the texture application: it slows drying, causes sagging or blistering, and weakens adhesion. You should monitor humidity effects to guarantee texture durability, choosing dry conditions and proper ventilation for best results.
Can I Texture Ceilings With a Ladder-Only Setup?
Yes — you can texture ceilings using just a ladder, but you’ll prioritize ladder safety and ceiling preparation: secure the ladder, clear fixtures, mask surfaces, inspect for damage, and work in manageable sections to maintain control and consistent texture.
How Long Before I Can Hang Fixtures on Textured Walls?
Right away: wait 24–48 hours for full cure; in humid or cool conditions you’ll want up to 72 hours. Like a knight checking armor, you’ll test adhesive strength and match fixture types before mounting.
Is Textured Paint Suitable for High-Moisture Rooms?
Yes — you can use textured paint in high-moisture rooms if you choose moisture resistant options and prioritize textured paint durability; you’ll need proper surface prep, waterproof primers, and good ventilation to prevent peeling and mold growth.
Conclusion
You’ve got the know-how to texture walls like a pro—now it’s time to act. Pick the right pattern for the room, suit up with safety gear, and use the proper sprayer and nozzle; practice first, troubleshoot clogs or uneven flow, and let coatings fully dry before sanding or painting. Clean and maintain your equipment to keep it working. Whether you DIY or hire help, a little patience turns messy moments into a masterpiece—your walls will thank you.