How to Take Off Command Strips Without Peeling Paint
You can remove Command Strips without peeling paint by pulling the adhesive tab straight down along the wall, keeping steady, even tension and avoiding any outward tugging that stresses the paint. If the strip resists, warm it with a hair dryer for 20–30 seconds from 6–8 inches away, or soften residue with isopropyl alcohol or vinegar on a cloth. Support heavy items, test a hidden spot for paint sensitivity, and keep tools ready — continue for tips on tricky surfaces and repairs.
Quick Answer: Remove Command Strips Safely
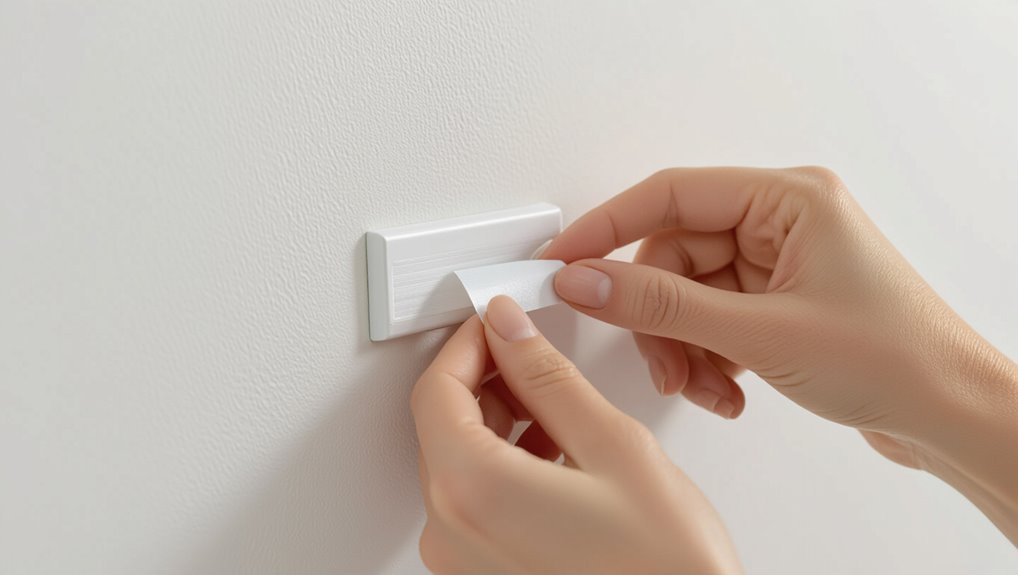
Start by gently pulling the tab straight down along the wall—don’t tug outward—so the adhesive stretches and releases.
You’ll keep tension steady, following removal techniques that respect adhesive properties. If it resists, warm the strip with a hair dryer to soften the adhesive, then continue pulling slowly.
Stop if paint seems to lift and reposition to reduce stress on the surface.
What You’ll Achieve: No Peeled Paint
You’ll keep your paint intact by releasing the adhesive slowly instead of yanking the strip off.
Move the tab along the wall to stretch the adhesive and avoid tugging at the paint edge. If you’re careful and steady, the paint will stay put.
Release Adhesive Slowly
Pull the tab slowly and steadily so the adhesive releases from the wall without taking paint with it; jerking or tugging can lift paint, especially on older or thin finishes.
Use gentle pressure, respect adhesive properties and strip lifespan, and follow removal techniques suited to wall types and paint finishes.
Consider environmental factors, surface preparation, weight limits, and adhesive strength to avoid damage.
Protect Paint Edges
When you remove Command Strips, work around the edges of the paint to prevent lifting—press a thin, flexible putty knife or a credit card along the seam while you pull the tab so the paint stays supported and intact.
For paint protection and edge sealing, do wall prep, consider paint compatibility, and apply careful strip application.
These maintenance tips focus on adhesive preservation, surface care, wall treatment, and damage prevention.
Quick Tools to Have on Hand
Have a few softening agents ready—like rubbing alcohol or a hair dryer—to loosen the adhesive without harming paint.
Keep safe removal tools on hand, such as plastic scrapers, dental floss, or a putty knife with a rounded edge.
With these items ready, you’ll make removal quick and low-risk.
Softening Agents
A few common softening agents can make Command Strip removal much easier: rubbing alcohol, white vinegar, and a commercial adhesive remover will loosen the bond without damaging most surfaces. You’ll match adhesive types to softening techniques, apply carefully, wait, then peel slowly.
| Agent | Use |
|---|---|
| Rubbing alcohol | Small spots |
| White vinegar | Mild glue |
| Goo remover | Stubborn glue |
| Warm water | Sensitive paint |
Safe Removal Tools
Gather a small kit of safe, effective tools before you start—this’ll make Command Strip removal quicker and reduce the chance of surface damage.
Include a plastic scraper, dental floss or fishing line for gentle sliding, a hair dryer for heat, and isopropyl alcohol for residue.
Match tools to removal techniques and adhesive types: softer tools for painted walls, firmer for trim, and always test a hidden spot first.
Why Strips Can Pull Paint
Because Command Strips rely on strong adhesive bonds, they can pull paint when the glue grips more firmly to the paint layer than the paint is bonded to the wall.
You’ll notice this with weak or old paint, certain paint types, or uneven surfaces.
Adhesive properties, drying time, and wall prep affect peel strength, so you should assess surface condition and proceed gently to avoid damage.
When Not to Remove Command Strips
If the paint on your wall is old, peeling, or has never fully adhered, don’t try to remove Command Strips—you’ll likely pull paint off with the adhesive.
Instead, consider Command strip alternatives or leave strips in place and secure items differently to avoid worsening flakes.
For wall damage prevention, patch and repaint first, or consult a pro before attempting removal to minimize risk.
How to ID the Exact Command Strip Type
Want to know which Command Strip you’re dealing with? Check the adhesive pad shape, color, and any printed labeling—those indicators help with identifying strip types.
Note whether it’s a picture-hanging, velcro-style, or heavy-duty variety.
Observe command strip features like thickness, backing paper, and removable tab presence to confirm type before removal, ensuring you use the correct technique.
Locate the Pull Tab and Its Pull Direction
Now find the thin fabric or plastic tab extending from the strip’s edge—it’s usually tucked beneath the mounted item or along the perimeter—and note which way the tab lies flat.
You’ll locate the pull tab and visually confirm the pull direction: it should be parallel to the wall.
Position your hand so you can grip the tab and pull straight down along that direction without tugging outward.
Prep: Clear Items and Protect Surfaces
Before you start pulling the tab, clear the mounted item and anything beneath it so nothing falls or gets damaged.
For proper surface preparation, remove nearby decor and cover furniture or floors with a drop cloth or towel.
Complete item clearance prevents scratches and simplifies access.
Clearing all nearby items prevents scratches and makes accessing the area much easier.
Keep tools and a trash bin close, and avoid leaning on the wall while you work.
Stabilize Heavy or Large Items First
Before you start pulling strips, stabilize any heavy or large item by propping it with a temporary support like a ladder, sawhorse, or a friend holding it.
Check the weight distribution so you don’t strain one side or yank the strips unexpectedly.
If the original anchors won’t work once the strips are removed, plan to replace them with proper wall anchors or hardware.
Secure With Temporary Support
If you’re removing Command Strips from a heavy or oversized item, stabilize it first so it doesn’t fall when the adhesive releases.
Prop the piece with a temporary support—step ladder, padded stool, or a second pair of hands—ensuring adhesive stability as you work.
Keep supports close to the mount, avoid shifting weight, and release strips slowly to prevent sudden movement or damage.
Check Weight Distribution
1. You should check weight balance and load distribution before pulling strips, stabilizing heavy or large items so stress won’t concentrate and peel paint. Use temporary supports, reposition hands, and work slowly to shift loads evenly.
| Item | Support Needed | Notes |
|---|---|---|
| Mirror | Yes | Two hands |
| Frame | Maybe | Use wedge |
| Shelf | Yes | Brace underneath |
Use Anchor Replacement
When you’re dealing with heavy or large items, swap the Command Strip anchors for a sturdier solution so the piece stays secure while you work; secure temporary supports or toggle anchors can take the load off the adhesive and prevent sudden shifts that might gouge paint or glass.
Use proper anchoring techniques, assess wall compatibility, and brace the item before removing strips to avoid damage.
The Best Method: Slow, Steady Low-Angle Pull
Start by gripping the Command Strip tab and pulling it straight down, keeping the strip as close to the wall as possible; that low-angle, steady pull stretches the adhesive and releases it cleanly without damaging paint.
- Use calm, steady motion.
- Keep pull angle low.
- Avoid jerks; maintain control.
- Finish slowly, inspect surface.
You’ll apply proven adhesive techniques and removal strategies.
How Much Force Is Too Much
Pulling slowly works, but you still need to judge how hard to tug: too little force won’t stretch the adhesive enough, and too much can yank paint or drywall paper.
Start gently, increase gradually until the strip slides without resistance. Watch for signs of paint lifting; stay below observed force limits tied to adhesive strength.
Stop and reassess if you feel sudden give or tearing.
If the Tab Is Damaged or Missing
If the plastic tab is torn off or missing, don’t panic—you can still remove the strip safely by working from the edges and using steady, controlled force.
Try these steps to avoid adhesive failure and protect paint:
Try these steps to prevent adhesive failure and safeguard paint when removing stuck strips.
- Pry gently from corners for extra support.
- Slide a thin card under the pad.
- Use alternative methods like dental floss.
- Consider replacement options or quick fixes for damaged tabs and wall protection.
Soften Adhesive With a Hair Dryer
A hair dryer can loosen Command Strip adhesive so you can peel the strip away without gouging paint; aim the warm air at the adhesive for 20–30 seconds, keeping the dryer about 6–8 inches away and moving it to avoid overheating one spot.
Use gentle hair dryer techniques to warm the adhesive properties, then peel slowly parallel to the wall.
Stop if paint softens.
Use a Heat Gun Safely (If Needed)
When a hair dryer doesn’t loosen the adhesive enough, consider a heat gun for stronger, concentrated heat—just take precautions.
If a hair dryer won’t cut it, a heat gun provides stronger, focused heat—use caution and proper safety.
You’ll want heat gun safety and effective techniques to avoid damage.
- Keep nozzle moving to prevent scorching.
- Hold 6–8 inches away from paint.
- Use low setting first, increase slowly.
- Wear gloves and eye protection.
Rubbing Alcohol and Adhesive Removers
Before using any solvent, test it on a hidden spot to make sure it won’t damage the finish.
You can apply isopropyl alcohol to a cloth and gently work the adhesive until it loosens.
Wipe away residue carefully and repeat as needed, avoiding harsh scrubbing.
Test On Hidden Area
Want to make sure rubbing alcohol or an adhesive remover won’t damage your wall finish? Perform hidden tests to gauge surface sensitivity before treating visible areas.
- Choose an inconspicuous corner.
- Apply a tiny amount of remover.
- Wait five minutes, then blot.
- Inspect for discoloration, softening, or sheen change.
If it passes, proceed cautiously; if not, try a gentler method.
Apply Isopropyl Alcohol
Apply a small amount of isopropyl alcohol to a clean cloth and gently rub the adhesive residue until it loosens—this solvent breaks down the glue without excessive scrubbing.
You’ll find isopropyl uses beyond cleaning; it evaporates quickly and won’t soak paint.
Work in small sections, reapplying sparingly to enjoy adhesive benefits while minimizing surface exposure, and stop if paint softens or discolors.
Remove Residue Gently
When residue refuses to lift with soap and water, reach for rubbing alcohol or a commercial adhesive remover and work slowly so you don’t damage the surface.
Use gentle techniques, testing a hidden spot first. Apply sparingly, let sit, then wipe away.
Steps:
- Blot alcohol on cloth.
- Test in corner.
- Rub gently across residue.
- Rinse and dry surface.
Gentle Alternatives: Oils and Soap
If you prefer to skip heat or solvents, oils and soap offer a safe, low-risk way to loosen Command Strip adhesive.
You can rub a few drops of essential oils or mild soap solutions onto adhesive residues, let sit a minute, then wipe gently.
Repeat as needed, using a soft cloth and gentle cleaning motions to avoid paint damage while removing sticky bits.
Use Dental Floss or Fishing Line to Separate Strips
Because the adhesive bonds along a thin seam, you can slice it apart cleanly with waxed dental floss or a length of fishing line; slide the floss behind the strip, hold both ends taut, and saw gently back and forth while keeping the floss close to the wall to avoid pulling paint.
Slide waxed dental floss or fishing line behind the strip, pull taut, and gently saw to separate adhesive from paint.
- Choose waxed floss or fishing line
- Pull taut
- Saw slowly
- Peel remaining adhesive with fingers using the floss technique
Removing Strips From Textured Walls
Before you pull, clear dust and loosen any paint chips around the strip so you won’t tear the texture.
Gently warm the adhesive with a hair dryer to soften it, then grab the tab and stretch it slowly along the wall, keeping tension parallel to the surface.
If the tab starts to resist, reapply heat and continue stretching in steady, controlled strokes.
Prepare Wall and Strip
Start by evaluating the textured surface and the strip: check how deep the texture is, whether the strip is bonded across peaks or just touching high points, and look for any paint lifts or cracks around the adhesive.
For proper wall preparation and strip selection, do this:
- Clean surface gently.
- Test a corner.
- Mark adhesive edges.
- Gather tools and a soft cloth.
Gentle Heat And Stretch
Now that you’ve checked the texture and tested a corner, apply gentle heat and slow, steady stretching to release the adhesive without damaging paint or peaks. Use a hair dryer for controlled heat application, combine with adhesive testing, and pull parallel to the wall.
| Tool | Action | Tip |
|---|---|---|
| Hair dryer | Warm strip | Low setting |
| Finger | Stretch slowly | Parallel pull |
| Cloth | Protect paint | Dab cool down |
Remove Command Strips From Satin, Eggshell, and Flat Paint
If your walls have a satin, eggshell, or flat finish, you can remove Command Strips without ruining the paint by pulling slowly and keeping the strip parallel to the wall. These finishes are more delicate than semi-gloss, so gentle, steady tension is key to preventing peeling or scuffs.
- Test paint compatibility on an inconspicuous spot.
- Use steady removal techniques.
- Watch for adhesive residues; wipe gently.
- Prioritize damage prevention for satin finishes, eggshell textures, and flat surfaces.
Remove Strips From Wallpaper and Vinyl Carefully
Because wallpaper and vinyl can tear or lift easily, you’ll need to remove Command Strips with extra care and patience.
Test a small corner first, assess wall type considerations, and pull slowly along the strip’s stretch direction. If resistance feels high, pause and warm the adhesive with a hairdryer for adhesive strength analysis.
Work incrementally to protect the surface and avoid sudden tugs.
When to Remove Strips in Stages for Large Mounts
For large mounts, you’ll often remove the strips in stages instead of pulling everything at once.
Start by releasing one side and supporting the weight as you go, then stagger the adhesive release so the item stays secure.
This method prevents sudden drops and makes removal safer and more controlled.
Remove One Side First
Start by removing the strips on one side of the mount first to reduce tension and prevent sudden shifts.
You’ll ease stress on the wall and mount by alternating sides. Consider removal techniques and adhesive types before you begin.
- Loosen one side slowly
- Test pull direction
- Watch for paint lift
- Proceed to opposite side carefully
Support Weight During Removal
If the mount is heavy or spans a wide area, support its weight before you pull any strips so it won’t suddenly drop and damage the wall or whatever’s attached.
You’ll maintain weight balance by bracing the item with one hand or using a prop.
Choose support methods like a second person holding it, a temporary shelf, or adjustable stands, then remove strips in stages safely.
Stagger Adhesive Release
Once you’ve got the mount supported, plan which strips to pull first so the load comes off gradually rather than all at once.
Use a staggered release to reduce stress on the wall and follow safe adhesive techniques. Pull each strip slowly, alternating sides.
- Identify strongest anchors
- Remove outer strips first
- Alternate sides
- Finish center strip
How Temperature and Humidity Affect Removal
Although temperature and humidity might seem like minor details, they considerably change how Command Strips stick and release, so you’ll want to check conditions before removing them.
Understand temperature effects and humidity impacts on adhesive behavior; consider environment considerations like seasonal changes and climate influence.
Assess wall conditions for dampness or heat, since these factors alter strip performance and determine whether removal will be clean and safe.
Prevent Paint Lifting: Small-Motion Techniques
Because paint can lift with sudden tugs, use small, controlled motions when stretching Command Strip tabs so the adhesive releases gradually and the paint stays put.
Use small, controlled motions when stretching Command Strip tabs so the adhesive releases gradually and paint stays intact.
You’ll use gentle techniques and careful handling to manage adhesive tension and surface tension after basic wall preparation.
- small movements
- slow release
- paint preservation
- gentle techniques
Dealing With Stubborn Adhesive Residue
When a strip leaves sticky residue, don’t scrape aggressively; instead soften the adhesive first so you can remove it without damaging paint.
You can warm the area with a hair dryer, then gently roll the residue away with a microfiber cloth.
For stubborn spots, apply a small amount of isopropyl alcohol or commercial adhesive removal, let it sit, then wipe.
Finish with residue cleanup and a dry cloth.
Immediate Patch: Quick Paint Touch-Ups
If you spot a small nick or thin adhesive outline after removing a Command Strip, act fast to keep the repair simple:
- Clean area with a damp cloth, let dry.
- Lightly sand rough edges for smooth blending.
- Use a matching quick paint in small quantities.
- Apply thin layers, feather edges with a damp brush.
These touch up techniques minimize visibility without full repainting.
Larger Repairs: Primer and Repaint Steps
Ready yourself for a slightly bigger job: larger gouges or adhesive stains usually need primer before repainting to guarantee even coverage and proper adhesion.
You’ll focus on surface preparation, sanding and cleaning to match wall texture, then primer application to seal repairs.
Choose paint selection to blend finish, follow drying times, and use precise repair techniques for seamless results.
Rehang Without Repainting: Best Practices
Before you rehang anything, check the mounting surface for remaining adhesive, paint chips, or soft spots so you know whether it can support a new fastener.
If the surface is sound, pick anchors that match the wall material and the weight of the item—light duty adhesive mounts for low weight, wall anchors or screws for heavier pieces.
Install the chosen anchors following manufacturer guidelines to guarantee a secure hold without repainting.
Inspect Mounting Surface
When you plan to rehang an item without repainting, carefully inspect the mounting surface for leftover adhesive, uneven paint, dents, or residue that could prevent strips from sticking properly.
You’ll assess mounting materials and surface conditions, then address issues.
- Clean residue
- Smooth dents
- Test adhesion
- Choose flat area
Choose Proper Anchors
Although you’ve prepped the wall and tested the adhesive, pick anchors that match the weight of the item and the wall material so your piece stays secure without repainting; choose anchor types by weight limits, wall compatibility, adhesive strength, installation surface, load capacity, and mounting options, and learn removal techniques to avoid damage.
| Anchor | Use |
|---|---|
| Plastic | Light |
| Toggle | Heavy |
| Molly | Medium |
| Adhesive | Temporary |
| Screw | Permanent |
Choosing Lower-Risk Command Strips Next Time
If you want fewer surprises next time, pick Command Strips that match the weight, surface, and finish of what you’re hanging. You’ll reduce damage and have options to avoid stronger alternative adhesives for delicate walls.
For future projects, consider:
- Match weight rating
- Check surface compatibility
- Choose paint-safe finish
- Test a small strip first
When to Call a Pro or Use Pro Products
Wondering whether to tackle stubborn Command Strip residue yourself or call in help? You should weigh risk assessment, cost analysis, and when necessary call for pro removal or expert advice. Use professional products and product recommendations when safe options fail. Consider pro removal benefits, seek expert advice, and pick trusted professional products.
| Fear | Relief | Action |
|---|---|---|
| Damage | Confidence | Call pro |
| Stress | Safety | Buy pro product |
Removal Checklist and Quick Troubleshooting Steps
Now that you’ve weighed when to call a pro and which professional products to try, you can move into a simple removal checklist and quick troubleshooting steps you can follow at home.
- Pull strip slowly, parallel to wall.
- Apply heat if adhesive resists.
- Use dental floss for stubborn spots.
- Clean residue with rubbing alcohol.
Follow these removal tips and troubleshooting techniques to avoid paint damage.
Frequently Asked Questions
Can Command Strips Damage Baseboards or Trim Differently Than Walls?
Yes—you’ll see more trim damage on narrow, delicate trim than on flat walls. You’ll protect baseboards with baseboard protection pads, remove strips slowly, and avoid pulling at angles that strain paint or wood surfaces.
Can I Remove Strips From Ceilings Without a Ladder?
Yes — you can remove strips from ceilings without a ladder. Picture yourself reaching with an extendable pole and soft hook; use removal techniques gently, mind ceiling considerations like texture and stability to avoid damage.
Are There Eco-Friendly Adhesive Removers Safe for Painted Surfaces?
Yes — you can use eco friendly options like citrus-based or plant-derived adhesive removers that’re safe for painted surfaces; test a hidden spot first, and consider adhesive alternatives like biodegradable tapes or water-soluble glues for future use.
Will Repeated Strip Use Gradually Degrade Paint Over Time?
Yes — repeated strip use can gradually degrade paint over time. You’ll risk reduced paint longevity from surface stress, and adhesive residue buildup can require cleaning that further abrades finish, especially on softer or older paint layers.
Can Pets or Children Accidentally Dislodge Strips and How to Prevent It?
About 30% of accidental pulls happen at floor level, so you’ll secure items higher, use pet-proof enclosures, reinforce strips, and keep fragile displays out of reach; prioritize pet safety and child supervision to prevent dislodging.
Conclusion
You’ve got this—remove Command Strips slowly, pull the tab straight down, and keep the adhesive warm to avoid ripped paint. Think of it like untangling a knot: patience wins. If paint starts to lift, stop and warm the strip or call a pro. Rehang using lower-tack strips and test first to protect your walls. Follow the checklist, and your walls will stay intact and picture-perfect—no repainting required.