How to Wash Dried Acrylic Paint Off Brushes Easily
You can soften and remove dried acrylic by soaking bristles in warm, soapy water mixed with white vinegar or isopropyl alcohol, then gently combing out softened paint with a brush comb or old toothbrush. Start with short soaks, check progress, and repeat; avoid letting solvent reach the ferrule. Use mild soap for synthetics, gentler cleaners for natural hair, and always work in a ventilated space with gloves. Keep at it and you’ll find tips for deeper restoration and care.
Quick Answer: Fastest Way to Soften Dried Acrylic on Brushes

1 simple trick works best: soak the brush in warm, soapy water mixed with a little rubbing alcohol or white vinegar to soften the dried acrylic quickly.
You’ll swish gently, let fibers relax, then comb bristles with your fingers or a brush comb.
This quick method supports Brush Care and Acrylic Preservation, restoring flexibility without harsh scraping or damaging the ferrule.
When You Can Restore a Brush : and When to Replace It
You can often restore a brush if the bristles are only stiff with dried acrylic and the ferrule isn’t clogged or bent.
Try soaking and gently combing the hairs; if they return to shape and hold paint evenly, it’s worth saving.
Replace the brush if bristles are frayed, permanently misshapen, or the handle/ferrule is loose or corroded.
When Restoration Is Possible
Restoring a dried acrylic brush is often possible if the bristles are intact, only slightly stuck together, and the ferrule isn’t clogged with hardened paint.
You can use gentle restoration techniques—soaking in brush cleaner, combing bristles, reshaping and conditioning—depending on brush types and value.
If cleaning restores spring and shape quickly, keep it; if not, consider replacing rather than prolonging damage.
Signs You Should Replace
Knowing when to replace a dried acrylic brush saves time and prevents ruined work, so look for clear, practical signs that restoration won’t cut it.
Replace brushes if bristles are permanently splayed, brittle, or shedding heavily, ferrules are loose or rusted, or the handle is warped.
Consider brush quality and brush types—cheap synthetics often aren’t worth salvaging, while high-quality brushes may justify deeper restoration.
How Acrylic Paint Dries and Why It Hardens Bristles
When acrylic paint dries, its water and solvent evaporate and the polymer particles coalesce into a hard film that binds pigment to the bristles.
So brushes quickly stiffen if paint’s left to cure on them. You’ll notice acrylic paint drying causes tacky residue, shrinking and film formation.
Those bristle hardening causes — resin consolidation and pigment embedding — make flexible restoration harder.
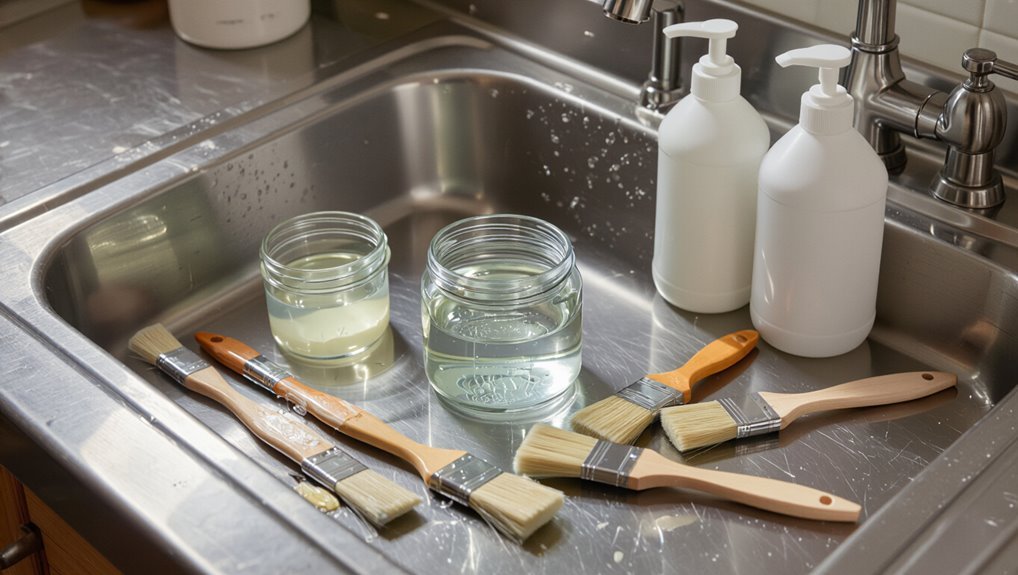
Tools and Supplies to Gather Before You Start
Now that you know how acrylic dries and why it hardens bristles, gather a few specific tools so you can tackle dried paint efficiently.
You’ll improve brush care, cleaning techniques, paint preservation, maintenance tips, drying prevention, brush materials, cleaning frequency, and storage methods with:
- Soft-bristle brush comb
- Mild soap or brush cleaner
- Small jar for soaking
- Lint-free cloth or paper towels
Household Cleaners That Dissolve Dried Acrylic on Brushes
Although dried acrylic can be tough, several common household cleaners will soften or dissolve it so you can restore brushes, and you don’t need exotic solvents to start.
Try warm soapy water, rubbing alcohol, vinegar, or a baking soda paste—these cleaning solutions break film gently.
Household paint removers like citrus-based gels can help, but test fibers first and rinse thoroughly after use.
Specialty Products That Remove Dried Acrylic Effectively
If DIY methods can’t revive your brushes, specialty removers offer targeted, faster results—formulated specifically to soften and lift cured acrylic without shredding bristles.
You’ll find professional specialty solvents designed for safe brush cleaning; follow label directions, ventilate, and test a small area.
- Gel solvent for concentrated action
- Spray for quick applications
- Soak kits with neutralizers
- Eco-friendly, low-odor options
Choosing the Right Solvent for Synthetic vs. Natural Bristles
When you pick a solvent, match it to your bristle type: mild soap or brush cleaner for synthetics and gentler solvents for natural-hair brushes.
Use stronger acrylic removers or acetone sparingly on stubborn dried paint, but only on synthetic filaments that can handle it.
Always test a small area first to avoid weakening natural bristles or loosening glue.
Solvent Types By Bristle
Because synthetic and natural bristles respond differently to cleaners, you’ll want to match solvent choice to brush type to avoid damage and get the best cleanup.
Focus on solvent compatibility and bristle care when selecting cleaners. Consider:
- Synthetic: mild soap, water-based cleaners
- Natural: gentle solvents, avoid harsh detergents
- Test first on a spare brush
- Rinse thoroughly after treatment
Solvent Strength Recommendations
Pick a solvent strength that matches your brush: lighter, water-based cleaners work best for most synthetic bristles, while tougher, oil-compatible solvents may be needed for natural-hair brushes that soaked up heavy-bodied acrylics.
You’ll choose among solvent types based on bristle compatibility, drying time and safety. Test on a single brush, start gentler, then step up strength only if residue persists to avoid damage.
Safety First: Ventilation, Gloves, and Safe Solvent Use
Before you start scrubbing, make sure you’ve set up good ventilation, grabbed chemical-resistant gloves, and chosen an appropriate solvent so you minimize health risks and protect your tools.
- Open windows and use a fan for ventilation tips.
- Wear nitrile gloves; avoid skin contact.
- Read solvent safety labels and follow instructions.
- Keep solvents sealed, stored away from heat and children.
Step-by-Step: Rehydrate Mildly Crusted Brushes in Water
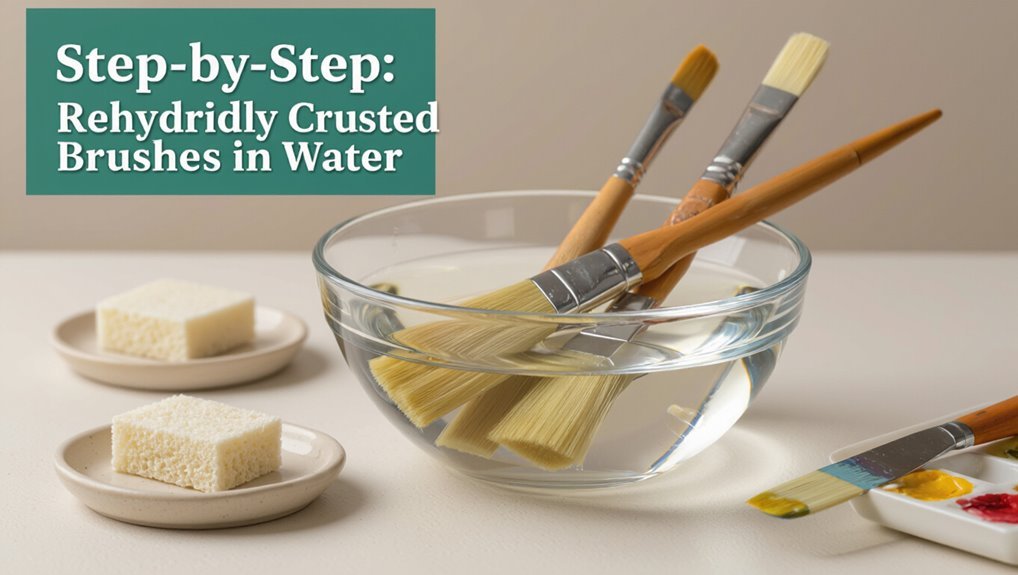
Start by soaking the mildly crusted brush in warm (not hot) water to soften the paint.
After a few minutes, gently work the bristles with your fingers or a soft brush comb to loosen softened flakes.
Rinse and repeat until the bristles move freely and no paint comes away.
Soak In Warm Water
Loosen dried acrylic by letting the bristles soak in warm (not hot) water for 15–30 minutes so the paint rehydrates without damaging glue or ferrules.
Use simple brush soaking techniques and enjoy warm water benefits as paint softens.
Then:
- Fill a cup with lukewarm water.
- Submerge bristles only.
- Check after 15 minutes.
- Change water if cloudy.
Gently Work Bristles
Gently flex the bristles with your fingers to coax softened paint out of the tips and gaps—work from the ferrule toward the tip to avoid pushing residue deeper into the brush. You’ll use gentle techniques and patient bristle care, rolling and lightly pulling paint away. Rinse, repeat, reshape, and air-dry to restore form and function.
| Calm | Hope | Relief |
|---|---|---|
| Soft | Restore | Clean |
| Patient | Repair | Ready |
Step-By-Step: Remove Moderately Dried Acrylic With Soap and Cleaner
Work through each brush methodically: rinse out as much softened paint as you can, then apply a mild soap and an appropriate brush cleaner to break down the remaining acrylic.
Work through each brush methodically: rinse out softened paint, then use mild soap and a brush cleaner to remove remaining acrylic.
You’ll focus on brush care and paint removal without harsh solvents. Follow these steps:
- Wet bristles and gently lather soap
- Work cleaner toward ferrule
- Rinse until water runs clear
- Reshape and dry flat
Step-By-Step: Break up Heavily Hardened Paint With Solvents
Start by protecting yourself and your workspace: wear nitrile gloves, open windows or use a respirator, and lay down paper or a disposable pad to catch drips.
Choose solvent types suited to acrylic—commercial brush cleaners or acetone-based options—and test on bristles.
Submerge tips briefly, agitate gently, rinse with water, reshape depending on brush materials, and repeat until hardened paint loosens.
Loosen Dried Acrylic With White Vinegar : Method and Timing
You can loosen dried acrylic by soaking brush heads in warm white vinegar, which softens the paint without harsh solvents.
Keep the soak short—usually 15–30 minutes for light build-up, longer only if needed—and use warm (not boiling) water to speed the process.
After soaking, rinse and gently work the bristles with your fingers or a soft comb to remove loosened paint.
Vinegar Soak Basics
A simple white-vinegar soak can loosen dried acrylic on brushes without harsh chemicals, making bristles pliable again; you’ll submerge the ferrule and part of the bristles in warm vinegar for a controlled period so the paint softens for gentle removal.
Use vinegar benefits and soaking techniques to guide you.
- Rinse first
- Submerge bristles only
- Check progress frequently
- Rinse and reshape
Timing And Temperature
Because vinegar works faster when warm, use hot (not boiling) water to heat the white vinegar and cut down soak time; aim for a mix that’s comfortably hot to the touch so it loosens paint without damaging bristles.
Adjust timing methods based on paint thickness: thin crusts need 15–30 minutes, thicker clumps several hours.
Monitor temperature effects and repeat soaks rather than overexposing bristles.
Bristle Rinse Technique
Start by holding the brush under warm running water to loosen surface grime. Then submerge just the bristles (not the ferrule) in a shallow cup of hot white vinegar so it can penetrate dried acrylic. You’ll loosen paint, preserve bristle care, and improve cleaning frequency habits.
- Soak 10–20 minutes
- Gently agitate bristles
- Rinse thoroughly
- Repeat if needed
Use Isopropyl Alcohol Safely on Brushes
One simple, effective way to remove stubborn dried acrylic is to soak the bristles in isopropyl alcohol, but you should handle it with care: work in a well-ventilated area, wear gloves to protect your skin, and keep the solvent away from open flames or heat sources.
Use small amounts, dab excess, rinse thoroughly with soap and water, and reshape bristles for proper isopropyl safety and brush care.
Using Acetone and Strong Solvents Without Ruining Handles
When you reach for acetone or other strong solvents, protect wooden or painted handles with a tight plastic wrap or waterproof tape so the finish doesn’t soften or stain.
Apply solvents sparingly with a cotton swab or small brush tip to the ferrule and bristles, keeping liquid away from the handle.
Work in a well-ventilated area and test a hidden spot first to confirm the handle won’t be damaged.
Protecting Wooden Or Painted Handles
Because solvents like acetone can strip varnish and paint fast, you’ll want to shield wooden or painted handles before soaking brush ferrules or plunging into stronger cleaners.
Use quick handle care steps for paint preservation:
- Wrap handle with painter’s tape tightly.
- Cover with plastic wrap or a zip bag.
- Use a rubber band to seal edges.
- Wipe spills immediately with a damp cloth.
Safe Solvent Application Techniques
Protecting the handle is only the first step; you’ll also need to apply strong solvents carefully so they remove dried acrylic from the ferrule and bristles without eating into wood or finish.
Choose solvent types (acetone, lacquer thinner, brush cleaner) by testing finishes.
Use targeted application methods: cotton swabs, small jars, and short soaks.
Rinse, neutralize, and dry immediately to protect handle and ferrule.
How Long to Soak Brushes in Commercial Restorers
A good rule of thumb is to let brushes soak just long enough for the restorer to dissolve the paint without weakening the bristles—usually 15–60 minutes for light to medium buildup, and up to several hours or overnight for very stubborn, thickly dried acrylics.
- Check bristle condition periodically
- Use recommended soaking time on label
- Avoid prolonged immersion of ferrules
- Rinse and reshape after soaking
Soaking time and restoration tips help you save brushes without damaging them.
Mechanical Techniques: Combing, Scrubbing, and Toothbrushes
Start by loosening dried acrylic with gentle mechanical action: comb bristles with a metal or nylon brush comb, scrub with your fingers or a soft-bristled brush, or use an old toothbrush to work paint out from the ferrule and tips. Focus on bristle care and targeted paint removal; rinse and repeat until pliable.
| Tool | Purpose |
|---|---|
| Comb | Separate bristles |
| Toothbrush | Detail cleaning |
Ultrasonic Cleaners: When They Help and When They Don’t
While ultrasonic cleaners can cut through stubborn, dried acrylic by sending high-frequency vibrations into a cleaning solution, they’re not a cure-all—so you should pick them when bristles are sturdy and paint layers are thick but not fully polymerized into a rock-hard shell.
Use ultrasonic effectiveness wisely and track maintenance frequency.
Use ultrasonics with care — balance effectiveness with proper solutions and regular maintenance tracking for best results
- Best for semi-hard deposits
- Not for fragile natural hairs
- Use proper solution
- Monitor cycles
Rinse and Neutralize Solvents to Protect Bristles
Because solvents that dissolve dried acrylic can also strip the natural oils from your brush hairs, rinse them thoroughly and neutralize any residue before drying.
After solvent selection, flush brushes under warm water, then wash with mild soap or brush cleaner to restore pH balance.
Gently work the solution through bristles, rinse until water runs clear, and blot excess moisture for proper bristle care.
Restore Brush Shape After Paint Removal
Once you’ve removed the paint and rinsed away solvents, reshape the bristles while they’re still damp to guarantee they dry in the proper form. You’ll preserve brush care and bristle maintenance by gently reforming the tip and aligning hairs with your fingers.
Try these steps:
- Comb bristles with your thumb
- Pinch ferrule to set shape
- Remove stray hairs
- Check symmetry before drying
Drying and Storing Brushes to Prevent Re‑Hardening
1. After rinsing and reshaping, blot excess water and let bristles air‑dry horizontally or hanging with tips down to prevent water soaking into the ferrule.
For proper brush care, avoid standing brushes upright while wet.
Use storage techniques like breathable cases or roll-up holders once fully dry to keep bristles aligned, dust‑free, and ready for use without risking re‑hardening or mildew.
Fix Split or Splayed Bristles After Cleaning
If your bristles are split or splayed after cleaning, gently reshape them with your fingers while they’re damp to bring the hairs back together.
For stubborn frizziness, work a small amount of hair conditioner through the tips, leave it for a few minutes, then rinse thoroughly.
Reshape the ferrule and lay the brush flat to dry so the bristles set straight.
Reshape Bristles Gently
After you’ve removed the paint and dried the brush, gently reshape the bristles while they’re still slightly damp so they settle back into their original form; use your fingers or a fine-toothed comb to smooth any splits or splaying, aligning the hairs toward the tip.
Focus on bristle care and gentle reshaping:
- Work from ferrule to tip
- Use light, even strokes
- Remove loose hairs
- Let air-dry flat
Use Hair Conditioner
Restore bristle flexibility by massaging a small amount of regular hair conditioner into the brush tips—work from ferrule to tip, gently detangling and smoothing splits with your fingers or a fine comb.
Let it sit a few minutes, rinse thoroughly, and reshape. You’ll notice hair conditioner benefits in softness and control.
If needed, try alternative conditioners like diluted fabric softener or a leave-in product sparingly.
If Paint Won’t Budge: Extra Steps and Escalation
When stubborn dried acrylic won’t come off with soap and water, move on to tougher tactics—soak the bristles in a solvent like isopropyl alcohol or a specialized brush cleaner, gently work the fibers with a comb or old toothbrush, and repeat as needed while rinsing thoroughly between attempts.
If soap fails, soak bristles in isopropyl alcohol or brush cleaner, gently comb fibers, rinse and repeat.
- Try longer soaks for paint removal challenges.
- Use gentle agitation and combing.
- Apply brush restoration techniques sparingly.
- Rinse, reshape, and air dry.
Solvent Damaged Ferrule or Handle : Fixes and Prevention
Check the ferrule and handle for softening, discoloration, or looseness caused by repeated solvent exposure, because catching damage early lets you repair or prevent further deterioration.
If metal loosens, squeeze or crimp gently and secure with epoxy for ferrule repair.
For handle preservation, sand off softened finish, seal with varnish, and avoid harsh solvents—use gentler cleaners and prompt rinsing after each use.
Cleaning Brushes Used With Textured Acrylics or Mixed Media
When you’re working with textured acrylics or mixed media, first scrape or pick away as much dried texture as you can before any solvent touches the bristles.
After removing bulk material, soak the brush in an appropriate solvent—water for water-based mediums or a stronger cleaner for heavy gel/impasto—following safety instructions.
Rinse and reshape the bristles, and repeat solvent soaks if residue or stiffness remains.
Remove Excess Texture
Scrape off any thick clumps of texture before rinsing so the bristles don’t get permanently misshapen or glued together.
You’ll reduce brush texture damage and loosen paint residue with careful scraping, then work gently toward the ferrule.
Use these steps:
- Use a palette knife to lift bulk texture
- Tap bristles to dislodge particles
- Comb gently with an old toothbrush
- Rinse under warm running water
Use Solvent Soaks
After you’ve removed as much texture as possible, soak the brushes in an appropriate solvent to loosen remaining paint and additives without forcing bristles apart. You’ll choose solvent types by paint thickness and brush materials, set soaking duration, and follow cleaning techniques for bristle care. Try restoration methods, and note alternative solutions if damage appears.
| Solvent | Duration | Result |
|---|---|---|
| Water-based | 10–30 min | Softens |
| Alcohol | 5–20 min | Dissolves |
| Commercial | 10–60 min | Restores |
| Oil | 30–90 min | Deep clean |
| Alternative | Variable | Last resort |
Caring for Specialty Brushes: Fan, Mop, Script Liners
Though they sit in the same brush roll, fan, mop, and script liner brushes need different care to keep their shapes and performance—you’ll treat each according to its purpose and build.
Though tucked together, fan, mop, and script liner brushes each demand distinct care to keep shape and performance.
Focus on brush types and cleaning techniques, rinsing gently, reshaping, and drying flat.
Use:
- Fan: comb and reshape
- Mop: soak briefly, pat dry
- Script: wipe tip
Store protected.
Restore Cheap Brushes vs. High‑End Brushes: Methods and Priority
When you’re deciding whether to restore a cheap brush or invest time in a high‑end one, prioritize based on replacement cost, workmanship, and sentimental value; cheap brushes often deserve quick fixes or recycling, while quality brushes merit more careful, time‑intensive restoration to preserve their shape and performance.
| Brush Quality | Restoration Techniques | Cost Considerations |
|---|---|---|
| Cheap | Quick clean | Low |
| High‑end | Deep restore | High |
| Mid‑range | Selective repair | Moderate |
Environmentally Friendlier Disposal and Solvent Alternatives
You’ve just decided which brushes to save and which to replace, so it’s worth thinking about how you’ll dispose of solvent and paint residue without harming the environment.
Use eco friendly alternatives and biodegradable solvents when possible.
Consider:
- Collect used solvent separately for hazardous-waste drop-off
- Wipe brushes with paper, not rinsing
- Use reusable cloths and strainers
- Choose water-based cleaners labeled biodegradable solvents
Preventative Routine to Stop Acrylic From Drying on Brushes
If you want to keep brushes usable, make a simple rinse-and-rescue routine part of every session: rinse brushes in water or a biodegradable cleaner between color changes, reshape the bristles, and store them upright or flat so paint can’t pool in the ferrule.
Adopt consistent brush care and cleaning routine habits: quick rinses, bristle protection, drying techniques, storage solutions, and maintenance tips for reliable paint prevention and better artist habits.
On‑The‑Spot Painting Habits to Keep Brushes Usable
Quick, simple habits while you paint can keep brushes usable for the whole session:
- Rinse between colors briefly to prevent buildup — quick tips that save time.
- Wring and reshape bristles after rinsing to maintain tip integrity.
- Keep a water cup nearby and change it often to avoid contamination.
- Rest brushes flat or upright with bristles up during short breaks for proper brush care.
Products and Tools to Keep Handy for Frequent Acrylic Painters
Keep a few key products and tools within arm’s reach so you can tackle dried acrylic before it ruins a brush.
Have quality brush cleaners, lathering soaps, and a gentle solvent, plus protective storage like brush rolls and vented holders.
Also keep repair items—pin vises, spare ferrules, and softening agents—so you can maintain and restore brushes when needed.
Essential Brush Cleaners
Tools matter: you’ll want a small selection of reliable cleaners and accessories on hand so dried acrylic doesn’t ruin your brushes.
For effective brush maintenance and simple cleaning techniques, keep these essentials nearby:
- Mild soap (artist or olive)
- Brush rest and comb
- Solvent for stubborn clumps (isopropyl or commercial cleaner)
- Conditioning balm for natural bristles
Use them quickly to extend brush life.
Protective Storage Solutions
A few smart storage solutions will make a big difference in how long your brushes stay usable.
You’ll want brush storage with protective cases and brush wraps for travel solutions, plus airtight containers for moisture control.
Use drying racks and upright brush holders for daily use, and keep a small toolbox or organizer for organizing brushes and supplies so tools stay safe and accessible.
Repair And Maintenance Tools
Once your brushes are stored properly, you’ll want a small kit of repair and maintenance items to extend their life and fix issues quickly.
You’ll care for different brush types and follow a strict maintenance schedule. Keep these essentials handy:
- Gentle brush soap
- Brush comb and reshaper
- Pin vise or tweezer for ferrule clogs
- Travel-sized solvent for stubborn acrylic residue
When to Hire a Pro: Cost vs Benefit of Professional Restoration
Deciding whether to hire a pro comes down to three things: the brush’s value, how badly it’s caked, and what you’re willing to spend to restore it.
Weigh professional costs against restoration benefits: rare or costly brushes often justify hiring someone with expert techniques and cleaning expertise.
If bristles are fused or sentimental value’s high, a pro can save time and preserve performance; otherwise, DIY.
Quick Maintenance Checklist to Keep Brushes Working Long‑Term
Keep a simple routine and your brushes will last far longer: rinse them thoroughly after each session, reshape the bristles while damp, and store them upright or flat so the ferrule stays dry.
Follow this checklist to guarantee brush care, cleaning frequency, and brush longevity:
- Note bristle types and compatible cleaning solutions
- Match methods to paint types
- Use proper drying methods
- Maintain tool organization and storage tips
FAQ: Common Quick Answers About Restoring Acrylic‑Hardened Brushes
What can you do when acrylic has hardened on your brushes? You can soak bristles briefly in warm water or a gentle solvent, then comb fibers with a brush comb or old toothbrush.
For stubborn clumps, use dedicated paint removal solution and repeat. Rinse, reshape, and dry flat.
Regular brush care prevents future damage and keeps performance reliable.
Frequently Asked Questions
Can Dried Acrylic Be Safely Removed From Foam Brushes or Palette Knives?
Yes — you can remove dried acrylic from foam brushes and palette knives; you’ll soak foam brushes gently and scrape or soak palette knives. Use foam brush techniques and palette knife care to avoid damage and prolong tool life.
Will Cleaning Solvents Affect My Painted Storage Jars or Studio Surfaces?
Yes — solvents can harm painted storage and studio surfaces; they’ll strip finishes and etch paint. Protect paint storage and worktops with surface protection like drop cloths, tape, or sealed trays before using strong cleaners, or test first.
Can I Use a Dishwasher to Clean Brushes or Parts Safely?
You shouldn’t: dishwasher safety is limited for brushes and parts because high heat and detergent can warp synthetic and natural brush materials, loosen ferrules, and ruin glue. You’ll risk damage; hand-cleaning’s safer for long-term care.
How Should I Transport Solvents and Dirty Brushes for Disposal or Recycling?
You should seal solvents and dirty brushes in labeled, leakproof containers, using secondary containment for transport; follow solvent safety rules, secure items upright in your vehicle, and take them to an approved hazardous-waste or recycling facility.
Are There Legal Restrictions for Shipping Brushes With Solvent Residue?
About 60% of hazardous shipments get flagged; yes, you’ll face shipping regulations when sending brushes with solvent residue—because solvents count as hazardous waste, you’ll need approved packaging, labeling, and follow solvent disposal rules to ship legally.
Conclusion
You can usually rescue dried acrylic brushes if you act fast and follow the right steps — but sometimes a brush’s bristles are ruined beyond hope. Gather the right cleaners and tools, soak and work gently, and keep up a simple maintenance routine so brushes last longer than your wildest painting marathon. If a brush’s shape or feel is gone, replace it; cheap time saved now can avoid bigger headaches later.