What Is a Milk Paint Finish? Classic Rustic Look Explained
You get a matte, vintage‑style finish when you use milk paint—a powdered casein paint you mix with water that bonds to wood and cures into a slightly textured, breathable surface. It’s low‑toxicity and eco‑friendly, often made with lime, clay, and natural pigments, and it naturally develops a patina or distressed look over time. It’s great for furniture and trim but usually needs a topcoat for heavy use, and you’ll find practical tips and techniques ahead.
Quick Answer What Is a Milk Paint Finish?
A milk paint finish is a natural, water-based coating made from milk protein, lime, and pigments that gives wood a matte, often slightly textured look.
You’ll notice it chips and ages differently than modern paints, offering authentic, vintage character and breathable protection.
Below are the key characteristics at a glance so you can quickly see if it fits your project.
One-sentence definition
While it looks like regular paint, milk paint is a natural, powder-based finish you mix with water that gives furniture a matte, often slightly textured or distressed look and bonds to surfaces without heavy chemicals.
In one sentence: if you’re asking what’s a milk paint finish, it’s a simple, eco-friendly decorative coating that adheres directly to wood and creates an authentic vintage appearance.
Key characteristics at a glance
If you want the short version, milk paint gives you a matte, slightly textured finish that’s breathable, eco-friendly, and often self-distressing — think authentic, aged furniture rather than a high-gloss modern coat.
You’ll appreciate its simplicity and versatility:
- Breathable, water-based formula
- Natural pigments and low toxins
- Tends to chip or flake for patina
- Sandable and easy to layer
Basic Understanding Milk Paint Fundamentals
You’ll learn that milk paint is a simple, natural mix—usually powdered casein (milk protein), lime, and earth pigments—that you rehydrate before using.
It behaves differently than latex, oil, or chalk paints, bonding into porous surfaces and giving thin, matte, sometimes uneven coverage that’s prized for age and texture.
You’ll also see how its history stretches back centuries, where craftsmen used it for furniture, walls, and folk finishes.
What milk paint is (composition and ingredients)
Milk paint is a simple, natural coating made from powdered casein (a milk protein), lime, and natural pigments that you mix with water to activate; some blends add clay, chalk, or tannins to tweak adhesion and color.
You’ll find powdered mixes or premixed jars; pigments come from earth oxides and organic dyes.
It cures into a porous, matte, durable finish that bonds to porous surfaces.
How milk paint differs from other paints (latex, oil, chalk)
Because it’s protein-based and mixed from powder, milk paint behaves very differently than modern latex, oil, or chalk paints: it soaks into porous surfaces and bonds chemically rather than forming a plastic film on top. You’ll notice texture, adhesion, and aging contrast distinctly.
| Paint Type | Bonding | Finish |
|---|---|---|
| Milk | Chemical | Rustic |
| Latex | Film | Smooth |
| Oil/Chalk | Surface | Sheen/Matte |
Historical background and traditional uses
Knowing how milk paint behaves compared to latex or oil helps explain why it was so widely used in earlier centuries.
You’ll find it was favored for furniture, walls, wagons and barns because it’s natural, breathable and inexpensive. Craftspeople liked its durability and matte patina.
You’ll also see traditional palettes—muted whites, ochres and soft greens—common in rural and colonial interiors.
How a Milk Paint Finish Works (Explanation)
When you apply milk paint, its casein-based chemistry bonds into porous surfaces rather than just sitting on top, so you’ll get a durable, integrated finish.
You can achieve matte, satin, smooth, or intentionally distressed looks by adjusting dilution, topcoat, and application technique.
It works on wood, plaster, metal with proper prep, and even previously painted pieces, though adhesion and texture will vary by substrate.
Chemistry and bonding process
Although milk paint looks simple, its chemistry combines natural polymers and minerals that bond to surfaces in a unique way.
You’ll mix casein protein with lime and earth pigments; the casein coagulates, forming a durable matrix. As it cures, it mechanically keys into porous fibers and chemically adheres via ionic interactions, giving strong, breathable adhesion without relying on synthetic resins.
Types of finishes achievable (matte, satin, distressed, smooth)
Because milk paint cures into a breathable, particulate-rich film, you can produce a wide range of finishes—matte, satin, distressed, or glass-smooth—by adjusting mix, application, and finishing techniques.
You’ll control sheen and texture through dilution, brush or rag application, sanding, and topcoats. Choose based on look and durability:
- Matte: thin, chalky appearance
- Satin: subtle sheen, smoother feel
- Distressed: layered, worn edges
- Smooth: fill, sand, and buff for a glassy surface
Surface compatibility (wood, metal, plaster, previously painted surfaces)
Compatibility matters: milk paint bonds differently to wood, metal, plaster, and previously painted surfaces, so you’ll need to adjust prep and technique for each.
Sand and seal oily or dense woods; use a metal primer for ferrous surfaces; apply a bonding primer on glossy or latex-painted pieces; mist or dilute for plaster to prevent peeling.
Test first and finish with a compatible topcoat.
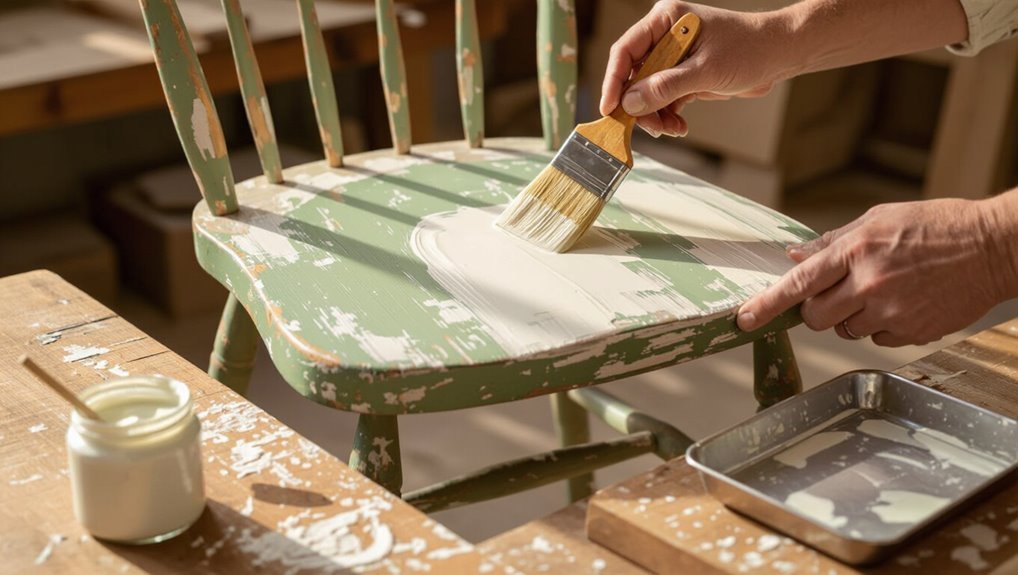
How-To Applying a Milk Paint Finish (Step-by-step)
Before you start, you’ll prep the piece by cleaning, sanding, and priming any problem spots so the paint adheres smoothly.
Mix and thin the milk paint to the right consistency, then choose your application—brush, roller, or sprayer—and work in even coats.
After layering, use distressing or glazing for the look you want, then seal with wax, oil, or a clear topcoat for protection.
Preparing the surface (cleaning, sanding, priming)
Start by stripping away dirt, grease, and loose finish so the milk paint can bond properly to the surface.
Wipe with mild detergent, rinse, and dry.
Sand glossy areas lightly to scuff the surface; remove dust with a tack cloth.
Fill holes or deep gouges, sand smooth, then apply a compatible primer or bonding coat where needed to guarantee even adhesion and finish.
Mixing and thinning milk paint correctly
Precision matters when you mix milk paint, so measure powder and water carefully to get the consistency you need.
Stir to dissolve clumps, then let it rest a few minutes and stir again. Thin with small water increments—too much weakens adhesion.
Test on scrap wood for coverage and opacity. Adjust for brushing or layering, noting thicker mixes add texture while thinner coats level smoother.
Application techniques (brush, roller, sprayer)
Choose the right tool and you’ll get the finish you want—brush for control and texture, roller for speed on flat surfaces, or sprayer for the smoothest, fastest coverage.
Prep, test, and work wet edges. Adjust thinning per tool and temperature.
- Brush: cut in, follow grain
- Roller: foam for fewer bubbles
- Sprayer: fine tip, multiple light coats
- Clean tools immediately
Layering, distressing, and glazing techniques
Now that you’ve selected the right tool and tested your application method, layering, distressing, and glazing let you control age, depth, and character in your milk paint finish.
Apply thin milk paint layers, sanding between coats for smooth shifts. Distress strategically with sanding blocks or steel wool.
Add translucent glaze to highlight crevices and warm tones. Blend quickly for natural variation and wipe excess.
Sealing and topcoat options (wax, oil, polyurethane)
Protection is essential once your milk paint looks right, because the topcoat determines durability, sheen, and how the piece will age.
Choose wax for a soft, low-sheen, repairable finish; oil for warm depth and water resistance; or polyurethane for tough, high-wear protection.
Apply thin, even coats, sand lightly between layers, and test compatibility on scrap to avoid blotching or tackiness.
Benefits and Drawbacks (Problem-Solution / Comparison)
You’ll find milk paint offers natural pigments, a matte vintage look, and low-toxicity benefits that make it great for furniture and restorations.
But it can chip, requires careful surface prep, and isn’t ideal for high-wear or outdoor pieces without proper sealing.
Compare cost, durability, and aesthetics to latex, oil, or lacquer to pick the finish that best fits your project’s needs.
Advantages of milk paint
Because milk paint is made from natural ingredients, it gives you a durable, breathable finish that works well on wood and older surfaces while being low in VOCs and easy to repair.
- Eco-friendly, low-toxicity choice
- Authentic, matte, vintage look
- Bonds to raw or previously finished wood
- Simple spot repairs and natural aging
You’ll get lasting character without harsh chemicals.
Common limitations and when not to use it
While milk paint offers a beautiful, natural finish, it isn’t right for every project. You should avoid it when you need high impact resistance, rapid drying, or perfect color uniformity.
Consider alternatives if you can’t prep well or need outdoor longevity.
- Fragile without topcoat
- Hard to touch up seamlessly
- Poor adhesion on slick surfaces
- Limited weather resistance
Comparison of cost, durability, and aesthetics versus other finishes
When you weigh milk paint against latex, chalk, or oil-based finishes, cost, durability, and look each pull in different directions; milk paint often wins on affordability and authentic, layered aesthetics but loses on impact resistance and outdoor longevity unless you add a protective topcoat. You’ll choose milk paint for charm and budget; choose other finishes for hardwearing or outdoor needs.
| Feature | Best choice |
|---|---|
| Cost | Milk paint |
| Durability | Oil-based/latex |
| Aesthetics | Milk paint |
| Outdoor use | Oil-based/sealed latex |
Best Practices, Tips, and Troubleshooting
To get flawless milk paint results, prep surfaces thoroughly, control temperature, and stick to correct mixing ratios.
If you run into issues—like poor adhesion, brush marks, or uneven coverage—you’ll learn the common mistakes and straightforward fixes.
I’ll also show how to repair, touch up, or fully refinish milk-painted pieces so you can keep them looking great.
Tips for flawless results (surface prep, temperature, mixing ratios)
Because good prep and correct mixing make the difference between a flaky finish and a showroom-quality result, take a few extra minutes to get surfaces clean, dry, and at the right temperature, and measure your pigments and water accurately.
Sand or degloss, remove dust, and prime porous wood. Mix to manufacturer ratios, strain, and test a small patch.
Maintain 60–75°F and moderate humidity.
Common application mistakes and fixes
Although milk paint’s charm is its simplicity, you can still run into common application errors—blotchy coverage, brush marks, running drips, or rapid drying—that are usually fixable with the right approach.
You can correct problems by adjusting technique and conditions:
- Thin slightly for smoother flow
- Use a high-quality brush or foam
- Work in thinner coats, feather edges
- Control temperature and humidity
How to repair, touch up, or refinish milk-painted surfaces
Repairing or refinishing milk-painted pieces is straightforward when you follow a few focused steps: assess the damage, decide whether a spot touch-up, full repaint, or light sanding and sealing will do the job, and gather compatible materials (matching pigment, milk paint or powder, binder if used, and an appropriate sealer).
Clean, sand lightly where needed, blend new paint into old, seal with wax or matte poly, and cure fully.
Use Cases and Project Ideas
You can use milk paint to bring out the character in vintage furniture and antiques, or to give cabinets, trim, and architectural elements a fresh, durable look.
Try decorative finishes and faux techniques for textured or aged effects, and plan differently when tackling outdoor or large-scale projects because adhesion and protection needs change.
Below we’ll cover practical project ideas, materials, and steps so you can pick the right approach for each use case.
Furniture restoration and antiques
When restoring antiques or revitalizing a thrifted piece, milk paint gives you an authentic, period-appropriate finish that’s forgiving and easy to work with; it adheres well to bare wood and worn surfaces, so you’ll often skip extensive stripping or priming.
Use layering, distressing, and color-washing to match age and patina. Stabilize fragile surfaces first, and seal with wax for gentle protection.
Cabinets, trim, and architectural elements
Cabinets, trim, and architectural elements get an instant character boost with milk paint—its thin, matte body settles into moulding details and panel grooves so you can highlight profiles without sanding everything to raw wood.
You’ll find it adheres well to existing finishes, ages attractively, and lets you refresh kitchens, built‑ins, staircase spindles, and window casings with minimal prep and lasting, authentic charm.
Decorative finishes and faux techniques
If you’re aiming for unique, period‑appropriate looks or playful accents, milk paint lends itself beautifully to decorative finishes and faux techniques.
You can layer, distress, and glaze to mimic age or marbleize for elegant surfaces. Try small projects first to master effects, then scale up with confidence.
- Distressed two-tone
- Glazed antiquing
- Faux marble veins
- Stenciled patina
Outdoor/large-scale considerations
Those decorative techniques work beautifully inside, but outdoor and large-scale projects ask for different choices and prep.
You’ll need exterior-grade milk paint or additives, UV and moisture protection, and thorough surface prep.
Plan for faster application, scaffolding or sprayers, and multiple coats or sealers.
Test adhesion on panels, schedule work in dry weather, and expect more maintenance over time.
Product Selection Guide (Buying Considerations)
When you’re choosing milk paint, decide whether you want the convenience of ready-mix or the longer shelf-life and control of powder concentrates.
Pick colors and pigments with intent—natural pigments give softer, ageable tones while synthetic options offer brighter, more consistent hues.
Also gather recommended tools and ancillaries like bonding primer, quality brushes, and mixing tools to get the finish you want.
Ready-mix vs. powder concentrates
Although both give that classic matte, milk-based look, ready-mix and powder concentrates suit different needs and workflows.
Ready-mix saves prep time and guarantees consistent color, ideal for quick projects.
Powder concentrates need water and shaking, letting you adjust intensity, mix small batches, and store long-term.
Choose ready-mix for convenience, powders for control, cost-efficiency, and less waste.
Choosing colors and pigments (natural vs. synthetic)
If you want a truly authentic, eco-friendly finish or need reliable, long-lasting pigments, choosing between natural and synthetic colorants matters—each type affects hue depth, lightfastness, and application behavior.
You’ll pick natural for subtle, earthy tones and low toxicity; choose synthetic for vivid, consistent colors and better lightfastness.
- Natural: clay, earths, low VOC
- Synthetic: pigments, brighter hues
- Mixability: synthetic blends easier
- Cost: natural often cheaper
Recommended tools and ancillary products
Because the right tools and ancillary products determine how smoothly your milk paint project goes, choose items that match the finish you want and the substrate you’re working on.
Stock quality brushes, foam rollers, flexible putty knives, and sanding pads.
Get bonding primer for slick surfaces, calcium carbonate extender if needed, clear or dark waxes, and a respirator, gloves, and tack cloths for clean, safe work.
Sustainability, Safety, and Maintenance
Think about how milk paint’s low-toxicity formula and natural ingredients affect indoor air quality and your household’s health.
You’ll also want simple maintenance and cleaning tips to keep finishes looking good over time without harsh chemicals.
Finally, learn proper storage and disposal to minimize environmental impact and make future projects safer.
Environmental and health considerations
1 important thing to know about milk paint is that it’s one of the more sustainable finish options you can choose: it’s made from natural ingredients, has low VOCs, and is biodegradable, which reduces long-term environmental impact and indoor air concerns.
You’ll still want to check pigment sources for heavy metals, use proper ventilation during application, and dispose of leftovers responsibly to minimize risks.
Long-term maintenance and cleaning tips
Maintaining milk paint is straightforward if you follow a few simple habits: wipe spills promptly with a damp cloth, avoid abrasive cleaners that can wear the natural binder, and recoat or touch up worn spots with powdered mix for a seamless repair.
You’ll also:
- Dust regularly with a soft cloth.
- Use mild soap for stains.
- Keep humidity stable to prevent flaking.
- Sand and spot-repair before recoating.
Disposal and storage best practices
Because milk paint is largely natural but can include additives, you should treat leftover mixes, containers, and used rags with care: dispose of small quantities by letting them dry, then discard with regular trash if local rules allow.
Store unopened powder in a cool, dry place; label mixed paint and use within 24–48 hours.
Seal containers tightly and follow local hazardous-waste guidelines for larger amounts.
Frequently Asked Questions
Can Milk Paint Be Used on Outdoor Furniture Without Sealant?
No — you shouldn’t. Like a paper sail in rain, milk paint will weather and flake outdoors without sealant; you’ll need a clear protective topcoat to lock color, repel moisture, and extend the finish’s life.
Will Milk Paint Work on Plastic Surfaces?
Yes, but it’ll need prep and bonding. You should scuff, clean thoroughly, and use a plastic-bonding primer or acrylic medium mixed with the milk paint. Without that, adhesion will be poor and it’ll chip or flake.
Can I Mix Milk Paint With Other Paint Types?
Yes — you can mix milk paint with some water-based paints and pigments for subtle color adjustments, but you shouldn’t combine it with oil-based paints. Test small areas first, since adhesion and finish can vary unpredictably.
How Long Does Milk Paint Last on High-Traffic Floors?
It lasts variably; you’ll get months to several years on high-traffic floors depending on prep, sealer, and maintenance. With proper priming and durable topcoat you’ll extend wear, but expect periodic touch-ups and eventual refinishing.
Is Milk Paint Safe for Children’s Toys Without Sealing?
No — you shouldn’t assume milk paint is safe on children’s toys without sealing; untreated milk paint can flake and expose pigments or contaminants. You’ll seal with a non-toxic, child-safe finish (water-based polyurethane or wax).
Conclusion
You’ve seen how milk paint gives furniture and walls a lived-in, classic look while staying natural and versatile. Ready to try it, you’ll appreciate its layered textures, easy distressing, and low-toxicity profile. Like an old photograph, it brings character and history without heavy upkeep. Pick the right product, prep properly, and seal when needed — then enjoy a durable, charming finish that ages gracefully and reflects your personal style.