What Is Knockdown Wall Texture? Types and Uses Explained
Knockdown wall texture is a drywall finish you’ll recognize by flattened, mottled peaks created by spraying or troweling joint compound and then “knocking down” the tops with a wide knife. It hides imperfections, reduces glare, and adds subtle depth to walls and ceilings while remaining durable and low‑maintenance. You can dial patterns from subtle to rustic and choose different sheens for washability. Keep this approach if you want versatile, forgiving surfaces—you’ll find practical how‑tos and tips ahead.
Quick Answer: What Knockdown Texture Is
Knockdown texture is a drywall finish you get by applying a thin layer of joint compound, creating raised droplets or peaks. Then, dragging a wide knife over them to “knock down” the tips leaves a flattened, mottled surface.
You’ll appreciate knockdown texture for hiding imperfections, adding subtle depth, and fitting many interior design styles. It’s durable, low-maintenance, and versatile for walls and ceilings.
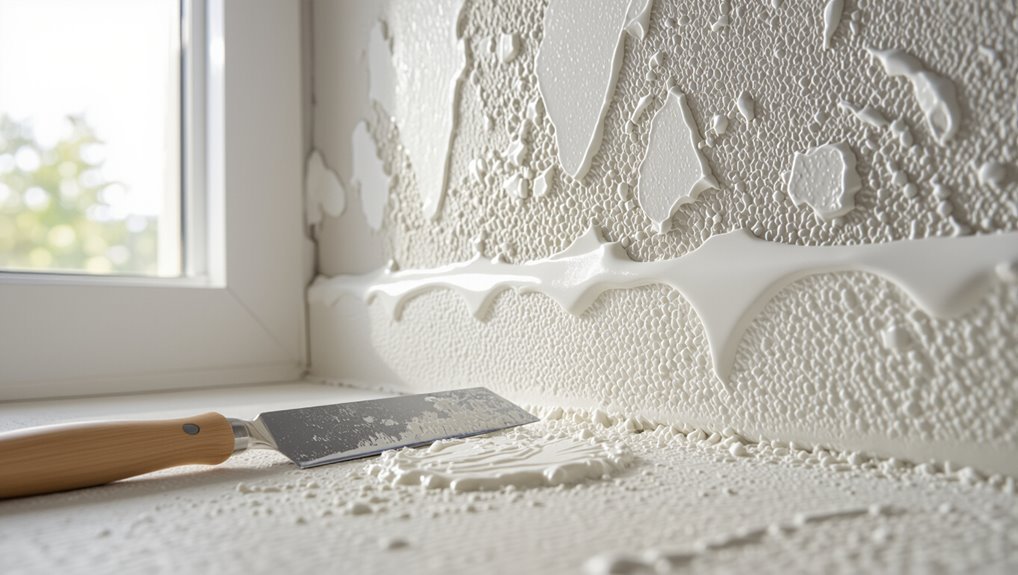
How Knockdown Texture Is Created (Step by Step)
Start by prepping the surface: clean the drywall, cover trim and floors, and tape any seams so the compound adheres smoothly.
Mix joint compound to proper consistency, apply with a hopper or trowel, and spray or dab to form peaks.
Wait briefly, then knock down peaks with a wide knife.
Finish with light sanding and touch-ups—these texturing techniques rely on careful drywall preparation.
Tools and Materials for Knockdown Texture
Now that the surface is prepped and you’ve practiced the knock-and-smooth rhythm, gather the right tools and materials so the job goes quickly and cleanly. Use sprayer techniques, texture additives, and pattern tools. Consider application tools for ceiling applications, finish variations, texture preservation, and texture removal. Plan project timelines alongside wall preparation.
| Hopper | Knife | Trowel |
|---|---|---|
| Sprayer | Brush | Roller |
| Additive | Masking | Cleaner |
Preparing Walls and Ceilings for Application
Before you start knockdown texture, clean the walls and ceilings thoroughly and patch any cracks or holes so the surface is smooth and sound.
Then prime repaired areas and control moisture—fix leaks and guarantee the substrate is dry—to help the texture adhere and cure properly.
Taking these steps will prevent adhesion failures and uneven drying.
Surface Cleaning And Repair
Clear away dust, grease, and loose material so the knockdown texture will bond evenly and look consistent.
Use cleaning techniques like mild detergent or TSP substitutes, then perform damage assessment to spot cracks or holes.
Choose repair methods, appropriate tool selection, and product recommendations for joint compound or patching.
Follow surface preparation and maintenance routines to enable reliable texture restoration and long-lasting finish.
Priming And Moisture Control
When you’re prepping walls and ceilings for a knockdown texture, priming and moisture control are essential to confirm even adhesion and prevent future problems like peeling or mold. You should inspect for dampness, install moisture barriers where needed, and choose primer selection suited to drywall or plaster to guarantee a uniform finish.
| Task | Tool | Tip |
|---|---|---|
| Dryness check | Moisture meter | 48-hour reading |
| Barrier install | Vapor barrier | Seal seams |
Common Knockdown Patterns and Finishes
Though the basic knockdown technique stays the same, you’ll find several distinct patterns and finishes that suit different styles and rooms.
You can choose simple, subtle knockdown patterns for modern spaces, more pronounced swirls for rustic looks, or directional skips to add movement.
Pick texture finishes based on lighting, room size, and cleaning needs to achieve the desired mood without overwhelming the space.
Smooth Knockdown vs. Heavy Knockdown
You’ll notice smooth knockdown gives a subtler, more refined appearance while heavy knockdown creates a bolder, more textured look.
The application differs too: smooth uses thinner mud and gentler knockdown, whereas heavy requires thicker compound and firmer scraping.
Choose smooth for modern, low-key rooms and heavy for hiding imperfections or adding rustic character.
Texture Appearance Differences
Curious how smooth and heavy knockdown textures differ at a glance? You’ll notice texture styles range from subtle, low-relief patterns to bold, pronounced peaks.
Smooth knockdown reads cleaner and softer, offering restrained visual impact and refined shadows.
Heavy knockdown creates dramatic depth, stronger shadowing, and a more rustic, tactile look.
You’ll pick based on desired room mood and light interaction.
Application Technique Variances
Now that you can spot visual differences between smooth and heavy knockdown, let’s look at how the application changes to create those looks.
You’ll choose application techniques based on texture variations: spray methods for broader coverage, hand techniques for control.
Tool differences and technique nuances affect finish options, pattern choices, time considerations, and required skill levels, so plan tools, pace, and practice accordingly.
Best Use Cases
1 clear rule will help you pick between smooth and heavy knockdown: match texture scale to room function and desired visual impact.
You’ll weigh best applications and room suitability: smooth for modern, heavy for rustic.
Consider aesthetic appeal, texture benefits, texture variations, design flexibility, style integration, maintenance considerations, moisture resistance, and installation tips so your choice fits use and upkeep.
Knockdown vs. Orange Peel and Popcorn
While they all hide wall imperfections, knockdown, orange peel, and popcorn textures each give rooms a distinct look and performance: you’ll notice knockdown’s soft mottled finish contrasts orange peel’s fine, even spritz and popcorn’s heavy acoustic bumps.
Consider texture advantages like style and concealment versus application challenges such as masking seams, cleanup, and repair complexity when choosing between them.
Best Rooms and Surfaces for Knockdown
You’ll find knockdown works great in living rooms and hallways because it hides minor imperfections while keeping a subtle, upscale look.
It’s also a smart choice for kitchens and bathrooms where moisture and splashes can make smooth finishes show wear.
For ceilings, knockdown reduces glare and conceals joints without looking heavy.
Living Rooms & Hallways
Although living rooms and hallways see heavy foot traffic, they’re ideal places for knockdown texture because it hides imperfections and wears well over time. You can use it to enhance cozy aesthetics and complement wall color.
Consider these benefits:
- Hides minor dents
- Adds subtle depth
- Reduces repainting frequency
- Blends with trims
- Works with varied lighting
Bathrooms, Kitchens, Ceilings
Moving from living areas, let’s look at bathrooms, kitchens, and ceilings to see where knockdown texture really shines.
You’ll appreciate how shower textures hide imperfections while aiding mold prevention when sealed properly.
In kitchens, it complements kitchen backsplashes for a rustic, durable look.
On ceilings, knockdown ceiling designs soften lighting and conceal seams, giving rooms cohesive, low-maintenance finishes.
When to Avoid Knockdown Texture
If your goal is a sleek, modern look, knockdown texture isn’t the best choice because its mottled, rustic finish draws attention rather than hiding it.
Consider knockdown alternatives and evaluate texture suitability for each space.
Don’t use knockdown when:
- You want ultra-smooth walls
- Spaces are minimalist
- Fine art hangs nearby
- Small rooms need simplicity
- You plan glossy finishes
Paint and Color Choices for Knockdown Walls
When you pick paint for knockdown walls, the finish matters as much as the color—eggshell or satin hides texture without highlighting imperfections, while flat can mask more uneven spots.
Choose colors that work with the wall’s shadows and the room’s lighting; lighter tones soften texture, and medium neutrals balance contrast.
Test samples on the actual wall so you can see how finish and color interact with the texture at different times of day.
Best Paint Finishes
Although knockdown texture hides imperfections, your paint finish and color will determine how much texture stands out and how easy the walls are to maintain.
Choose finishes that balance texture compatibility, aesthetic appeal, and finish maintenance.
- matte finishes: minimize sheen, hide flaws
- satin finishes: moderate sheen, easy cleaning
- semi gloss options: durable, highlights texture
- consider sheen levels for washability
- prioritize color durability and maintenance
Color Selection Tips
Wondering how color will change the look of your knockdown walls? You’ll use color psychology to set mood, choosing warm tones for coziness or cool tones for calm.
Balance texture contrast with neutral palettes and introduce accent colors sparingly. Follow color harmony and current color trends, but prioritize room function and lighting.
Test swatches on textured surfaces before committing.
DIY Knockdown Texture: A Weekend Method
Set aside a weekend, gather a few basic tools, and you can apply knockdown texture to refresh a room without hiring pros.
You’ll use DIY tools, learn texture techniques, manage wall preparation, try spray methods, and master finishing touches linked to design trends, texture variations, and paint applications.
- Prep surfaces
- Mix compound
- Spray evenly
- Knock down peaks
- Sand and paint
Hiring a Pro: Process and Cost Range
When you hire a pro for knockdown texture, you’ll usually start with a walkthrough, estimate, and timeline.
Expect quotes to break down labor, materials, surface prep, and cleanup so you can compare bids.
Typical total costs vary by room size and region, but the line items help you spot where to save or invest.
Hiring Process Overview
Before you hire someone to apply knockdown texture, get a clear sense of the process and what you’ll pay:
- Ask interview questions and check contractor credentials, work samples, and skill assessment.
- Use candidate evaluation to confirm job expectations and timeline expectations.
- Discuss material sourcing and pricing negotiation.
- Clarify project management responsibilities.
- Get written scope, schedule, and payment terms before they start.
Typical Cost Breakdown
A clear cost breakdown helps you compare bids and avoid surprise charges. You’ll see line items for prep, materials, labor, and cleanup. Do a cost comparison across pros, factor in travel or repair fees, and set budget considerations up front so bids match scope.
| Item | Typical Range |
|---|---|
| Prep | $50–$200 |
| Materials | $30–$150 |
| Labor | $150–$800 |
| Cleanup | $20–$100 |
Repairing and Patching Knockdown Texture
Start by evaluating the damage so you know exactly what needs patching and what tools you’ll need.
You’ll perform texture repair with careful surface preparation to guarantee texture consistency and finish matching. Choose material selection wisely, follow proven patching techniques, control drying time, and use proper application methods.
- Clean area
- Mix compound
- Apply base
- Knock down
- Feather edges
Long-Term Maintenance and Cleaning Tips
When you keep a regular cleaning and inspection routine, your knockdown texture will stay attractive and last longer.
You should perform routine inspections for cracks, stains, or delamination, addressing issues promptly.
Use gentle cleaning techniques—soft brush, mild detergent, low-pressure rinse—to remove dirt without damaging texture.
Repaint or reseal touched areas as needed, and document maintenance dates for consistency.
Resale Implications of Knockdown Texture
Although some buyers prefer smooth walls, knockdown texture can boost curb appeal if it’s well-executed and maintained. You should highlight its hiding of minor imperfections and durable finish when marketing the home.
Although some prefer smooth walls, well-maintained knockdown texture boosts curb appeal by hiding imperfections and adding durable finish
- Emphasize improved resale value
- Note common buyer preferences
- Mention current texture trends
- Show consistent maintenance history
- Frame as increased market appeal
Creative Combos: Knockdown With Other Finishes
Pairing knockdown texture with other finishes gives you flexible ways to add depth and personality to a room without overwhelming it. You can use creative combinations and texture layering for unique patterns, finish fusion, and design contrasts that enhance aesthetic balance. Aim for style integration and visual harmony while mixing smooth panels, shiplap, or painted accents to highlight focal areas.
| Finish | Effect | Best Use |
|---|---|---|
| Smooth | Contrast | Trim |
| Shiplap | Rhythm | Accent wall |
| Painted | Highlight | Focal area |
| Stone | Depth | Fireplace |
Troubleshooting Common Knockdown Problems
Mixing knockdown with other finishes can create striking focal points, but it also raises the chance of visible seams, uneven texture, or adhesion issues that you’ll want to fix quickly.
Use these knockdown texture issues troubleshooting techniques:
- Inspect seams for drywall tape gaps
- Sand high spots lightly
- Reapply thin compound where needed
- Guarantee proper drying time
- Prime problem areas before painting
Quick Checklist Before You Start
Before you touch compound or paint, run through a short pre-start checklist to prevent common knockdown problems: confirm texture benefits versus smooth walls, weigh aesthetic appeal and design trends, review application tips and maintenance tips, compare cost factors, consider DIY considerations, and decide if you need professional advice.
Prep surfaces, gather tools, test a small patch, and schedule adequate drying time.
Frequently Asked Questions
Is Knockdown Texture Environmentally Friendly or Low-Voc?
Generally, knockdown texture itself isn’t inherently low-VOC, but you can use eco friendly materials and VOC alternatives like low-VOC joint compounds or natural lime plasters; you’ll reduce emissions if you choose those products and proper ventilation.
Can Knockdown Texture Be Applied Outdoors or on Exterior Surfaces?
Yes, you can apply knockdown texture for exterior application; you’ll need weather-resistant materials and proper sealing so the texture durability holds up against moisture, UV, and temperature changes to prevent cracking and erosion.
How Does Knockdown Texture Affect Sound Insulation or Acoustics?
You’ll see knockdown texture gently mutes echoes like brushed clouds; it offers modest sound absorption but won’t replace acoustic panels, yet its aesthetic impact softens rooms while primarily serving visual, not high-performance, sound control needs.
Are There Historical or Regional Styles Tied to Knockdown Texture?
Yes — you’ll find historical significance in mid-20th-century trends, and regional variations where artisans adapt patterns, trowel techniques, and finish levels; coastal, southwestern, and Mediterranean areas often showcase distinctive knockdown looks tied to local styles.
Can Knockdown Texture Hide Mold or Underlying Moisture Damage?
No, knockdown texture won’t hide mold or underlying moisture damage long-term; you’ll miss mold identification if you rely on texture, and you’ll need moisture prevention and remediation to fix causes rather than covering symptoms with texture.
Conclusion
You’re ready to turn boring walls into something that actually makes people stop and stare — seriously, it’ll feel like your room got a personality overnight. Knockdown texture gives you that handcrafted, designer look without needing a miracle. With the right prep, tools, and a little practice, you’ll go from bland to boldly textured and maybe even start getting compliments from neighbors who wondered if you secretly hired a pro. Go do it.