What to Do About Peeling Paint: Repair and Prevention Guide
If paint is peeling, start by scraping loose material, sanding and feathering edges, then clean and dry the surface. Prime exposed areas with a compatible, high-adhesion primer, fill deep cracks, and apply thin, even topcoats in proper weather. Fix underlying moisture, caulk gaps, and use paintable elastomeric sealants where needed to prevent recurrence. Wear proper PPE and test for lead on old coatings. Keep following this guide to learn how to make repairs last and avoid common mistakes.
Quick Steps to Fix Peeling Paint
Start by evaluating the damage: scrape loose paint, sand rough edges, and remove dust so the new coating will stick.
Next, match paint types to the substrate and test a small area.
Prime exposed areas, allow proper dry time, then apply thin, even coats.
Adjust technique for different surface textures, feathering edges to blend old and new for a durable, invisible repair.
Is It Peeling, Crazing, or Flaking?
Wondering whether your finish is peeling, crazing, or flaking? Inspect the surface: peeling paint lifts in sheets, often exposing substrate; crazing shows fine, spiderweb-like cracks across paint finishes; flaking produces small, brittle chips that break away when touched.
You’ll want to identify which you’ve got so you can choose the right prep and repair approach without guessing.
What Causes Paint to Peel?
Now that you can tell peeling from crazing or flaking, look at why paint actually peels. You’ll spot causes tied to paint adhesion failures, environmental factors and weather influences, poor surface conditions, improper application or bad application techniques, and aging paint or substrate differences.
Focus on moisture management and paint quality to prevent problems.
- Poor surface prep
- High humidity
- Wrong primer/paint
- Thermal cycling
- Incompatible substrates
Is the Damage Cosmetic or Structural?
How bad is the peeling—just surface-level or a sign of deeper damage?
You’ll inspect flaking paint, cracks, and soft spots; cosmetic concerns mean sanding, priming, and repainting will suffice.
If peel reveals rotten wood, rusted metal, or compromised siding, the issue affects structural integrity and needs repair beyond paint.
Decide by probing, tapping, and checking for moisture sources.
When You Should Call a Pro
If your inspection shows anything beyond surface flaking—soft wood, active rust, widespread blistering, or signs of moisture—you should call a professional.
If you find more than surface flaking—soft wood, active rust, blistering, or moisture—call a professional.
You’ll get an expert assessment, clear project timeline, and proper repairs. Consider hiring when issues are extensive or recurring.
- Structural rot
- Hidden mold or moisture
- Large exterior areas
- Complicated trim or siding
- Recurring peeling after fixes
Safety First: PPE and Lead-Paint Precautions
Because disturbed paint can release hazardous dust and chips, you should gear up before any scraping or sanding: wear a fitted N95 or P100 respirator, disposable coveralls, gloves, and eye protection.
Treat paint hazards seriously, limit contamination, and ventilate. Follow lead safety measures to reduce health risks.
Dispose of debris sealed in heavy bags and clean surfaces with wet methods to control dust.
How to Test for Lead Paint and Legal Steps
Before you disturb old paint, confirm whether it contains lead so you can choose safe, legal options for removal.
You should hire certified pros for accurate lead paint testing, use EPA-recognized kits only as preliminary checks, document results, follow local legal regulations for disclosure and disposal, and keep occupants away until remediation’s certified safe.
- Hire certified tester
- Use EPA kits carefully
- Document results
- Follow legal regulations
- Restrict access
Tools and Supplies You’ll Actually Need
Before you start scraping, make certain you’ve got the essential hand tools—scrapers, putty knives, sandpaper, and a good wire brush—to remove loose paint cleanly.
You’ll also need surface-prep supplies like tack cloths, degreaser, patching compound, and primer to guarantee a stable base.
Having the right tools and prep materials on hand will save time and give you a long-lasting finish.
Essential Hand Tools
You don’t need a garage full of gear to tackle peeling paint — a few reliable hand tools will get most jobs done cleanly and safely.
Pick tool selection and essential equipment wisely: paint scrapers, sanding blocks, utility knives, caulk guns, and paint rollers.
Always use safety goggles, dust masks, drop cloths, paint trays, appropriate brush types, roller covers, patching compounds, and practice ladder safety.
Surface Prep Supplies
Tackle prep like a pro by gathering the right supplies: drop cloths, painter’s tape, tack cloths, joint compound or spackling, a quality putty knife, and rust-inhibiting primer for bare metal or exposed fasteners.
You’ll also need sandpaper, a sanding block, scraper, wire brush, solvent or detergent for surface cleaning, and a brush or roller suited to your paint to guarantee strong paint adhesion.
Prep: Clean and Dry the Surface
Start by removing loose paint and dirt so the new coating can stick properly. You’ll use surface cleaning and drying techniques to guarantee adhesion.
Scrub with mild detergent, rinse, and let air circulate. Sand rough edges and vacuum dust. Prime only when fully dry.
- Scrub with a soft brush
- Rinse thoroughly
- Use fans for faster drying
- Sand loose edges
- Vacuum debris
Testing Walls for Damp and Treating Moisture
Before you prime or repaint, check the walls for damp so the new coating won’t fail. Use moisture testing tools and visual damp detection: meter readings, touch tests, and odor. Treat surface moisture with drying, dehumidifiers, and compatible anti-mould primers. Recheck before painting.
| Test | Tool | Action |
|---|---|---|
| Visual | Eye | Inspect |
| Probe | Meter | Measure |
| Smell | Nose | Confirm |
Fix the Moisture Source: Leaks, Condensation, and Vents
You’ll need to find and fix any hidden water leaks before you paint, because even small drips will bring the problem back.
Keep indoor humidity in check with dehumidifiers or simple habits like drying laundry outdoors when possible.
Finally, improve ventilation paths—clear clogged vents and add exhaust fans where moisture builds up.
Identify Hidden Water Leaks
How can you be sure that peeling paint isn’t just a cosmetic issue? Use moisture detection tools and inspect common leak sources to find hidden water behind walls, ceilings, and trim. Act fast to prevent mold and further damage.
- Check for stains or bulging
- Use a moisture meter
- Inspect roof and flashings
- Examine plumbing fixtures
- Look behind appliances
Control Indoor Humidity
If moisture keeps building up inside your home, peeling paint will just return no matter how well you patch it—so control humidity by tackling the source: fix leaks, reduce condensation, and make sure vents exhaust properly.
You should monitor indoor humidity, use dehumidifiers where needed, insulate cold surfaces to prevent condensation, and repair plumbing.
Effective humidity control and moisture management protect paint and building materials.
Improve Ventilation Paths
Controlling humidity is only part of the solution; you also need clear, functioning ventilation paths to carry that moisture out of the house.
Check vents, clean ducts, and fix leaks so ventilation systems work and air quality improves. You should also balance intake and exhaust and direct vents away from foundations.
- Inspect exhaust fans
- Clear dryer vents
- Seal roof leaks
- Clean HVAC ducts
- Vent crawlspaces
Repairing Plaster, Drywall, and Wood After Peeling Paint
Start by evaluating the damage to determine whether you’re dealing with loose paint, surface cracks, or deeper plaster or wood rot—this tells you what tools and materials you’ll need and whether a simple patch or a more extensive repair is required.
For plaster repair, drywall restoration, and wood treatment, remove deteriorated material, apply appropriate fillers or epoxy, sand, prime for paint adhesion, and repaint.
Removing Loose Paint Safely and Efficiently
Wear gloves and a dust mask, then tap and scrape the surface to identify all loose, flaking paint before you begin removing it.
Use gentle paint removal techniques and safe scraping methods to avoid damage. Work outward from edges, collect debris, and minimize dust.
- Use a plastic scraper
- Score stubborn edges
- Wet for chalky paint
- Contain debris with plastic
- Vacuum with HEPA filter
Sanding and Feathering Edges for a Smooth Patch
Start by prepping the damaged area—clean, remove dust, and make sure loose flakes are gone.
Sand the surrounding paint so the edges blend smoothly into the intact surface.
Finish by wiping clean and applying a primer to seal the patch before repainting.
Prep The Damaged Area
Before you patch, remove loose paint and smooth the changeover between damaged and sound areas so the repair won’t show through later.
You’ll do a quick surface assessment and damage evaluation, then sand, feather, clean, and prime for best adhesion.
- Sand edges to solid paint
- Feather with medium grit
- Remove dust completely
- Apply appropriate primer
- Let primer cure before filling
Blend Edges Smoothly
With the primer cured, you’ll focus on sanding and feathering the surrounding paint so the patch disappears into the wall.
Use fine-grit sandpaper to smooth edges, feather toward intact paint, and check texture matching with light strokes.
Clean dust, then assess surface for evenness.
Practice subtle color blending at the margins so the repair reads seamless before you proceed to the next step.
Finish With Primer
After the primer’s cured, apply a thin, even coat over the repaired area and let it fully dry so you can sand and feather the edges cleanly.
This final priming step locks in the patch, evens porosity, and gives you a consistent surface for the topcoat.
Choose primer types and application methods, then:
- Sand with fine grit
- Feather edges smoothly
- Clean dust thoroughly
- Spot-check texture
- Reprime if needed
Choosing Primers for Peeling-Prone Areas
When you’re repairing areas prone to peeling, pick a primer formulated for adhesion and moisture resistance so the topcoat can stay put; high-adhesion primers, bonding primers, and oil- or shellac-based options each address different substrates and failure causes, so match the primer to the surface condition and moisture exposure. Use proper primer types and application techniques to guarantee adhesion.
| Primer | Best for | Notes |
|---|---|---|
| High-adhesion | Painted surfaces | Bonds well |
| Bonding | Chalky/porous | Improves grip |
| Oil/shellac | Raw wood/metal | Moisture barrier |
| Latex | Dry interior | Flexible |
Selecting Paints and Finishes That Resist Peeling
If you want paint that stays put, choose finishes and formulations designed for adhesion, flexibility, and moisture resistance—acrylic-latex hybrids for general-purpose durability, alkyds for toughness on trim and high-wear areas, and elastomeric coatings for exterior surfaces that move or crack.
Pick based on paint types, finish durability, surface compatibility, adhesive properties, weather resistance, and color selection.
Choose paints by type, durability, surface compatibility, adhesion, weather resistance, and color.
- Check paint ratings
- Compare brands
- Match surface compatibility
- Consider environmental factors
- Note application techniques
Application Tips: Brush, Roller, and Spray Techniques
Start by picking the right tool for the job: brushes for edges and detail, rollers for flats, and sprayers for speed and smoothness.
Use proper brush techniques—light pressure, long strokes—match roller nap to surface texture, and maintain even roller application.
With spray methods, control distance and overlap.
Practice to guarantee consistent paint adhesion and a uniform finish without drips or missed spots.
How Many Coats Do You Need?
Now that you’ve chosen tools and mastered application, you’ll need to decide how many coats to apply for lasting results.
Consider paint types and surface conditions to choose primer and finish coats. Thicker coatings don’t always mean better adhesion.
- New, bare wood: primer + 2 topcoats
- Previously painted: 1 primer, 1–2 topcoats
- Glossy surfaces: sand, prime, 2 coats
- High-moisture areas: use moisture-resistant paint
- Spot-repairs: feather edges, 1–2 coats
Curing Time and Conditions That Affect Adhesion
You’ll need to account for recommended drying time frames before applying additional coats to guarantee proper curing.
Pay attention to temperature and humidity, since cold or humid conditions slow curing and weaken adhesion.
Also confirm the surface is dry to the touch and free of trapped moisture, because even slight dampness can cause peeling later.
Drying Time Frames
Curing times for paint can vary from a few hours to several days depending on the product and conditions, so plan your schedule accordingly.
You’ll monitor drying conditions and use proper drying techniques to guarantee adhesion. Follow these steps:
- Wait manufacturer’s minimum cure before light use
- Allow full cure before recoating
- Use fans for gentle airflow
- Avoid dust during curing
- Test adhesion before heavy wear
Temperature And Humidity
Although temperature and humidity both control how paint dries, they affect adhesion in different ways you should monitor closely.
You’ll plan painting during steady temperatures, using temperature control to stay within the paint’s recommended range.
Practice humidity management to avoid overly slow curing or trapped moisture that weakens bonds.
If conditions fluctuate, pause work until stability returns to guarantee proper adhesion and long-lasting finish.
Surface Moisture Levels
- You must check surface moisture before painting; proper curing time improves adhesion. Use moisture measurement tools and practice humidity control to avoid peeling.
- Use a moisture meter on wood and drywall
- Test after rain or cleaning
- Wait recommended cure times on labels
- Maintain stable indoor humidity control
- Recheck before priming and painting
Painting Exteriors vs. Interiors: Key Differences
When you’re choosing paint for a room versus a house exterior, you’re balancing different demands: durability against weather, breathability, and finish choices for appearance and maintenance.
You’ll prioritize exterior durability—UV, moisture, and mildew resistance—and tougher binders.
Indoors, you focus on interior aesthetics, washability, and low VOCs.
Prep, primer choice, and proper drying dominate both to prevent peeling.
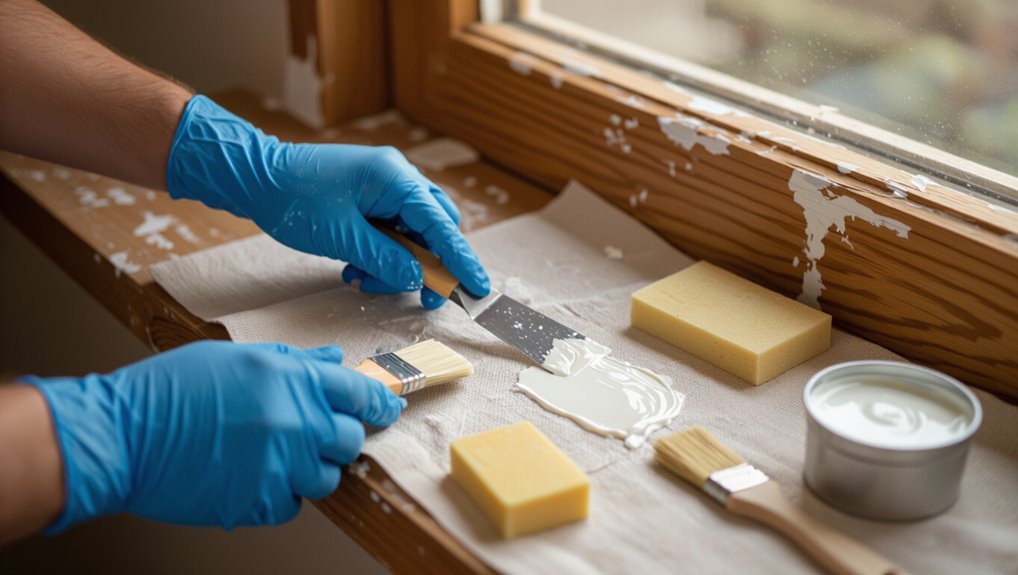
Trim, Window Sills, and Doors: Special-Case Repairs
When you tackle trim, window sills, and doors, start by removing loose paint and properly prepping the surfaces so new coatings will adhere.
Pay special attention to gaps and joints, using appropriate sealants to block moisture that causes peeling.
Proper prep and moisture control will keep these vulnerable areas durable and paint looking good longer.
Prep And Paint Removal
Trim, window sills, and doors demand more care than flat walls because their profiles, joints, and hardware hide old paint and trap moisture.
So you’ll need targeted prep and removal techniques to guarantee a durable finish. You’ll focus on paint adhesion and surface compatibility while stripping, sanding, and cleaning before priming and painting.
- Use chemical stripper for tight profiles
- Hand-scrape corners
- Sand to feather edges
- Clean solvent residues
- Mask hardware
Sealants And Moisture Control
Because trim, window sills, and doors channel water and hide gaps, you’ll need to prioritize proper sealing and moisture control to prevent peeling and rot.
Choose appropriate sealant types and exterior sealants for joints, apply waterproof coatings where needed, and install moisture barriers or vapor retarders.
Manage interior moisture and humidity control, and consider paint additives that improve adhesion and mildew resistance.
Best Caulk, Sealant, and Flashing Tips to Prevent Peeling
If you want paint to last, sealant, caulk, and flashing are as important as prep and paint quality.
Choose proper caulk types for gaps, follow sealant application instructions, and install flashing to divert water. You’ll prevent peeling by sealing joints, matching materials, and ensuring adhesion.
- Pick paintable elastomeric caulk
- Clean surfaces first
- Tool joints smooth
- Overlap flashing correctly
- Inspect yearly
Humidity Control for Bathrooms and Kitchens
You’ll want to control humidity in bathrooms and kitchens to stop paint from blistering and peeling.
Consider improving ventilation with exhaust fans, window use, or inline ducting to move moist air outside.
Also monitor and manage indoor humidity with a dehumidifier or by running fans during and after showers and cooking.
Improve Ventilation Options
When moisture builds up in bathrooms and kitchens, paint will peel faster. So improving ventilation is one of the most effective steps you can take to prevent damage.
Adding or upgrading exhaust fans, ensuring vents vent outdoors (not into attics), and using timers or humidity-sensing controls will cut humidity spikes and protect painted surfaces.
- Use mechanical ventilation with exhaust fans
- Add natural ventilation where possible
- Improve air circulation with vents and air filters
- Consider indoor plants for mild humidity control
- Install ventilation systems with humidity-sensing controls
Manage Indoor Humidity
Although bathrooms and kitchens naturally generate moisture, you can control indoor humidity to slow paint deterioration and prevent mold growth. Use exhaust fans, dehumidifiers, and open windows after showers or cooking. Install moisture barriers where needed and monitor levels with a hygrometer.
| Action | Benefit |
|---|---|
| Exhaust fan | Removes steam |
| Moisture barriers | Protects walls |
Best Paints for High-Moisture Rooms
Because high-moisture rooms challenge both finish and substrate, pick paints formulated for humidity and frequent cleaning.
You’ll want high moisture paints with mildew resistant options and bathroom finishes that resist staining. Choose kitchen durability where grease meets steam, and consider exterior coatings for damp-prone walls to boost humidity control.
- Acrylic latex mildew-resistant
- Mold-blocking primers
- Satin or semi-gloss finishes
- Waterproofing additives
- Fiber-reinforced coatings
Preventive Maintenance Schedule to Stop Peeling
If you want to stop peeling before it starts, set a simple, regular maintenance schedule that inspects surfaces, controls moisture, and addresses damage promptly.
You should perform preventive inspections monthly, note blistering, cracks, or mold, and schedule routine maintenance like caulking, re-sealing, and cleaning gutters.
Respond to issues quickly to prevent spread and prolong paint life.
Seasonal Timing: Best Time to Repaint Exteriors
Pick a stretch of mild, dry weather with temperatures between about 50°F and 85°F so paint can cure properly.
Don’t start if a hard freeze or a heatwave is forecast, since extreme cold or heat will ruin adhesion and finish.
Timing your work within that ideal window will give you the best, longest-lasting results.
Ideal Weather Window
When planning exterior repainting, aim for a stretch of several dry, mild days with temperatures consistently between about 50°F and 85°F so paint can adhere and cure properly.
You’ll target the perfect temperature range and best humidity to guarantee durability.
Consider these tips:
- Pick a multi-day dry forecast
- Paint mid-morning to early afternoon
- Avoid dew-prone evenings
- Check paint manufacturer specs
- Monitor humidity trends
Avoid Freeze/Heat Extremes
Because extreme cold or heat can ruin adhesion and finish, plan exterior painting for seasons that stay well above freezing and below extreme highs so your work cures properly.
You should avoid sudden temperature fluctuations and high humidity; they compromise primers, paint and moisture barriers.
Check forecasts, pick consecutive dry days, and delay if overnight lows dip near freezing or daytime heat exceeds manufacturer recommendations.
Cost Estimates: DIY vs. Hiring a Contractor
Curious whether you should tackle peeling paint yourself or hire a pro? You’ll weigh cost comparison, time, tools, and contractor benefits.
DIY saves labor but may take longer; pros guarantee durability.
- Materials and tools cost
- Estimated labor hours
- Permit or disposal fees
- Warranty and quality assurance
- Unexpected repair contingencies
Common Mistakes That Cause Repeat Peeling
You’ll often see paint start peeling again because you didn’t prep the surface properly, used cheap paint, or missed an underlying moisture problem.
Fixing those root issues — thorough sanding and priming, selecting the right quality and type of paint, and locating leaks or humidity sources — prevents repeat failures.
Before you repaint, check each of those areas so you’re not repeating the same mistakes.
Poor Surface Preparation
If you skip proper prep, paint won’t adhere and peeling will come back. You must guarantee surface cleanliness and correct drying to restore paint adhesion.
Remove loose paint, sand glossy spots, clean dirt and grease, and repair substrate defects so new coating bonds.
- Remove loose paint
- Sand for profile
- Wash and degrease
- Patch and seal cracks
- Allow full drying before painting
Using Low-Quality Paint
When you skimp on paint quality, the coating won’t flex, hide, or bond the way you need, and peeling will come back sooner rather than later. You should pick products rated for adhesion and paint durability; cheap options mask issues and invite repeat work.
| Choice | Result |
|---|---|
| Low quality paint | Poor adhesion |
| Premium paint | Longer life |
| Wrong finish | Faster failure |
| Proper grade | Better durability |
Ignoring Moisture Sources
Cheap paint isn’t the only culprit; moisture under or behind the coating will make even the best products fail.
You need to locate leaks, fix ventilation, and install proper moisture barriers so paint adhesion lasts. Don’t just repaint.
- Check roof and flashing
- Inspect plumbing and gutters
- Improve ventilation
- Install vapor retarders
- Use compatible primers for adhesion
Temporary Fixes to Avoid (and Why They Fail)
Although quick patches might seem tempting, they usually just delay proper repair and can make peeling worse. You’ll waste time and end up with a larger job later.
You should avoid temporary solutions and ineffective methods like quick patches, short term fixes, band aid approaches, superficial repairs, cosmetic cover ups, and other quick remedies.
They hide issues, trap moisture, and cause bigger failures.
How to Blend Patches So Repairs Are Invisible
If you want your repair to disappear, feather the edges of the patch, match the texture, and blend paint so shifts are seamless.
Use precise patching techniques and color matching, then employ blending methods for texture consistency so repairs vanish.
- Sand feathered edges
- Build matching texture
- Use sample swatches
- Apply thin glaze coats
- Inspect under varied light
Troubleshooting: What to Try If Peeling Returns
When peeling comes back, don’t assume your first fix failed—you might be dealing with an underlying issue like moisture, poor adhesion, or incompatible coatings, and you’ll need to diagnose the cause before redoing the repair.
Inspect peeling patterns and surface conditions, perform moisture assessment, consider environmental factors and seasonal effects, review paint types and application techniques, then try targeted repair techniques and follow maintenance tips.
Pre-Paint Checklist for Repaired Surfaces
Now that you’ve identified and addressed the causes of recurring peeling, get the repaired surface ready for paint with a focused checklist to prevent problems from coming back.
Do a thorough surface assessment, confirm paint compatibility, and verify adhesion. Follow this checklist:
- Clean and degrease area
- Sand and feather edges
- Prime appropriate substrate
- Check humidity and temperature
- Use recommended topcoat
Frequently Asked Questions
Can Peeling Paint Indicate Mold Behind the Surface?
Yes — peeling paint can indicate mold behind the surface. You’ll need mold identification and a thorough surface assessment to confirm; check for musty odors, staining, and moisture, and test or hire a pro if you suspect hidden growth.
Will Home Warranties Cover Paint Failure or Moisture Damage?
About 60% of claims are denied; you’ll usually find paint warranty excludes cosmetic failures, and moisture coverage varies by policy. Check specifics—some plans add moisture coverage or separate water damage riders for paint warranty protection.
Can Wallpaper Removal Cause Underlying Paint to Peel Later?
Yes—you can cause paint to peel later if you skip proper wall preparation; you’ll damage the paint layer or leave adhesive residue that prevents new coatings from bonding, so remove residue, repair edges, and prime before repainting.
Do Pets or Plants Near Walls Contribute to Paint Peeling?
Yes—pets and plants can cause peeling. If your pet behavior includes scratching, rubbing, or moisture from saliva, it damages paint; certain plant types hold moisture or emit acids, so keep distance and control humidity to prevent peeling.
Is Condensation on Windows From Occupants or Building Design?
Both—condensation comes from occupants’ moisture and building design. You’ll reduce it by improving window insulation, controlling indoor humidity, and using proper moisture management strategies like ventilation, dehumidifiers, and sealing gaps to prevent recurring damp on glass.
Conclusion
You’ve got this—think of the repair like tending a garden after a storm: remove damaged paint, prep the soil (surface), seed with primer, and topcoat when conditions are right. If problems keep sprouting, call a pro before weeds take over. With steady care and the right steps from this guide, your walls will heal and stay beautiful. Keep an eye out, act early, and your paint will reward you like a well-kept yard.