Why Is My Concrete Paint Peeling And How Do I Fix It?
Your concrete paint is peeling because moisture, poor preparation, wrong products, or application errors kept the coating from bonding. Check for damp, efflorescence, loose paint, oil, and cracks. Remove failed paint, clean and degrease, repair substrate, allow full drying, then prime with a compatible primer and topcoat suited to the area. Apply in recommended temperatures and humidity for proper cure. Keep going to learn how to diagnose causes and step through repairs.
Quick Answer Why Your Concrete Paint Is Peeling and What to Do Now
Most peeling happens because moisture, poor surface prep, or incompatible paint let the coating lose adhesion.
You can slow damage today by removing loose flakes, drying the area, and applying a temporary waterproofing or patching compound.
For a long-term fix you’ll need to address moisture sources and recoat with the right primer and paint.
One-sentence summary of the most common causes
If your concrete paint is peeling, it’s usually because water, poor surface prep, or incompatible paint is breaking the bond between the coating and the substrate—moisture (rising or trapped), dirt/efflorescence/old paint left behind, or using the wrong type of paint or primer are the typical culprits.
Addressing those three things is the quickest path to a lasting repair. Know why is my concrete paint peeling so you can fix it.
Immediate temporary fixes you can apply today
Quick fixes can stop further damage and buy you time before a full repair.
You can stabilize peeling areas and protect concrete today with simple steps:
- Scrape loose paint and sweep dust away.
- Rinse with a hose and let fully dry.
- Apply a concrete primer to bare spots.
- Tape and cover surrounding areas to block moisture and debris.
How Paint Bonds to Concrete Basic Understanding
To fix peeling paint you need to understand how coatings actually stick to concrete: surface texture, porosity, and previous sealers all change adhesion.
You’ll also want to match the right coating—acrylics, epoxies, and masonry paints bond differently and tolerate moisture and alkali to varying degrees.
Finally, remember that trapped moisture, high pH, and dirt or oils are the usual culprits when paint fails.
Concrete surface properties that affect adhesion
When paint won’t stick, it’s usually because the concrete’s surface chemistry and texture aren’t cooperating; factors like porosity, alkalinity, moisture content, and existing contaminants control how well coatings penetrate and bond.
You should assess surface pH, porosity, efflorescence, dirt, oil, and laitance.
Roughness and micro-cracking also affect mechanical keying.
Address these before priming to guarantee durable adhesion and prevent peeling.
Types of concrete paint and coatings (acrylic, epoxy, masonry paint)
Although each coating is formulated for different performance needs, you’ll usually choose between acrylic, epoxy, and masonry paints based on durability, appearance, and the substrate’s condition. Acrylics are flexible and UV resistant; epoxies bind hard for high traffic; masonry paints breathe for older walls.
| Type | Best use |
|---|---|
| Acrylic | Exterior, fading-prone areas |
| Epoxy | Garages, heavy wear |
Role of moisture, pH, and surface contaminants in paint failure
Because concrete is porous and chemically active, moisture, pH, and surface contaminants directly determine whether paint will stick or peel.
You must test for dampness and alkalinity; high pH or rising moisture pushes paint off. Oils, dust, salts, and efflorescence block adhesion and cause bubbling or flaking.
Clean, neutralize, and fully dry surfaces before priming to guarantee lasting bonds.
Common Causes of Concrete Paint Peeling
You’ll usually find peeling starts from a handful of common problems: moisture (rising damp, hydrostatic pressure, or leaks), poor surface prep (efflorescence, laitance, dirt, or oil), wrong paint or incompatible primer, application errors (too-thin coats, painting in cold or humid conditions), or movement and cracking in the substrate.
Check each of these systematically to pinpoint the cause.
Once you identify the culprit, you can choose the proper repair and prevention steps.
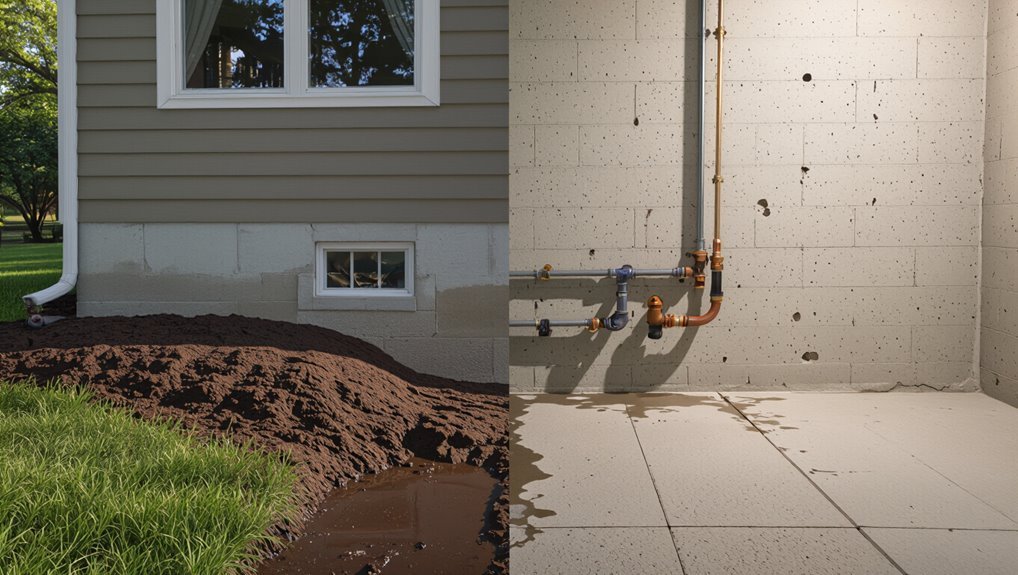
Moisture-related causes (rising damp, hydrostatic pressure, leaks)
When moisture gets into or under concrete, paint can lose adhesion and start to peel.
You’ll see bubbling, flaking, or large sheets detaching when rising damp, hydrostatic pressure, or leaks push water through the slab.
Fix it by locating sources, improving drainage, sealing cracks, installing vapor barriers or weeping systems, and allowing surfaces to dry fully before repainting with breathable masonry coatings.
Poor surface preparation (efflorescence, laitance, dirt, oil)
Moisture isn’t the only reason paint peels—poor surface preparation sets you up for failure even on dry concrete.
If efflorescence, laitance, dirt, or oil remain, coatings won’t bond. You should clean, degrease, etch, and remove loose residue before painting.
Use a stiff brush, pressure wash, or chemical cleaners as appropriate, then allow full drying to guarantee adhesion.
Using the wrong paint type or incompatible primers
Anyone can sabotage a paint job by choosing the wrong product or mixing incompatible layers, and that’s a common reason concrete coatings peel.
If you use interior latex on exterior concrete, oil-based primers with waterborne topcoats, or paints not formulated for masonry, adhesion fails.
Match paint and primer chemistries, pick masonry-grade products, and check manufacturer compatibility before you start.
Application errors (thin coats, low temperature, high humidity)
Picking the right paint and primer won’t save a job if you botch the application — thin coats, painting in cold conditions, or working during high humidity all undermine adhesion and cause peeling.
You should apply recommended film thickness, wait proper flash and recoat times, and only paint within the manufacturer’s temperature and humidity range. Skipping these steps invites poor cure and eventual failure.
Substrate movement and cracking
Because concrete expands, contracts, and settles over time, paint can’t cling forever where the substrate is shifting beneath it.
When cracks form or joints move, paint separates along those stress lines, causing flaking or large panels to lift.
You should repair cracks, install flexible fillers or elastomeric coatings, and allow movement joints so the finish can flex instead of failing.
Age and wear: UV, abrasion, and repeat coatings without stripping
As coatings age, UV rays, foot and vehicle traffic, and repeated recoats without stripping gradually break down the paint’s binder and adhesion.
So the surface gets chalky, thin, and prone to flake off. You’ll notice color fading, loss of gloss, and reduced waterproofing.
To fix it, remove weakened layers, clean thoroughly, repair defects, then apply a UV-resistant primer and proper topcoat.
How to Diagnose the Root Cause (Step-by-Step Inspection)
Start by doing a visual inspection to note peeling patterns and where it’s happening on the concrete.
Then run moisture tests—like the plastic sheet method or a moisture meter—followed by an adhesion check (tape or pull test) and a look for efflorescence or salts.
Finish by checking nearby plumbing, grading, or structural issues that could be introducing water.
Step 1 Visual inspection checklist for patterns and locations of peeling
Wondering where to look first? Inspect systematically: note peeling patterns, locations, and nearby conditions.
Check edges, vertical joints, and floor connections. Look for recurring signs that hint at cause.
- Flaking near baseboards or floor junctions
- Large blisters or map-like patches
- Peeling around cracks or control joints
- Isolated spots under eaves or overhangs
Step 2 Moisture testing methods (plastic sheet test, moisture meters)
One of the most reliable ways to confirm moisture as the culprit is to run simple tests—like the plastic sheet test and spot checks with a moisture meter—so you can separate surface problems from damp substrate issues.
Tape a clear plastic sheet over concrete for 24–48 hours; condensation or darkening means vapor.
Use a pin or non‑invasive meter to map moisture levels before repairs.
Step 3 Adhesion test (tape/pull test) and salt/efflorescence check
If your moisture checks looked clear or only flagged a few wet spots, the next step is to confirm whether the paint actually bonded to the surface and whether salts are pushing it off.
Do a tape/pull test: press strong tape, rip quickly—if paint lifts, adhesion failed.
Scrape suspect areas; look for white powder or crystalline deposits (efflorescence). Those indicate salts; treat before repainting.
Step 4 Checking for structural or leak sources (plumbing, grading)
Before you retouch paint, trace where water’s actually coming from so you don’t just mask the problem.
Inspect nearby plumbing, fixtures, and joints for drips or stains. Check grading for slopes directing water toward the wall and clear clogged drains.
Look for hairline cracks, failed sealants, or damp spots inside.
Fix leaks and regrade before repainting to prevent recurrence.
Fixing Peeling Paint on Concrete Step-by-Step Repair Guide
Before you start, make sure you’ve got safety gear and the right tools and materials on hand.
You’ll remove loose paint, clean and treat the concrete, and repair cracks or uneven areas with patching compounds.
Finally, you’ll address moisture—allow proper drying time and apply vapor barriers or sealers so your new paint will stick.
Step 1 Safety, tools, and materials checklist
1 clear checklist will save you time and keep the repair safe: gather personal protective equipment (gloves, safety glasses, a NIOSH-approved respirator for dust/solvent vapors), drop cloths or plastic sheeting, a stiff wire brush or power washer, paint scraper or putty knife, concrete patching compound, masonry primer and paint, masonry cleaner or muriatic solution (diluted), a bucket, stiff-bristled brush, sanding block or diamond pad, and any needed caulk or sealant.
- PPE on before work
- Protect nearby surfaces
- Organize tools within reach
- Mix cleaners and patches per instructions
Step 2 Removing loose and flaking paint (scraping, wire brushing, power washing)
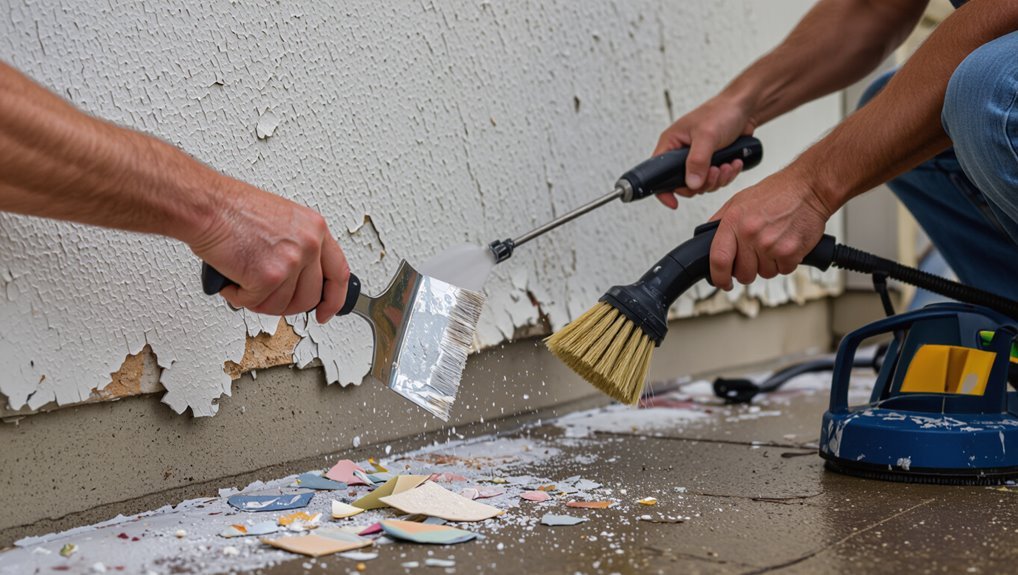
Start by stripping away all loose, flaking, and bubbling paint so you’re working on a solid surface; use a paint scraper or putty knife for peeling edges.
Follow up with a stiff wire brush to knock down remaining flakes, and consider a power washer for larger areas—just keep the nozzle moving and use a fan spray to avoid gouging the concrete.
Collect debris, vacuum dust, and repeat scraping until all unstable paint is removed.
Step 3 Cleaning and treating the surface (detergent wash, degreasing, efflorescence removal)
Now you’ll clean and treat the concrete so paint can bond properly: scrub with a stiff brush and a detergent solution, rinse thoroughly, and let dry.
Use a concrete degreaser for oil stains, following label instructions.
Remove efflorescence with a mild acid cleaner or specialized remover, neutralize and rinse.
Confirm surface is fully dry and free of contaminants before priming and repainting.
Step 4 Repairing cracks and uneven substrate (patching compounds, crack fillers)
Patch visible cracks and level uneven areas before you prime—any gaps or hollows will let moisture and movement undermine new paint.
Use a concrete patch for wide voids and a flexible crack filler for hairline or active cracks.
Chase and clean cracks, apply product per instructions, tool smooth, and allow full cure.
Sand feathered edges so primer and paint bond evenly.
Step 5 Moisture mitigation before repainting (drying time, vapor barriers, concrete sealers)
After you’ve filled cracks and smoothed the surface, address moisture before priming—leftover damp or vapor pressure will lift new coatings just like it did the old.
Let concrete dry fully (use moisture meter), fix drainage, and install vapor barriers where needed.
Apply a breathable concrete sealer to block rising damp but allow evaporation.
Only repaint when moisture readings are within product specs.
Step 6 Choosing the right primer and paint for concrete
Because concrete has unique porosity and moisture behavior, you need primers and paints formulated for masonry rather than standard interior products; choosing the right systems prevents re-peeling and guarantees adhesion. Pick a breathable masonry primer, then a concrete-specific acrylic or elastomeric paint. Match products to substrate and exposure for durability.
| Product Type | Best Use |
|---|---|
| Masonry primer | New or patched concrete |
| Acrylic paint | Exterior concrete |
| Elastomeric | High-moisture areas |
| Epoxy | Garage floors |
Step 7 Proper application techniques (temperature, humidity, coat thickness, drying times)
Now that you’ve picked a primer and paint suited for concrete, pay close attention to how you apply them: temperature, humidity, coat thickness, and drying time all affect adhesion and longevity.
Apply coats within manufacturer temperature/humidity ranges, avoid painting in direct sun or high humidity, keep each coat thin and even, and respect recommended flash and full cure times for durable, non-peeling results.
Step 8 Post-application curing and inspection
When the paint’s down and dry, give the surface a careful cure period and a thorough inspection so you catch any early failures before they get worse.
Keep traffic and moisture off for the manufacturer’s recommended time, check for blisters, cracks, or adhesion loss, and mark problem spots.
Address issues promptly with spot repairs or recoat as needed to guarantee long-term performance.
Comparing Repair Options and Coating Types
You can choose a quick DIY patch for localized peeling or a full strip-and-recoat when damage is widespread.
DIY is cheaper and faster but may not last if adhesion or contamination is the root cause.
Pick coatings by location: epoxy or polyaspartic for garage floors, moisture-tolerant primers and paints for basements, breathable masonry paints for exterior walls, and slip-resistant sealers for patios.
We’ll compare the pros and cons and recommend products for each situation.
Small DIY patch vs. full strip-and-recoat (pros and cons)
Thinking about whether to spot-patch peeling paint or strip and recoat the whole surface? You’ll weigh cost, time, durability, and skill. Patch’s quick and cheap but may show seams and fail sooner. Full strip lasts longer and looks uniform but costs more and takes effort.
| Patch | Strip-and-recoat |
|---|---|
| Cheap | Expensive |
| Fast | Slow |
| Visible seams | Uniform finish |
| DIY-friendly | Labor-intensive |
| Shorter life | Longer life |
Best coating choices by location (garage floor, basement, exterior wall, patio)
Because different locations face different stresses, choosing the right coating for a garage floor, basement, exterior wall, or patio makes a big difference in longevity and performance.
You’ll pick by moisture, traffic, and UV exposure. Consider these options:
- Garage: epoxy with silica for traction
- Basement: breathable masonry sealer
- Exterior wall: elastomeric paint
- Patio: UV-stable concrete stain with sealer
Common Mistakes to Avoid
Don’t paint over damp or dirty concrete—you’ll just trap moisture and invite peeling.
Always use a compatible primer and avoid mixing products that won’t bond.
Also, don’t paint in the wrong weather or expect paint to fix underlying moisture or structural issues.
Painting over damp or contaminated surfaces
If you paint over damp or contaminated concrete, the finish won’t adhere and will peel sooner rather than later.
You need to test for moisture, let surfaces dry fully, and remove oil, grease, efflorescence, and loose debris with appropriate cleaners and a stiff brush or pressure washer.
Don’t skip proper surface prep—clean, dry concrete is essential for durable paint adhesion.
Skipping primer or using incompatible products
When you skip a primer or mix products that aren’t compatible, the paint can’t form a secure bond to concrete and will blister, flake, or peel much sooner than expected.
Use a concrete-specific primer and match paint chemistry (latex over latex, epoxy over epoxy).
Test adhesion on a small area, follow manufacturer guidelines, and never layer products with conflicting bases or required curing profiles.
Applying in unsuitable weather conditions
Because paint cures through chemical reactions that depend on temperature and humidity, applying concrete paint in the wrong weather lets it fail before it even bonds.
You should check forecasts and follow manufacturer temperature/humidity ranges. Don’t paint in direct sun, during rain, or when temperatures will drop below recommended levels overnight.
Allow full cure time and avoid rushing jobs when conditions aren’t stable.
Over-relying on paint to solve moisture or structural problems
Even after you’ve waited for perfect weather, paint won’t fix underlying moisture or structural issues; relying on it alone just masks problems until the coating fails.
You need to identify and repair leaks, efflorescence, cracks, or poor drainage first. Use vapor barriers, sealants, or professional structural repair when necessary.
Paint’s cosmetic; treat the cause to prevent recurrence and wasted effort.
Prevention and Best Practices for Long-Lasting Concrete Paint
To keep paint from peeling you’ll want a routine maintenance checklist — regular cleaning, inspections, and resealing when needed.
Before repainting, follow strict surface-prep standards and address moisture by improving drainage and sealing cracks.
Choose the right products for concrete and don’t hesitate to get professional help for persistent problems.
Routine maintenance checklist (cleaning, inspections, resealing)
When you want your painted concrete to last, a simple routine of cleaning, inspections, and timely resealing will catch problems before they escalate; follow it every season to keep small issues from becoming large repairs.
Sweep and pressure-wash gently, remove stains, check for cracks, blisters, or moisture, touch up thin spots, reseal high-traffic areas, and document dates so you stay on schedule.
Surface prep standards before repainting
1 step you can’t skip before repainting concrete is thorough surface prep — it determines whether the new coating will adhere or fail.
Remove loose paint, dirt, and efflorescence with pressure washing or mechanical abrasion.
Repair cracks, spalls, and laitance, then etch or profile for proper bonding.
Verify surfaces are dry and dust-free, and use manufacturer-recommended primers for durable adhesion.
Moisture control and drainage solutions around concrete
After you’ve prepped and primed the surface, controlling moisture around the slab is what keeps paint from blistering and peeling; water undermines adhesion from behind the coating.
Grade soil away from the slab, extend downspouts, install guttering, and use gravel or French drains where runoff pools.
Seal cracks, apply vapor barriers beneath slabs if accessible, and maintain landscaping to prevent saturation.
Product selection and professional help guidelines
Choose the right products and know when to call a pro: pick paints and primers formulated for concrete and high-alkalinity substrates, use concrete-specific elastomeric or acrylic masonry coatings for exterior slabs, and match primers to new versus previously painted or sealed surfaces so adhesion lasts.
Test small areas, follow manufacturer prep and cure times, and hire a pro for severe cracks, efflorescence, structural issues, or persistent moisture.
Cost and Time Estimates for Common Repairs
You’ll want to weigh DIY versus professional repair costs—DIY projects often run tens to a few hundred dollars while pros can charge hundreds to thousands depending on scope.
Expect surface prep and small repairs to take a few hours to a day, with full prep and recoating usually needing one to three days (plus drying time between coats).
Knowing these ranges helps you decide whether to tackle the job yourself or hire a pro.
Typical cost ranges for DIY vs. professional repairs
Wondering whether to tackle peeling concrete paint yourself or hire a pro? You can save money DIY: expect $50–$300 for cleaners, patch, primer, and paint. Pros cost $300–$2,000 depending on area and repairs. Choose DIY for small, simple jobs; hire pros for large surfaces or structural fixes.
| Option | Typical cost |
|---|---|
| DIY small job | $50–$300 |
| DIY major | $200–$600 |
| Professional | $300–$2,000 |
Estimated timeframes for surface prep, repairs, and recoating
A typical repair timeline for peeling concrete paint breaks down into three phases—surface prep, repairs, and recoating—and most small-to-medium jobs take a day or two, while larger or moisture-related issues can stretch to several days or more.
Surface prep usually takes 2–6 hours; patching and curing 4–48 hours depending on products; primer and two coats plus drying 8–36 hours.
FAQ Answers to Common Questions
You’ll want clear answers to common concerns like whether you can paint over peeling areas or how long concrete must cure before painting.
We’ll cover whether a masonry sealer helps when moisture’s present, how to tell efflorescence from poor adhesion, and when it’s time to call a pro.
Read on for concise guidance so you can decide the right next steps.
Can I paint over peeling concrete paint without removing it all?
Can you paint over peeling concrete paint without stripping it all off? You can in limited spots, but you must remove loose, flaking areas, clean surface dirt, and feather edges so new paint adheres.
Use a compatible primer on bare concrete and flexible concrete paint.
For widespread peeling, full removal and proper prep prevent future failures—spot repairs are a temporary fix.
How long should concrete be cured before painting?
Most concrete needs at least 28 days of curing before you paint it, because that gives the slab time to gain strength and for internal moisture to drop to safe levels for coatings.
If you pour and finish recently, wait the full curing period; if conditions were cold or wet, allow extra time.
Test for dryness with a moisture meter before priming and painting.
Will a masonry sealer stop paint from peeling if moisture is present?
If moisture is actively moving through the concrete, a masonry sealer alone won’t stop paint from peeling because the coating can’t bond to a damp substrate.
Sealers can slow vapor transmission or block surface moisture, but they don’t cure the underlying wetness or fix leaks.
So you should diagnose and stop the source of water before relying on a sealer and paint.
After repairs, use a vapor-permeable primer and paint.
How do I know if peeling is caused by efflorescence or poor adhesion?
How can you tell whether peeling paint comes from efflorescence or from poor adhesion?
Check for white, powdery deposits on the surface or under flaking paint — that signals efflorescence and moisture migration.
If paint peels in large, contiguous sheets with no powder and the substrate is dry, poor adhesion or improper prep is likely.
Scratch tests and moisture meters help confirm the cause.
When is it necessary to call a professional?
Once you’ve determined whether peeling comes from efflorescence or poor adhesion, you’ll know which repairs you can handle and when to call in a pro.
Call a professional if the damage is widespread, moisture sources persist, structural cracks exist, or previous fixes failed.
Also hire one for complex waterproofing, pressure washing, or if you lack proper tools or confidence to guarantee a durable repair.
Quick Repair Checklist (Printable) for Peeling Concrete Paint
Use this quick repair checklist to get peeling concrete paint fixed fast and without missing steps.
Follow these steps, check them off, and keep a photo for records.
- Scrape loose paint, sweep and vacuum debris.
- Clean with trisodium phosphate or mild detergent; rinse and dry.
- Repair cracks, etch surface if smooth, prime porous areas.
- Apply appropriate concrete paint in recommended conditions; cure fully.