Why Is My Paint Bubbling and Peeling? Causes You Shouldn’t Ignore
If your paint is bubbling and peeling, it’s because the coating’s bond to the surface has failed. You’re likely dealing with trapped moisture, poor surface prep, incompatible primer/paint, or heat and UV damage. Leaks, high humidity, or painting over glossy or dirty surfaces often trigger blisters and lift. Fix the source—drying, cleaning, and proper priming—before you repaint, or the problem will return. Keep going to learn how to diagnose causes and repair them correctly.
Quick Answer Why Paint Is Bubbling and Peeling
You’re usually seeing bubbling and peeling because of trapped moisture, poor surface prep, incompatible paints, or prolonged sun and heat exposure.
If the paint is bubbling across large areas, near foundations, or alongside rotten wood, it can signal urgent structural or water-intrusion problems that need immediate attention.
Check the source of moisture and the substrate before repainting to avoid repeat failures.
One-sentence summary of common causes
Although it can look like a cosmetic problem, paint bubbles and peels because moisture, poor surface preparation, incompatible paints, or heat and sunlight weaken adhesion and cause trapped water or air to expand beneath the film.
When you wonder why is my paint bubbling and peeling, check for leaks, high humidity, dirty or chalky surfaces, wrong primer/paint combos, and direct sun exposure that accelerates failure.
When bubbling/peeling indicates urgent structural issues
The common causes you just read about are often cosmetic, but bubbling or peeling can also flag more serious problems you should address immediately.
If paint bubbles across wide areas, near floors, ceilings, or exterior walls, suspect trapped moisture, roof leaks, plumbing failures, or failing substrate.
Don’t ignore spreading damage—inspect promptly, stop moisture sources, and call a professional to prevent rot, mold, or structural decay.
How Paint Works Basic Understanding
To understand bubbling and peeling, you need to know that paint adhesion is how well the coating bonds to the surface beneath it.
Typically you’ll have a substrate, a primer, the paint layer, and sometimes a topcoat, and each layer has to interact properly.
If moisture, heat, or incompatible surface chemistry intervene, those bonds weaken and the paint will blister or lift.
What paint adhesion means
Adhesion is how paint sticks to a surface—it’s the bond that holds your finish in place so it doesn’t peel, bubble, or flake away.
Good adhesion relies on proper surface cleanliness, dryness, and compatibility between paint and substrate.
When adhesion fails, moisture, temperature shifts, or contaminants break that bond, causing lifting.
You can minimize problems by preparing surfaces and choosing appropriate products.
Typical layers: substrate, primer, paint, topcoat
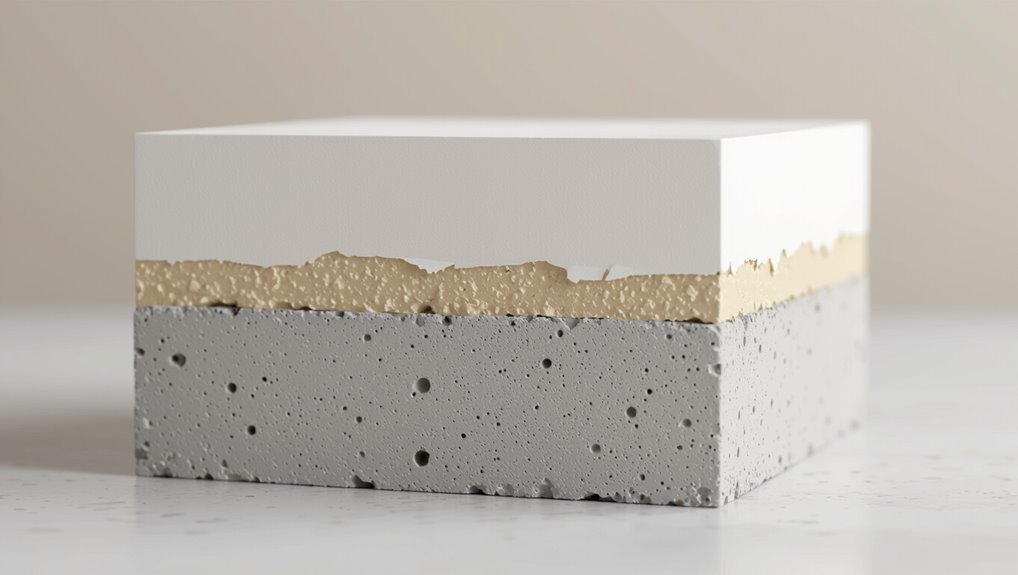
A typical paint system stacks four layers—substrate, primer, paint, and topcoat—each playing a specific role in protection and appearance.
You rely on the substrate for structural support, the primer for sealing and adhesion, the paint for color and coverage, and the topcoat for durability and resistance.
Each layer must be chosen and applied correctly to prevent failures like bubbling and peeling.
How moisture, heat, and surface chemistry affect paint
When moisture, heat, and surface chemistry change, they each alter how paint bonds, cures, and performs over time—so you’ll see bubbling, peeling, or soft spots if conditions aren’t right.
Moisture lifts coatings, trapped vapor expands with heat, and alkali or contaminants prevent adhesion.
You should control humidity, dry surfaces, use compatible primers, and avoid painting in extreme temperatures to prevent failure.
Primary Causes of Bubbling and Peeling (Problem-Solution)
You’ll usually find bubbling and peeling traceable to a few clear causes: moisture problems, poor surface prep or application, incompatible materials, environmental or structural stresses, and biological or chemical damage.
For each cause you can identify specific signs and take targeted fixes—like drying and sealing wet substrates, redoing prep and using the right primer, or replacing incompatible coatings.
Start by inspecting where the paint failed and match the visible clues to the likely cause so you can apply the correct solution.
Moisture-related causes
You’ll often find bubbling and peeling where moisture’s coming from below, inside, or above the structure.
Rising damp or groundwater can push moisture through walls, while condensation and high indoor humidity weaken paint from the back.
Leaks from roofs, windows, or plumbing create concentrated wet spots.
First, identify which source is causing the problem so you can fix the moisture and then repair or repaint.
Rising damp and groundwater intrusion
If your paint is bubbling or peeling from the bottom up, rising damp and groundwater intrusion are likely suspects: moisture wicks through masonry and skirting boards, pushing paint away from substrates and breaking bonds.
Check for tide marks, crumbling plaster, salt deposits, or musty smells.
Fix drainage, repair damp-proof courses, replace damaged plaster, and allow walls to dry before repainting with breathable, moisture-tolerant coatings.
Condensation and high humidity indoors
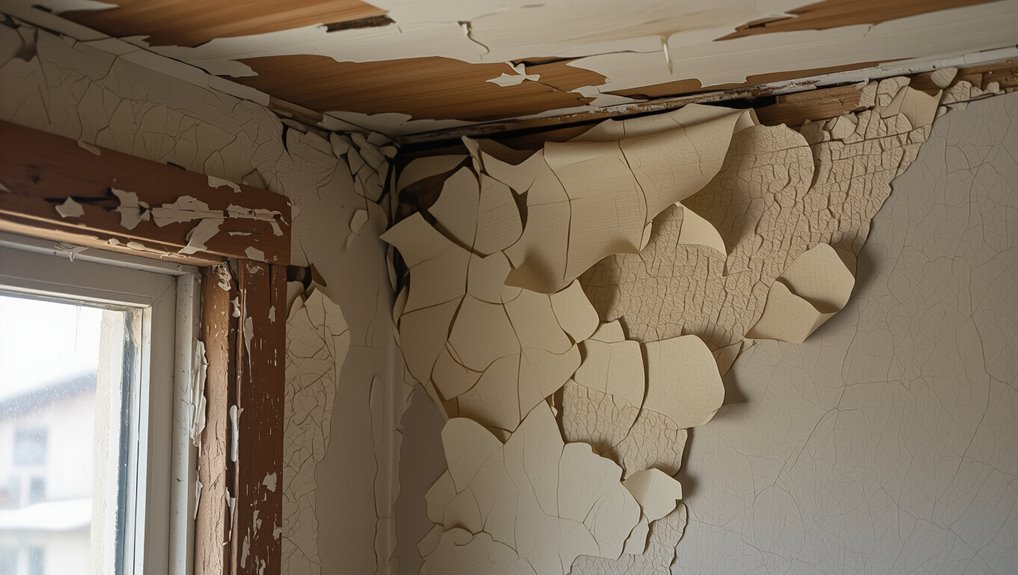
When indoor humidity stays high, moisture condenses on cool walls and undermines paint adhesion.
So you’ll often see bubbling, blistering, or peeling starting at window heads, corners, and exterior-facing walls.
You can stop it by improving ventilation, using exhaust fans, running dehumidifiers, and keeping indoor temperatures steady.
Remove damaged paint, let surfaces dry fully, then repaint with moisture-tolerant primer and paint.
Leaks from roofs, windows, or plumbing
Because leaks introduce a steady source of moisture behind paint, they quickly cause bubbling, blistering, and peeling, often starting where water runs in from roofs, windows, or plumbing joints.
You should inspect attic, eaves, flashing, window sills, and under sinks for stains or soft spots.
Fix leaks, dry materials thoroughly, replace damaged drywall or trim, then prime with a mold-resistant sealer before repainting.
Surface-preparation and application errors
If you skip proper cleaning or leave grease and dust behind, paint won’t stick and will blister or peel.
Painting glossy or incompatible surfaces without the right primer creates weak bonding that fails over time.
Also avoid laying paint on too thick or working in extreme temperatures, since that traps solvents and prevents proper curing.
Poor cleaning and residual contaminants
Though it may seem minor, failing to remove dirt, grease, or old paint leaves contaminants that stop new coatings from bonding properly.
You’ll see bubbling, flaking, or rapid wear when oils, dust, or mildew remain. Clean thoroughly with appropriate cleaners, rinse, dry, and sand glossy spots.
Use a degreaser on kitchen areas and a mildew treatment where needed before priming and painting.
Painting over glossy or incompatible surfaces without proper priming
After you’ve cleaned and deglossed a surface, you still can’t simply slap paint onto shiny or incompatible materials and expect it to stick.
You’ll get poor adhesion, bubbling, and eventual peeling if you skip a suitable primer or bonding agent. Always use a primer formulated for slick substrates (or oil-to-latex bonding primer), follow dry times, and sand lightly between coats for reliable adhesion.
Applying paint too thickly or in unsuitable weather
One common mistake is applying paint in coats that are too thick or working in weather that’s too hot, cold, humid, or windy, and you’ll see bubbling, sagging, and poor adhesion as a result.
You should apply thinner, even coats, follow manufacturer recoat times, and avoid extreme conditions.
Use proper drying windows and a fan or dehumidifier when needed to guarantee good bonding.
Material and compatibility issues
Check the primer and paint you’re using, because incompatible combinations can stop coatings from bonding and lead to bubbling or peeling.
Don’t use low-quality or expired paint, as weakened binders fail prematurely.
Also inspect old layers—aged paint can lose adhesion and cause new coats to lift.
Incompatible primer/paint combinations
When primers and paints aren’t compatible, they’ll fail to bond and you’ll see bubbling, flaking, or peeling soon after application.
You should match primer type to paint chemistry—oil-based primer with oil or a proper adhesion-promoting primer for latex.
Test a small area, follow manufacturer guidelines, and remove and re-prime if adhesion fails to guarantee a durable finish and prevent recurring delamination.
Low-quality paint or expired products
If you’ve ruled out primer-paint mismatch, look next at the paint itself: low-quality or expired products often lack the binder strength and additives that keep coatings flexible and adhesive, so they’re much more likely to bubble, flake, or peel after drying.
Check cans for age, separation, or foul odor; test a small patch.
Replace old or cheap paint with reputable, properly stored products.
Old paint layers losing adhesion
Because older paint systems lose their grip over time, you’ll often see bubbling or peeling starting at the weakest layer where adhesion has failed.
You should strip loose layers, sand to solid edges, and clean surfaces before repainting.
Test compatibility between old and new coatings—oil over latex, for example, can fail.
Use appropriate primers to reestablish a stable bond and prevent recurrence.
Environmental and structural factors
You’ll often see paint fail where environmental or structural stresses are at work, so start by checking for UV-related fading and thermal expansion that break the film.
Look for signs of building movement—cracks, shifting substrates, or loose fasteners—that let paint separate from the surface.
On masonry, test for salt or efflorescence, since those salts push paint off as moisture moves through the wall.
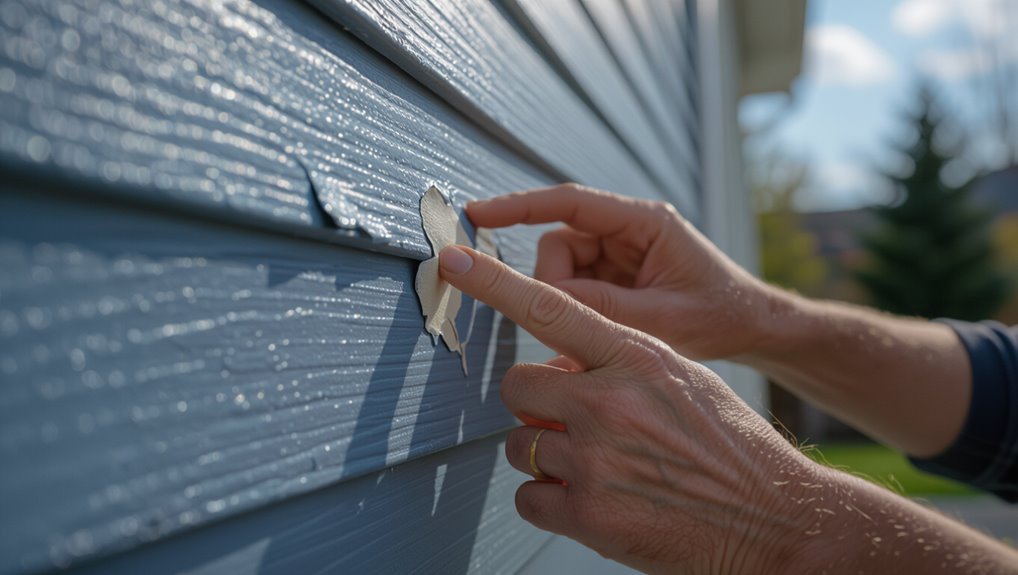
UV exposure and thermal expansion
When sunlight beats down on painted surfaces, UV rays break down binders and pigments so the film gets brittle and starts to crack. Over repeated heating and cooling cycles, the substrate and paint expand and contract at different rates, forcing blisters and flakes to form.
You can prevent this by using UV-resistant coatings, lighter colors, and proper primers to maintain flexibility and adhesion.
Structural movement, cracks, and substrate failure
If walls shift, foundations settle, or nearby vibrations stress a surface, paint won’t stay bonded and you’ll see bubbles, cracks, or sheets peeling away.
You should inspect for hairline cracks, movement joints, or loose plaster; these let moisture and air break adhesion.
Repair structural issues, stabilize substrates, fill and sand cracks, then prime before repainting to prevent recurrence.
Salt or efflorescence on masonry
Structural movement and cracks let moisture reach masonry just as easily as they undermine plaster, but salts in the masonry bring a different problem: efflorescence can push paint off surfaces from behind.
You’ll see white, powdery deposits and blistering where salts migrate with water.
Clean, allow walls to dry, fix water entry, then use a salt-resistant primer and breathable masonry paint to prevent recurrence.
Biological and chemical causes
You’ll often find that biological growth like mold, mildew, or fungi can form beneath paint, lifting it away from the surface.
You should also watch for chemical reactions between new paint and old coatings or treatments that break adhesion and cause bubbling.
Addressing these issues means removing contaminants, treating surfaces, and choosing compatible products before repainting.
Mold, mildew, and fungal growth under paint
Mold, mildew, and other fungi thrive where moisture meets organic material, and they’ll lift and break the bond between paint and substrate as they grow.
You’ll see discoloration, soft or powdery patches, and bubbling as colonies expand.
Remove affected paint, fix the moisture source, clean with a fungicide or diluted bleach, dry thoroughly, then repaint with a mildew-resistant primer and topcoat.
Chemical reactions with underlying coatings or treatments
When old finishes or surface treatments chemically react with new paint, they’ll break the bond and cause bubbling or peeling.
You’ll see blistering where solvents, waxes, or incompatible primers prevent adhesion. Remove or neutralize the old coating, sand to sound substrate, and use a primer formulated for your situation.
Test a small area before full repainting to avoid repeated failure.
How to Diagnose the Exact Cause
Start by looking closely and feeling the surface for soft spots, blister patterns, or bubbling edges.
Then try simple adhesion and moisture checks at home, review recent repairs, storms, or product changes, and note any patterns.
If you suspect structural damage, persistent leaks, or mold, call a professional for a thorough assessment.
Step 1 Inspect visually and feel the surface
Begin by closely examining the area: look for bubbles, cracks, blistering, and loose flakes.
Then run your hand over the surface to feel for soft spots, raised edges, or powdery residue that signal adhesion or substrate problems.
Note where damage clusters, whether it’s localized or widespread, and record the paint type, underlying material, and any previous repairs to guide your next diagnostic steps.
Step 2 Perform adhesion and moisture tests (simple DIY methods)
Because paint failures often come from poor adhesion or trapped moisture, you’ll want to run a few simple DIY tests to pinpoint which is at fault before repairing.
Start with a tape pull test, a moisture meter or dampness check, and a solvent smear to spot soft paint.
Follow results to choose fix: remove loose paint or dry and seal.
- Frustrating
- Urgent
- Reassuring
Step 3 Check recent history: repairs, weather events, product use
If you’ve had recent repairs, storms, or changes in the products you’ve used, they can point directly to why paint’s bubbling or peeling — so go back through the last few months and note any patching, caulking, roof leaks, pressure-washing, or new primers and paints applied.
Compare areas affected to those events, check drying conditions after work, and flag incompatible products or recent heavy moisture exposure.
Step 4 When to call a professional (structural, plumbing, or mold)
When should you call a pro? If bubbling or peeling recurs, spreads rapidly, or follows leaks, hire an expert.
Call a plumber for persistent moisture or hidden leaks, a structural engineer for sagging walls or compromised framing, and a mold specialist if you detect musty smells or visible mold.
Don’t delay—early professional diagnosis prevents bigger damage and costly repairs.
Fixes and Repairs by Cause (Step-by-Step Solutions)
Now that you’ve diagnosed the cause, we’ll walk through step-by-step fixes for each problem so you can stop bubbling and peeling at the source.
You’ll learn how to repair moisture-related failures, correct surface prep and repainting techniques, handle masonry and efflorescence, and treat mold and other biological issues.
Follow each targeted procedure to guarantee a durable, trouble-free finish.
Repairing moisture-related failures
First, you’ll stop water at its source by fixing leaks, sealing roof or flashing failures, and improving grading or gutter drainage so moisture can’t reach painted surfaces.
Then you’ll dry affected areas thoroughly with fans, heaters, or commercial dehumidifiers and open ventilation to lower humidity before repainting.
Finally, confirm surfaces are fully dry with a moisture meter and only proceed when readings are within recommended levels.
Stopping leaks and improving drainage
Because moisture usually finds the weakest path, you’ll stop most paint bubbling and peeling by fixing leaks and improving drainage around the affected area.
Inspect roofs, flashing, gutters and downspouts; clear debris and seal gaps. Grade soil away from foundations, install or repair gutters, and replace damaged flashing.
Patch plumbing leaks, caulk joints, and reroute runoff to prevent recurring moisture intrusion and paint failure.
Drying techniques and dehumidification
Fixing leaks and improving drainage will stop most water sources, but you still need to remove trapped moisture before repainting.
Use fans and axial blowers to accelerate airflow, open windows when humidity allows, and run dehumidifiers until readings stay below 50% for 48 hours.
Check with a moisture meter; don’t paint until substrate readings match manufacturer limits to prevent recurrence.
Correct surface preparation and repainting process
You’ll start by removing loose paint safely with scraping, chemical strippers, or low-dust sanding and by following PPE and containment measures.
Then clean, sand, and degrease the surface thoroughly so new coatings can bond—wipe, vacuum, and use the proper grit for the substrate.
Finally, pick primers and paints formulated for that material and condition to prevent future bubbling and peeling.
Removing loose paint safely (methods)
Start by removing all loose, flaking paint so the new finish will adhere properly and last.
Use a sturdy putty knife or paint scraper at a low angle to lift flakes, tapping stubborn spots with a hammer and chisel if needed.
For delicate surfaces, employ a chemical stripper per instructions or a heat gun on low, working slowly to avoid damage.
Clean debris thoroughly.
Cleaning, sanding, and degreasing best practices
Before repainting, clean, sand, and degrease the surface thoroughly so the new paint can bond and look smooth.
Remove dust, flaking edges, and oils methodically. Scuff with appropriate grit, wipe with solvent, and let dry completely.
Take safety precautions like ventilation and gloves.
- Reclaim confidence in your walls
- Prevent frustration later
- Enjoy a flawless finish
Choosing primers and paints for specific substrates
When different substrates demand different chemistry, choosing the right primer and paint is essential to get durable adhesion and a smooth finish; match primers to material—metal, bare wood, drywall, masonry, or glossy finishes—and then pick compatible topcoats formulated for that substrate and the environment (interior, exterior, high-humidity, or high-traffic).
You’ll apply stain-blocking primer for knots, rust-inhibitor for metal, masonry sealer, and flexible exterior coatings.
Repairing masonry and efflorescence issues
When you see efflorescence or crumbling mortar, start by washing salts off the masonry with a stiff brush and appropriate cleaner.
Then let it dry completely before sealing to block future salt migration.
If plaster or mortar is badly damaged, remove the loose material and replaster or repoint using compatible mixes to restore a sound substrate.
Taking these steps stops salts from pushing paint off and gives your new coating a stable surface to adhere to.
Cleaning salts and sealing masonry
If efflorescence or loose salts are showing through paint, you’ll need to clean and stabilize the masonry before repainting or sealing; otherwise the salts will keep pushing coatings off.
Scrub with a stiff brush and dilute muriatic or white vinegar solution, rinse thoroughly, let dry completely, then apply a breathable masonry sealer or salt-blocking primer.
Repaint with compatible, breathable coating.
Replastering or repointing where necessary
Although cleaning and sealing can stop most salt migration, you’ll often need to replaster or repoint damaged areas to restore a sound, moisture-resistant surface before repainting.
Remove loose render, rake out deteriorated mortar, and let substrates dry.
Use compatible lime-based plaster or mortar, apply in thin, keyed coats, and cure properly.
Repaint only after moisture and salts are fully controlled.
Addressing mold and biological causes
Before repainting, you’ll want to follow safe mold remediation steps—protect yourself, remove affected material, and dry the area thoroughly.
After the surface is clean and dry, apply an anti-microbial primer to block regrowth.
Finish with a paint formulated to resist biological growth so your repair lasts.
Safe mold remediation steps
When you spot bubbling or peeling paint caused by mold, take quick, careful action to protect your health and stop further damage; start by isolating the area, ventilating when safe, and wearing proper personal protective equipment (gloves, N95/half‑face respirator, and eye protection).
Contain with plastic sheeting, remove contaminated paint and drywall, clean surfaces with appropriate fungicide or diluted bleach, dry thoroughly, and dispose of waste in sealed bags.
Anti-microbial primers and paints
After you’ve removed mold-damaged paint and dried the area, using an anti-microbial primer and paint can help suppress future biological growth and protect your repair.
Choose products labeled for mold resistance, follow manufacturer instructions, and guarantee good ventilation while applying.
Apply primer evenly, allow proper cure time, then topcoat.
Reinspect periodically; recoat if finish degrades or moisture issues recur to prevent return.
Prevention and Best Practices
Before you start painting, run a quick pre-paint checklist to confirm the surface is clean and dry, the weather’s suitable, and your products match the job.
Pick coatings formulated for indoor or outdoor use and the local climate to avoid premature failure.
Set a maintenance plan—regular inspections, touch-ups, and seasonal care—to stop bubbling and peeling from coming back.
Pre-paint checklist (surface, weather, products)
1 simple checklist will save you time and money: inspect the surface, confirm suitable weather, and verify product compatibility before you ever open a can.
Do these steps to avoid bubbling and peeling:
- Check for moisture, loose paint, and mold — don’t ignore hidden damage.
- Wait for dry, moderate conditions — rushing ruins results.
- Match primer and paint to the surface — small choices prevent big headaches.
Choosing the right products for indoor vs. outdoor use
When you’re deciding between indoor and outdoor paints and primers, pick products formulated for the environment they’ll face. You’ll choose moisture-resistant, mildew-rated formulations for bathrooms and breathable, UV-resistant coatings for exterior walls. Match primer type to substrate and paint (latex vs. oil) to prevent adhesion failures.
| Indoor | Outdoor |
|---|---|
| Low-VOC | UV-resistant |
| Breathable | Waterproof |
Long-term maintenance tips to prevent recurrence
Choosing the right products was a big step, but regular upkeep keeps paint failures from coming back.
Inspect surfaces twice yearly, clean dirt and mildew, and touch up chips promptly.
Maintain proper ventilation to reduce moisture, reseal exterior trim and caulk joints as needed, and sand and repaint worn areas before peeling starts.
Keep gutters clear to prevent water damage.
Seasonal and climate considerations
Because weather and seasons change how paint adheres and weathers, you should match your prep and products to your local climate—plan jobs for mild, dry days, use moisture- and UV-resistant coatings where needed, and adjust drying times and primer choices for humidity or temperature extremes.
Store materials properly, schedule exterior work outside freeze/thaw cycles, ventilate for indoor humidity, and choose breathable paints for damp regions.
Common Mistakes to Avoid
Don’t skip primer or pick the wrong one, since poor adhesion is the root of many bubbles and peels.
Don’t paint when temperatures or humidity are outside the product’s range, and don’t use cheap or incompatible paints that won’t bond properly.
Finally, don’t ignore small blisters or flakes—catching them early keeps repairs simple.
Skipping primer or using wrong primer
One quick misstep that wrecks adhesion is skipping primer or grabbing the wrong one—if you skip it, paint won’t bond properly; if you use the wrong primer, it can repel or chemically react with your topcoat.
You’ll see bubbling, peeling, or flaking when primer isn’t compatible with substrate or paint. Always choose the correct primer type and follow manufacturer instructions to guarantee a durable finish.
Painting in unsuitable temperature/humidity
After you’ve picked the right primer, pay attention to the conditions you’re painting in—temperature and humidity strongly affect how paint cures and adheres.
If it’s too cold, paint won’t cure properly and can bubble or crack; if it’s too hot or humid, drying stalls and traps moisture, causing peeling.
Check product limits, delay jobs during extreme weather, and control ventilation for stable results.
Using cheap or incompatible paints
If you skimp on paint quality or mix incompatible products, you’ll likely pay for it with bubbling, poor adhesion, or rapid failure.
Cheap paints often lack binders and flexibility, so they crack and peel. Mixing incompatible solvent- and water-based formulas prevents proper bonding.
Always match paint types, follow manufacturer recommendations, and invest in quality coatings to avoid premature deterioration and costly rework.
Ignoring small signs until large areas fail
When you spot tiny blisters, hairline cracks, or a few flakes, don’t shrug them off—those small defects are the earliest warning signs of systemic failure.
If you delay, moisture, UV, and substrate issues spread beneath the film.
Address causes early: scrape loose paint, fix leaks, sand, prime, and repaint. Acting promptly saves time, money, and prevents large-scale repairs.
Cost and Time Estimates for Typical Repairs
You can often fix small bubbling or peeling spots yourself with a few hours and basic materials, while a full repaint will take days and more costly supplies.
Compare that DIY time-and-materials cost to a pro’s quote when the damage is widespread, on high walls, or needs surface prep you can’t handle.
Knowing when a contractor saves you time and prevents rework will help you choose the most cost-effective option.
Small DIY patch vs. full repaint (materials and time)
Because small peeling spots are often localized and superficial, you can usually fix them yourself with minimal supplies and time, while a full repaint requires more prep, materials, and labor. You’ll need sandpaper, primer, matching paint, and a few hours for a patch; a full repaint needs more paint, rollers, tape, and a day or more per room.
| Task | Materials | Time |
|---|---|---|
| Patch | Sandpaper, primer, paint | 2–4 hrs |
| Small room | Rollers, tape, paint | 1 day |
| Whole room | Extra paint, tools | 1–3 days |
When professional repair is cost-effective
If your peeling or bubbling covers large areas, affects multiple rooms, or exposes damaged drywall, calling a pro often saves time and prevents mistakes.
Professionals charge $200–$800 for spot repairs and $1,000–$5,000 for full rooms depending on size, prep, and materials.
Expect 1–5 days for repairs vs. longer DIY learning curves.
Get written estimates and warranties before hiring.
Tools and Products Recommended
You’ll want a compact kit of diagnostic and repair tools—moisture meter, scraper, sanding block, putty knife, and a heat gun or steamer for stubborn areas.
Choose primers and paints matched to the substrate: use a high-adhesion primer for glossy or chalky surfaces, a mildew-resistant exterior primer for damp-prone masonry, and oil-based or bonding primers where wood or bare metal is exposed.
For finishes, pick high-quality acrylic latex for most exteriors and water-based or alkyd enamels for trim and interiors as appropriate.
Essential tools for diagnosis and repair
When diagnosing and repairing paint bubbling or peeling, gather a compact kit of inspection and repair tools so you can work efficiently and accurately.
You’ll want durable, precise items that reveal causes and let you fix surfaces with confidence.
- Putty knife and scraper — decisive for removing loose paint.
- Moisture meter — revealing and unsettling when wet spots show.
- Sandpaper and sanding block — restore smooth, honest surfaces.
Recommended primer and paint types per substrate
After you’ve identified and removed failing paint and confirmed substrate moisture is under control, pick primers and topcoats matched to the material so repairs last. Choose bonding primer for glossy surfaces, oil-based for bare wood, masonry primer for stucco/concrete, and rust-inhibiting primer for metal. Match topcoat: acrylic for exterior, enamel for trim, elastomeric for masonry.
| Substrate | Primer/Topcoat |
|---|---|
| Glossy | Bonding primer / Acrylic |
| Wood | Oil-based primer / Enamel |
| Masonry | Masonry primer / Elastomeric |
| Metal | Rust-inhibitor / Enamel |
FAQ Common Questions About Bubbling and Peeling Paint
You’ll probably have practical questions like whether you can paint over bubbled paint, how long to wait after fixing moisture, or if new paint will stop mold underneath.
You’ll also want to know rough costs for widespread peeling and whether any quick, safe temporary fixes exist.
Below we’ll answer each of these common concerns so you can choose the right repair approach.
Can I paint over bubbled paint?
Can you paint over bubbled paint? You can, but don’t. Painting over bubbles hides damage and leads to rapid failure.
Scrape loose areas, sand edges, remove contaminants, and prime bare spots. If bubbling stems from moisture or adhesion issues, address the root cause first.
Only repaint after proper prep and when the surface is dry, sound, and clean for lasting results.
How long after fixing moisture can I repaint?
Once you’ve fixed the moisture source, wait until the substrate is fully dry and stable before repainting — typically 24 to 72 hours for small patches, but up to several days or even weeks for thicker materials or chronic dampness.
Test dampness with a moisture meter or touch; paint only when readings are within manufacturer specs.
Prime repaired areas and use appropriate paint for the environment.
Will new paint stop mold underneath?
Will slapping on a fresh coat of paint stop mold underneath? No — paint only hides it temporarily.
If mold’s present, it’ll continue growing beneath the film, causing future bubbling, peeling, and health risks. You need to remove mold, fix moisture sources, dry surfaces, and apply a mold-killing primer before repainting.
Otherwise, the new finish won’t last and problems will return.
How much does it cost to fix widespread peeling paint?
If your peeling paint covers large areas, expect costs to vary widely depending on the cause, surface, and prep work required.
You’ll typically pay between $1.50 and $6 per square foot for basic repair and repainting; extensive rot, mold remediation, or siding replacement can raise total bills to thousands.
Get multiple quotes and a clear scope before proceeding.
Are there quick temporary fixes that are safe?
Curious about a quick fix? You can temporarily stabilize small bubbles by gently puncturing and pressing out air, then applying a flexible patching compound and matching paint.
For peeling edges, sand, prime with a bonding primer, and repaint small areas.
These are short-term measures; they won’t stop underlying moisture or adhesion problems, so arrange proper repairs to prevent recurrence.
Final Checklist Before Repainting
Before you repaint, run through a step-by-step readiness checklist to confirm surfaces are clean, dry, and properly primed and that you’ve chosen compatible materials.
Decide whether the job’s size or damage level means you should schedule professionals, and if so, ask about their prep methods, warranty, and estimated timeline.
Keep records of measurements and photos to compare bids and verify completed work.
Step-by-step readiness checklist
When you’re about to repaint, run through a concise final checklist to make certain surfaces are sound, materials are ready, and your safety gear and tools are within reach; this prevents wasted time and guarantees a long-lasting finish.
Confirm surface prep, dry conditions, and compatible primers. Gather tools, respirator, drop cloths. Trust your instincts if something feels off.
- You’ve inspected every patch
- You’ve staged every tool
- You’ve protected every surface
When to schedule professionals and what to ask them
If a job looks bigger than a weekend or involves structural issues, hazardous materials, or complex surface repairs, schedule a pro instead of risking a poor finish or safety problems.
Ask about licensing, insurance, lead-abatement certification, references, detailed estimates, timelines, substrate prep methods, warranty terms, and cleanup.
Confirm who handles permits and unexpected repairs so you won’t face surprise costs or delays.